In 2014 we released the beta of the Property Manager API, which we call "PAPI" for short. (I suspect we're betraying our Boston roots with that name.)
Property Manager is an extremely powerful tool for managing how Akamai Edge servers process requests, responses, and objects served over the Akamai platform. If you've used Property Manager before, you've almost certainly configured it via the Luna Control Center. That's a great way to interact manually with Property Manager, but there are many cases where you're going to want to make automated changes to your configurations, or integrate Property Manager functionality into your own internal tools like a CMS.
PAPI is the programmatic interface that lets you do exactly that. Anything you can configure on Property Manager in Luna Control Center can also be done via PAPI by making a series of calls to the API.
PAPI is really powerful but also necessarily really complex. This series of blog posts is going to walk you through the process of building your own browser-based dashboard for configuring Property Manager. We're going to use Node.js, Express, and AngularJS to set up the application.
This tutorial is going to assume some level of familiarity with Node, Express, and Angular, but even if you're familiar with none of these technologies, you should be able to at least follow along with these and get the gist of writing an application to interface with PAPI.
For this part of the tutorial, we're going to walk you through installing Node.js and getting Express set up. We're not doing anything Akamai-specific here, but we're getting your environment ready for all the good stuff that's come.
If you're unfamiliar with Node.js, you can think of it as a server-side implementation of JavaScript. You're probably familiar with JavaScript as the standard scripting language that web browsers use for dynamic content--Node.js is just JavaScript that you can run outside of a web browser in a general, executable context. It enables you to use JS as a general-purpose scripting language like Python or Ruby.
The first thing you'll need to do is install a recent version of Node.js (v0.10+). There are a few ways to do this:
- On any OS: click "Install" at the Node.js, which will detect your OS and give you an appropriate direct download with instructions for compilation or installation (recommended, especially for Windows).
- On OSX: you can install with Homebrew (
brew install nodejs) or macports (port install nodejs). - On Ubuntu: do not use the default
aptpackages as they tend to be out of date. Instead follow the instructions here.
Once Node.js is installed, you can test if you got it up and running successfully by typing the following in your terminal:
$ node -v
# => v0.10.36
If it reports a version of "v0.10.0" or higher, congratulations, it's installed!
When Node.js is installed, it also automatically installs npm, which is the package manager for Node. We're going to use npm to install express-generator, which is a tool for scaffolding Express-based projects. This is a handy tool that will generate a "hello world" style example in Express so we don't have to write it all out ourselves.
# first we install the generator globally (-g) so it becomes a globally-accessible CLI command
# (note: you might need to run this with `sudo` on a linux OS)
$ npm install -g express-generator
# now we ask it to generate a blank express project in a new directory
$ express -e papi-demo-app
This creates a directory within your working directory called papi-demo-app/ that contains the following directories and files:
app.js: the main file that ties the whole application together. It doesn't do much itself, but it loads all the dependencies along with all the application logic included in the subdirectories.package.json: this is a metadata file that, among other things, specifies dependencies external to Express itself. It allows us to use npm to magically install all those dependencies with a single command.bin/: contains the file that gets executed to kick off the server itself. We're not going to edit or touch this so don't worry about it.public/: contains the static files our web application will serve (images, scripts, stylesheets).routes/: contains our "routes", which tells the application what to do when a browser attempts to access a particular URI. This is the heart of our application.views/: contains HTML-based ejs templates that our Express app can use to render different HTML in response to a request from the user. The routes determine our core application logic; the views determine what we actually show the user and can be considered the "output" of our application.
Before we go any further, let's take a look at package.json:
{
  "name": "papi-demo-app",
  "version": "0.0.0",
  "private": true,
  "scripts": {
    "start": "node ./bin/www"
  },
  "dependencies": {
    "body-parser": "~1.10.2",
    "cookie-parser": "~1.3.3",
    "debug": "~2.1.1",
    "ejs": "~2.2.3",
    "express": "~4.11.1",
    "morgan": "~1.5.1",
    "serve-favicon": "~2.2.0"
  }
}
Among other things you'll see there's a "start" command specified. It's like an alias which means that when you run npm start on the command line, it will kick off node ./bin/www to make your life a little easier.
You'll also notice a "dependencies" listing. This tells us there are seven packages that need to be installed for this application to work, and lists the version numbers of each package as well. So we're going to use npm one more time to install the application dependencies:
$ cd papi-demo-app/
$ npm install
That will automatically install all of the dependencies listed in package.json (including Express itself--we've only intalled the Express generator so far). Now we're ready to start our basic application server. It'll run by default on port 3000 at localhost. It runs its own web server so you don't need to have Apache or nginx installed, but it will complain if port 3000 is being used by other processes.
$ npm start

# > papi-demo-app@0.0.0 start /Users/dkazemi/Projects/papi-demo-app
# > node ./bin/www
While this is running, try opening http://localhost:3000 in a web browser (or http://127.0.0.1:3000/ if localhost isn't mapped in your hostsfile). You should see the following page:
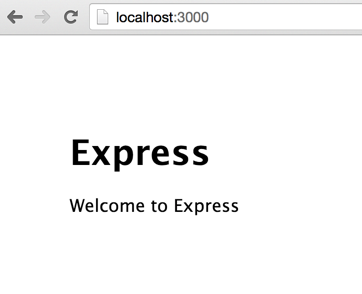
If you're seeing this, congrats! You got the "Hello World" equivalent of an Express app up and running.
We're not going to do much modification in this part of the tutorial, but I do want to give you a taste of what's to come.
One of the most basic things you can do with PAPI is get a list of Groups associated with your account. (Groups organize your Akamai properties and provide user- and application-level access control to individual properties.) We're not going to make the API call (we haven't even generated our API credentials yet), but we can set up a dummy route (aka URI) that will function in a future tutorial as a place to list out our available groups.
First we'll make a copy of our index.js route and our index.ejs view:
$ cd routes/
$ cp index.js groups.js
$ cd ../views/
$ cp index.ejs groups.ejs
Then open routes/groups.js in the text editor of your choice and change the router.get() call to the following:
/* handle a GET request to the subdirectory root. */
router.get('/', function(req, res, next) {
  res.render('groups', { title: 'List of Property Manager Groups', data: ['group1', 'group2', 'group3'] });
});
You'll notice we're passing in an object with some data: a title string and an array of strings as data. The data is dummy data that we'll eventually be getting from PAPI: a list of group names. But for now our fake data will do.
Next open views/groups.ejs and edit the contents of the <body> tag to contain the following:
<body>
  <h1><%= title %></h1>
  <ul>
  <% for(var i=0; i<data.length; i++) {%>
     <li><%= data[i] %></li>
  <% } %>
  </ul>
</body>
What this means is that when we render the groups view, we'll put the title data in the <h1> tag, and we'll generate <li> tags for each item in the data array.
Now none of this is hooked up in the main application logic yet. So we have to open app.js and modify it. Near the top of the file (line 8) you'll see a place where routes (the default route) and users are defined. Comment out users (since we won't be using it), and add a line defining a getGroups route.
var routes = require('./routes/index');
// delete or comment out this line
//var users = require('./routes/users');
// add this line
var getGroups = require('./routes/groups');
Further down the file (about line 25) you'll see a place where app.use() is called. This is where individual routes are assigned to URIs. Again, comment out the users stuff and assign our getGroups route (which we just defined above) to the /groups/ URI.
app.use('/', routes);
//app.use('/users', users);
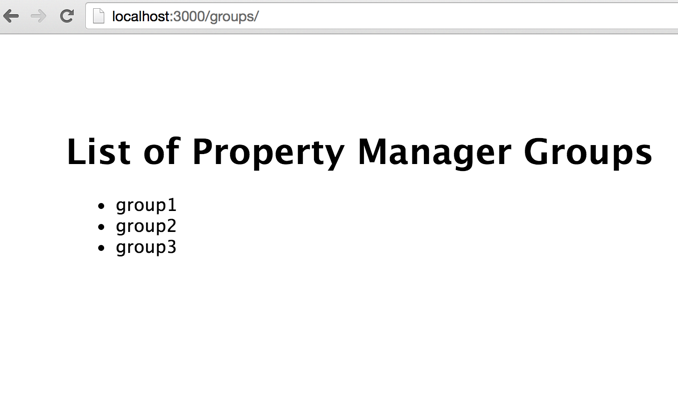
app.use('/groups/', getGroups);Now we've hooked up http://localhost:3000/groups to our new route defined in routes/groups.js, which should render the view we defined in views/groups.ejs. Restart the server by going back to the terminal where you ran npm start and hit ctrl+C to kill the server, then run npm start again. If you point your browser to http://localhost:3000/groups you should see the following:
For our next tutorial we're going to walk you through getting your Property Manager API credentials set up and making your first call to PAPI. We'll get a list of available groups and apply them to our new application so we're not using dummy data anymore!