This document will take you through the flight training curriculum for CICATA. In order to fly a CICATA drone, you must at least be familiar with the checklists, procedures, and basic flight knowledge. Practical flight knowledge will be necessary for the non-trainer drones (those that are more expensive or difficult to fly).
As part of the flight training curriculum, all pilots will make use of a logbook system. This is so that we can ensure that pilots are qualified. If there is an anomaly with the airframe, this should be noted in the logbook and clearly marked in the airframe’s own logbook.
This is a rough draft. Using this guide does not mean that every flight you undertake will be a success. I am not responsible for damage to persons or property. Use this guide at your own risk; I am certainly not an expert on the topics at hand.
While the guide I’ve created here is a good starting point, it is not any substitute for acquiring more detailed knowledge yourself. Using this guide to obtain a baseline knowledge is NOT enough for success, and you should take all other information into consideration before considering.
Homebrewed
Below are some of the resources I designed to create a robust testing environment for the Bormatec MAJA in particular. The techniques and knowledge I have compiled here are applicable to many different airframes.
Expandable Logbook, the logbook I use (and you should too!). Simply make a copy of this logbook and duplicate pages.
Fault Injector, a robust testing environment for ArduPilot.
MAJA Model, a custom model of the Bormatec MAJA. You can add this model into PhoenixRC.
CICATA ArduPilot, a customized version of ArduPilot with launch locations in Mexico. Make sure to pull from the master branch to ensure that ArduPilot is up to date.
SITL Documentation, a more detailed guide about how to make a SITL testing environment on Windows 10.
Around the Web
Oscar Liang’s Website, tutorials and reviews focused on FPV racing systems, but with excellent discussions of transmitters, receivers, flight controllers, etc.
ArduPilot Documentation, for those who are interested in autonomous systems.
Mission Planner Documentation, a reference for creating missions, tuning autonomous vehicles, and monitoring performance.
FAA Certification, if you’re interested in flying a drone commercially in America (or if you like safety in general).
- Checklists and Procedures: Pre-flight, In Flight, Post-Flight
- Basic Flight Knowledge: How to Fly, in Theory
- Practical Flight Knowledge: Simulator and Trainer Time
- Advanced Flight Knowledge: Automation
Checklists are a fundamental part of aviation. Without them, it is far too easy to make mistakes. Generally, checklists include assembly procedures, preflight procedures, and post-flight procedures, and should include all potential events. Checklists are not fixed; they can be edited as the pilot determines. Checklists should be physical and brought with the drone to the flying site.
Every flight requires a Remote Pilot in Command (RPIC) and an observer. Never fly the drone outside of line-of-sight (even with FPV). Never fly the drone if you are extremely uncomfortable.
You need to bring everything you could possible need before a drone flight. An example “materials” checklist could include:
- Drone
- Drone batteries (charged)
- Drone battery charger
- Transmitter (charged)
- Extra transmitter batteries
- Computer (charged), if the drone uses a ground control system or other flight logs.
- Computer charger, if the drone uses a ground control system or other flight logs.
- Drone to computer dongle.
- Camera (charged), if the drone is using a camera or some other FPV system.
- Tools: screwdriver, duct tape, superglue, epoxy, hot glue, general adhesives, hex key sets, knife.
- Charging cable for drone.
Think about everything that happens before you fly your drone. An example preflight checklist could be something along the lines of:
- Assemble drone (attach wings, fasten important parts, etc.).
- Check the weather. Is it too windy? Is it going to rain?
- Plug in battery.
- Turn on transmitter.
- Turn on camera and other sensors (if needed).
- Check GPS and connection to computer.
- Confirm all control surfaces do what they should.
- Visually trim the aircraft.
- Confirm the center of gravity (should be somewhere underneath the wing).
- Clear flight area.
- Take off.
Think about everything that needs to happen after the flight. An example post-flight checklist could include:
- Disarm drone.
- Download flight logs and save.
- Take out batteries.
- Disassemble drone.
- Logbook entry for flight, noting lessons learned, challenges, etc.
- Pack up everything you brought, survey surrounding area for things left behind.
- Discharge batteries and store in LiPo-safe bags.
- Store drone in proper location.
- Review logs and store in safe location.
Electric drones require batteries; typically, they require LiPo (Lithium Polymer) batteries. A more detailed description of battery care and maintenance can be found here, but I’ve done my best to outline the most important elements below.
LiPo batteries usually have some numbers that describe their use, like: 10C 8000mAh 3S.
10C - continuous discharge rate. Usually, drone batteries will also specify a “burst” capacity, which is the discharge rate for short periods of time.
8000mAh - the overall capacity of the battery; how long it will last between charges.
3S - the number of “cells” in the battery. You can usually see all three cells via visual inspection.
LiPo batteries are sensitive. To that end, here are some rules about how to store/charge/maintain batteries.
- You must never discharge them below
3.8Vper cell in flight. - You must never charge them above
4.2Vper cell. - You must use a balance charger.
- You should never charge them at more than 1C (1Amp).
- You must use a LiPo safe bag to charge your batteries.
- You must never charge a battery unattended.
- Do not hit, drop, or puncture the batteries.
- Do not store the batteries below
0deg C. - If batteries appear “puffy” or swollen, then they are damaged and should not be used due to fire risk.
- Discharge batteries to 40 or 50% for storage.
If a battery becomes unserviceable, discharge it completely and dispose of it in the trash. LiPo batteries are trash-safe and environmentally friendly (when totally discharged).
Here is a friendly reminder of the dangers of LiPo batteries.
Below is an abridged version of how an RC plane flies.
If you want more information, you can find it
here or here or here. Basically, just google “how to fly an RC airplane”.
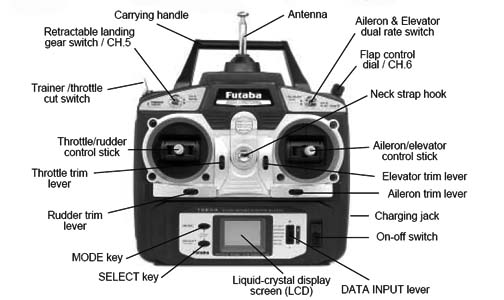
Rudder: makes the airplane “yaw” (point its nose) left or right.
Elevator: makes the airplane go up and down.
Ailerons: make the airplane roll left or right.
Throttle: changes the speed of the propeller, making the airplane go faster.
The trim controls the neutral position of all of your control surfaces. It’s a good idea to visually trim the aircraft before you take off by confirming all control surfaces are roughly level. Then, once flying, re-trim the aircraft until it is flying straight and level with no control input.
Some airframes have different characteristics: some have retractable landing gear, stabilized/assisted modes, cameras that can be turned on and off, etc. Read the manual and familiarize yourself with the particular controls of the aircraft you are flying.
Before you fly, it’s a good idea to do a “controls check” of the aircraft. This confirms that the airplane will actually do what you want it to do; if controls are flipped, there is likely a switch on your transmitter you can activate to switch the control.

What actually makes up an RC aircraft? The “guts” are a little different depending on what you’re flying (plane, quadcopter, etc).
Generally speaking, your airplane will have several main electronic components: flight controller (FC), electronic speed controllers (ESCs), servos, battery, and motors, in addition to the control surfaces already described.
The flight controller has varying complexity. The most complex will offer extra stability due to the IMU (inertial measurement units) and compatibility with extra sensors. Some will have GPS units or GPS units attached to them. A good, robust, open-source software/autopilot solution is Ardupilot, which runs on a variety of flight controller hardwares, including most notably Pixhawk. Ardupilot can be optimized for different scenarios depending on what interfaces the software needs to have.

The electronic speed controller tells the motor how fast to go. They have different ratings that depend on the ESC’s ability to accept a peak current. A good rule of thumb is that your ESC should be rated for about 20% over the peak rating of your motor.

The motor is fairly self explanatory–it’s what makes the plane or quadcopter move. They come in different kV ratings. Multiplying the kV rating by the voltage of the battery gives you an estimate of how fast the motor will spin. For example: a 2300kV Motor on a 4S battery (16.6 volts fully charged) spins at 2300 * 16.6, or 38180 RPM. This explanation comes from the FPV Freerider website, and there’s more information available over there.

The propeller is, at its surface, fairly simple. It is the thing that generates the thrust/lift to propel the UAV up or forwards. An excellent discussion is available here, but it’s recommended that you look up recommended propellers for the motors you’re using and the size of the frame (if flying a quadcopter).
Before flying a “real” drone, you should get some time in a simulator so you’re more comfortable actually manipulating controls. I will make use of the RealFlight Challenge Modes, which are simply easy-to-restart challenges focused on certain aspects of flight.
Please log these flights, as well as any notes you have made in your logbook.
Landing and Take Off: RealFlight Spot Landing, Levels 1 and 2. Practice taking off and landing until you are comfortable with the pattern and can execute both skills without crashing. Goal: 10 consecutive times.
Navigation: RealFlight Air Race, Levels 1-5. Practice going through gates until you are comfortable with the process. Goal: Make it through all levels.
Height Regulation: RealFlight Air Race. Do the same as above, but pay particular attention to keeping the plane close to the ground without crashing. Goal: Make it through all levels without exceeding the top of the gates at any point in flight.
Inclement Weather: Practice with varying wind conditions in RealFlight or PhoenixRC. In RealFlight, navigate to Environment and change Wind, Turbulence, and Thermals until you understand how the plane’s behavior changes in these various environments. Goal: practice for at least one hour or until you feel comfortable in inclement weather, whichever comes later.
Failure Modes: Practice with varying environmental conditions, failing certain parts of the drone. What happens if you lose your engine? What about control surfaces? Goal: Practice for an hour or until you feel you could handle failure, whichever comes later.
Aircraft Specific: Get a feel for the airframe you’re actually going to be modeling. You can create custom models for PhoenixRC as seen here, and RealFlight custom models are pending.
Repeat these activities until you feel comfortable with every one of them. While it’s ultimately up to the pilot’s discretion as to how much time he or she wishes to log in the simulator before flying a real drone, it is recommended that at least basic proficiency in all of these aspects (at least 1 hour per topic).
If there’s a lightweight trainer aircraft available, fly that before moving to the tougher, more expensive crafts.
One of the fascinating things about ArduPilot is its ability to run automated flights. This involves coordinating Mission Planner with the ArduPilot software.
More detailed documentation about Mission Planner functionality is available here, but I’ve included a quick-start guide below.
To connect Mission Planner to your UAV, press the Auto Connect button in the top right corner of the screen. This will find the most important connection for Mission Planner to look at and give you the information.
It’s recommended to use Mission Planner to calibrate your drone on the calibration screen. For a more complete description on how to do this, go here.
Mission Planner has several main capabilities: flight monitoring, flight planning, and parameter modifications. Click through these various screens to figure out just how much you can do with Mission Planner (hint: it’s a lot).
Flight Vitals Screen. Here, you can see that there are actions you can take, as well as the attitude (where the drone is pointing) and the altitude (how high the drone is).
Mission Planner Screen. Here, you can make waypoint grids, set takeoffs and landings ,and create other various mission options depending on the needs of the project.
Parameters Screen. Here, you can change any parameter allowed by ArduPilot. You can tune the drone and perform various calibrations.


One of my major projects this summer was designing a Flight Testing environment for the quadcopter. While I have a much more detailed description of what I did to set up this environment, a quick-start guide is available here:
- Install Cygwin as described in the ArduPilot Documentation. To do so, copy and past this command after downloading
setup-x86_64.exe.
setup-x86_64.exe -P autoconf,automake,ccache,gcc-g++,git,libtool,make,gawk,libexpat-devel,libxml2-devel,python27,python2-future,python27-libxml2,python27-pip,libxslt-devel,python27-devel,procps-ng,zip,gdb,ddd
- Install the GCC Compiler (necessary only for Pixhawk development). Make sure to add the path to environment variable.
- Install MAVProxy, as described here.
- Clone my ArduPilot repo, which includes some CICATA-specific edits (changed default home location, launched with particular options).
- In Cygwin, get to the
ardupilot/Tools/autotestdiretory and runfg_plane_view.batto get FlightGear running with a default plane. An empty window should load (this is because the plane is slightly underground). This plane model still does not full support collisions in this part of the world because it has not been fully modeled.
- Open another Cygwin window and run this command
sim_vehicle.py --console --out 192.168.5.32:14550 -L MEX -v ArduPlane. - Start Mission Planner and find the automatic connection OR connect via UDP to port
14550or14551.


You should now have three windows: one with MavProxy running, another showing the airplane in FlightGear, and the third Mission Planner window where you can design missions and test them.
For more information about how to run FlightGear, launch options, etc., please go to the official ArduPilot documentation here.
While it is very nice to know that your drone flies under perfect condition, it is even better to know that your version of ArduPilot is robust enough to handle failures of instruments like GPS, RC, throttle, and battery. To add one final connection, I would highly recommend cloning my UAV Fault Injection repository, which gives you an excellent way to test these failures. As of 7/3/2019, this repository is still unfinished: my current project is to run multiple missions in succession with various failures, counting which missions are successful and which ones fail.
However, the basic functionality of the program, lovingly modified from Jayson Boubin is present. Simply press the “Connect” button with the correct UDP port to get information about the simulated UAV. To simulate failures, toggle any of the buttons on the right side of the screen.
