Skip to content

Instantly share code, notes, and snippets.

@diogomartino
Last active November 24, 2019 01:31
Show Gist options
  • Save diogomartino/8d9fcb52fd5f221866122f679d8718c6 to your computer and use it in GitHub Desktop.
Save diogomartino/8d9fcb52fd5f221866122f679d8718c6 to your computer and use it in GitHub Desktop.
How to connect ESP8266-01 to Arduino

Program the ESP8266-01

1: Buy a USB programmer. There are other ways, but this is the easiest. They cost like 1$. Example

2: You need to make a change to your USB Programmer if you want to push code to it. You will need to short these pins when you upload your code into it:

Pins

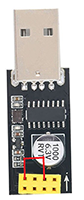
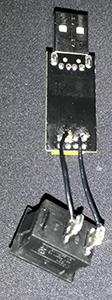
I recommend you to solder some kind of switch to it, to be able to switch between "code mode" and "debug mode". The debug mode will allow you to use the Serial Mode. The code mode will allow you to push code to the microcontroller and to do that those pins need to be shorted. My solution:

Pins

3: Short the pins, connect the ESP8266-01 to the computer and upload my code (server.ino). Download the ESP8266WiFi.h library if you don't have it.

4: Unshort the pins.

Program the Arduino

The ESP8266-01 will request a update response to the Arduino. The Arduino will get the request and respond to the ESP8266-01 accordingly. That response will be shown on the Web Server. There are better (faster) options to do this but I think this is the simpliest.

Just upload the code I gave you to the Arduino (arduino.ino). To upload the code to the arduino, the ESP8266-01 will need to be powered off. If you need to upload code to the arduino while the ESP8266-01 is connected, just disconnect the VCC, upload the code, disconnect the Arduino, plug the VCC back again and turn the Arduino on.
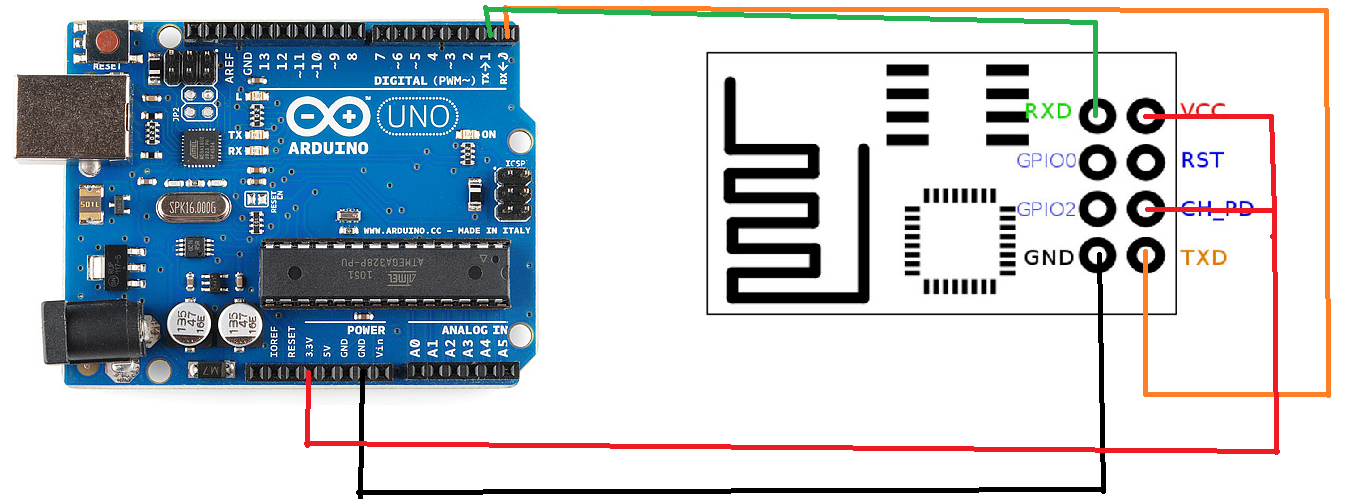
Wiring

Pins

ESP --> ARDUINO

RX --> TX

TX --> RX

VCC --> 3.3V

CH_PD --> 3.3V

GND --> GND

void setup() {
Serial.begin(115200);
pinMode(LED_BUILTIN, OUTPUT);
}
void loop() {
String response = "";
if (Serial.available() > 0) {
Serial.flush();
response = Serial.readString();
response.trim();
}
if(response == "getdata") {
digitalWrite(LED_BUILTIN, HIGH);
String sendBack = "This string will be shown on the browser";
sendBack.trim();
Serial.print(sendBack);
}
digitalWrite(LED_BUILTIN, LOW);
delay(100);
}
#include <ESP8266WiFi.h>
#include <ESP8266WebServer.h>
const char* ssid = "WIFI SSID";
const char* password = "password";
ESP8266WebServer server(80);
void setup() {
Serial.begin(115200);
WiFi.disconnect();
delay(10);
Serial.println('\n');
WiFi.begin(ssid, password);
Serial.print("Connecting to ");
Serial.print(ssid);
Serial.println(" ...");
int i = 0;
while (WiFi.status() != WL_CONNECTED) {
delay(1000);
Serial.print(++i);
Serial.print(' ');
}
Serial.println('\n');
Serial.println("Connection established!");
Serial.print("IP address:\t");
Serial.println(WiFi.localIP());
server.on("/", handleRootPath);
server.begin();
Serial.println("Server listening");
}
void loop() {
server.handleClient();
delay(50);
}
void handleRootPath() {
String response = "";
Serial.print("getdata");
while(Serial.available() <= 0) {
delay(10);
}
if (Serial.available() > 0) {
Serial.flush();
response = Serial.readString();
response.trim();
}
server.send(200, "text/plain", response);
}
Sign up for free to join this conversation on GitHub. Already have an account? Sign in to comment