Operating System: Ubuntu 18.04
AWS Region (e.g. ap-southeast-1)
AWS Access Key ID
AWS Access Secret Key
For the list of AWS region see the following, https://docs.aws.amazon.com/general/latest/gr/rande.html
Note: The user to which the Access Key ID and Access Secret Key belong to should have the following security policy
arn:aws:iam::aws:policy/SecurityAudit
-
If provisioning via Vagrant, do the following steps first. If via VM or local, skip to step 08.
-
Make sure that Vagrant has been installed. Check the version, this has been tested on version 2.1.5.
$ vagrant -version
- Initiate a Vagrant box, with an Ubuntu 18 Operating System.
$ vagrant init ubuntu/bionic64
- Update the Vagrant file, updating the ports that will be opened and forwarded to the guest os.
$ nano Vagrantfile
- Add the following content
Vagrant.configure("2") do |config|
  …

  # Create a forwarded port mapping which allows access to a specific port
  # within the machine from a port on the host machine. In the example below,
  # accessing "localhost:8080" will access port 80 on the guest machine.
  # NOTE: This will enable public access to the opened port
  #config.vm.network "forwarded_port", guest: 80, host: 8080
  config.vm.network "forwarded_port", guest: 7474, host:7474
  config.vm.network "forwarded_port", guest: 7687, host:7687

  ...
end
- Initialize or start the Vagrant box
$ vagrant up
- Connect to the instance via SSH
$ vagrant ssh
- On a local machine, open a terminal and create a bash script file.
$ cd ~
$ nano setup-script.sh
- Set the content of the bash script as follows
#!/bin/bash
# Arguments
# -- 1st: aws region (e.g. ap-southeast-1)
# -- 2nd: aws output form (e.g. json)
# -- 3rd: aws access key id
# -- 4th: aws secret access key
# -- 5th: neo4j password

# Set Environment Variable
# nano ~.bashrc
NEO4J_PASSWORD_ENV_VAR=$1

# Install the necessary packages
apt-get update
apt-get install wget -y
apt-get install sed -y
apt-get install gnupg -y

# Install Java
apt install openjdk-8-jdk -y

# Install Neo4J
wget -O - https://debian.neo4j.org/neotechnology.gpg.key | apt-key add -
echo 'deb https://debian.neo4j.org/repo stable/' | tee -a /etc/apt/sources.list.d/neo4j.list
apt-get update
apt-get install neo4j -y

# Set the neo4j user password
/usr/share/neo4j/bin/neo4j-admin set-initial-password $NEO4J_PASSWORD_ENV_VAR

# Update the Neo4j configurations
sed -i '/dbms.security.auth_enabled=false/s/^#//g' /etc/neo4j/neo4j.conf
sed -i '/dbms.connectors.default_listen_address=0.0.0.0/s/^#//g' /etc/neo4j/neo4j.conf
sed -i '/dbms.connector.bolt.listen_address=:7687/s/^#//g' /etc/neo4j/neo4j.conf

# Restart Neo4J for the updates to the config to take effect
service neo4j restart

# Install Python, Pip, Cartography and AWS CLI
apt-get install python3 -y
apt-get install python3-pip -y
pip3 install cartography
pip3 install awscli

# Create AWS Config
# ~./aws/config
mkdir $HOME/.aws
touch $HOME/.aws/config
echo "[default]" >> $HOME/.aws/config
echo "region = $1" >> $HOME/.aws/config
echo "output = $2" >> $HOME/.aws/config

# ~./aws/credentials
touch $HOME/.aws/credentials
echo "[default]" >> $HOME/.aws/credentials
echo "aws_access_key_id = $3" >> $HOME/.aws/credentials
echo "aws_secret_access_key = $4" >> $HOME/.aws/credentials

# Set the password for the Neo4j
export NEO4J_PASSWORD_ENV_VAR="$5"

# Run Cartography sync
cartography --neo4j-uri bolt://localhost:7687 --neo4j-user neo4j --neo4j-password-env-var NEO4J_PASSWORD_ENV_VAR
- Execute the script with the necessary credentials.
# FORMAT
$ sudo sh setup-script.sh <aws-region> json <access-key-id> <secret-access-key> <neo4j-password>
Replace the value of the aws-region, access-key-id, and secret-access-key with the values set in the prerequisites.
- Wait for the script to finish the installation. It may take more than ~10 minutes for it to finish. This is dependent on the AWS resources that have been provisioned for the AWS account.

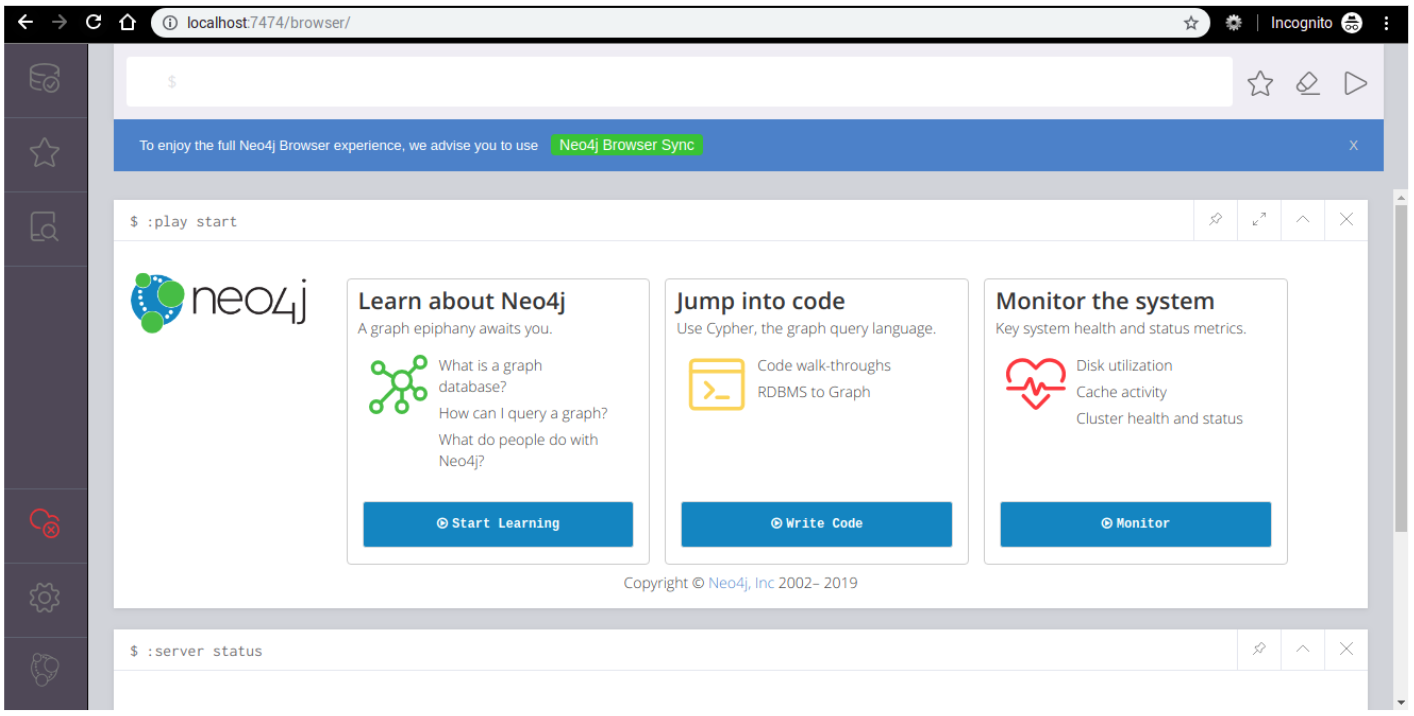
- After the installation, visit the following URL on the browser
# If the setup is executed on the local machine
http://localhost:7474

# If the setup is executed on a remote machine.
http://<hostname-or-dns>:7474
Make sure that the port 7474 and 7687 are accessible remotely if executed on an external machine.
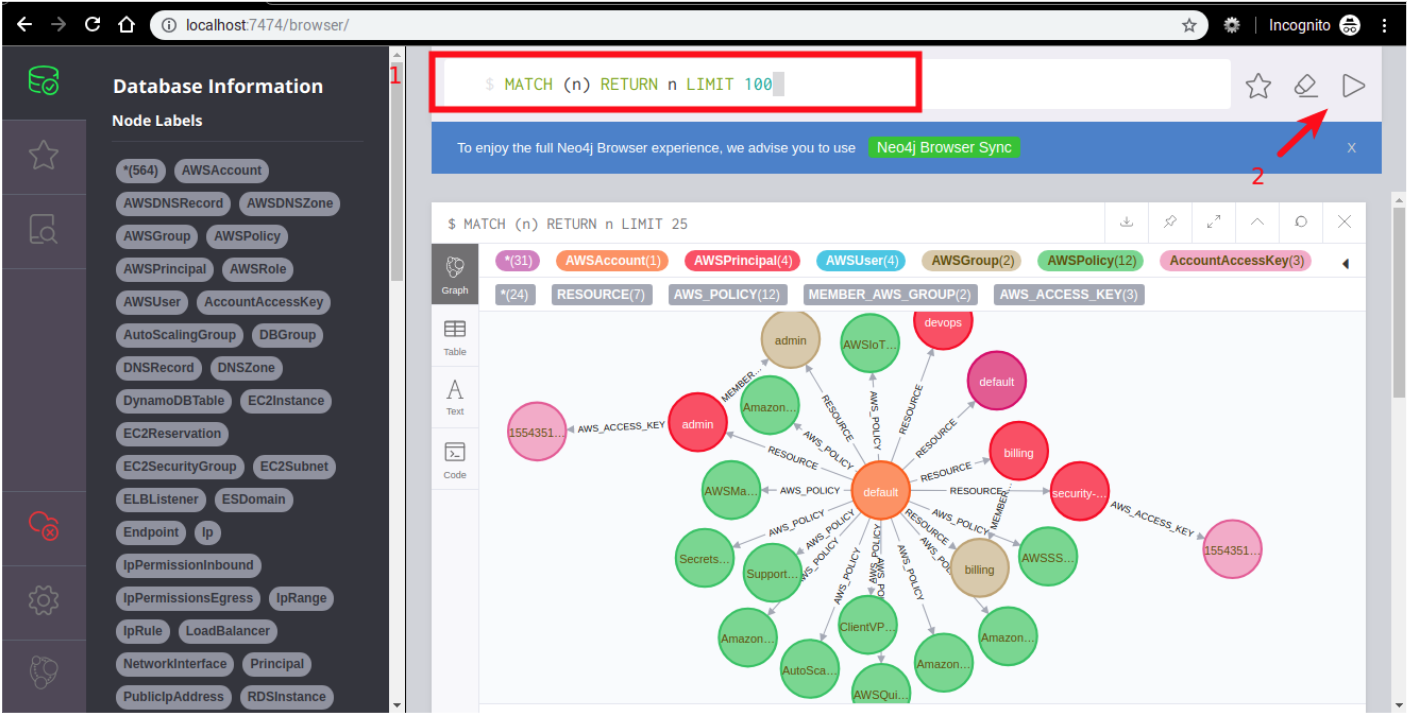
- A new screen section is visible. To view a partial graph of the AWS resources, select the database icon on the upper-left.
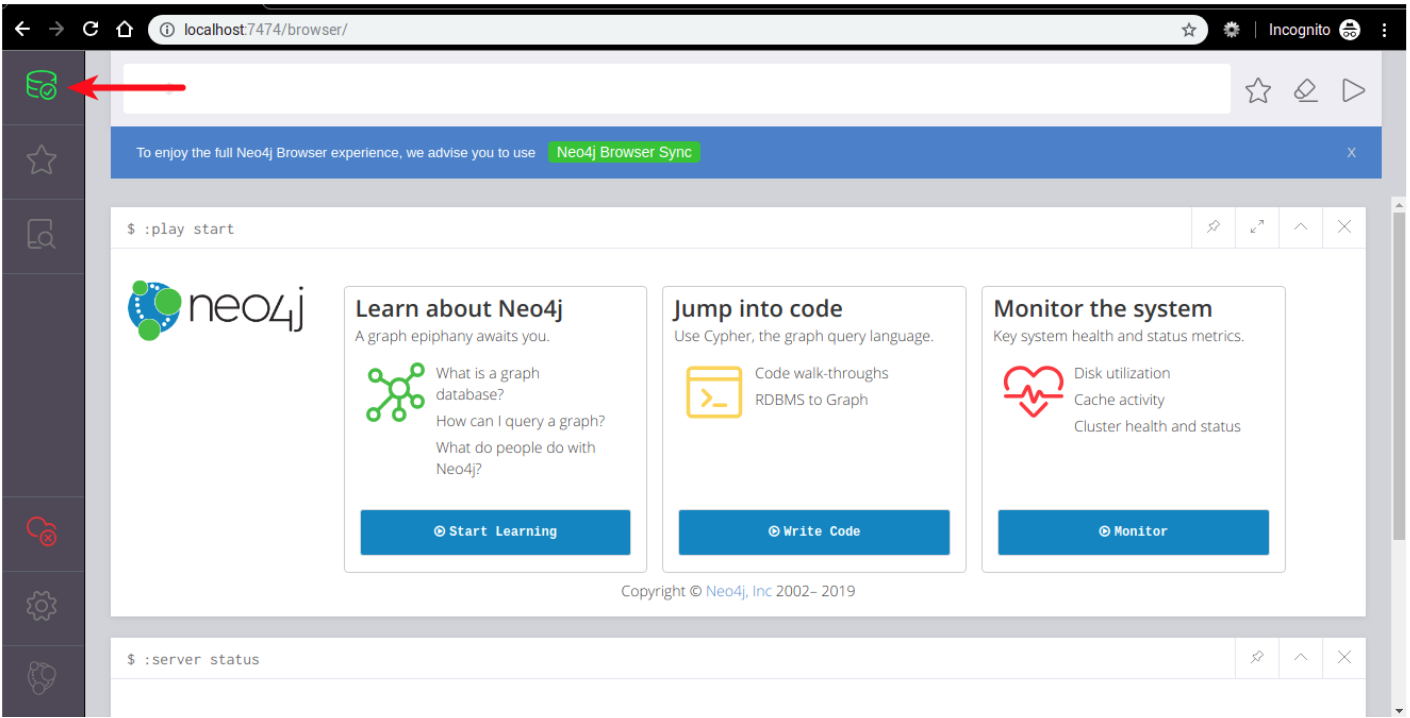
Then select the asterisk with the number. This will view a partial graph of the AWS resources.
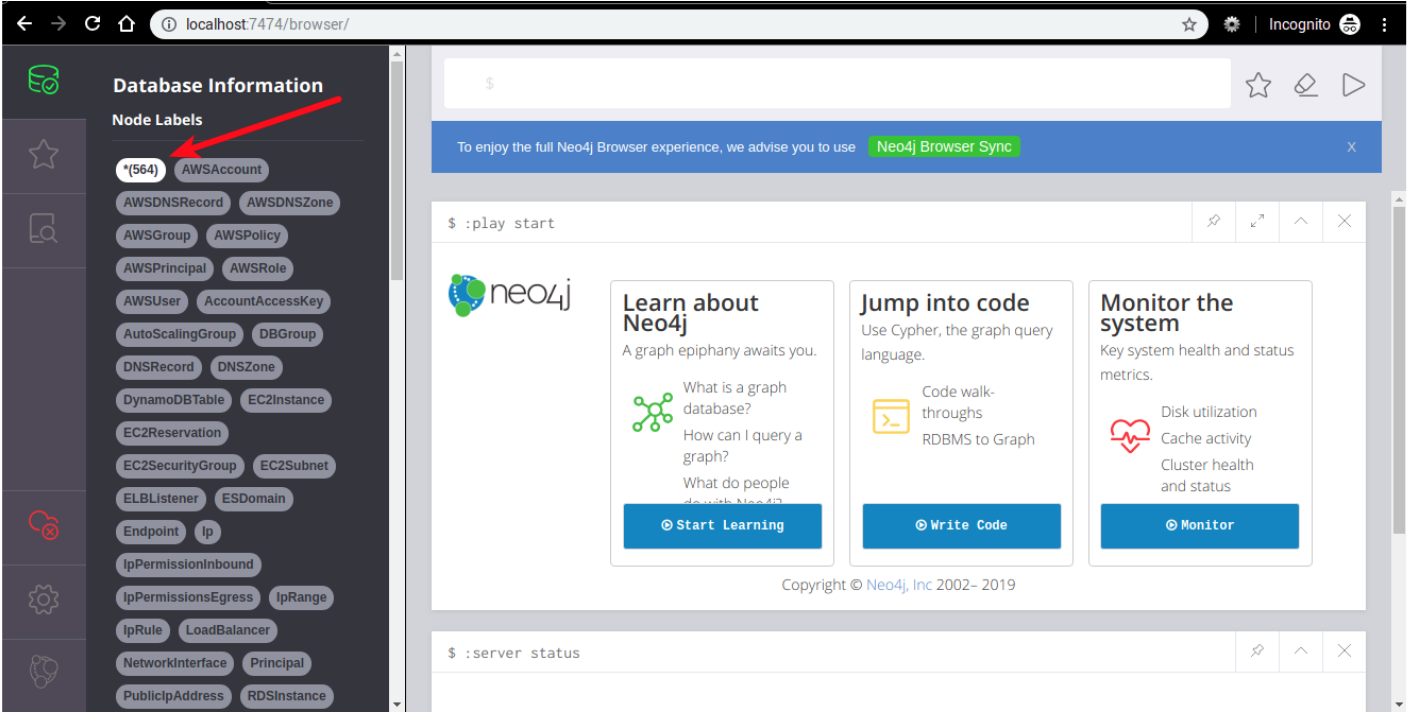
And produce something like below.
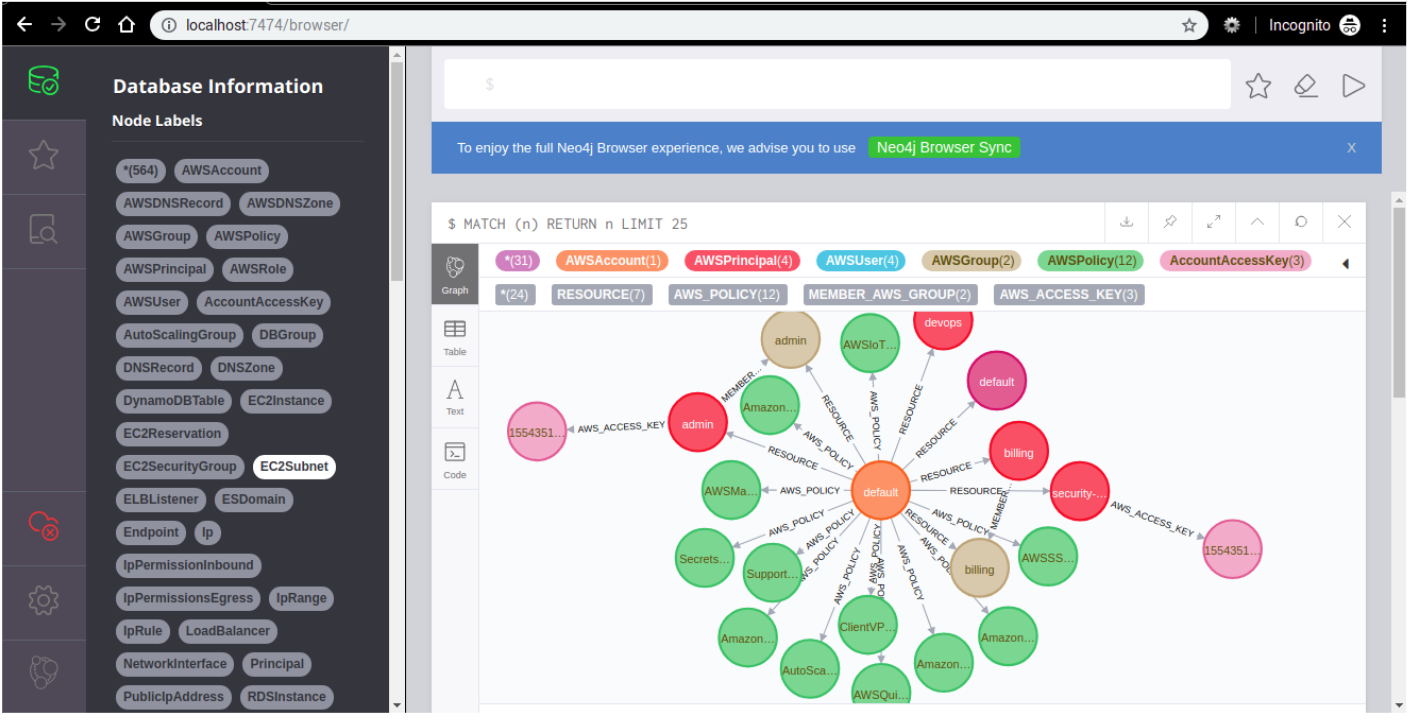
You can view more nodes or details by changing the LIMIT on the query. Example, type the following on the query textfield on the top. Then click on the Play button on it’s right
MATCH (n) RETURN n LIMIT 100
The output will be something similar, with more details.
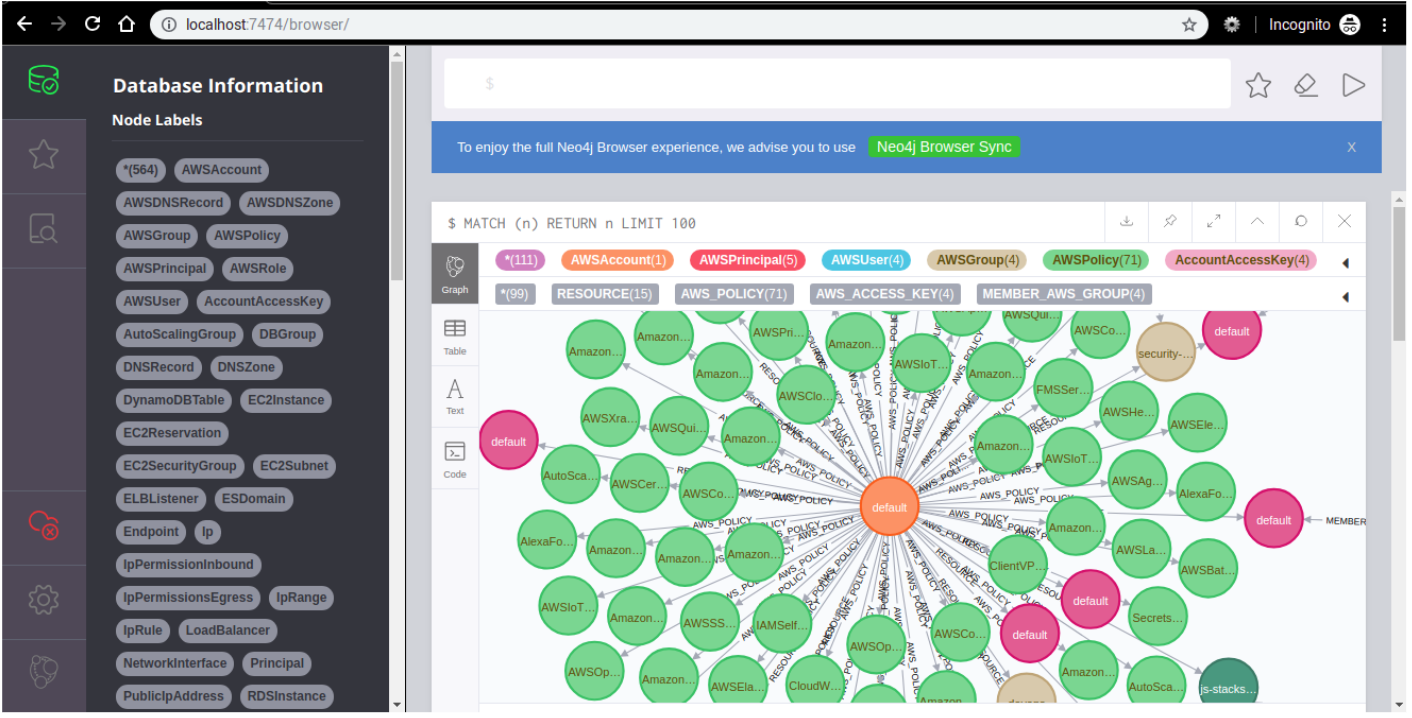
For additional queries, see the Appendix for a list of available commands to use.
If running in a Vagrant environment
- Exit from the Vagrant instance
vagrant@ubuntu-bionic:~$ exit
-
- Destroy the instance
$ vagrant destroy
Confirm the deletion by typing ‘y’ and pressing the enter key.
If running in a local machine
- Select from the following commands depending on which package you want to uninstall.
# Neo4J
$ sudo apt remove --purge neo4j

# Python (Python, PIP)
$ sudo apt remove --purge python3-pip
$ sudo apt remove --purge python3

# Java
$ sudo apt remove --purge openjdk-8-jdk

# Others (gnupg)
$ sudo apt remove --purge gnupg

# Remove obsolete packages and orphaned packages
$ sudo apt autoclean
$ sudo apt autoremove
Or run the following shell script
$ nano cleanup-script.sh
Set the content as follows
#!/bin/bash

# Neo4J
apt remove --purge neo4j -y

# Python (Python, PIP)
apt remove --purge python3-pip -y
apt remove --purge python3 -y

# Java
apt remove --purge openjdk-8-jdk -y

# Others (gnupg)
apt remove --purge gnupg -y

# Remove obsolete packages and orphaned packages
apt autoclean -y
apt autoremove -y
Then run the cleanup script.
$ sudo sh cleanup-script.sh
Operating System: Ubuntu 18.04 Docker is installed on the system
AWS Region (e.g. ap-southeast-1)
AWS Access Key ID
AWS Access Secret Key
For the list of AWS region see the following, https://docs.aws.amazon.com/general/latest/gr/rande.html
Note: The user to which the Access Key ID and Access Secret Key belong to should have the following security policy
arn:aws:iam::aws:policy/SecurityAudit
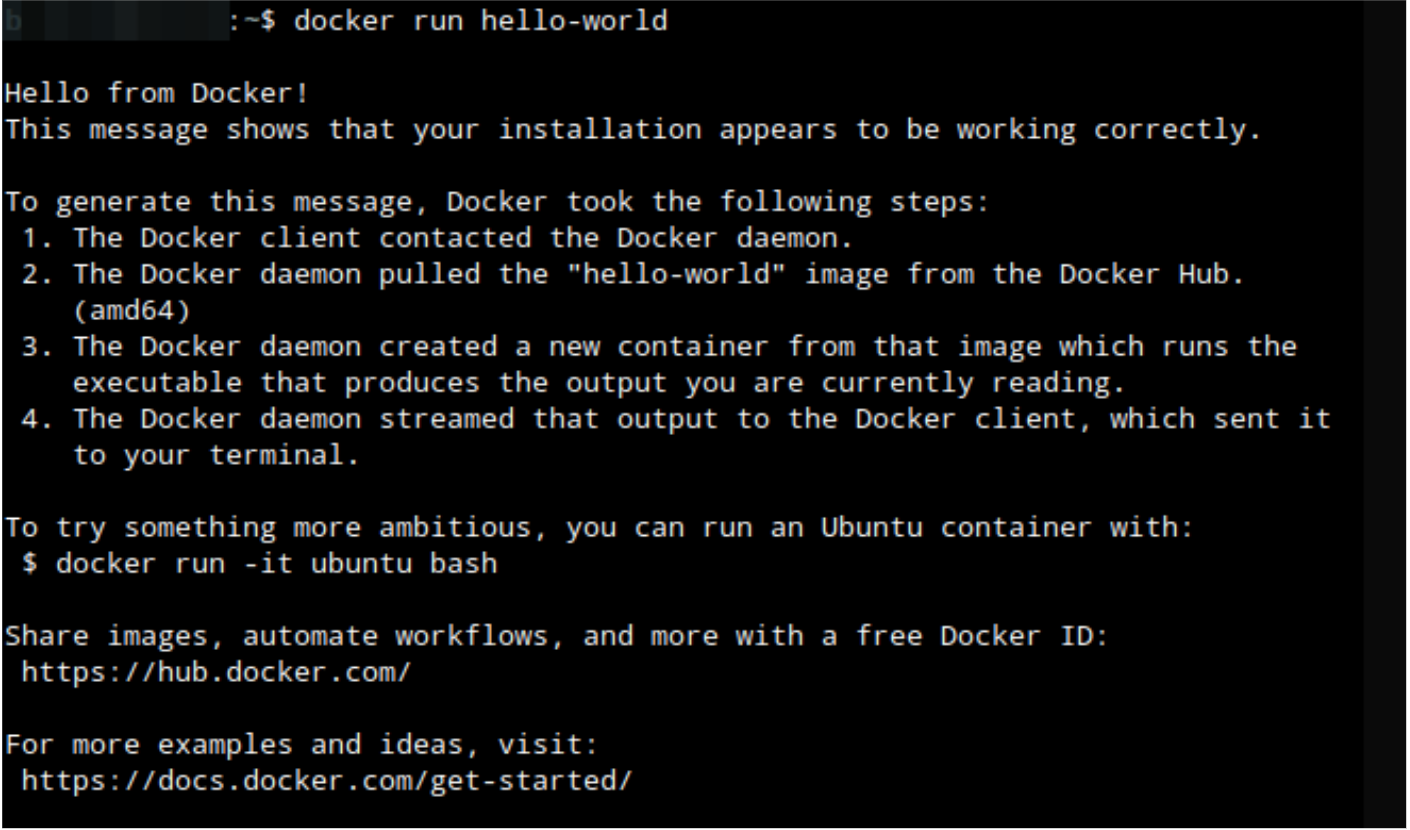
- Verify that docker is installed on the machine. Run the following.
$ docker run hello-world
The output should be
- Once docker has been verified. Create a new empty directory. For this example, the directory will be created at the HOME of the user.
$ cd ~
$ mkdir aws-cartography
- Go the directory and create the Dockerfile.
$ cd aws-cartography
$ nano Dockerfile
Set the content as follows. Make sure to update the following values in the Dockerfile:
<aws-region>
<aws-access-key-id>
<aws-access-secret-key>
Dockerfile content should be:
FROM ubuntu:18.04

RUN apt-get update

# Set current directory
WORKDIR /app

# Copy the current directory contents into the container at /app
COPY . /app


RUN apt-get install -y ca-certificates wget
RUN sh /app/setup-script.sh <aws-region> json <aws-access-key-id> <aws-access-secret-key> p@ssw0rd
RUN service neo4j start

# Make port 7474 available to the world outside this container
EXPOSE 7474

# Make port 7687 available to the world outside this container
EXPOSE 7687
- Create the bash script named setup-script.sh.
$ nano setup-script.sh
Set the content as follows
#!/bin/bash
# Arguments
# -- 1st: aws region (e.g. ap-southeast-1)
# -- 2nd: aws output form (e.g. json)
# -- 3rd: aws access key id
# -- 4th: aws secret access key
# -- 5th: neo4j password

# Set Environment Variable
# nano ~.bashrc
NEO4J_PASSWORD_ENV_VAR=$1

# Install the necessary packages
apt-get update
apt-get install wget -y
apt-get install sed -y
apt-get install gnupg -y

# Install Java
apt install openjdk-8-jdk -y

# Install Neo4J
wget -O - https://debian.neo4j.org/neotechnology.gpg.key | apt-key add -
echo 'deb https://debian.neo4j.org/repo stable/' | tee -a /etc/apt/sources.list.d/neo4j.list
apt-get update
apt-get install neo4j -y

# Set the neo4j user password
/usr/share/neo4j/bin/neo4j-admin set-initial-password $NEO4J_PASSWORD_ENV_VAR

# Update the Neo4j configurations
sed -i '/dbms.security.auth_enabled=false/s/^#//g' /etc/neo4j/neo4j.conf
sed -i '/dbms.connectors.default_listen_address=0.0.0.0/s/^#//g' /etc/neo4j/neo4j.conf
sed -i '/dbms.connector.bolt.listen_address=:7687/s/^#//g' /etc/neo4j/neo4j.conf

# Restart Neo4J for the updates to the config to take effect
service neo4j restart

# Install Python, Pip, Cartography and AWS CLI
apt-get install python3 -y
apt-get install python3-pip -y
pip3 install cartography
pip3 install awscli

# Create AWS Config
# ~./aws/config
mkdir $HOME/.aws
touch $HOME/.aws/config
echo "[default]" >> $HOME/.aws/config
echo "region = $1" >> $HOME/.aws/config
echo "output = $2" >> $HOME/.aws/config

# ~./aws/credentials
touch $HOME/.aws/credentials
echo "[default]" >> $HOME/.aws/credentials
echo "aws_access_key_id = $3" >> $HOME/.aws/credentials
echo "aws_secret_access_key = $4" >> $HOME/.aws/credentials

# Set the password for the Neo4j
export NEO4J_PASSWORD_ENV_VAR="$5"

# Run Cartography sync
cartography --neo4j-uri bolt://localhost:7687 --neo4j-user neo4j --neo4j-password-env-var NEO4J_PASSWORD_ENV_VAR
- Build the docker image.
$ docker build --tag=cartography .
-
Wait for the docker image to be built. This might take more than 10 minutes, depending on the internet connection speed and the AWS resources.
-
Run the docker run command to access the docker instance.
$ docker run -it -p 7474:7474 -p 7687:7687 cartography
- At the docker instance, start the Neo4j service. And after starting do not exit this terminal. If you exit the terminal the docker instance will be stop and the Neo4J browser will be unavailable.
root@...:/app# service neo4j start
- Visit the following URL on the browser
http://localhost:7474
- A new screen section is visible. To view a partial graph of the AWS resources, select the database icon on the upper-left.
Then select the asterisk with the number. This will view a partial graph of the AWS resources.
And produce something like below.
You can view more nodes or details by changing the LIMIT on the query. Example, type the following on the query textfield on the top. Then click on the Play button on it’s right
MATCH (n) RETURN n LIMIT 100
The output will be something similar, with more details.
For additional queries, see the Appendix for a list of available commands to use.
- Exit from the docker terminal to stop the docker instance
root@...:/app# exit
- From the host OS execute one or a combination of the following
# Remove the Docker image using its name
$ docker image rm cartography
- List the docker images and see if it has been removed
# List the Docker image on this system
$ docker image ls
Operating System: Ubuntu 18.04 Docker is installed on the system
AWS Region (e.g. ap-southeast-1)
AWS Access Key ID
AWS Access Secret Key
For the list of AWS region see the following, https://docs.aws.amazon.com/general/latest/gr/rande.html
Note: The user to which the Access Key ID and Access Secret Key belong to should have the following security policy
arn:aws:iam::aws:policy/SecurityAudit
- Verify that docker is installed on the machine. Run the following.
$ docker run hello-world
The output should be
If docker is not yet installed, see the following for instructions : https://docs.docker.com/install/
- Once docker has been verified. Create a new empty directory. For this example, the directory will be created at the HOME of the user.
$ cd ~
$ mkdir aws-cartography
- Go the directory and create the Dockerfile.
$ cd aws-cartography
$ nano Dockerfile
Set the content as follows.
FROM ubuntu:18.04

# INSTALLATIONS: Wget, SED, GNUPG, Java, and Neo4j
RUN apt-get update
RUN apt-get install wget -y
RUN apt-get install sed -y
RUN apt-get install gnupg -y
RUN apt install openjdk-8-jdk -y
RUN apt-get install -y ca-certificates wget
RUN wget -O - https://debian.neo4j.org/neotechnology.gpg.key | apt-key add -
RUN echo 'deb https://debian.neo4j.org/repo stable/' | tee -a /etc/apt/sources.list.d/neo4j.list
RUN apt-get update
RUN apt-get install neo4j -y
RUN /usr/share/neo4j/bin/neo4j-admin set-initial-password p@ssw0rd

# Install Python, Pip, AWS CLI and Cartography
RUN apt-get install python3 -y
RUN apt-get install python3-pip -y
RUN pip3 install awscli
RUN pip3 install cartography

# Update the Neo4j configurations
RUN sed -i '/dbms.security.auth_enabled=false/s/^#//g' /etc/neo4j/neo4j.conf
RUN sed -i '/dbms.connectors.default_listen_address=0.0.0.0/s/^#//g' /etc/neo4j/neo4j.conf
RUN sed -i '/dbms.connector.bolt.listen_address=:7687/s/^#//g' /etc/neo4j/neo4j.conf
RUN service neo4j restart

# Set the Neo4J password on the environment variable
ENV NEO4J_PASSWORD_ENV_VAR="p@ssw0rd"

# Set current directory
WORKDIR /app

# Copy the current directory contents into the container at /app
COPY . /app

# Make port 7474 available to the world outside this container
EXPOSE 7474

# Make port 7687 available to the world outside this container
EXPOSE 7687
- Create the bash script named setup-script.sh.
$ nano setup-script.sh
Set the content as follows
#!/bin/bash
# Arguments
# -- 1st: aws region (e.g. ap-southeast-1)
# -- 2nd: aws output form (e.g. json)
# -- 3rd: aws access key id
# -- 4th: aws secret access key
# start the neo4j service
service neo4j start

# add a delay for the neo4j service to fully start
sleep 10

# Create AWS Config
# ~./aws/config
rm -rf $HOME/.aws
mkdir $HOME/.aws
touch $HOME/.aws/config
echo "[default]" >> $HOME/.aws/config
echo "region = $1" >> $HOME/.aws/config
echo "output = $2" >> $HOME/.aws/config

# ~./aws/credentials
touch $HOME/.aws/credentials
echo "[default]" >> $HOME/.aws/credentials
echo "aws_access_key_id = $3" >> $HOME/.aws/credentials
echo "aws_secret_access_key = $4" >> $HOME/.aws/credentials

# Run cartography sync
cartography --neo4j-uri bolt://localhost:7687 --neo4j-user neo4j --neo4j-password-env-var NEO4J_PASSWORD_ENV_VAR
- Build the docker image.
$ docker build --tag=cartography .
-
Wait for the docker image to be built. This might take more than 10 minutes, depending on the internet connection speed and the AWS resources.
-
Run the docker run command to access the docker instance.
$ docker run -it -p 7474:7474 -p 7687:7687 cartography
- At the docker instance, start the Neo4j service. And after starting do not exit this terminal. If you exit the terminal the docker instance will be stopped and the Neo4J browser will be unavailable. Run the following command:
root@...:/app# sh setup-script.sh <aws-region> json <access-key-id> <secret-access-key>
If an error saying the following is shown. Try executing again the command above.
ERROR:cartography.sync:Unable to connect to Neo4j using the provided URI 'bolt://localhost:7687', an error occurred: 'Failed to establish connection to ('::1', 7687, 0, 0) (reason [Errno 99] Cannot assign requested address)'. Make sure the Neo4j server is running and accessible from your network.
- Visit the following URL on the browser
http://localhost:7474
- A new screen section is visible. To view a partial graph of the AWS resources, select the database icon at the upper-left.
Then select the asterisk with the number. This will view a partial graph of the AWS resources.
And produce something like below.
You can view more nodes or details by changing the LIMIT on the query. Example, type the following on the query textfield on the top. Then click on the Play button on it’s right
MATCH (n) RETURN n LIMIT 100
The output will be something similar, with more details.
For additional queries, see the Appendix for a list of available commands to use.
- Exit from the docker terminal to stop the docker instance
root@...:/app# exit
- From the host OS execute one or a combination of the following
# Remove the Docker image using its name
$ docker image rm cartography
- List the docker images and see if it has been removed
# List the Docker image on this system
$ docker image ls
For Ubuntu users
# Install VirtualBox, ignore if already installed
$ sudo apt install virtualbox

# Install Vagrant
$ sudo apt install vagrant

# Check if Vagrant is installed
$ vagrant --version
For MacOS and Windows users
Download and install from https://www.vagrantup.com/downloads.html.
# vagrant-box-directory is where the Vagrantfile file is located
$ cd <vagrant-box-directory>
$ vagrant destroy

# Type y to confirm deletion
# Remove dangling/unused containers
$ docker container prune

# Remove dangling/unused images
$ docker image prune

# Remove a specific docker image
$ docker image rm <image-name>
Select all RDS instances where encryption is turned OFF.
MATCH (a:AWSAccount)-[:RESOURCE]->(rds:RDSInstance{storage_encrypted:false})
RETURN a.name, rds.id

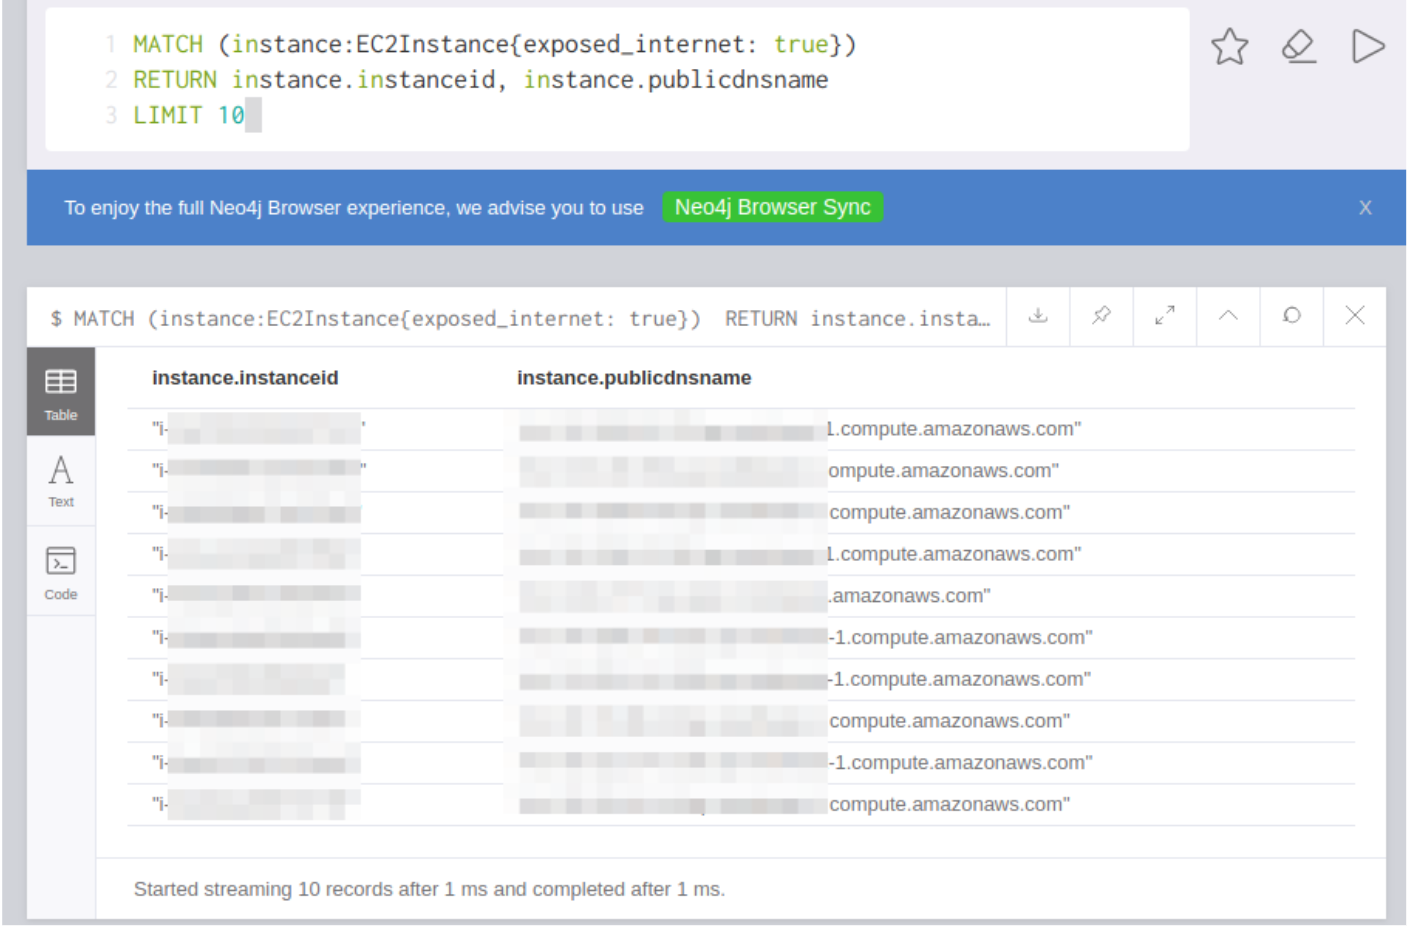
Select all EC2 instances that are directly accessible from the Internet
MATCH (instance:EC2Instance{exposed_internet: true})
RETURN instance.instanceid, instance.publicdnsname
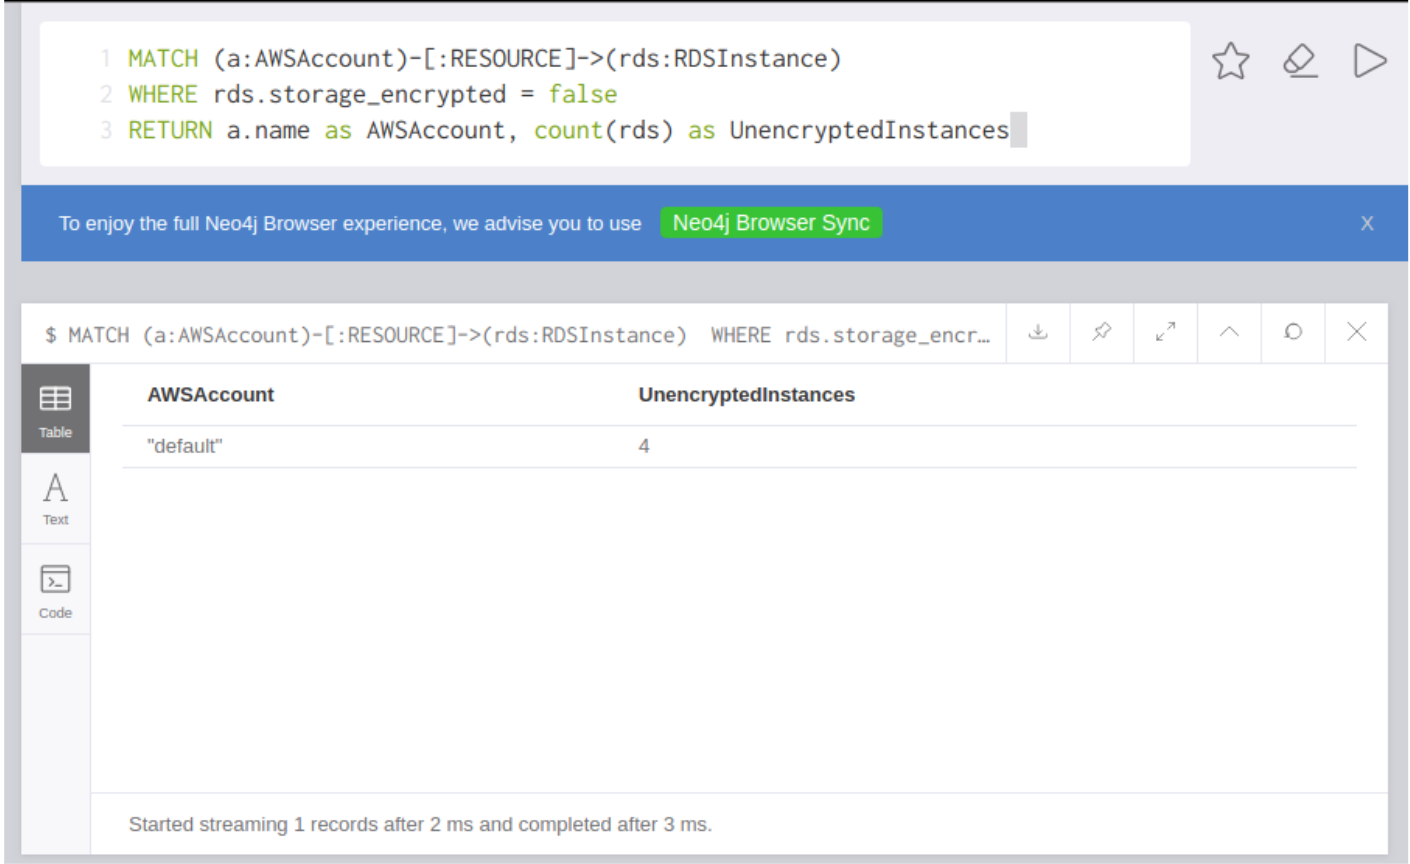
Count the number of unencrypted instances
MATCH (a:AWSAccount)-[:RESOURCE]->(rds:RDSInstance)
WHERE rds.storage_encrypted = false
RETURN a.name as AWSAccount, count(rds) as UnencryptedInstances
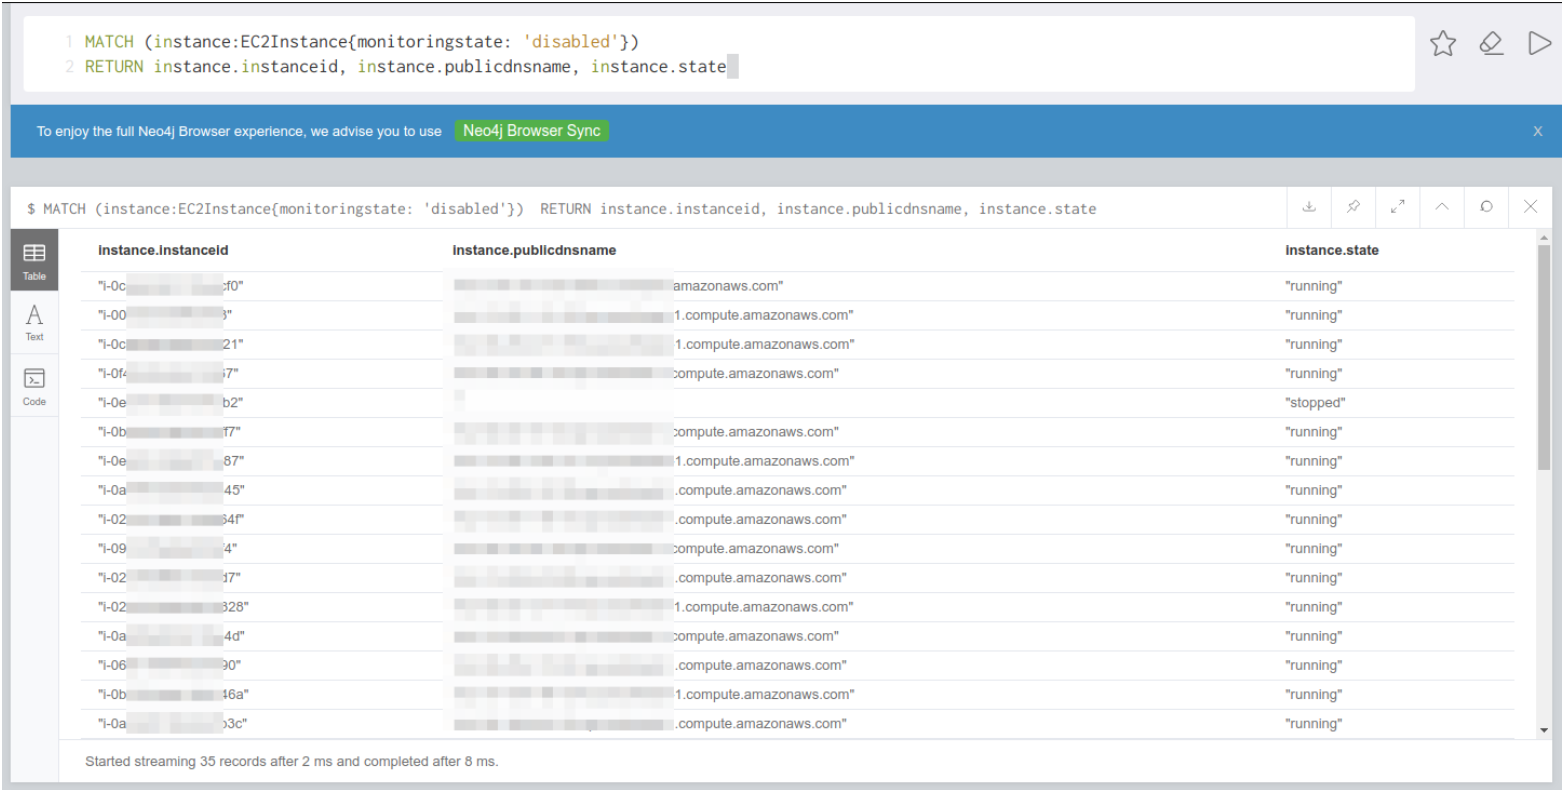
Select all the EC2 instances where monitoring is disabled
MATCH (instance:EC2Instance{monitoringstate: 'disabled'})
RETURN instance.instanceid, instance.publicdnsname, instance.state
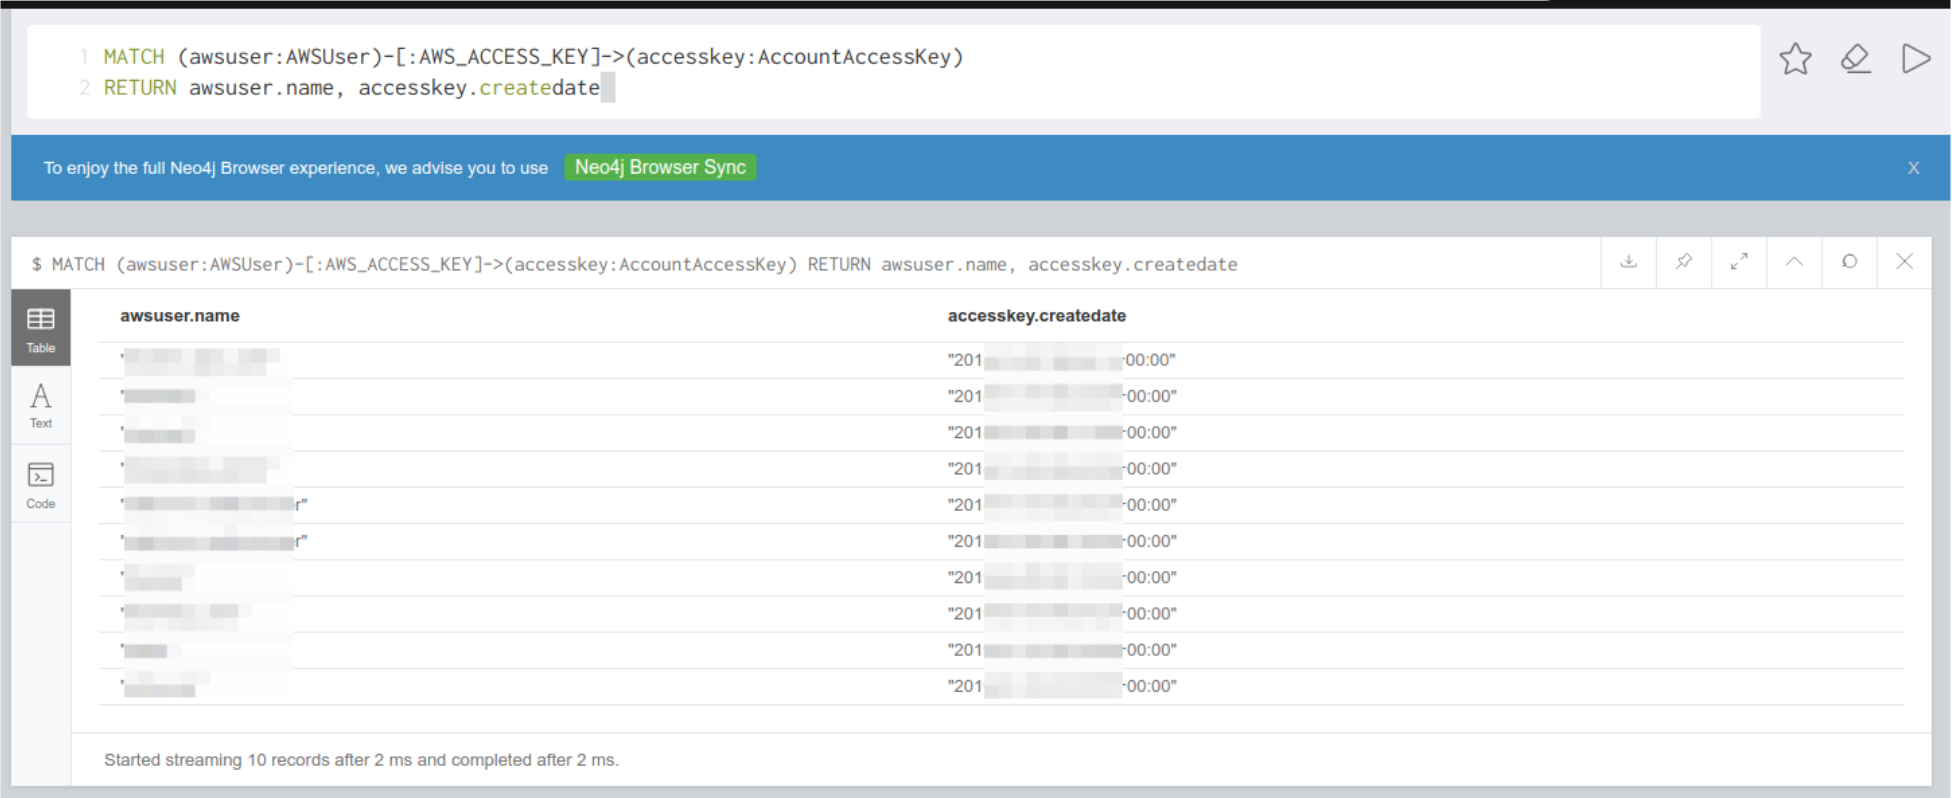
Select all the AWS Account and their Access Key, and show how old the access key has been since it was created.
MATCH (awsuser:AWSUser)-[:AWS_ACCESS_KEY]->(accesskey:AccountAccessKey)
RETURN awsuser.name, accesskey.createdate
Determine the subnet group of instances and view also other instances belong in that subnet
-- Can be used to know how many IP address is used within the subnet -- With additional update to the query, can filter out which of instances are exposed in the internet
MATCH (ec2:EC2Instance)-[:PART_OF_SUBNET]->(subnet:EC2Subnet)
RETURN ec2, subnet

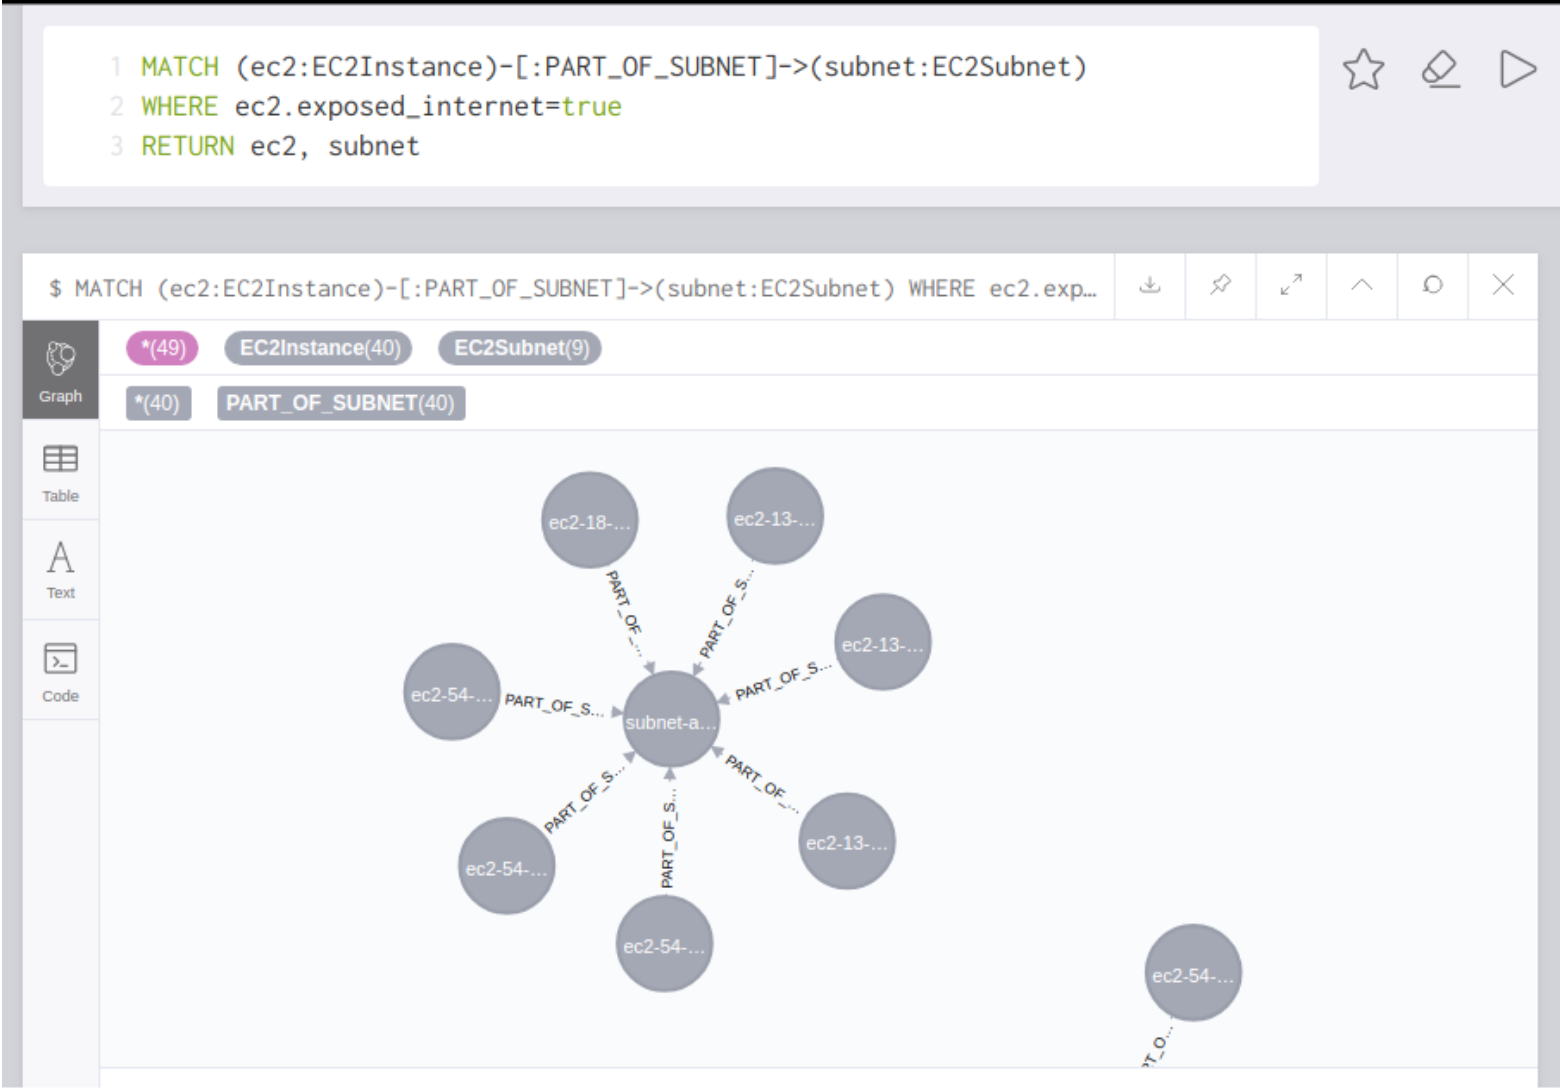
Updated query, filtered where instances are publicly accessible
MATCH (ec2:EC2Instance)-[:PART_OF_SUBNET]->(subnet:EC2Subnet)
WHERE ec2.exposed_internet=true
RETURN ec2, subnet
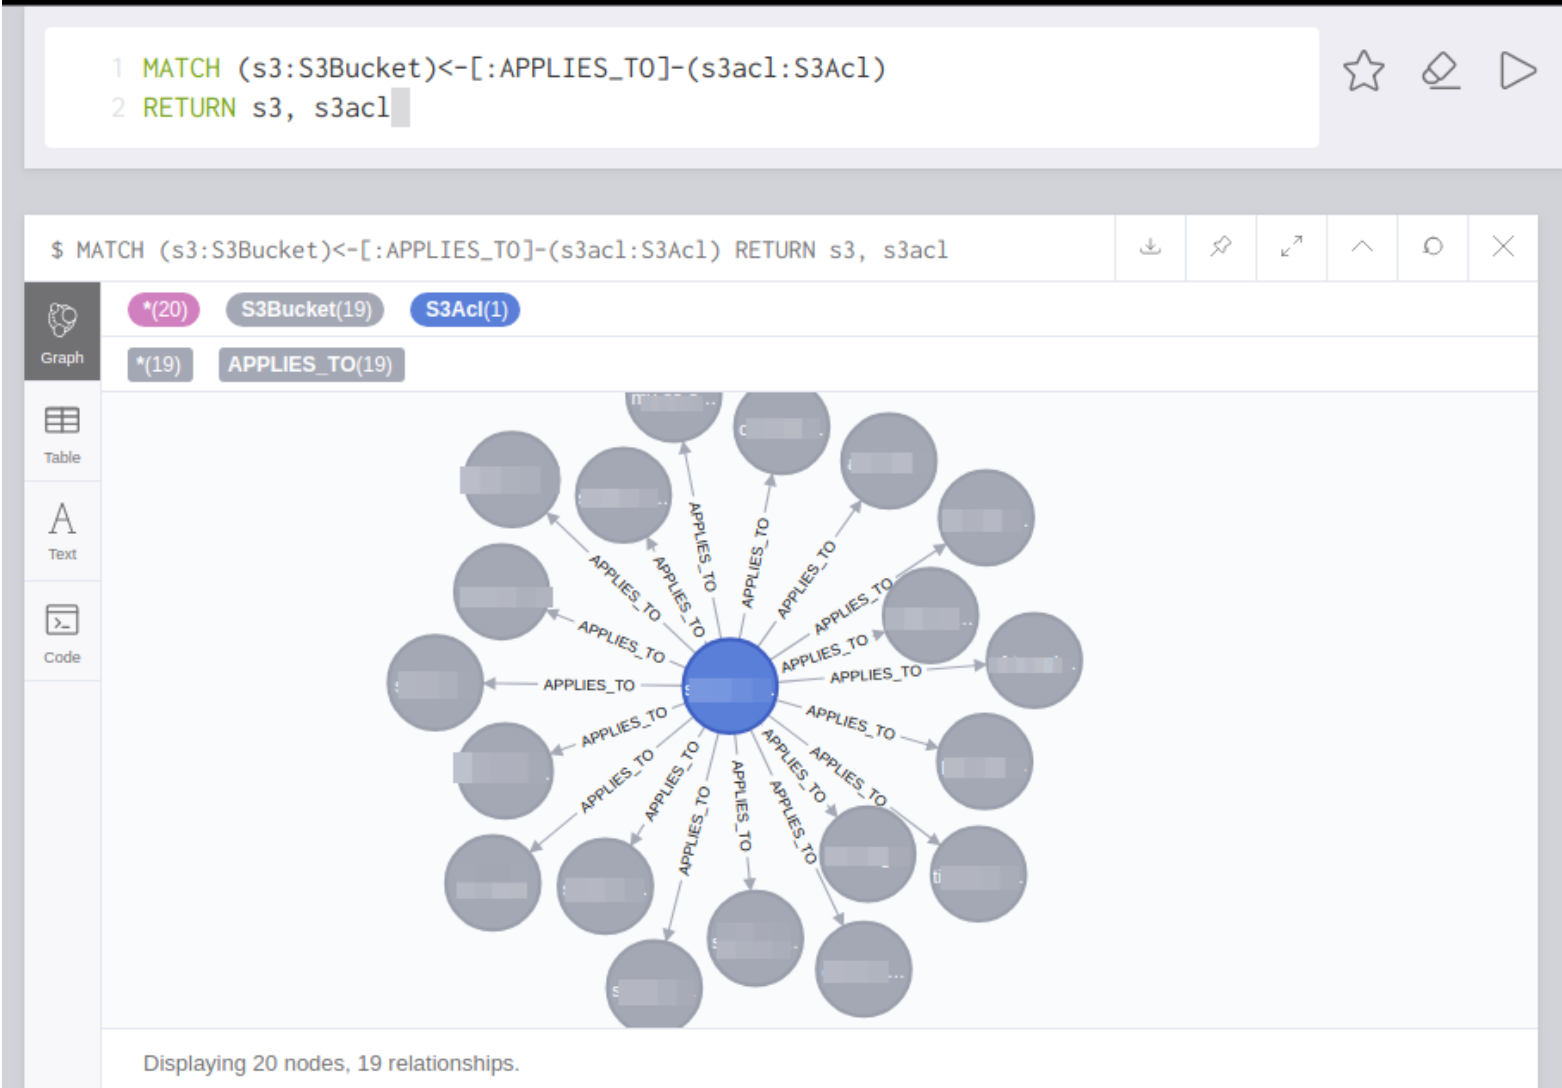
Check which S3Acl is applied to buckets
MATCH (s3:S3Bucket)<-[:APPLIES_TO]-(s3acl:S3Acl)
RETURN s3, s3acl
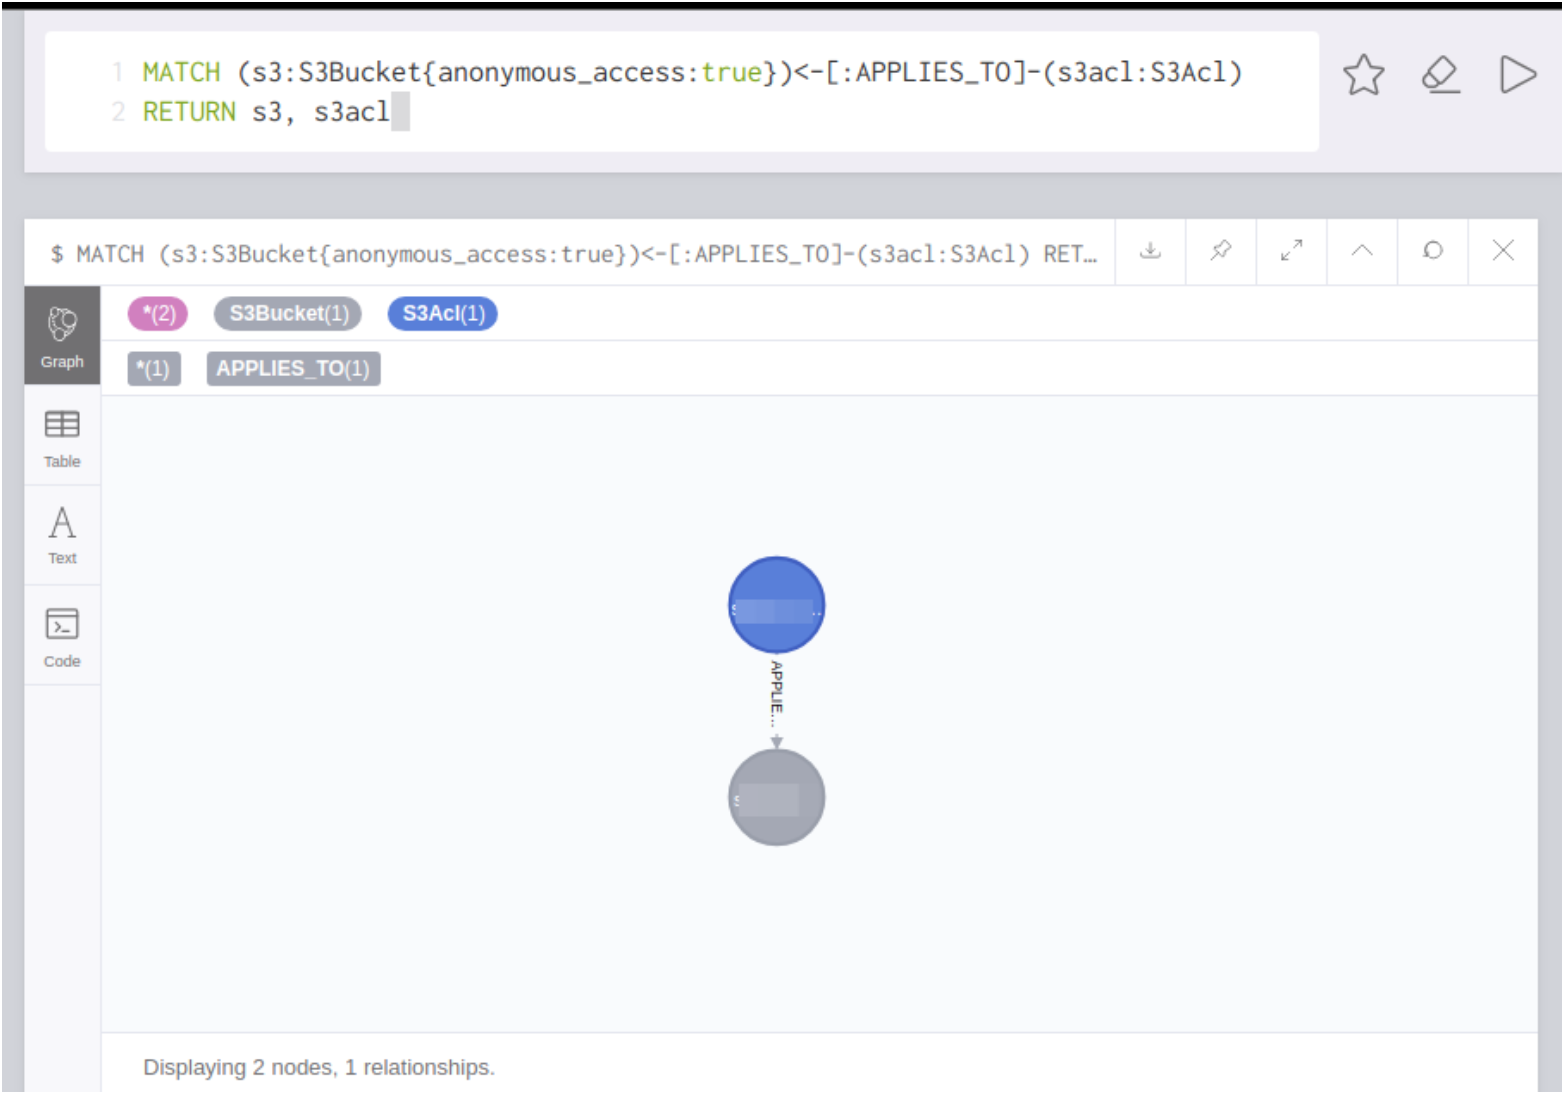
The query can be updated to filter which S3 Bucket is publicly accessible.
MATCH (s3:S3Bucket{anonymous_access:true})<-[:APPLIES_TO]-(s3acl:S3Acl)
RETURN s3, s3acl
[update] [20190425] - Updated
Appendixsection and addedCleanupsection