Melvanimate is a library for ESP8266 that lets you control your Neopixels over WLAN easily. It supports everything imaginable besides toasting your toast, e.g.,:
- Animate Neopixels (hence the name!) or set them to solid colors
- Control LEDs via a web interface (for casually setting a certain color of effect)
- Control LEDs via MQTT or DMX/E131 (for automation)
- Adalight DIY ambient monitor lighting similar to Ambilight
- PixelController
- Timer to switch lights on/off or select a preset after a certain time
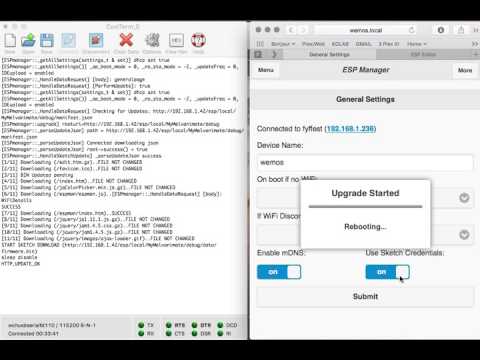
- Super awesome easy configuration web interface and over-the-air updateability
(Insert cool photos/videos here!)
- 1 ESP8266 board, e.g., a NodeMCU 1.0 board (around USD 3 from China shipped) or, if it should fit a small enclosure, a bare ESP12E module (around USD 2 from China shipped; in this case need a matching programming jig too in order to flash it initially, and you need to use the usual minimal circuit to pull up CH_PD and pull down GPIO15 as well as a voltage regulator)
- WS2812 strip or matrix
The NodeMCU 1.0 board has an integrated power regulator so I can hook up the light strip and the ESP directly to 5V and it works with 0 external components. The data line of the neopixels strip is connected to the RX of the NodeMCU 1.0 board.
These are very concise instructions on how to build and run using Ubuntu 16.04 (other versions should also work).
First, install known working versions of the dependency libraries.
which git || sudo apt-get install -y git
# rm -rf $HOME/Arduino/ # Uncomment this only if you are sure what you are doing
mkdir -p $HOME/Arduino/libraries/
cd $HOME/Arduino/libraries/
git clone -o c01d36a https://github.com/sticilface/Melvanimate.git
git clone -o 174087f https://github.com/Makuna/NeoPixelBus.git
git clone -o bfde9bc https://github.com/me-no-dev/ESPAsyncWebServer.git
git clone -o 0f2292b https://github.com/me-no-dev/ESPAsyncTCP.git
git clone -o d00420b https://github.com/marvinroger/async-mqtt-client.git
git clone -o 6c902fb https://github.com/sticilface/ESPmanager.git
git clone -o 409ca7e https://github.com/bblanchon/ArduinoJson.git
git clone -o 334e815 https://github.com/adafruit/Adafruit-GFX-Library.git
cd -
Download and run Arduino AppImage that contains the IDE, the esp8266 core, and the SPIFFS upload tool.
If you are not running Linux or do not want to use the AppImage, you have to download and install those parts manually.
AI="Arduino-1.6.11.hourly201608220325.esp4754f43-x86_64.AppImage"
wget -c "https://bintray.com/probono/AppImages/download_file?file_path=$AI" -O "$AI"
chmod a+x "$AI"
./"$AI" &
Now that we have everything in place, configure, compile, and upload.
- File -> Examples -> Melvaimate-withESPManager
- Tools -> Board -> Your board type
- Tools -> CPU Frequency -> 160 MHz
- Tools -> Upload Speed -> 921600
- Tools -> Port -> Your port (can also use OTA)
- Sketch -> Upload
Melvanimate has a super cool web interface that can do real magic, including over-the-air updates.
- You should see a new WLAN access point. Connect to it
- Open the IP of this access point (you need to find it out somehow)
- In the GUI, connect to your WLAN using your credentials. Save and reboot
- From thereon, you should be able to use the GUI from within your network
If you have multiple installations of Melvanimate in the same network, they will automatically discover each other and talk to each other. From the web interface, you can select the different devices in the upper right-hand corner.
Let's say I want my LEDs to come up as blue, whenever I attach them to a power plug, whether there is WLAN or not. To do this, we
- Create a preset in the web interface, call it "Blue"
- Adjust adjust the sketch: at the end of the
setup()function add:lights.Load("Blue");Done! Now, whenever I power on, the lights go blue.
Who is going to implement them?
- Scenarios, e.g., set LED strip on ESP #1 to blue and LED strip on ESP #2 to orange
- A setting to limit the milliamps
- Kelvin based on daytime and location (see code below)
- Bus is coming
- Weather info
- Hue mode (e.g., using code from ESP8266HueEmulator)
- Use dithering so that you can't see the individual steps e.g., in RainbowChase
- Investigate MIDI or OSC for professional stage lighting control (e.g., using https://github.com/OSSIA/i-score which can do things like https://vimeo.com/113089469, or http://www.duration.cc/)