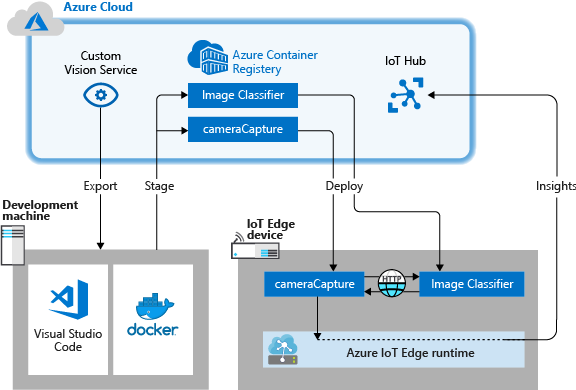
Azure IoT Edge can make your IoT solution more efficient by moving workloads out of the cloud and to the edge. This capability lends itself well to services that process a lot of data, like computer vision models. The Custom Vision Service lets you build custom image classifiers and deploy them to devices as containers. Together, these two services enable you to find insights from images or video streams without having to transfer all of the data off site first. Custom Vision provides a classifier that compares an image against a trained model to generate insights.
For example, Custom Vision on an IoT Edge device could determine whether a highway is experiencing higher or lower traffic than normal, or whether a parking garage has available parking spots in a row. These insights can be shared with another service to take action.
In this tutorial, you learn how to:
[!div class="checklist"]
- Build an image classifier with Custom Vision.
- Develop an IoT Edge module that queries the Custom Vision web server on your device.
- Send the results of the image classifier to IoT Hub.
Tip
This tutorial is a simplified version of the Custom Vision and Azure IoT Edge on a Raspberry Pi 3 sample project. This tutorial was designed to run on a cloud VM and uses static images to train and test the image classifier, which is useful for someone just starting to evaluate Custom Vision on IoT Edge. The sample project uses physical hardware and sets up a live camera feed to train and test the image classifier, which is useful for someone who wants to try a more detailed, real-life scenario.
Before beginning this tutorial, you should have gone through the previous tutorial to set up your environment for Linux container development: Develop IoT Edge modules for Linux devices. By completing that tutorial, you should have the following prerequisites in place:
- A free or standard-tier IoT Hub in Azure.
- A Linux device running Azure IoT Edge
- A container registry, like Azure Container Registry.
- Visual Studio Code configured with the Azure IoT Tools.
- Docker CE configured to run Linux containers.
To develop an IoT Edge module with the Custom Vision service, install the following additional prerequisites on your development machine:
-
After training your classifier, select Export on the Performance page of the classifier.
-
Select DockerFile for the platform.
-
Select Linux for the version.
-
Select Export.
-
When the export is complete, select Download and save the .zip package locally on your computer. Extract all files from the package. You'll use these files to create an IoT Edge module that contains the image classification server.

When you reach this point, you've finished creating and training your Custom Vision project. You'll use the exported files in the next section, but you're done with the Custom Vision web page.
Now you have the files for a container version of your image classifier on your development machine. In this section, you configure the image classifier container to run as an IoT Edge module. You also create a second module that will be deployed alongside the image classifier. The second module posts requests to the classifier and sends the results as messages to IoT Hub.
A solution is a logical way of developing and organizing multiple modules for a single IoT Edge deployment. A solution contains code for one or more modules as well as the deployment manifest that declares how to configure them on an IoT Edge device.
-
In Visual Studio Code, select View > Terminal to open the VS Code integrated terminal.
-
Select View > Command Palette to open the VS Code command palette.
-
In the command palette, enter and run the command Azure IoT Edge: New IoT Edge solution. In the command palette, provide the following information to create your solution:
Field Value Select folder Choose the location on your development machine for VS Code to create the solution files. Provide a solution name Enter a descriptive name for your solution, like CustomVisionSolution, or accept the default. Select module template Choose Python Module. Provide a module name Name your module classifier.
It's important that this module name be lowercase. IoT Edge is case-sensitive when referring to modules, and this solution uses a library that formats all requests in lowercase.Provide Docker image repository for the module An image repository includes the name of your container registry and the name of your container image. Your container image is prepopulated from the last step. Replace localhost:5000 with the login server value from your Azure container registry. You can retrieve the login server from the Overview page of your container registry in the Azure portal. The final string looks like <registry name>.azurecr.io/classifier.

The Visual Studio Code window loads your IoT Edge solution workspace.
The environment file stores the credentials for your container registry and shares them with the IoT Edge runtime. The runtime needs these credentials to pull your private images onto the IoT Edge device.
- In the VS Code explorer, open the .env file.
- Update the fields with the username and password values that you copied from your Azure container registry.
- Save this file.
Currently, Visual Studio Code can develop modules for Linux AMD64 and Linux ARM32v7 devices. You need to select which architecture you're targeting with each solution, because the container is built and run differently for each architecture type. The default is Linux AMD64, which is what we'll use for this tutorial.
-
Open the command palette and search for Azure IoT Edge: Set Default Target Platform for Edge Solution, or select the shortcut icon in the side bar at the bottom of the window.
-
In the command palette, select the target architecture from the list of options. For this tutorial, we're using an Ubuntu virtual machine as the IoT Edge device, so will keep the default amd64.
The Python module template in Visual Studio code contains some sample code that you can run to test IoT Edge. You won't use that code in this scenario. Instead, use the steps in this section to replace the sample code with the image classifier container that you exported previously.
-
In your file explorer, browse to the Custom Vision package that you downloaded and extracted. Copy all the contents from the extracted package. It should be two folders, app and azureml, and two files, Dockerfile and README.
-
In your file explorer, browse to the directory where you told Visual Studio Code to create your IoT Edge solution.
-
Open the classifier module folder. If you used the suggested names in the previous section, the folder structure looks like CustomVisionSolution / modules / classifier.
-
Paste the files into the classifier folder.
-
Return to the Visual Studio Code window. Your solution workspace should now show the image classifier files in the module folder.
-
Open the module.json file in the classifier folder.
-
Update the platforms parameter to point to the new Dockerfile that you added, and remove all the options besides AMD64, which is the only architecture we're using for this tutorial.
"platforms": {
    "amd64": "./Dockerfile"
}
-
Save your changes.

In a real Custom Vision deployment, you would have a camera providing live images or video streams. For this scenario, you simulate the camera by building a module that sends a test image to the image classifier.
In this section, you add a new module to the same CustomVisionSolution and provide code to create the simulated camera.
-
In the same Visual Studio Code window, use the command palette to run Azure IoT Edge: Add IoT Edge Module. In the command palette, provide the following information for your new module:
Prompt Value Select deployment template file Select the deployment.template.json file in the CustomVisionSolution folder. Select module template Select C# Module Provide a module name Name your module cameraCapture Provide Docker image repository for the module Replace localhost:5000 with the login server value for your Azure container registry. The final string looks like <registryname>.azurecr.io/cameracapture. The VS Code window loads your new module in the solution workspace, and updates the deployment.template.json file. Now you should see two module folders: classifier and cameraCapture.
-
Open the Program.cs file in the modules / cameraCapture folder.
-
Replace the entire file with the following code. This sample code sends POST requests to the image-processing service running in the classifier module. We provide this module container with a sample image to use in the requests. It then packages the response as an IoT Hub message and sends it to an output queue.
namespace NewCustomVisionModule
{
  using System;
  using System.IO;
  using System.Runtime.Loader;
  using System.Text;
  using System.Threading;
  using System.Threading.Tasks;
  using Microsoft.Azure.Devices.Client;
  using Microsoft.Azure.Devices.Client.Transport.Mqtt;
  using System.Net.Http;
  using System.Net.Http.Headers;

  class Program
  {
    static int counter;
    private static ModuleClient ioTHubModuleClient;

    static void Main(string[] args)
    {
      Init().Wait();

      // Wait until the app unloads or is cancelled
      var cts = new CancellationTokenSource();
      AssemblyLoadContext.Default.Unloading += (ctx) => cts.Cancel();
      Console.CancelKeyPress += (sender, cpe) => cts.Cancel();
      WhenCancelled(cts.Token).Wait();
    }

    /// <summary>
    /// Handles cleanup operations when app is cancelled or unloads
    /// </summary>
    public static Task WhenCancelled(CancellationToken cancellationToken)
    {
      var tcs = new TaskCompletionSource<bool>();
      cancellationToken.Register(s => ((TaskCompletionSource<bool>)s).SetResult(true), tcs);
      return tcs.Task;
    }

    /// <summary>
    /// Initializes the ModuleClient and sets up the callback to receive
    /// messages containing temperature information
    /// </summary>
    static async Task Init()
    {
      MqttTransportSettings mqttSetting = new MqttTransportSettings(TransportType.Mqtt_Tcp_Only);
      ITransportSettings[] settings = { mqttSetting };

      // Open a connection to the Edge runtime
      ioTHubModuleClient = await ModuleClient.CreateFromEnvironmentAsync(settings);
      await ioTHubModuleClient.OpenAsync();
      Console.WriteLine("IoT Hub module client initialized.");

      // Get the image path and adress of the classifier module (set in deployment.template.json)
      var image_path = Environment.GetEnvironmentVariable("IMAGE_PATH");
      var image_processing_endpoint = Environment.GetEnvironmentVariable("IMAGE_PROCESSING_ENDPOINT");

      // Create a new HttpClient to make a request to the classifier
      var client = new HttpClient();
      HttpResponseMessage response;

      var filebytes = File.ReadAllBytes(image_path);
      using (var content = new ByteArrayContent(filebytes))
      {
        content.Headers.ContentType = new MediaTypeHeaderValue("application/octet-stream");
        response = await client.PostAsync(image_processing_endpoint, content);
        Console.WriteLine(response.Content.ReadAsStringAsync().Result);

        var message = new Message(Encoding.ASCII.GetBytes(response.Content.ReadAsStringAsync().Result));

        // Send the message to the IoT Hub
        await ioTHubModuleClient.SendEventAsync("output1", message);
      }
    }
  }
}
-
Save the Program.cs file.
Instead of using a real camera to provide an image feed for this scenario, we're going to use a single test image. A test image is included in the GitHub repo that you downloaded for the training images earlier in this tutorial.
-
Navigate to a test image, located at the extracted zip file you downloaded earlier for the CustomVision.ai. The zip file contained both train and test data
-
Copy one of the test png images for example
developed-7.png -
Browse to your IoT Edge solution directory and paste the test image in the modules / cameraCapture folder. The image should be in the same folder as the Program.cs file that you edited in the previous section.
-
In Visual Studio Code, open the Dockerfile.amd64 file for the cameraCapture module.
-
After the line that establishes the working directory,
COPY --from=build-env /app/out ./, add the add your image, for exampledeveloped-7.png.COPY ./developed-7.png . -
Save the Dockerfile.
So far in this tutorial you've trained a Custom Vision model to classify images of trees, and packaged that model up as an IoT Edge module. Then, you created a second module that can query the image classification server and report its results back to IoT Hub. Now, you're ready to create the deployment manifest that will tell an IoT Edge device how to start and run these two modules together.
The IoT Edge extension for Visual Studio Code provides a template in each IoT Edge solution to help you create a deployment manifest.
-
Open the deployment.template.json file in the solution folder.
-
Find the modules section, which should contain three modules: the two that you created, classifier and cameraCapture, and a third that's included by default, SimulatedTemperatureSensor.
-
Delete the SimulatedTemperatureSensor module with all of its parameters. This module is included to provide sample data for test scenarios, but we don't need it in this deployment.
-
If you named the image classification module something other than classifier, check the name now and ensure that it's all lowercase. The cameraCapture module calls the classifier module using a requests library that formats all requests in lowercase, and IoT Edge is case-sensitive.
-
Update the createOptions parameter for the cameraCapture module with the following JSON. This information creates environment variables in the module container that are retrieved in the main.py process. By including this information in the deployment manifest, you can change the image or endpoint without having to rebuild the module image.
"createOptions": "{\"Env\":[\"IMAGE_PATH=test_image.jpg\",\"IMAGE_PROCESSING_ENDPOINT=http://classifier/image\"]}"
If you named your Custom Vision module something other than classifier, update the image-processing endpoint value to match.
-
At the bottom of the file, update the routes parameter for the $edgeHub module. You want to route the prediction results from cameraCapture to IoT Hub.
    "routes": {
      "CameraCaptureToIoTHub": "FROM /messages/modules/cameraCapture/outputs/* INTO $upstream"
    },
If you named your second module something other than cameraCapture, update the route value to match.
-
Save the deployment.template.json file.
With both modules created and the deployment manifest template configured, you're ready to build the container images and push them to your container registry.
Once the images are in your registry, you can deploy the solution to an IoT Edge device. You can set modules on a device through the IoT Hub, but you can also access your IoT Hub and devices through Visual Studio Code. In this section, you set up access to your IoT Hub then use VS Code to deploy your solution to your IoT Edge device.
First, build and push your solution to your container registry.
- In the VS Code explorer, right-click the deployment.template.json file and select Build and push IoT Edge solution. You can watch the progress of this operation in the integrated terminal in VS Code.
- Notice that a new folder was added to your solution, config. Expand this folder and open the deployment.json file inside.
- Review the information in the deployment.json file. The deployment.json file is created (or updated) automatically based on the deployment template file that you configured and information from the solution, including the .env file and the module.json files.
Next, select your device and deploy your solution.
- In the VS Code explorer, expand the Azure IoT Hub Devices section.
- Right-click on the device that you want to target with your deployment and select Create deployment for single device.
- In the file explorer, navigate to the config folder inside your solution and choose deployment.json. Click Select Edge deployment manifest.
If the deployment is successful, a confirmation message is printed in the VS Code output. In the VS Code explorer, expand the details about the IoT Edge device that you used for this deployment. Hover your cursor on the Azure IoT Hub Devices header to enable the refresh button if the modules don't show up right away. It may take a few moments for the modules to start and report back to IoT Hub.
You can also check to see that all the modules are up and running on your device itself. On your IoT Edge device, run the following command to see the status of the modules. It may take a few moments for the modules to start.
iotedge listThere are two ways to view the results of your modules, either on the device itself as the messages are generated and sent, or from Visual Studio Code as the messages arrive at IoT Hub.
From your device, view the logs of the cameraCapture module to see the messages being sent and the confirmation that they were received by IoT Hub.
iotedge logs cameraCaptureFrom Visual Studio Code, right-click on the name of your IoT Edge device and select Start Monitoring Built-in Event Endpoint.
The results from the Custom Vision module, which are sent as messages from the cameraCapture module, include the probability that the image is of either a hemlock or cherry tree. Since the image is hemlock, you should see the probability as 1.0.