N1MM+ has been the go-to contest logger for many hams and, thanks to its networking features, also clubs. Sadly, it's only for Windows, it's closed-source and the bugs (whether in N1MM or Wine) don't make it any more fun.
- Install any decently recent flavour of Wine. Usually the one provided by your distro's package manager is fine.
- Install winetricks.
- Set the required environment variables. To work inside this wineprefix (which is, in short, a self-contained "fake" "Windows" "installation"), you need to specify its path inside every newly opened terminal window.
export WINEPREFIX=~/.wine_n1mm
export WINEARCH=win32
Tip
You only need to specify $WINEARCH the first time when creating the wineprefix.
- Use winetricks to install .NET, which N1MM uses to run:
wine wineboot
winetricks win7
winetricks dotnet46
- Download and install N1MM+ (in the same terminal window,
wine ~/Downloads/N1MM-Logger....exe).
... is no longer necessary since 1.0.10476 thanks to the N1MM team! You can read the instructions in an earlier revision of this text. Nevertheless, the cause of the issue is still present -- a bug in Wine (audio enumeration is not fully implemented), which breaks the voice line recording feature (e. g. in the QTC config window). Playback works perfectly fine. Just use (i. e.) Audacity to make the recordings.
I personally prefer to run every ham program with FLrig, if possible. N1MM does not natively support it, but with a useful utility in hamlib called rigctlcom, we can simulate a Kenwood TS-2000 radio.
Due to some bug, FLrig does not save the quite long file path of my radio's USB serial converter correctly. One workaround is to set up FLrig, save the config, make a copy, fix the xcvr_serial_port path, and then just overwrite the corrupted config with my good one on every launch. This is the command my desktop icon runs:
bash -c "cp ~/.flrig3000/FTdx3000.prefs.good ~/.flrig3000/FTdx3000.prefs ; flrig --config-dir ~/.flrig3000"
There is an open issue to allow rigctlcom to work over TCP saving us these next two commands. But until that's implemented, we need to create a virtual serial port:
sudo socat pty,raw,link=/dev/vspin0,group-late=uucp,mode=660 pty,raw,link=/dev/vsp0,group-late=uucp,mode=660
Tip
Your user must be a member of the uucp group. You can also use mode=666.
Then, "bridge" the virtual serial port onto a TCP port.
socat TCP-LISTEN:10501,fork,reuseaddr,nodelay FILE:/dev/vsp0,raw,echo=0
Finally, start rigctlcom to translate the TS-2000 commands into something FLrig can speak.
rigctlcom -vvvv -m 4 -R /dev/vspin0
Tip
If FLrig gets stuck/closed and your CAT suddenly stops working, the culprit is most likely rigctlcom. Just kill it with Ctrl+C and start it again. N1MM should recover. With the -vvvv flags, you'll see "IO error" printed in the console.
In N1MM in menu Config > Configure Ports, Mode Control, Winkey... select Port: TCP, Radio: TS-2000, and fill in your IP and port: 127.0.0.1:10501.
Click the Set button and enable PTT via Radio Command, if you want to use N1MM to play back prerecorded CQ calls, for example.
You can. In that case, it's just this one command. Your radio must be supported by N1MM and it's not the most stable way, in my experience.
socat TCP-LISTEN:10501,fork,reuseaddr,nodelay FILE:/dev/serial/by-id/usb-Silicon_Labs_CP2105_Dual_USB_to_UART_Bridge_Controller_AH046H4J230099-if00-port0,raw,echo=0,cs8,crtscts=1,b38400,cstopb=1
Note
cstopb can be 0 (one stopbit) or 1 (two stopbits).
Along with PipeWire (link to its docs on virtual devices and their configuration), which is now the default audio server in most popular distributions, I use these great tools:
- Calf Studio Gear for DSP audio filters with a very nice and easily understandable interface.
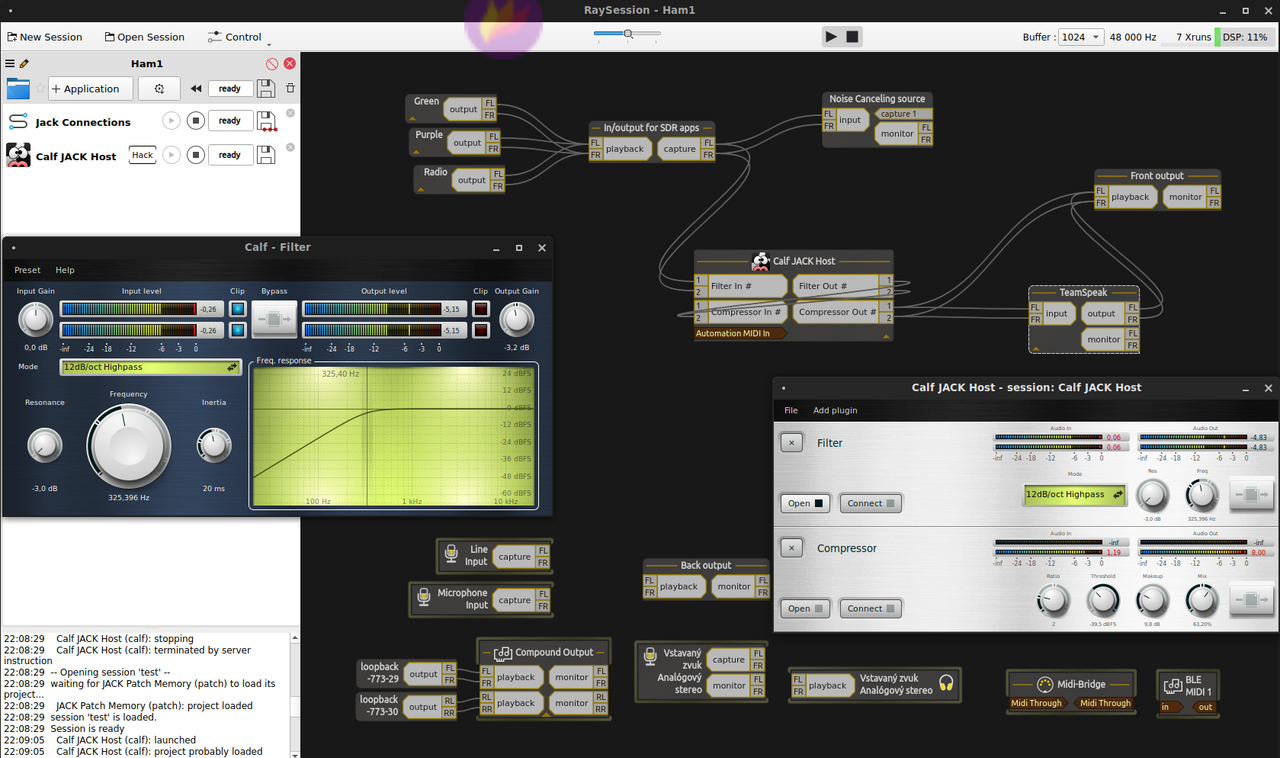
- The RaySession family (mostly Patchance) for routing audio around the system and to/from the individual filter blocks. It's very easy to use and makes audio on Linux so much fun. Alternatives are qpwgraph, Helvum, Carla, or doing it manually (see below).
- Pavucontrol -- should be available in the repositories of your distro, maybe it's even pre-installed.
Setting up the Calf plugins from scratch every single time is tedious. RaySession makes this EXTREMELY easy. Simply create a new session, add the Calf JACK Host application from the menu, add whatever plugins you want, route their inputs/outputs and click the "Save" button on the left. This will make RaySession remember the exact routing and settings of each Calf filter. Upon loading the session later, it'll route and start everything automatically. It truly is an amazing piece of software.
If you want to skip using a session manager (or do it via CLI for any reason), you can save the preset in calfjackhost in File > Save. To recall it, start the program with -l (path to the preset file). Then, to route the audio streams between the filters, use pw-link with the names of the ports, like so, ending with your radio's sound card:
# List all ports: pw-link --output --input
# Link two: pw-link {{output_port_name}} {{input_port_name}}
# Unlink two: pw-link --disconnect {{output_port_name}} {{input_port_name}}

set -m
calfjackhost -l ham_ssb_emph &
sleep 1
pw-link "Calf Studio Gear:Emphasis Out #1" "Calf Studio Gear:Compressor In #1"
pw-link "Calf Studio Gear:Emphasis Out #2" "Calf Studio Gear:Compressor In #2"
pw-link "Calf Studio Gear:Compressor Out #1" "Calf Studio Gear:Equalizer 5 Band In #1"
pw-link "Calf Studio Gear:Compressor Out #2" "Calf Studio Gear:Equalizer 5 Band In #2"
pw-link "Calf Studio Gear:Equalizer 5 Band Out #1" "alsa_output.usb-Burr-Brown_from_TI_USB_Audio_CODEC-00.analog-stereo:playback_FL"
pw-link "Calf Studio Gear:Equalizer 5 Band Out #2" "alsa_output.usb-Burr-Brown_from_TI_USB_Audio_CODEC-00.analog-stereo:playback_FR"
fg
The only other proprietary part of my setup, apart from N1MM+, is TeamSpeak 3. Before the era of Discord, it was the go-to communicator for gamers (and some value its simplicity and stability even today). It's low latency (UDP) and uses the CELT codec (with configurable quality). You need a server. I recommend self-hosting your own, for full control and the lowest possible latency. Simply use Patchance to route the audio from your radio into TS3's input and vice versa.
I've made a simple Node.js script that triggers the radio's PTT line when there's a client speaking in the TS3 channel: https://git.lixko.eu/ericek111/ts3_remote_ham.
I have configured TS3 to only transmit my voice when I hold down the left Shift key. This has a side effect in Linux -- your num-pad will behave as if you had Num Lock off. This can be easily disabled, in my environment (MATE), it's under Keyboard > Layouts > Options > Compatibility options > Numeric keypad always enters digits (as in macOS).
Any app for remote desktop is fine. I found VNC to be too slow and other alternatives for gamers (such as Steam Remote Play or Moonlight) too much hassle. In the end, I've settled with NoMachine and it's served me well over the years. It's multi-platform, free (as in beer, sadly), and pretty low latency. It uses H.264 and supports hardware accelerated encoding. The audio support is (probably still) broken on Linux/PipeWire. It, like TS3, also requires a direct connection to the machine, necessitating a VPN software such as WireGuard or OpenVPN.
AnyDesk was also mostly usable -- it does not need a direct connection and audio works fine, but for me, sometimes the image would start falling behind, growing the latency to several seconds, and only a reconnect would fix it.