This is a full guide for people who wanted to setup Windows 10/11 VM with QEMU/KVM hypervisor for laptops that configured with hybrid graphics card like Intel/AMD + NVIDIA. This process will take about 1 to 2 hours, depending on your system's performance.
There is another comprehensive guide you can follow here (shoutout to asus-linux team). It is more up-to-date than mine. I'll probably incorporate those information to my guide, but you are welcome to use this one as a reference!
- This guide is exclusively for Fedora because this distro is quite different to set up than other distro such as Arch. I would say Arch is easier to setup than Fedora, but sometimes your prefer Fedora than Arch in terms of its usage & features.
- This tutorial mostly focus on laptops with NVIDIA Optimus MUXed configuration when dGPU (dedicated GPU) can connect directly to HDMI/DP output. If in doubt, search "VR-Ready laptops", as those are definitely MUXed.
- For MUXless configuration which the dGPU share display alongside with iGPU (integrated GPU), you may need to extract your system's vBIOS for your card to avoid getting no output from your screen. Refer here first before proceeding.
- How to check in terminal:
lspci -k | grep -A 2 -E "(VGA|3D)"; If it's display 2 VGA = likely MUXed, else 1 VGA and 1 3D = highly likely MUXless. - This tutorial also doesn't cover AMD iGPU + AMD dGPU configuration (or AMD Advantage laptops) as I personally don't have them. The process might be the same, but some steps needs slight alteration. Do this at your own risk.
Tested on Lenovo Ideapad Gaming 3 15ARH05 (AMD Ryzen 5 4600H + NVIDIA Geforce 1650 Ti) with Fedora 36 (previously on ArchLinux), using NVIDIA driver
Please ignore update logs below if you are new here. Proceed to the next section as usual.
UPDATE 2/29/2024: Recommended another guide from asus-linux team, and fix more grammars.
UPDATE 9/11/2023: Updated supergfxctl guide with its latest version, recommended NVCleanInstall as an alternative way to install NVIDIA driver without their software bloat, and fix some of the grammar issues.
UPDATE 3/11/2023: You don't need SCREAM audio driver or IVSHMEM driver starting from B6 update, as they are already provided their own drivers. It is easier now to use Looking Glass as your remote client. Secure boot is still need to be disabled however.
UPDATE 10/30/2022: Supergfxctl has updated to version 5.0.0. Rebootless mode is enabled by default, and Xorg is no longer supported (but still can be used however).
- Prerequisites
- Pre-setup VM
- Setting up Windows 10/11 VM
- Using supergfxctl to bind vfio to GPU
- Post VM setup with GPU passthrough
- VM Enhancements
- Miscellaneous optimizations
- FAQs & Troubleshooting
- References
- CPU requirements: Intel Core or AMD Ryzen, at least 6-core CPU with hyper-threading/SMT (12 threads in total) and has support for virtualization extension (VT-d/AMD-Vi)
- GPU requirements: Intel/AMD iGPU+ NVIDIA GPU w/ MUXed (or MUXless) configuration
- At least have 12GB of RAM. Even better if you have more.
- Have more disk space depending on your use case (eg: gaming, creative work, etc.). For me, minimum space per virtual disk should be 256GB or 512GB. So your system should have at least 1TB of total space for bigger headroom. Even better if you are using SSD.
- You have installed Fedora Workstation . Should work with any desktop environment, and with display server like Xorg/Wayland. Type
echo $XDG_SESSION_TYPEto check your current display server. - You have installed NVIDIA driver. If you haven't installed it yet, get it here, unless you don't want your host to use your dGPU at all. In this case, this doesn't matter.
- Things to display your Windows 10/11 VM. Either:
- Have a separate monitor to display Windows 10/11 VM (highly recommended)
- Use Looking Glass (a good alternative)
- Use any remote display client (NVIDIA Stream, Moonlight, etc., not recommended)
- Basic terminal knowledge. This guide requires you to type certain command lines to achieve something that is not possible with only just GUI. (tips: use Ctrl+Shift+C to copy and Ctrl+Shift+V to paste from inside the terminal, and use Tab to autocomplete commands or filenames)
You need to prepare some tools before setting up your virtual machine. If you already set everything up, go here.
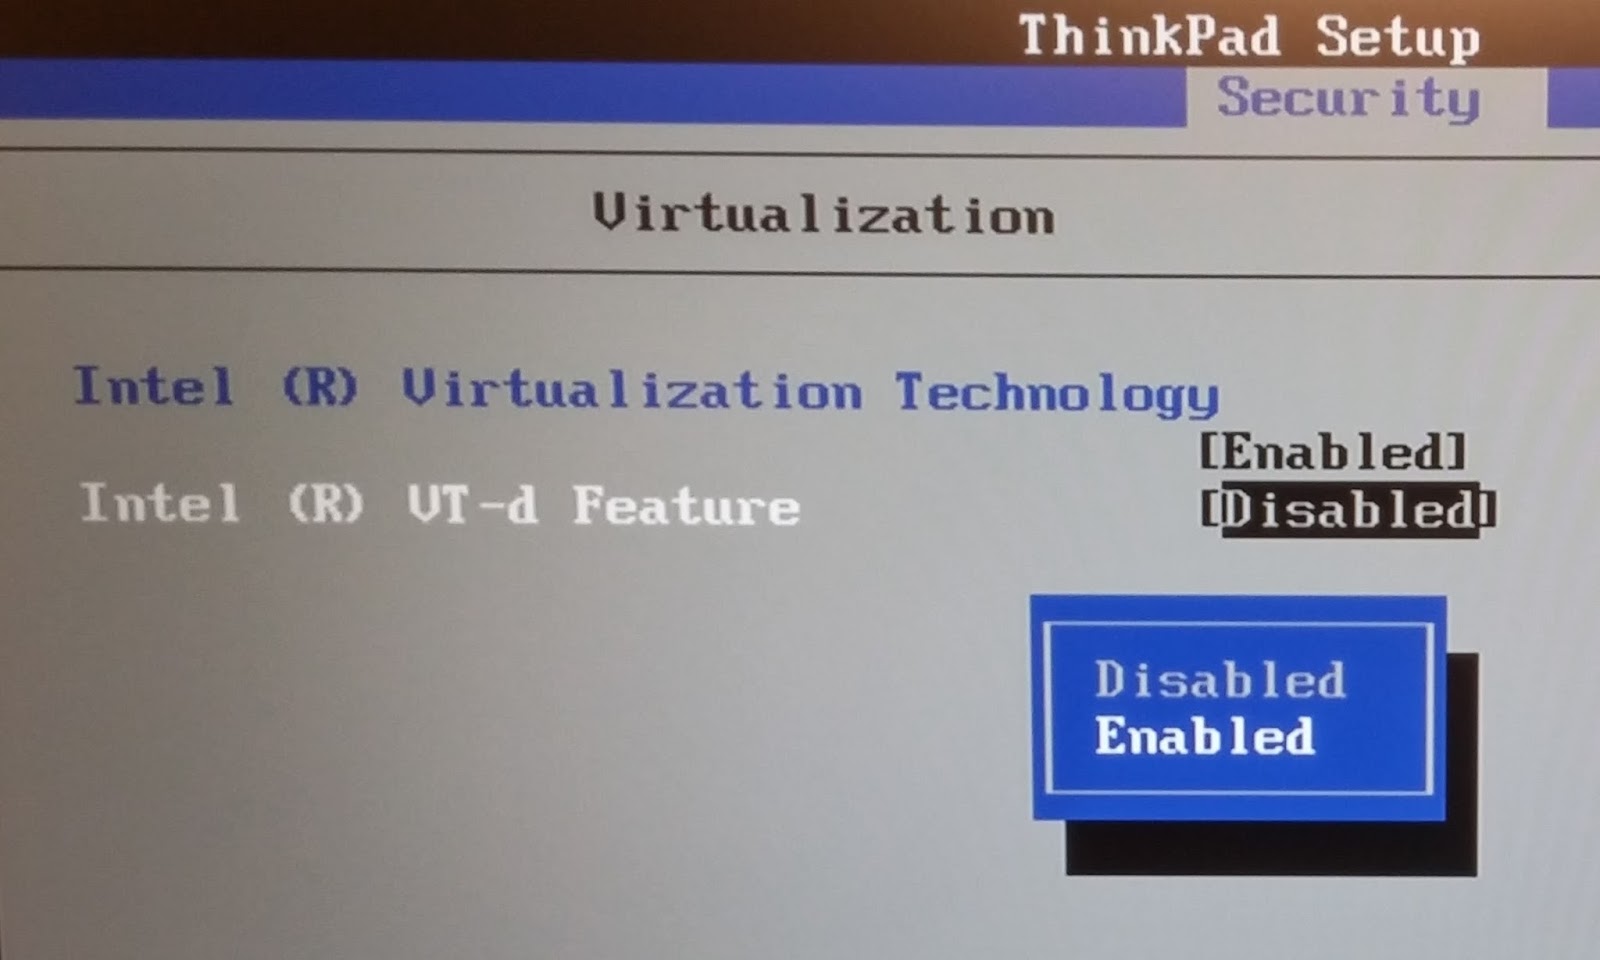
Most laptops nowadays already have this extension build into their chipset. To enable it, you need to go your UEFI/BIOS settings and search for the option that relates to virtualization which they may have different naming scheme in different settings tab, depending on your hardware. (example from the picture below)
Usually you can hit function keys (F10, F2, Delete, etc.) when rebooting. Consult with your laptop manufacturer or read their user guides on how to boot to BIOS/UEFI.
Install virtualization tools package by typing:
sudo dnf update # update your system first
sudo dnf groupinstall "Virtualization"
The virtual machine tools such as virt-manager, QEMU, and libvirt will be installed to your system, which is required to run Windows 10/11 VM with GPU passthrough.
Then, start libvirtd service:
sudo systemctl enable libvirtd
sudo systemctl start libvirtdIOMMU is part of Intel/AMD virtualization technology (VT-d/AMD-Vi) that can be used to passthrough PCI devices, in this case your dGPU. IOMMU groups PCI devices to ensure passthrough work properly. NVIDIA has two PCI devices: the VGA controller (or 3D controller for MUXless), and audio device. You can check by typing lspci | grep NVIDIA or lspci -s 01:00..
If you have AMD CPU, you don't need to do anything because it is already enabled by the kernel itself.
However, if you have Intel CPU, it isn't enable by default. Edit your kernel parameter through GRUB2 configuration, by typing:
sudo nano /etc/default/grub # you can use vim/emacs if you wantThen, in the line GRUB_CMDLINE_LINUX, insert/append:
intel_iommu=on # insert before the end of the quotation mark (")Then, apply your GRUB2 config:
# UEFI, for most modern laptops shipped with Windows 8+
sudo grub2-mkconfig -o /boot/efi/EFI/fedora/grub.cfg
# BIOS, if you have older laptop
sudo grub2-mkconfig -o /boot/grub2/grub.cfg
To confirm that you have enable IOMMU, copy and paste this to your terminal:
#!/bin/bash
shopt -s nullglob
for g in $(find /sys/kernel/iommu_groups/* -maxdepth 0 -type d | sort -V); do
    echo "IOMMU Group ${g##*/}:"
    for d in $g/devices/*; do
        echo -e "\t$(lspci -nns ${d##*/})"
    done;
done;
If you see something like this:
IOMMU Group 9:
	01:00.0 VGA compatible controller [0300]: NVIDIA Corporation TU117M [GeForce GTX 1650 Ti Mobile] [10de:1f95] (rev a1)
	01:00.1 Audio device [0403]: NVIDIA Corporation Device [10de:10fa] (rev a1)
These means that your IOMMU grouping is working. If you don't see anything like these, you may need to redo those steps above properly.
If, for some reason the IOMMU isn't properly group, for example some random PCI device grouped with NVIDIA out of nowhere, you should return the device immediately and blame the laptop manufacturer for shipping a broken motherboard. I doubt this will happen with your laptop, though there is the ACS patch that can be used but that mostly applies only for full-fledge PCs.
In this section, you need to set up and configure Windows 10/11 VM. Then, you need to install it and go through the OOBE (Windows Out of Box Experience) setup before doing the passthrough process. You can setup the VM entirely through command line by using QEMU, but I'll be using virt-manager for this tutorial, because it is easy for for first-time users.
*If you know about these steps already, you can skip ahead to the next section
Before launching virt-manager, you need to download Windows ISO file first. You can get here: Windows 10 ISO or Windows 11 ISO. Then, create a new folder in your home directory to store the file. Name the folder something like "VM". This will be useful to store the installation file and also creating virtual hard disk later.

(Optional) You also need to download virtio-win drivers from Fedora if you want to increase your VM image disk and virtual network card performance. You can visit here and select Latest virtio-win ISO and it will download the file. Don't forget to put it into your VM folder.
- Launch virt-manager in the application menu. You may need to enter your user password if prompted. Then, create a new VM.
- Then, choose Local install media.

- Select your Windows installation file. Click Browse.

- Click the + button at the bottom left, then choose the pool's name (eg: myVM), and then locate the folder you just made in the home directory.

- Then, choose the pool that you've created, select the Windows ISO file and click Choose Volume. Virt-manager will detect the OS of the iso file. (If you're using Windows 11, it might says "Microsoft Windows 10". This is normal as Windows 10 and 11 are not that different)

- The dialogue box might be appeared, something to do with search permission. Just check the box and click Yes.

- Configure the amount of memory and CPU core depending on how much available in your system. You can put at least 4GB of memory which is minimum system requirement for Windows 10/11, with 2 or 4 CPU core. Don't worry, you can configure these again later.

Create a virtual hard disk. By default, it will create the hard disk in the default directory /var/lib/libvirt/images, but you can create it inside your own directory you just made.
- Select the "Select or create a custom image" option, then click Manage

- Select your pool, then press + at the top center besides "Volume"
- Name your disk, and enter number of capacity that you want. Make sure the format qcow2 is selected. *You can use raw too, some people say it actually increase performance, but I personally haven't compared between these two formats

- Select the disk that you've just created. Then click Choose Volume. Make sure the path is right in the main window.

- Finally, name your virtual machine anything you like (no whitespaces). There are some configurations that you need to change later, so tick the checkbox Customize configuration before install. Then, click Finish.

- In the Overview tab, you can fill out basic details of your VM. Make sure to select Q35 as your chipset, and change the firmware to UEFI x86_64: /../OVMF_CODE.fd, or OVMF_CODE.secboot.fd if you install Windows 11 to enable secure boot. Click Apply if you're done.

- In the CPUs tab, you have to manually set the CPU. Tick the checkbox Manually set CPU topology, and edit your sockets, cores and threads. You shouldn't use all of the CPU cores and threads, and leave only one core for your host system. Click Apply if you're done.

If you don't how to specify those properties, you can type in your terminal: lscpu, and check under the VendorID. This is the result in my terminal:
Vendor ID:               AuthenticAMD
  Model name:            AMD Ryzen 5 4600H with Radeon Graphics
    CPU family:          23
    Model:               96
    Thread(s) per core:  2
    Core(s) per socket:  6
Socket(s): 1- In the Memory tab, make sure the amount of memory is enough for your VM and also watch your total system memory. Decrease or increase the amount if necessary. "Enable shared memory" is necessary if you plan to use Looking Glass, which you'll enable it later.

- In the SATA Disk 1 tab, this is your virtual disk that you've created. Check if the path points to the right direction. Make sure "Disk bus" is SATA. Also check in the SATA CDROM 1 section, make sure it is read-only under "Advanced options".

*If you want to increase read/write performance of the virtual disk, change the disk bus to virtio and Advanced options > Cache mode: none and Discard mode: unmap. (requires virtio-win drivers)
- In the NIC tab, you can leave device model as default, e1000e, or you can change it to virtio to increase network performance (requires virtio-win drivers). Make sure the link state is active (
you can disable this to trick Windows 11 to setup offline accountthis method does not work in the current Windows 11 Home Edition).

-
In Video QXL tab, make sure QXL is selected.
-
(Optional) Add virtio-win ISO file as a secondary CDROM. Click Add Hardware in the bottom left corner, select Storage in the left list. Select virtio-win ISO file (same as selecting your Windows ISO), then select Device Type to CDROM device and finally enable read-only under advanced options. Click Finish to add the hardware.

- (For Windows 11 installation) To emulate TPM, click Add Hardware, then select TPM. The type should be Emulated, and under advanced option, select
CRBTIS as the model and choose version 2.0 as stated from Windows 11 requirement. Click Finish to add the hardware.

- Make sure everything is configured properly. If you satisfied with the configuration, click Begin Installation at the top left corner. At this point, the screen should be popped up, and hit any key when asked. If there is an error while starting the VM, you should see the log and try to troubleshoot for yourself.

The windows installation is pretty much just like a normal installation in a bare metal hardware. You need to use the screen provided by virt-manager to interact with the installation process.
However, if the display is too small for you (for folks who uses GNOME fractional scaling or 4k display), you can use Remote Viewer in the Application menu. Enter spice://localhost:5900 then press Connect.

I chose Pro edition because it is easier to setup local account instead of Microsoft live account (Windows 11 only), and also enable Hyper-V virtualization so I can spin up VM inside this VM setup. You can also choose Home edition if you wish.
CAUTION: I DO NOT recommend enter any product key as you are likely to messed up your VM or you might find yourself constantly delete/create this VM and configure it to your liking. There is a way to copy your product key embedded from your laptop (ACPI table) and paste it into this VM, but I won't cover here in this tutorial. You can check here if you are interested.
(Optional) If you configured your virtual hard disk bus to use virtio, you may find that the disk is missing after you choose Custom: Install Windows only (advanced). In this case you need to do the following:
- Click Load driver at the bottom left. Then click Browse.

- Under This PC > select the folder under CD Drive named virtio-win > viostor > w10/w11 > amd64. Click OK. (w11 if you are using Windows 11, w10 if you are using Windows 10)

- The Red Hat VirtIO SCSI Controller should be selected. Click Next.

-
Now, the Drive 0 Unallocated Space should appear.
-
If you also select your NIC type to virtio, you should install driver from here too. Just like before, select Load driver > Browse > CD Drive named virtio-win > NetKVM > w10/w11 > amd64 and click OK. The Red Hat VirtIO Ethernet Adapter should appear, and select it to install.

-
Select Drive 0 Unallocated Space and click Next to begin installation.
-
After the installation, it will reboot by itself (sometimes even reboot several times). Now you have to go through the OOBE process to initialize Windows operating system. After everything is done initializing, you can shutdown the VM to begin GPU passthrough process.

PRO TIPS: If you use Windows 11 Pro Edition, select "Set up for work or school" option, then click Sign-in options > Domain join instead, which it will prompt you to set up local account instead.
If you want a super clean installation of Windows 11, you can refer to this guide here by Chris Titus, which I won't be cover here.
Supergfxctl is a very useful tool to bind vfio drivers to GPU on demand, which also doubles as graphics mode switching tools. However, when switching modes, it requires you to log out and log back in to your account which can be slightly inconvenient, but that just how it works. You can also switch mode during boot by edit kernel parameter via GRUB menu.
This tool is incompatible with other graphics mode switching such as Envycontrol. If you have one, refer here to completely uninstall it.
Since Fedora doesn't have this tool in their repository, you have to build it from source by yourself.
- Get development tools by copy & paste this line of code in your terminal:
sudo dnf upgrade && sudo dnf install curl git && sudo dnf groupinstall "Development Tools"- This tool also requires Rust as dependency:
curl --proto '=https' --tlsv1.2 -sSf https://sh.rustup.rs | sh
source ~/.cargo/env- Make a folder called
buildin your home directory, or any name that you want. This is just a good practice to reserve a folder to any tools that you want to build from source. Then, clone supergfxctl's repository.
mkdir ~/build && cd ~/build
git clone https://gitlab.com/asus-linux/supergfxctl.git- Proceed to install supergfxctl to your system:
cd supergfxctl
make && sudo make install- Then enable the service:
sudo systemctl enable supergfxd.service --nowIf you are using GNOME as your desktop environment, you can add GNOME extension as GUI to use this tool. You can check them out here.
- To install, get Extension Manager from Sofware app if you don't have one.

- After installing Extension Manager, click Browse at the top center, then search "supergfx". It will automatically show up the first result, which is Super Graphics Control by krst. Click Install.

The UI button "H" at your toolbar should appear at the top right. If you can't see it, make sure to install AppIndicator and KStatusNotifierItem Support as well.

Now, you need to configure the tool to add vfio mode. To do that, you need to edit /etc/supergfxd.conf.
- Edit the config as super user:
sudo nano /etc/supergfxd.conf # or vim if you like- Change
vfio_enablevalue totrue. If you want persistent vfio mode on reboot, you can also setvfio_savetotrue(recommended). The final config should look like this:
{
  "mode": "Hybrid",
  "vfio_enable": true,
  "vfio_save": true,
  "compute_save": false,
  "always_reboot": false,
  "no_logind": false,
  "logout_timeout_s": 180,
  "hotplug_type": "None"
}- Save the configuration. You may need to restart the service to make changes:
sudo systemctl restart supergfxd.service- You can check whether your laptop can switch to
vfiomode:
supergfxctl -sThe terminal should returned [Integrated, Hybrid, Vfio]. For X11, you also have two additional modes which are Dedicated and Compute.
- Make sure you switch to integrated mode before set to vfio mode, as per tool's instruction (or switch via GUI):
supergfxctl -m integrated- This switch mode from hybrid > integrated requires logout. After you login back to your account, make sure you don't have NVIDIA card running in your system by typing in your terminal:
nvidia-smi # if you have xorg-x11-drv-nvidia-cuda installed Should return this line (this error is normal if you don't have NVIDIA card running, which means it works):
NVIDIA-SMI has failed because it couldn't communicate with the NVIDIA driver. Make sure that the latest NVIDIA driver is installed and running.
-
Or, check your nvidia card via
lspci | grep NVIDIA, should return nothing. -
Now, switch to "vfio" mode, either via GUI or in terminal after you switched to integrated:
supergfxctl -m vfio- To confirm that the vfio drivers has binded your GPU, type
lspci -ks 01:00.. The result would be like this:
01:00.0 VGA compatible controller: NVIDIA Corporation TU117M [GeForce GTX 1650 Ti Mobile] (rev a1)
	Subsystem: Lenovo Device 3a44
	Kernel driver in use: vfio-pci
	Kernel modules: nouveau, nvidia_drm, nvidia
01:00.1 Audio device: NVIDIA Corporation Device 10fa (rev a1)
	Subsystem: Lenovo Device 3a44
	Kernel driver in use: vfio-pci
	Kernel modules: snd_hda_intel
If the line under Kernel driver in use is vfio-pci, then it is success!
- To use your laptop normally, you can switch back to
hybridafter you have done using your VM.
Now you can add your NVIDIA GPU PCI devices into your VM, then install NVIDIA drivers in Windows 10/11. Before doing this though, you need to edit your VM's XML config first.
-
Make sure to check your libvirt version because some version requires different code snippet which I'll show you later. As of writing this, my version is 8.1.0 which is a little bit older than the latest version. To check your version, open your terminal and type
virsh --version. -
You also need to get your dGPU's sub-vendor/device ID by typing
lspci -nks 01:00.0, find it under yourSubsystem:.
lspci -nks 01:00.0
# Results below
01:00.0 0300: 10de:1f95 (rev a1)
	Subsystem: 17aa:3a44 # your id here
	Kernel driver in use: vfio-pci
	Kernel modules: nouveau, nvidia_drm, nvidia
For example, my subsystem ID is 17aa:3a44. My vendor ID is 17aa, and my device ID is 3a44
- In the main window, at the top left, select Edit > Preferences. In the General tab, check the box Enable XML editing, and click Close.

- Select the your VM, click the bulb icon at the top left then at the bottom left corner, then click Add Hardware. In the left list, select PCI Host Device and select both PCI devices named NVIDIA Corporation (if you have another 2 PCI devices named NVIDIA Corporation, select those as well). After that, click Finish.

- To edit full XML, select Overview in the left list, and click XML tab at the top center. In the editing window, change the content of the
domaintag at the top line to this line of code (DO NOT HIT APPLY YET!):
<domain xmlns:qemu="http://libvirt.org/schemas/domain/qemu/1.0" type="kvm">

- (For libvirt version lower than 8.2.0) Scroll down until at the bottom, and between the line
</devices>and</domain>, copy and paste this block of codes and edit the value ID:
  <qemu:commandline>
    <qemu:arg value="-set"/>
    <qemu:arg value="device.hostdev0.x-pci-sub-vendor-id=0x17aa"/>
    <qemu:arg value="-set"/>
    <qemu:arg value="device.hostdev0.x-pci-sub-device-id=0x3a44"/>
  </qemu:commandline>
  <qemu:capabilities>
    <qemu:del capability="device.json"/>
  </qemu:capabilities>
Derived from my example above, the sub-vendor-id should be 0x17aa, and sub-device-id would be 0x3a44. Then, click Apply.
- (For libvirt version 8.2.0 and above) Scroll down until at the bottom, and between the line
</devices>and</domain>, copy and paste this block of codes and edit the value:
  <qemu:override>
    <qemu:device alias="hostdev0">
      <qemu:frontend>
        <qemu:property name="x-pci-sub-vendor-id" type="unsigned" value="6058"/>
        <qemu:property name="x-pci-sub-device-id" type="unsigned" value="14916"/>
      </qemu:frontend>
    </qemu:device>
  </qemu:override>
To get value from the two property, your subsystem ID should be converted from hexadecimal to decimal value. You can go to online converter for this. For example, my vendor id 17aa converts to 6058, and for my device ID 3a44 converts to 14916. Then, click Apply.

-
Connect to your external monitor and start your VM. If you don't have any external monitor, you can temporarily use the screen provided by virt-manager or Remote Viewer (after installing NVIDIA driver, you should install Looking Glass).
-
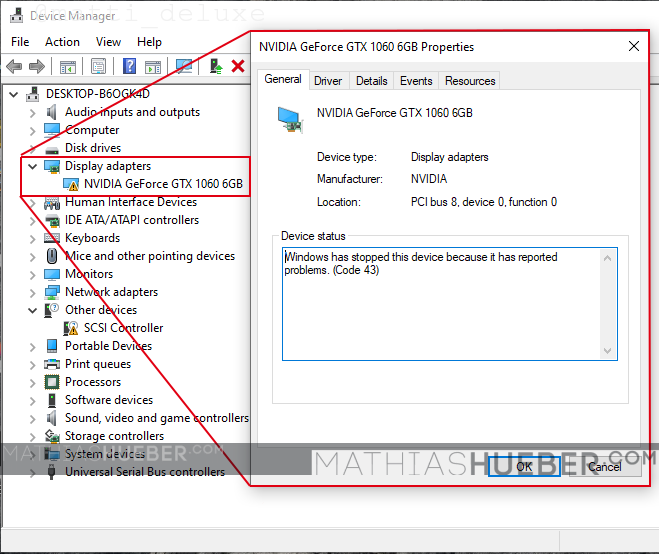
Check if you have another Display adapter in Device Manager with error sign on it. That means you have successfully passthrough your GPU. (tips: Right Click on Windows button > Device Manager)
-
After boot and login to your Windows 10/11, go to official NVIDIA website and download the NVIDIA driver for your appropriate dGPU (or even better, use NVCleanInstall for less bloat). And then install it just like you would normally do on your Windows laptop.
NOTE: Does your VM hangs when installing your NVIDIA driver? Or getting BSOD with error VIDEO_TDR_FAILURE? Refer here for a temporary solution.
- After installing NVIDIA driver, go to Device Manager and under Display adapter. There should not be an error if you hover to your dGPU card. If you have an error such as code 43, you can refer here on how to fix it.
If you made it here, congrats! You successfully managed to do GPU passthrough in your laptop. You can check out guide below on how to enhance your VM by giving you more performance and some tools that can help you to get a better experience. These steps are entirely optional and you can just start using your VM as it is.
Looking-Glass is a great tool to have if you don't have external monitor. Unlike using live capture/remote display client such as NVIDIA Stream, Moonlight or FreeRDP; Looking Glass have insanely low latency and no compression/artifacts because the video memory is shared from Linux to VM directly. More info here.
Even if you have an external monitor, you can take advantage of Looking-Glass as a video capture card that can be used to recorded your Windows VM screen via OBS on Linux by using OBS plugin.
Before doing this, you need HDMI dummy plug for it to work. Or else it will not be at a full resolution that you've set. There is an alternative solution later on, so just follow along this section first.
To install Looking-Glass, you need to build it from source as Fedora repository unfortunately doesn't provide the binary package.
- Firstly, download the dependencies for Looking Glass. In your terminal, copy & paste this line of code:
sudo dnf install cmake gcc gcc-c++ libglvnd-devel fontconfig-devel spice-protocol make nettle-devel \
            pkgconf-pkg-config binutils-devel libXi-devel libXinerama-devel libXcursor-devel \
            libXpresent-devel libxkbcommon-x11-devel wayland-devel wayland-protocols-devel \
            libXScrnSaver-devel libXrandr-devel dejavu-sans-mono-fonts dkms kernel-devel kernel-headers
If you want to include audio in Looking Glass, you can use one of the lines below depending on your audio system:
# If you are using Pipewire (default in Fedora 36+)
sudo dnf install pipewire-devel pulseaudio-libs-devel libsamplerate-devel
# IF you are using PulseAudio
sudo dnf install pulseaudio-libs-devel libsamplerate-devel
For up to date dependency packages, check here.
-
Download the package from the website here. Under Official/Stable version, choose Source.
-
Make a directory called
buildin your home directory if you don't have it, or any name that you want. This is just a good practice to reserve a folder to any tools that you want to build from source.
mkdir ~/build-
Extract the downloaded package to your build folder. (tips: install GNOME File Roller to easily manage package files)
-
In your terminal, go to
client/builddirectory from your extracted files.
# depending on your Looking Glass version
cd ~/build/looking-glass-B5.0.1/client- If you are using GNOME Wayland, install
libdecore-develand cmake with additional parameter. If you're not using GNOME Wayland, just cmake it.
# run this if you are GNOME wayland user
sudo dnf install libdecor-devel # do this first
cmake -DENABLE_LIBDECOR=ON ../

# run this if you are non-GNOME wayland user
cmake ../- Then finally run
maketo build the Looking Glass client. This will take some time to finish.
make- The
looking-glass-clientshould appeared if you look insideclient/builddirectory. You can typelsto make sure it's there. Copy the file to/usr/local/binto easily access the application with terminal:
sudo cp looking-glass-client /usr/local/bin- To confirm the client is working, type
looking-glass-client -h. It should show up useful commands that you can do. List of commands can be found here as well if you want to know more about them.
-
If you have virt-manager still opened, go to your Windows VM settings, and in the Memory tab, check the box Enabled shared memory.
-
In your XML config, scroll down until at the bottom. Between the line
<memballoon/>and</devices>, copy paste this block of codes:
<shmem name='looking-glass'>
  <model type='ivshmem-plain'/>
  <size unit='M'>32</size>
</shmem>
Depending on the size, 32MB is plenty enough to display 1080p. If you want to have 2K or 4K resolution, you might need to increase it. See this guide to determine your memory size.
- Speaking of
<memballoon/>line, you need to change the model type to none for performance improvement:
<memballoon model="none"/>- You need to give permission for the Looking Glass shared memory file found in
/dev/shm/looking-glass. Create a new file in your terminal:
sudo nano /etc/tmpfiles.d/10-looking-glass.conf # use vim if you likeAnd copy and paste this block of codes (change user to your username):
#Type Path               Mode UID  GID Age Argument

f /dev/shm/looking-glass 0660 user kvm -
- Try start your VM first before proceeding. If you have permission problem such as "Permission denied", see here to know how to fix it.
-
When booting, you need to go to BIOS settings before installing a driver by pressing F2 repeatedly.
-
Go to Device Manager > Secure Boot Configuration > uncheck Attempt Secure Boot. Press F10 to save configuration. Go back to the main menu by ESC, then press Continue.

-
Now, go to the Looking Glass website and download the Windows Host Binary from here. Make sure the version is the same as your client.
-
Extract the zip file that you have downloaded and start installing Looking Glass.
-
After this step, you might need a dummy HDMI plug for Looking Glass to work. There is an alternative solution if you don't have one, which you can refer here. You can return to this section here if you're done.
-
Everything should be set. Exit the BIOS settings and restart your VM now, and open your terminal and type:
# you can pass more arguments such as ''-F' for fullscreen, but this is just a test
looking-glass-client- Plug in your dummy HDMI (not relevant if you have installed virtual display driver), and it should appear. You can do fullscreen by pressing ScrollLk + F. You can see all keybindings here.
- ScrollLk is a "master" key for those bindings (also capture your mouse to VM directly). To change it, refer the number keys here and type
looking-glass-client -m <number>. e.g: Right Ctrl is 97, so you should typelooking-glass-client -m 97.
That should be it for setting up Looking Glass. You can check out other enhancements here if you want to futher improve your experience.
UPDATE 9/14/2023: There is a new guide on alternative way on share memory buffer using your GPU directly, which uses Direct DMA Upload (DMABUF) instead of IVSHMEM. The benefit of using DMABUF is that it will lessen the workload of your CPU, which could increase your VM performance by 10% while using Looking Glass, maybe.
Though it is more complicated to install it than using IVSHMEM. If you are interested, you can follow this guide here (yes, the above section also show you how to use NvFBC, but most laptop will not support it, hence I do not recommend it)
I do not recommend any network based remote desktop client as their quality is too low, and introduce artifacts compares to Looking Glass, more reason that I won't cover this step. I don't know any program that is good enough to do this, and you have to search on your own.
By default, the virt-manager/QEMU uses HD audio (ICH9) sound driver which can be piped through SPICE server (the screen you use in virt-manager or remote viewer), but the audio quality is terrible and produces high latency. If your monitor supports HDMI audio, you won't need additional steps to do this and just remove the sound driver from virt-manager.
However if you are using Looking Glass B6 version and above, you don't need to do anything, as it already provides the audio passthrough for you. If you have B5 version or below, it is recommended to update your Looking Glass to the latest version.
If, for some reason it does not work in your system, or you don't want to use Looking Glass because you preferred using external monitor (that has no audio output), there are a few options that you can do to achieve this besides Looking Glass or HDMI audio driver:
- Use USB sound card (best option, very low latency/overhead)
- Use "Scream" audio driver (a good alternative, easy to setup for Windows guest)
- Passthrough Pipewire directly (better than pulseaudio, easier to set up for other OS guest)
- Passthrough Pulseaudio directly (not a good solution, CPU heavy and poor bitrate)
This is the best option if you have a spare sound card. Note that this can be only used for Windows VM and cannot be shared through your host. Most laptops have their own on-board sound card (your built-in headphone jack) and use that for your host.
- Plug in your USB Sound Card, from your VM settings, click Add Hardware > USB Host Device, and choose your sound card. Once added, remove the sound driver (HDA ICH9).
This is a virtual audio driver in Windows VM which sends through your VM virtual network to passthrough the sound it produce. The latency is very low and produce cleanest sound you can get for virtual audio, which can be piped through your host audio system. The benefit is that the audio from guest can be shared with your host as well with no sound quality loss, unlike using USB Sound card.
- Install dependency packages for scream:
sudo dnf install pulseaudio-libs-devel- Make a directory called
buildin your home directory if you don't have it, or any name that you want. This is just a good practice to reserve a folder to any tools that you want to build from source.
mkdir ~/build- Download Scream git repo:
cd ~/build # go here first
git clone https://github.com/duncanthrax/scream.git- Go to receiver's build directory to start
cmakethem. This won't take long to build.
cd scream/Receivers/unix/
mkdir build && cd build
cmake ..
make- Copy scream to
/usr/local/bin:
sudo cp scream /usr/local/bin
scream -h # check if it's installed in your system-
Start your Windows VM if you haven't already. If you didn't install Looking Glass, you might need to disable secure boot first in your VM. (spam F2 while boot > Device Manager > Secure Boot Configuration > uncheck Attempt Secure Boot > F10 to save)
-
Download the zip file audio driver in the SCREAM's release page.
-
Extract the zip file, run Install_x86_64.bat. This will install scream audio driver. If an install prompt showed up, click Install.
-
The scream driver should be installed. You can check it via sound settings in the toolbar at bottom right.
-
In your linux host, open your terminal and just type:
scream -i virbr0virbr0 is the default name for virtual network for your VM. If in doubt, type ip link show to know your network interface name.
- If something shows up, it means that you have sucessfully passthrough audio from the VM. If you don't hear anything, this might be because of firewall blocking the connection. To remedy this, add a port to the firewall rule:
firewall-cmd --zone=libvirt --add-port=4010/udp
sudo firewall-cmd --runtime-to-permanent # make sure the rule is permanent
Start testing your audio by going to Youtube and play a video, or play a game to see if it works for you.
Using PipeWire & JACK as a passthrough is also good if you don't want so much hassle installing SCREAM. This is also useful if you plan to spin other VM like linux distro or Mac OS using this method. Pipewire and JACK are installed natively in Fedora, so you don't need to do anything besides setting up few things in your VM.
- Before anything, make sure QEMU is running as user. Edit qemu.conf:
sudo nano /etc/libvirt/qemu.conf- Find this line, uncomment and change it to your username then save the file. (tips for nano user: Press Ctrl + W and search "user =")
...

user = "bob"

...
- Go to VM settings, open your XML window. Scroll down until you find
<audio id="1" type="spice"/>line. Replace it with these codes (change win11 to win10 or anything, doesn't matter):
  <audio id="1" type="jack">
    <input clientName="vm-win11" connectPorts="Family 17h/19h HD Audio Controller Analog Stereo"/>
    <output clientName="vm-win11" connectPorts="Family 17h/19h HD Audio Controller Analog Stereo"/>
</audio>- The
Family 17h/19h HD Audio Controller Analog Stereois my audio port. To know what port name in your system, install either Carla or Audacity. For me, Audacity is the easiest to identify my audio ports. At the leftmost toolbar, switch from ALSA to JACK Audio Connection Kit. Observe the the name of the input and output:

- Then, under
</devices>, add these:
  <qemu:commandline>
    <qemu:env name="PIPEWIRE_RUNTIME_DIR" value="/run/user/1000"/>
    <qemu:env name="PIPEWIRE_LATENCY" value="512/48000"/>
</qemu:commandline>-
The
/run/user/1000(1000) is your user ID. If you are not sure what is your user ID, you can check it by typingidin your terminal. -
The latency is set at
512/48000(512 is sample size, 48000 is sample rate) which is enough for most laptop. You probably need to change it depending on your audio card. If you have cracking audio, increase the sample size or change the sample rate according to your pipewire system. -
If you don't hear any sound, SELinux might block it from connecting through pipewire. Refer here for the fix.
I will not cover how to passthrough audio via Pulseaudio because the sound quality is quite poor with constant audio cracking. If you are still insist on doing this for whatever reason, I recommend reading this guide from ArchWiki. (the explanation is quite technical, so proceed at your own risk)
CPU pinning improves performance massively because it gives number of cores in your host CPU to run exclusively on VM. You may not passed every cores as you need one to reserve for your host, or else everything will not be responding and smoothly.
Intel and AMD CPUs have different topology if they support hyper-threading for Intel, or SMT for AMD (1 core each gives 2 threads). Below are examples of 6 cores with 12 threads in total.
- In your terminal, type
lscpu -e. The output should be like this (my AMD Ryzen 5 4600H):
CPU NODE SOCKET CORE L1d:L1i:L2:L3 ONLINE    MAXMHZ    MINMHZ       MHZ
  0    0      0    0 0:0:0:0          yes 3000.0000 1400.0000 1400.0000
  1    0      0    0 0:0:0:0          yes 3000.0000 1400.0000 1397.3250
  2    0      0    1 1:1:1:0          yes 3000.0000 1400.0000 1396.9139
  3    0      0    1 1:1:1:0          yes 3000.0000 1400.0000 1400.0000
  4    0      0    2 2:2:2:0          yes 3000.0000 1400.0000 1397.3600
  5    0      0    2 2:2:2:0          yes 3000.0000 1400.0000 1396.5480
  6    0      0    3 4:4:4:1          yes 3000.0000 1400.0000 1397.3590
  7    0      0    3 4:4:4:1          yes 3000.0000 1400.0000 1397.2980
  8    0      0    4 5:5:5:1          yes 3000.0000 1400.0000 1394.4351
  9    0      0    4 5:5:5:1          yes 3000.0000 1400.0000 3000.0000
 10    0      0    5 6:6:6:1          yes 3000.0000 1400.0000 1397.4510
11 0 0 5 6:6:6:1 yes 3000.0000 1400.0000 1397.0450- If you're using Intel, it might be like this (Intel Core i7-8700k):
CPU NODE SOCKET CORE L1d:L1i:L2:L3 ONLINE MAXMHZ    MINMHZ
0   0    0      0    0:0:0:0       yes    4600.0000 800.0000
1   0    0      1    1:1:1:0       yes    4600.0000 800.0000
2   0    0      2    2:2:2:0       yes    4600.0000 800.0000
3   0    0      3    3:3:3:0       yes    4600.0000 800.0000
4   0    0      4    4:4:4:0       yes    4600.0000 800.0000
5   0    0      5    5:5:5:0       yes    4600.0000 800.0000
6   0    0      0    0:0:0:0       yes    4600.0000 800.0000
7   0    0      1    1:1:1:0       yes    4600.0000 800.0000
8   0    0      2    2:2:2:0       yes    4600.0000 800.0000
9   0    0      3    3:3:3:0       yes    4600.0000 800.0000
10  0    0      4    4:4:4:0       yes    4600.0000 800.0000
11  0    0      5    5:5:5:0       yes    4600.0000 800.0000
*Note: Intel 12th Gen processors and up have different topography than the generations before it, with the presence of p-cores and e-cores. Someone made a post here on how they successfully pinned their CPU.
- Note that the link between "ID" of
CPUandCORE. If I use the example above, AMD/Intel links their core with threads would be like this:
| AMD | Intel | (n)th Core |
|---|---|---|
0,1 |
0,6 |
1 |
2,3 |
1,7 |
2 |
4,5 |
2,8 |
3 |
6,7 |
3,9 |
4 |
8,9 |
4,10 |
5 |
10,11 |
5,11 |
6 |
-
If I want to isolate them, I would use 2nd-6th cores for VM, and 1st core reserves for host. Remember these setups, as you need to configure them later on:
- To isolate AMD CPU would be: 2-11, leave 0,1
- To isolate Intel CPU would be: 1-5, 7-11, leave 0,6
- To config AMD CPU in XML:
2,3,4,5,6,7,8,9,10,11 - To config Intel CPU in XML:
1,7,2,8,3,9,4,10,5,11
-
If you want a visualization of how your CPU topology looks like, run
lstopo:
sudo dnf install hwloc-gui # install this first
lstopo
Mine looks like this:

- If you have VM settings windows open, under CPUs tab, make sure that you define your CPU topology according to how many cores you wanted to pass through.
- Go to XML editing window, find the
<vcpu/>line. Replace it with one of snippets below: - For AMD Ryzen 5 4600H, passing the last 5 cores to VM:
  <vcpu placement='static'>10</vcpu>
  <iothreads>1</iothreads>
  <cputune>
    <vcpupin vcpu='0' cpuset='2'/>
    <vcpupin vcpu='1' cpuset='3'/>
    <vcpupin vcpu='2' cpuset='4'/>
    <vcpupin vcpu='3' cpuset='5'/>
    <vcpupin vcpu='4' cpuset='6'/>
    <vcpupin vcpu='5' cpuset='7'/>
    <vcpupin vcpu='6' cpuset='8'/>
    <vcpupin vcpu='7' cpuset='9'/>
    <vcpupin vcpu='8' cpuset='10'/>
    <vcpupin vcpu='9' cpuset='11'/>
    <emulatorpin cpuset='0-1'/>
    <iothreadpin iothread='1' cpuset='0-1'/>
</cputune>- For Intel Core i7-8700k, passing the last 5 cores to VM:
  <vcpu placement='static'>10</vcpu>
  <iothreads>1</iothreads>
  <cputune>
    <vcpupin vcpu='0' cpuset='1'/>
    <vcpupin vcpu='1' cpuset='7'/>
    <vcpupin vcpu='2' cpuset='2'/>
    <vcpupin vcpu='3' cpuset='8'/>
    <vcpupin vcpu='4' cpuset='3'/>
    <vcpupin vcpu='5' cpuset='9'/>
    <vcpupin vcpu='6' cpuset='4'/>
    <vcpupin vcpu='7' cpuset='10'/>
    <vcpupin vcpu='8' cpuset='5'/>
    <vcpupin vcpu='9' cpuset='11'/>
    <emulatorpin cpuset='0,6'/>
    <iothreadpin iothread='1' cpuset='0,6'/>
</cputune>- Configure only
cpusetdepending on how much core you wanted to pass through this VM.vcpunumber increases incrementally if you pass more cores. Arrangement is important! <iothreads/>and<iothreadpin/>is useful when your storage is using virtio driver. Do not use this when you don't configured it!- Now try starting your VM. If it doesn't complain anything, that means it is working! You can inspect your CPU process by using
htopif you have it installed, or use built-in system monitor if you're using GNOME/KDE desktop environment.
Isolating CPU cores is another major performance improvement to go along with CPU pinning. This is done to make sure that the cores that you want to use for VM will not be used in your host so there are no hiccups in your system.
This can be done either by configure your kernel parameter or via basic libvirt hook, which is an automation tool that can be used when starting/stopping your VM. I recommend choosing latter if you are planning to use your host extensively. If you want total isolation, you can refer here instead.
- Open your terminal, and create a libvirt hooks directory:
sudo mkdir -p /etc/libvirt/hooks- Create a file called qemu:
sudo nano /etc/libvirt/hooks/qemu # or vim if you like- Copy and paste this lines of codes to the file (for AMD use 0-1, Intel use 0,6 depending on how much core you have pass through):
#!/bin/sh

command=$2

# When VM starts, the core from 0 to 1 will be used for host (0,6 if Intel)
if [ "$command" = "started" ]; then
    systemctl set-property --runtime -- system.slice AllowedCPUs=0-1
    systemctl set-property --runtime -- user.slice AllowedCPUs=0-1
    systemctl set-property --runtime -- init.scope AllowedCPUs=0-1
# If VM stops, the host will reclaim all cores
elif [ "$command" = "release" ]; then
    systemctl set-property --runtime -- system.slice AllowedCPUs=0-11
    systemctl set-property --runtime -- user.slice AllowedCPUs=0-11
    systemctl set-property --runtime -- init.scope AllowedCPUs=0-11
fi- Make it executable and restart libvirtd service to apply:
sudo chmod +x /etc/libvirt/hooks/qemu
sudo systemctl restart libvirtd- Try starting your VM and see your
htopor system monitor. If the script works, you will see that some of the cores are in 0% utilization at Windows startup. That means it's working.
Some optimizations that may or may not improve your VM performance.
Your CPU governor will use their settings by default, which can lower the performance if you wanted to run your VM.
I recommend using auto-cpufreq by @AdnanHodzic to change your CPU mode on the fly. Refer to the instruction on how to install them and create a config for the tool. I recommend set it to performance mode when charged and use it while spinning up your VM, and powersave mode if unplugged to save more battery for your laptop.
This is for AMD CPUs only if you want hyper threading performance uplift. Inside your XML, find the tag <cpu>. Add a TOPOEXT feature like below:
<cpu mode='host-passthrough' check='none'>
  <topology sockets='1' cores='5' threads='2'/>
  <feature policy='require' name='topoext'/>
</cpu>Sometimes dynamic isolation via libvirt hook does give a bit lower performance than using static isolation via kernel parameter. I recommend use your system GRUB menu (when you boot up your laptop) to add them instead of permanently isolate them which host can only use one core all the time.
To edit your kernel parameter, reboot your laptop and press Right-Shift (or Esc if it didn't work, not sure what is the correct key) repeatedly to force GRUB menu to show up. Select latest linux kernel in the option, then press E.
Under the line linux /boot/..., append this line of code (the number below refer to cores that you wanted to use for virtualization, not host):
... isolcpus=2-11 nohz_full=2-11
This will isolate your cores completely from the start, so that your VM can claim those cores for maximum performance. This changes is only temporary as your next boot will reset those changes.
If you want to make it permanent, refer the GRUB instruction here.
I've seen a lot of guides telling you to set up static/dynamic hugepage, however I also seen some people claim that it doesn't make much difference in terms of performance. If you think it will increase your VM performance or wanted to try it out first, check this guide here by asus-linux team.
This guide doesn't cover everything though. You might be interested here, which has more things to cover, written by the developer of asus-linux and supergfxctl.
You can also look here on how to squeeze your gaming performance in your VM, a great article made by Mathias Hueber.
- If there is no output, you might need to extract your vBIOS from your laptop to be used in your VM. (likely will happen if your laptop is configured MUXless)
- You might want to follow this guide. You need to find your system's BIOS update from your manufacturer's website (some may not provide the vbios file). If you dual boot Windows 10/11, you can follow this guide here (look at on board GPU section).
Go back to Before we proceed.
You may have issues when booting up your Windows VM if your laptop starts in hybrid mode and then switch to integrated, then vfio mode. The problems such as the remote display not appearing at all (black screen), VM constantly freezes and restarts, or Windows BSOD return error VIDEO_TDR_FAILURE (which is a common occurrence for my laptop unfortunately). My guess is that the dGPU is not properly shut down or its kernel driver bugging out when switching to integrated mode.
If these problems persist, please restart your laptop after switching to integrated mode, then your Windows VM will be fine and NVIDIA driver should be installed. You can also switch modes from the GRUB menu which you can refer here on how to do it.
The problem doesn't appear when you boot your laptop with integrated or vfio mode already, which then you are safe to boot your VM (which is why vfio_save is recommended).
When you are done using your VM and then switch to hybrid mode, your Linux host can use your dGPU no problem (though the problem might appear again if you switch back to integrated).
If you can identify the problem (and also have a solution), please share in the comment section below. (try this maybe ¯\(ツ)/¯)
Go back to Test your VM and install NVIDIA driver.
Note: Only applied for supergfxctl version 4.0.5 and below, or you're using Xorg as your display server. For version 5.0.0 and above, ignore this section.
If you're using terminal to switch mode, you might noticed this message:
Rebootless mode requires nvidia-drm.modeset=0 to be set on the kernel cmdline
- This error was shown because
nvidia-drm.modeset=1is set by default in your kernel parameter. - This is entirely optional if you want to change
nvidia-drm.modesetto0in your kernel parameter. That way, you won't need to reboot your system, either by logout then login, or instantly. - However, if you're using GNOME or KDE with Wayland, you are forced to use Xorg instead of defaulting to Wayland if you're passing that option (unless you are using it).
- If you don't care about this, you can refer to this section on how to edit kernel parameter via GRUB. (find
nvidia-drm.modeset, change from1to0) - If you still wanted to use rebootless mode but still using Wayland, see the next section. (I recommend doing GPU passthrough completely before doing this)
Go back to Switch to vfio mode
Note: Only applied for supergfxctl version 4.0.5 and below. For version 5.0.0 and above, ignore this section. Also this section will cause some problems with your system. Do not follow this section if you don't know what you're doing!
(Works only for GNOME Display Manager) There is a reddit post talking about how to enable dGPU to enter D3cold state in hybrid mode to reduce power draw. The method seems to work with running Wayland while using nvidia-drm.modeset=0.
It is stated that this method supports D3cold if you're using Geforce 16 Series and above, however this doesn't matter as you can easily enter integrated mode from supergfxctl in case if your dGPU doesn't support it.
*NOTE: This method will make your external monitor to not display anything in hybrid mode (except for MUXless laptops). The display will still works if you're using "GPU passthrough"-ed VM connected to external display.
- If you haven't done it yet, change
nvidia-drm.modesetfrom1to0using GRUB configuration. Refer to this section on how to do it. - (For Geforce 16 Series+) Enable power dynamic management for power save if you plan to use it on
hybridmode. Copy & paste this code in the terminal:
echo 'options nvidia "NVreg_DynamicPowerManagement=0x02"' | sudo tee /etc/modprobe.d/nvidia.conf- In
/usr/lib/udev/rules.d/61-gdm.rules, put#(comment out) at the left ofATTR{parameters/modeset}!="Y", GOTO="gdm_disable_wayland"in line 20. Usenanoorvimfor the editor. - Move
10_nvidia.jsonsomewhere else in case if you need it again:
sudo mv /usr/share/glvnd/egl_vendor.d/10_nvidia.json ~/build # move to "build" or "VM" folder if you like- Reboot your machine. Check if you are using Wayland:
echo $XDG_SESSION_TYPE # should return wayland- Check if you can switch to
integratedmode fromhybrid. It should say you need to log out, instead of reboot. Dolspci | grep NVIDIA, should return nothing. - Check if you can switch to
vfio, which be instant. Dolspci -ks 01:00., both should returnKernel driver in use: vfio-pci
To edit your kernel parameter, reboot your laptop and press Right-Shift (or Esc if it didn't work) repeatedly to force GRUB menu to show up. Select latest linux kernel in the option, then press E.
Under the line linux /boot/..., insert/append this (use End button to move your typing cursor at the rightmost position in that line):
... supergfxd.mode=vfio
Of course, you can change vfio to integrated or dedicated if you wish.
Go back to Post VM setup with GPU passthrough
If you follow my instructions on using Envycontrol to switch VFIO before, you may need to do as follow to remove envycontrol entirely in terminal:
- Switch back to hybrid mode:
envycontrol -s hybridthensudo reboot. - After reboot, make sure to type
envycontrol -q. It should returnhybrid. - Delete these files via terminal:
sudo rm /etc/modprobe.d/nvidia.conf /lib/udev/rules.d/50-remove-nvidia.rules /lib/udev/rules.d/80-nvidia-pm.rules /usr/local/bin/envycontrol- Do
sudo reboot. Now envycontrol removed completely from your system. Make sure the commandenvycontrolreturnscommand not found.... - If you have completed all the steps for my guide before I changed my instruction, you need to install supergfxctl. Click the second hyperlink below to get started. Or if you haven't, ignore this message.
Go back to Before we proceed or Using supergfxctl to bind vfio to GPU
If you have problem installing NVIDIA and you got the error code 43, you might need to add fake battery to your VM to solve the error.
- Copy this base64 code and decode it to file here:
U1NEVKEAAAAB9EJPQ0hTAEJYUENTU0RUAQAAAElOVEwYEBkgoA8AFVwuX1NCX1BDSTAGABBMBi5f
U0JfUENJMFuCTwVCQVQwCF9ISUQMQdAMCghfVUlEABQJX1NUQQCkCh8UK19CSUYApBIjDQELcBcL
cBcBC9A5C1gCCywBCjwKPA0ADQANTElPTgANABQSX0JTVACkEgoEAAALcBcL0Dk=
-
Rename it to
SSDT1.datand put it in your VM folder (make sure the folder is the same as your ISO file). -
If you have your VM details window still open, head over to XML edit page. Make sure the first line,
<domain>has changed into:
<domain xmlns:qemu="http://libvirt.org/schemas/domain/qemu/1.0" type="kvm">- Then, scroll down and between the line
</devices>and</domain>, insert this code snippet and click Apply:
  <qemu:commandline>
    <qemu:arg value="-acpitable"/>
    <qemu:arg value="file=/home/bob/VM/SSDT1.dat"/>
</qemu:commandline>- Try start your VM. If you have problem starting your VM because of permission error, you can refer below to fix the problem.
Go back to Test your VM and install NVIDIA driver
- This is due to SELinux uses "Enforce" mode by default in Fedora. You can set it to permissive, but you should give permission only for QEMU. In your terminal, enter these commands:
sudo -s # login as root
cd ~ # go to /root folder because the command below will create a file
     # that only root can access. you don't want the file in your user directory
ausearch -c 'qemu-system-x86' --raw | audit2allow -M my-qemusystemx86
semodule -X 300 -i my-qemusystemx86.pp
setsebool -P domain_can_mmap_files 1
If, for some reason one of these lines gave you some errors, then my steps is probably outdated. To mitigate this problem, I have an alternative solution.
- In your terminal, open the file called
/etc/libvirt/qemu.conf:
sudo nano /etc/libvirt/qemu.conf #use vim if you like- Search for the line
#security_default_confined = 1(tips: in nano editor, use Ctrl+W then searchsecurity_defaultthen press enter. It should come up instantly), then uncomment it then change1to0.
security_default_confined = 0
Because of this change, when you start virt-manager, it will no longer asking you for a password. It's less secure, but at least it doesn't complain any permission errors. It should be fine when you're the only person who operates your Windows VM.
Go back to Installing Looking Glass in Windows VM or PipeWire & JACK
- If you happened to have older graphics card, NVIDIA might forced you to use older version of driver which doesn't have error 43 fix provided by them. In this case, check out this blogpost to solve the problem.
If you don't have one, you might be interested in this solution by u/ImaginationLatter523. Just in case if the post got deleted or changed for some reason, I'll leave them here:
- Start your VM if you haven't, and download custom IddSampleDriver here, and extract it to C:\ (your root C: drive).
- Open your command line, either cmd or PowerShell if you like. Run these commands:
cd C:\IddSampleDriver
CertMgr.exe /add IddSampleDriver.cer /s /r localMachine root- Edit
C:\IddSampleDriver\option.txtfirst before installing. You should edit the resolution and refresh rate according to your laptop's screen. - After that, go to Device Manager (tips: right click Windows icon), then click on any device. At the top panel, select Action > Add legacy hardware.
- Then click Next > choose the link Install hardware that I manually select from a list (Advanced). Click Next while Show all devices is selected, select Have disk > Browse.
- Find
C:\IddSampleDriver\IddSampleDriver.inf, select it and click Ok. Then continue clicking Next. Wait for it to install, and then click Next again to exit the setup.
Go back to Installing Looking Glass in Windows VM
Most anti-cheat games will not work with VM. However, there are several solutions that you can use to get around them, albeit will not work on intrusive or ring 0 anti-cheats (eg: Valorant's Vanguard).
There is a great documentation on how to (atleast) bypass EAC anti-cheat provided by VRChat developers. See here for the instruction.
For other anti-cheat, you may need additional steps to hide your virtual machine. For instance, you need to enable "core isolation" under Settings -> Update & Security -> Windows Security -> Device Security. However, this will impact performance on Intel CPUs, and massive performance drop for AMD CPUs (your OS might start lagging terribly, therefore not recommended).
You can do further by passing through a real hard drive and install Windows there, and also use external monitor all the time, avoid using Looking Glass and remove SPICE server or any remote client software.
For advanced users who are familiar with QEMU/KVM, you can further spoof your VM by passing more smbios info, patch QEMU source code to change hardware names and also patch RDTSC timing. This is by far the hardest if you don't know how to compile a linux kernel. (Note that you have a high risk of get yourself banned from video games that you want to play)
Full stealth KVM resource can be found here. Only do this if you know what you're doing. Same thing for RDTSC timing patch, which you can follow this instruction on how to do it.
- It should work, but there are some steps need to be added or not needed depending on certain distros. Do it at your own risk, and you should do some research & troubleshoot by yourself.
- For example, choosing
OVMF_code.secboot.fdin virt-manager might not be present in other distro as this is exclusively for Red Hat distros repository (which Fedora also includes as well). Some distro don't even have OVMF in their repository. - Other example, such as SELinux fix might not be for other distro, but they have their own security tool such as AppArmor which requires different ways to fix permission problems.
- I might add a guide for Arch Linux in the future, if I have more time of course.I clearly don't have much time lmao. You are welcome to make your own guide though!
- It should work well, but I personally did not test them yet. Any fedora spins should work, if not the same as normal Workstation edition.
- Fedora Silverblue/Kinoite might need a slightly different steps, as it is an immutable system. It might be (or maybe?) difficult to do depending on certain steps. They have RPM-ostree and toolbox for package installation, so that adds more difficulty to follow this guide. There is one person who actually successfully passthrough their GPU with their custom Fedora Silverblue, which you can read it here.
- Nobara Project should work as well, in fact it some steps aren't required. For instance, it has
SELinux sets to "Permissive"(now it uses AppArmor for some reason), applied ACS patch, and supergfxctl installed by default.
- PCI passthrough via OVMF in ArchWiki
- VFIO dGPU Passthrough Guide by asus-linux team
- Guide for GPU Passthrough on laptop with Optimus Manager by mysteryx93
- Optimus laptop dGPU passthrough by Misairu-G
- MUXless configuration card guide by jscinoz
- Getting started with virtualization by Fedora Project
- Supergfxctl, a graphics mode switching tool by asus-linux
- 12th gen tested by Elegant_Cantaloupe_8
- GPU passthrough success report on Acer Nitro 5 by DrZetein
- Libvirt version differences comment by ghost82
- Looking-Glass website
- Using VRChat in a Virtual Machine by VRChat developers
- Spoof and make your VM Undetectable - No more bullsh*t bans by AlexanderTheAutist
- NVIDIA GPU Runtime D3 with Wayland (on supported hardware) by whyyfu


@No-Biggie805 I'm glad the problem is solved for you. Sorry for the late reply though, I was away from a long time. I wonder how did you solve the problem? Mind sharing the solution so people reading here don't have the same road block as yours?
For people who already read here before, I already updated some sections such as Looking Glass and supergfxctl (and the problem using it) so it is clear and more up to date. (it's been almost a year lmao sorry for that)