The accompanying video for this tutorial is published on https://learn.alexchiri.com
Contents:
- Recommendations
- Install Docker CE for Linux
- Configure Docker to start automatically in our WSL distribution when we log in to Windows
- Install go
- Install kind
- Install kubectl, the CLI we will use to talk with our cluster
- Install kubectx and kubens
- Let's create a new kind cluster
In order to get the most out of this video I recommend to:
- have at least a high-level understanding of what Kubernetes is - I have a short video that talks about that
- have installed WSL2 and a WSL distribution of your choice - this is if you want to try out the things I am doing. I describe how to do that in this video here, but please note that we will not need Docker for Windows with WSL2 backend, it is still useful to have around, but for playing with kind I (now) recommend installing Docker for Linux inside the distribution
Using the official instructions from docker website:
sudo apt-get update && sudo apt-get -y install jq \
  jid \
  apt-transport-https \
  ca-certificates \
  gnupg-agent \
  software-properties-common \
  curl

sudo curl -fsSL https://download.docker.com/linux/ubuntu/gpg | sudo apt-key add -

sudo apt-key fingerprint 0EBFCD88

sudo add-apt-repository \
  "deb [arch=amd64] https://download.docker.com/linux/ubuntu \
  $(lsb_release -cs) \
  stable"

sudo apt-get update && sudo apt-get install -y docker-ce docker-ce-cli containerd.io

# add your local user in the docker group, so no sudo is needed for running docker
sudo usermod -aG docker $(whoami)

# reload group settings
newgrp dockerIn order to have Docker start whenever we start our WSL distro, we need to do a few more things (these instructions are based on the steps from this blog post, but with some adaptations to suit our needs)
Let's create a new script called start_docker.sh in /usr/local/sbin with the following content:
#!/usr/bin/env bash

[ ! -f /sys/fs/cgroup/systemd ] && sudo mkdir /sys/fs/cgroup/systemd && sudo mount -t cgroup -o none,name=systemd cgroup /sys/fs/cgroup/systemd
sudo service docker start
This will create and mount some special folder and start docker.
Next, since we need to run this script without asking for a password, let's give our user that permission. Run sudo visudo and add the following line at the bottom (make sure to replace alex with whatever your current user is):
alex ALL=(ALL:ALL) NOPASSWD: /bin/sh /usr/local/sbin/start_docker.sh
Finally, make the script executable:
sudo chmod +x /usr/local/sbin/start_docker.shNow we need to tell Windows to execute this process when it boots. We can do that using the Task Scheduler tool in Windows 10.
What we want to do here is to create a task that runs every time we log in and that executes the start_docker.sh script from our WSL distribution using the following command: wsl -d basic-learn sudo /bin/sh /usr/local/sbin/start_docker.sh. basic-learn is the name of my distribution based on Ubuntu 18, you need to figure out your own using wsl -l.
So create a new task in the Task Scheduler Library using the Create task... option.
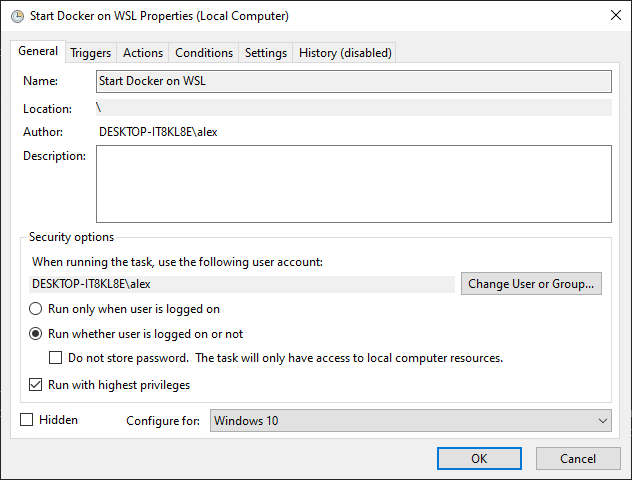
Define the general properties:
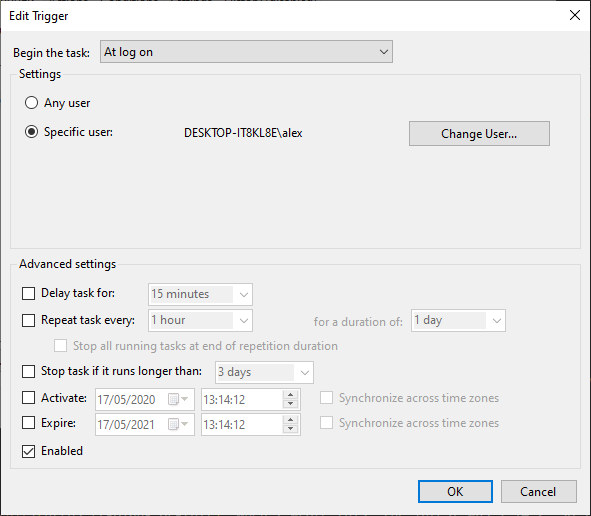
Add a new Trigger at log on:
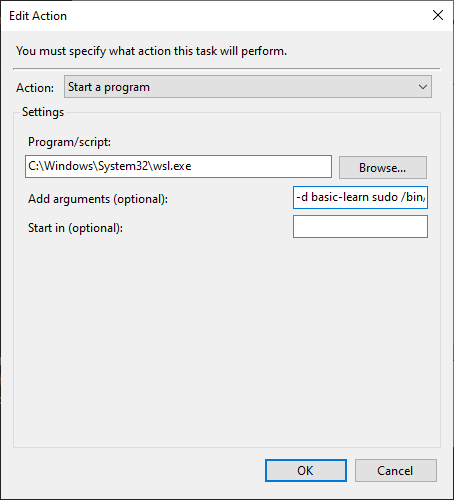
And a new Action, that should run C:\Windows\System32\wsl.exe with parameters -d basic-learn sudo /bin/sh /usr/local/sbin/start_docker.sh (remember to replace basic-learn with your own distribution name):
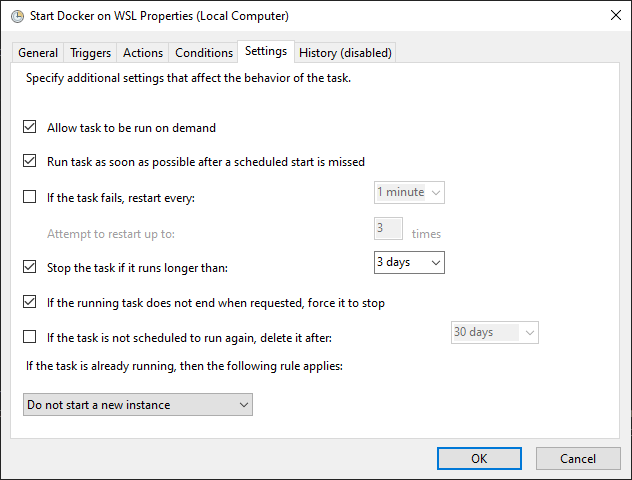
Finally, here are the Conditions and Settings tabs as I configured them:

Save the task by clicking Ok and entering your user password.
First we go to the go official download page to see what is the latest version: https://golang.org/dl/. When I wrote this, the latest was 1.14.2, so I will use that in the commands further. I will download and unpack go in /usr/local:
cd /tmp

curl -LO https://dl.google.com/go/go1.14.2.linux-amd64.tar.gz

sudo tar -xzvf ./go1.14.2.linux-amd64.tar.gz -C /usr/local
In order to be able to use easily use go, we need to add its binary location into our PATH. So make sure to edit your shell configuration and add /usr/local/go/bin to your PATH variable and reload the config in the current session.
Check the official page: https://kind.sigs.k8s.io/
GO111MODULE="on" go get sigs.k8s.io/kind\@v0.8.0Update PATH to include the kind binary in the PATH: ~/go/bin
There is a lot of information and instructions on the official kubectl page: https://kubernetes.io/docs/tasks/tools/install-kubectl/.
curl -LO https://storage.googleapis.com/kubernetes-release/release/`curl -s https://storage.googleapis.com/kubernetes-release/release/stable.txt`/bin/linux/amd64/kubectl
chmod +x ./kubectl
sudo mv ./kubectl /usr/local/bin/kubectl
For autocomplete and alias in zsh (check official page for instructions for other shells) add the following into your .zshrc file:
source <(kubectl completion zsh)
alias k=kubectl
complete -F __start_kubectl kkubectx allows you to easily change between clusters (or contexts), pretty
useful when working with multiple Kubernetes clusters.
kubens allows you to re-define the current default Kubernetes namespace so
you don't have to specify always what namespace your commands should be
executed towards.
Official homepage: https://github.com/ahmetb/kubectx
sudo git clone https://github.com/ahmetb/kubectx /usr/local/kubectx
sudo ln -s /usr/local/kubectx/kubectx /usr/local/bin/kubectx
sudo ln -s /usr/local/kubectx/kubens /usr/local/bin/kubens

# configure autocompletion in oh-my-zsh (check github page for other shells)
mkdir -p ~/.oh-my-zsh/completions
chmod -R 755 ~/.oh-my-zsh/completions
ln -s /usr/local/kubectx/completion/kubectx.zsh ~/.oh-my-zsh/completions/_kubectx.zsh
ln -s /usr/local/kubectx/completion/kubens.zsh ~/.oh-my-zsh/completions/_kubens.zshSimply run kind create cluster and it will create a new one-node cluster.
If you get a funky error in the middle about cgroups: cannot find cgroup mount destination: unknown. then I suggest rerunning the /usr/local/sbin/start_docker.sh script.