PostgreSQL for Windows installs the PGDATA directory by default into C:\Program Files\PostgreSQL\some version\data. This mini-HOWTO explains how to change the default PGDATA directory to another location.
Close all application that are currently connected to your database, then go to Windows Services Management and stop the PostgreSQL service:
You should check the task manager to see if any postgresql.exe instances are still running. If so, DO NOT TERMINATE them, instead close all applications that are still connected to the database. Sometimes services like webservers keep persistent connections. In this case you also should stop these services.

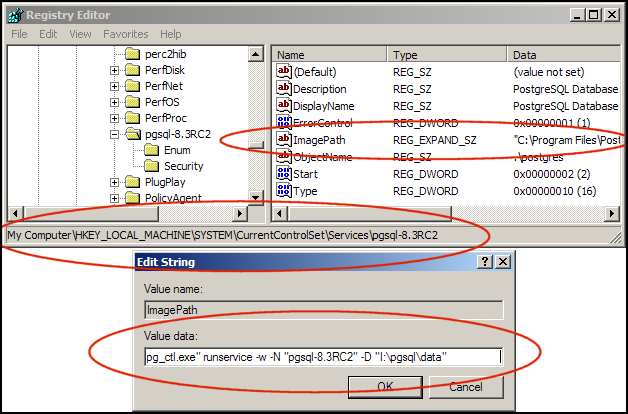
Start the Windows Registry Editor (regedit.exe) and navigate to: HKEY_LOCAL_MACHINE\SYSTEM\CurrentControlSet\Services\pgsql-some version.
Double click on ImagePath and change the directory after the –D option to your new location. If the path to your new location contains spaces, you should then enclose it with quotes.
Move your current PGDATA directory to the directory you just specified in Step 2. Please note that you should do this as Administrator on server machines. You should also check user permissions in the new directory to ensure the username under which your PostgreSQL instance runs has permissions to do so in the new directory, otherwise PostgreSQL will not start.
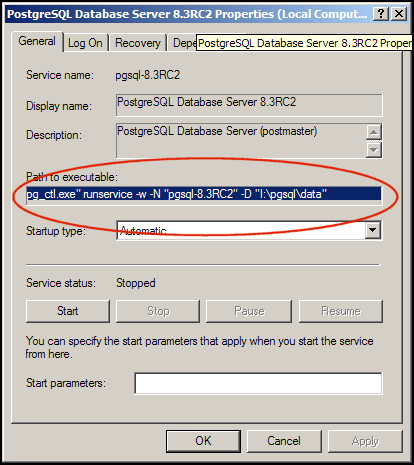
Before you can start your database you must close and re-open the Windows Services Management window. This refreshes the path you just changed in the registry without the need to restart your system.
After closing and re-opening the Services Management window, you should check the path to executable information of the PostgreSQL Database service. The path after –D option should be pointing to your new directory now.