release.yml generated from x mix release-ecr-aws, this template in designed to help with automating CI deployments to AWS ECS and dedicated AWS ECS cluster.
This is a cheap way to start without an AWS Application Load Balancer (ALB) and also be in a situation that will easier to add one once the web service needs additional scale or high availability.
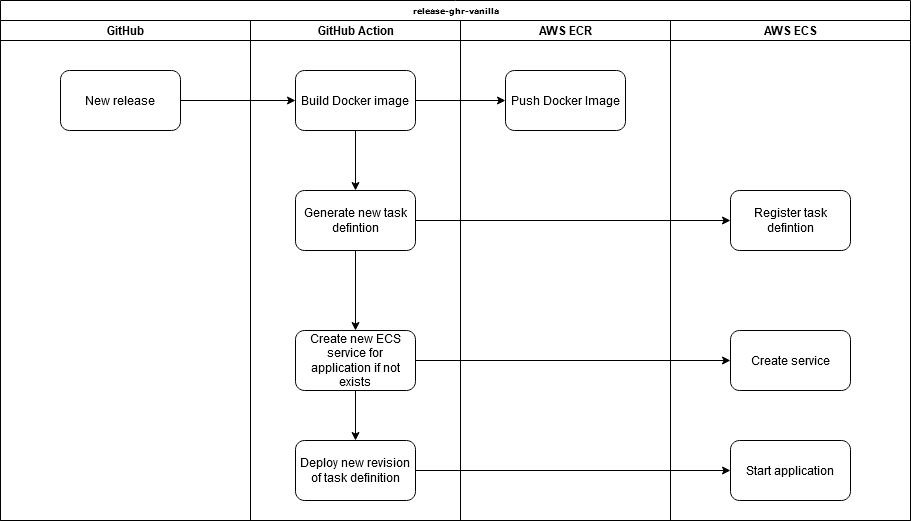
release.yml is designed to work with a ServiceStack app templates deploying directly to a single server in a dedicated ECS cluster via templated GitHub Actions.
For this setup, it is best to create a separate cluster as cluster will only have the single instance in it running. This pattern is to start from a good base with AWS ECS and automated CI deployment while avoiding the higher costs of needing to run an application load balancer (ALB).
If/when you can justify the cost of an ALB for easier scaling and zero downtime deployment, the GitHub Action release.yml can be slightly modified to be used with a re-created or different ECS Service that is configured to be used with an Application Load Balancer and Target Group.
The reason you might want to register this first is because we are only running one EC2 instance and hosting our own nginx-proxy on the same instance as the applications.
Since an A record will be pointing there, one advantage of not using an auto-assigned IP is that we can reassign the elastic IP if for what ever reason the instance goes down or is lost.
When launching the EC2 instance, you'll need to select an 'ECS optimized' AMI as the image used for your instance.
The easiest way to find the latest Amazon Linux 2 image for this is to go to the AWS documentation for ECS-optimized AMIs and look up your region here.
Using the AMI ID (starts with ami-) at the bottom, search in the 'Community AMIs' tab on the first step of the Launch EC2 Instance wizard.
A t2.micro or larger will work fine, this pattern can be used to host multiple applications on the 1 server so if the number of applications gets larger, you might need a larger instance type.
Note this pattern is suitable for testing prototypes or low traffic applications as it is cost effective and makes it easy to bundle multiple apps onto 1 EC2 instance.
Under IAM role, use the ecsInstanceRole, if this is not available, see AWS documentation for the process of checking if it exists and creating it if needed.
If you are not using your own generated Elastic IP, select Enabled for Auto-assign Public IP.
You will also want to add the following Userdata script (in the Configure step of the launch wizard) with your own ECS_CLUSTER value. This tells the ecs-agent running on the instance which ECS cluster the instance should join.
#!/bin/bash
cat <<EOS >/etc/ecs/ecs.config
ECS_CLUSTER=my-cluster
ECS_AVAILABLE_LOGGING_DRIVERS=["awslogs", "syslog"]
ECS_ENABLE_CONTAINER_METADATA=true
EOS
Note down your cluster name as it will need to be used to create the cluster in ECS before it is visible.
See ECS Container Agent Configuration for more information.
The default of 30gb is fine but take into account how large/how many applications you'll have running.
You'll want to expose at least ports 80 and 443.
To let your server handle multiple ServiceStack applications and automate the generation and management of TLS certificates, an additional docker-compose file is provided via the x mix template, nginx-proxy-compose.yml. This docker-compose file is ready to run and can be copied to the deployment server.
This is done via docker-compose rather than via ECS itself for simplicity.
First you'll need to install docker-compose.
sudo curl -L "https://github.com/docker/compose/releases/download/1.27.4/docker-compose-$(uname -s)-$(uname -m)" -o /usr/local/bin/docker-compose
sudo chmod +x /usr/local/bin/docker-compose
Run docker-compose --version to confirm.
To copy you can use scp or just creating a new file via server text editor to copy the short YML file over. For this example, we are going to copy it straight to the ~/ (home) directory.
scp -i <path to private ssh key> ./nginx-proxy-compose.yml ec2-user@<server_floating_ip>:~/nginx-proxy.compose.ymlFor example, once copied to remote ~/nginx-proxy-compose.yml, the following command can be run on the remote server.
docker-compose -f ~/nginx-proxy-compose.yml up -d
This will run an nginx reverse proxy along with a companion container that will watch for additional containers in the same docker network and attempt to initialize them with valid TLS certificates. This includes containers created and managed by the ECS agent.
If the container doesn't have the environment variable
VIRTUAL_HOSTset, it will be ignored.
The release.yml assumes 6 secrets have been setup.
- AWS_ACCESS_KEY_ID - AWS access key for programmatic access to AWS APIs.
- AWS_SECRET_ACCESS_KEY - AWS access secrets for programmatic access to AWS APIs.
- AWS_REGION - default region for AWS API calls.
- AWS_ECS_CLUSTER - Cluster name in ECS, this should match the value in your Userdata.
- HOST_DOMAIN - Domain/sub-domain of your application, eg
my-app.example.com. - LETSENCRYPT_EMAIL - Email address, required for Let's Encrypt automated TLS certificates.
These secrets can use the GitHub CLI for ease of creation. Eg, using the GitHub CLI the following can be set.
gh secret set AWS_ACCESS_KEY_ID -b"<AWS_ACCESS_KEY_ID>"
gh secret set AWS_SECRET_ACCESS_KEY -b"<AWS_SECRET_ACCESS_KEY>"
gh secret set AWS_REGION -b"<AWS_REGION, eg us-east-1>"
gh secret set AWS_ECS_CLUSTER -b"<AWS_ECS_CLUSTER, eg my-apps>"
gh secret set HOST_DOMAIN -b"<HOST_DOMAIN, eg my-app.example.com>"
gh secret set LETSENCRYPT_EMAIL -b"<LETSENCRYPT_EMAIL, eg me@example.com>"
These secrets are used to populate variables within GitHub Actions and other configuration files.
For the AWS access, a separate user specifically for deploying via GitHub Actions should be used.
The policies required for the complete initial setup will be:
AmazonEC2ContainerRegistryFullAccessAmazonECS_FullAccess
Once the application is successfully deployed the first time, reduced access for both ECR and ECS can be used instead. For application updates, the GitHub Action can use the following policy.
{
  "Version": "2012-10-17",
  "Statement": [
    {
      "Sid": "VisualEditor0",
      "Effect": "Allow",
      "Action": [
        "ecr:GetRegistryPolicy",
        "ecr:PutImageTagMutability",
        "ecr:GetDownloadUrlForLayer",
        "ecr:DescribeRegistry",
        "ecr:GetAuthorizationToken",
        "ecr:ListTagsForResource",
        "ecr:UploadLayerPart",
        "ecr:ListImages",
        "ecr:PutImage",
        "ecr:UntagResource",
        "ecr:BatchGetImage",
        "ecr:CompleteLayerUpload",
        "ecr:DescribeImages",
        "ecr:TagResource",
        "ecr:DescribeRepositories",
        "ecr:InitiateLayerUpload",
        "ecr:BatchCheckLayerAvailability",
        "ecr:ReplicateImage",
        "ecr:GetRepositoryPolicy",
        "ecs:SubmitTaskStateChange",
        "ecs:UpdateContainerInstancesState",
        "ecs:RegisterContainerInstance",
        "ecs:DescribeTaskDefinition",
        "ecs:DescribeClusters",
        "ecs:ListServices",
        "ecs:UpdateService",
        "ecs:ListTasks",
        "ecs:ListTaskDefinitionFamilies",
        "ecs:RegisterTaskDefinition",
        "ecs:SubmitContainerStateChange",
        "ecs:StopTask",
        "ecs:DescribeServices",
        "ecs:ListContainerInstances",
        "ecs:DescribeContainerInstances",
        "ecs:DeregisterContainerInstance",
        "ecs:TagResource",
        "ecs:DescribeTasks",
        "ecs:UntagResource",
        "ecs:ListTaskDefinitions",
        "ecs:ListClusters"
      ],
      "Resource": "*"
    }
  ]
}
Further permission reduction can be done by reducing what resources can be accessed. Application permissions can be controlled via
taskRoleArn, see AWS docs for details.