| heading | seo | title | description | layout | order | published |
|---|---|---|---|---|---|---|
Integration Guide |
Integration Guide | Cloud Elements API Docs |
Integration Guide |
Overview of the Cloud Elements Platform and how to integrate it into your application. |
docs |
1 |
false |
Cloud Elements is an API Integration Platform for application providers. Our 100% API based service can be embedded seamlessly into your app, making it easy to build and offer an integration marketplace to your customers.
Cloud Elements provides pre-built connectors to the leading cloud applications such as Salesforce, QuickBooks, and Microsoft Dynamics CRM. We've categorized these applications into Hubs (e.g. CRM, Cloud Storage, and Finace).
The pre-built connectors are referred to as Elements. You integrate to a Cloud Elements Hub via a single RESTful API and your app is instantly connected to all the leading services in that category.to cloud services.
comment: <> (I DON'T THINK THIS IS QUITE RIGHT: You integrate to a Cloud Elements Hub via a single RESTful API and your app is instantly connected to all the leading services in that category.to cloud services)
The following section will define some common terms used throughout the Cloud Elements Platform.
Hubs map resources from a collection of endpoints (What we call Elements) into a uniform set of APIs. With Hubs you can integrate an entire category of services (e.g., CRM, Documents, Finance) through a single set of APIs.
We normalize our API calls for all endpoints, to enable calls between services e.g. Salesforce to HubSpot. However, with this feature, certain endpoint resources cannot be mapped for each hub.
- Hubs provide uniform APIs to access any collection of Elements or a set of resources.
- Hubs enable “One-to-Many” access to an entire category of services.
- Hubs are accessed using a consistent RESTful API with a JSON payload regardless of the technology used at the endpoint.
- Hubs rapidly translate calls into the semantic and data structure required by each endpoint.
- Hubs provide a uniform set of interactive API documentation that developers use to access the resources in the Hub.
- Combine resources from multiple categories providing a consistent set of APIs and documentation to access any collection of resources (e.g., combine Salesforce, Box, and QuickBooks API resources into a Hub).
We’ve categorized the leading cloud applications into Hubs (e.g. CRM, Documents, and Messaging). You integrate to a Cloud Elements “Hub” via a single RESTful API and your app is instantly connected to all the leading services in that category, no need to do custom and costly integration to each service.

An Element is a collection of resources providing a pre-built integration into a service endpoint. RESTful methods (POST, GET, UPDATE, PATCH, DELETE) are used to interact with these resources (accounts, contacts, files) regardless of the type of APIs (SOAP or REST) provided by the endpoint. Elements leverage Cloud Elements API Manager platform services including authentication, data transformation, and event management.
- Elements share common services including discovery, search query, pagination, bulk uploading and downloading, logging and interactive documentation.
- Methods are normalized and accessible through RESTful APIs
- Complete data payloads are returned in JSON and available to transform and normalize via the Cloud Elements API Manager Transformation Services.
- Cloud Elements keeps each Element up to date with changes at the endpoint.
- Each Elements is a “Multi-tenant” connector supporting an unlimited number of authenticated accounts with no additional code required.
To call our APIs, you will need an account with Cloud Elements. To get an account, you must sign up using our API Manager Console. When you create an account with us, we assign you an Organization secret and a User secret. An Organization is a customer of Cloud Elements (/organizations). The User and Organization secret represent your account with Cloud Elements An Organization secret and User secret are needed to call our Platform APIs, to do things like:
- learn about our Catalog of endpoints (
/elements) - create connections to an endpoint (
/instances) e.g. Dropbox or Salesforce
Our tokens and secrets are passed as Basic HTTP Header Values. For example, to make an API call, the following authorization header is passed:
Authorization: User 7OpR4MRo7wnPoVKkKFXHhHBUPRzqutoem/d+WEnR1kY=, Organization ce7f1f9be0d2a8b1f37bcfa6d71eda20
Separate authentication is required for each of our Elements based on the endpoint requirements, e.g. Basic, OAuth 1, OAuth 2, and Custom. comment: <> (NEED HELP HERE PLEASE)
The Cloud Elements base URL for all API calls is:
https://api.cloud-elements.com/elements/api-v2
OAuth is an open standard for authorization. Cloud Elements uses OAuth to interact with elements in the Document Hub during the provisioning process.
Standard OAuth Exchange
The diagram to the right shows a standard OAuth interaction with a service endpoint. An application user performs an action that requires access to a service endpoint. The application then redirects to a well-known OAuth URL for the service endpoint. The user logs in, if necessary, and grants access to the application.
After access is granted, the service endpoint redirects to the URL configured in the “Set up your Application with the Endpoint” section. The redirect URL includes a code that the application exchanges for OAuth access and refresh tokens. These tokens are then used in subsequent API requests between the application and endpoint. Each endpoint has different expiration intervals for the tokens, which the application must manage.

The diagram to the left shows how Cloud Elements uses OAuth during element provisioning. An application user performs an action that requires access to a service endpoint. The application requests the OAuth URL for the service endpoint from Cloud Elements, then redirects. The user logs in, if necessary, and grants access to the application.
After access is granted, the service endpoint redirects to the URL configured in the “Set up your Application with the Endpoint” section. The redirect URL includes a code that the application uses to create an element instance. Cloud Elements uses this code to exchange for OAuth access and refresh tokens. Cloud Elements stores these tokens before responding to the instance creation request with the element information, including an element instance token. The application then uses the element instance token to make Cloud Elements uniform API requests. Cloud Elements makes endpoint API requests using the OAuth tokens obtained from the endpoint.
Each vendor’s OAuth implementation varies slightly, but these details are handled by Cloud Elements. Cloud Elements also manages the app’s OAuth access and refresh tokens internally. The user does not need to worry about storing these tokens or refreshing them when they expire.

Instances are an authenticated connection to a cloud service. When you provision an instance, your app will have access to the different functionality offered by the application platform.
For example, provisioning an instance to Salesforce.com will give you the ability to create, retrieve, update, and delete data like accounts.
As mentioned in the Authentication section, each Element requires authentication. In order to provision an instance, the Cloud Elements tokens are required along with the Element requirements.
Example cURL request using Basic Authentication:
curl -X POST
-H 'Authorization: User <INSERT_USER_SECRET>, Organization <INSERT_ORGANIZATION_SECRET>'
-H 'Content-Type: application/json'
-d @instance.json
'https://api.cloud-elements.com/elements/api-v2/instances'
{
"element": {
"key": "closeio" // The Cloud Application Service
},
"configuration": {
"username": "<INSERT_CLOSE_IO_API_KEY>", // Credentials needed to provision the Element
"password": "<INSERT_CLOSE_IO_PASSWORD>"
},
"tags": [
"<INSERT_TAGS>"
],
"name": "<INSERT_INSTANCE_NAME>"
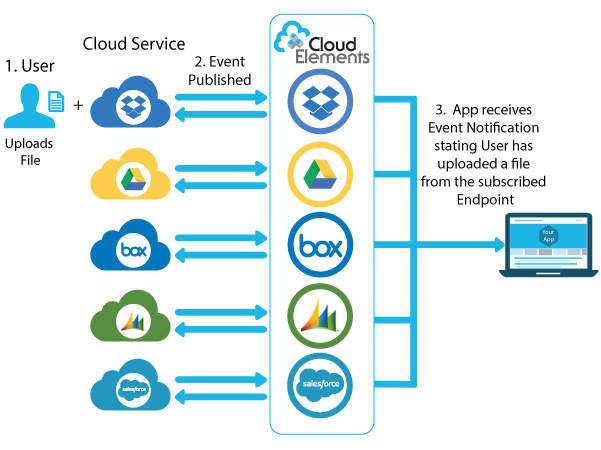
}Cloud Elements Events Framework provides a uniform mechanism for
subscribing to events from Endpoints (e.g. Salesforce, HubSpot,
QuickBooks, Dropbox). Our Framework gives you the flexibility to receive
notifications to your app regarding user activity by having our Elements
subscribe to Endpoint Events. Endpoints publish changes to notify the
Elements that events have occurred. For example, a user uploads a file
to her Dropbox account using the Dropbox user interface. This change
would be published to our Dropbox Element. The Dropbox Element would
then notify your app that a new file has been uploaded. Your app can
then be updated with the most current data making it that much more
cooperative and powerful.
Cloud Elements currently supports building integrations with polling or webhooks capability.
Polling is a mechanism where Cloud Elements executes the configured query every n minutes and capture the changed information.
Webhooks are when the provider lets Cloud Elements know what information has changed. NOTE: Some Application Endpoints require some additional configuration setup for Event Management. Instructions and screen shots for these configurations can be found in the Element Guides under Events for each endpoint.
The purpose of the Transformation APIs (Beta) is to give you the option of defining what an object would look like in your app.
The Transformation APIs allow you to:
- manage custom object and custom data fields
- map custom data fields to and from the format that your application uses and expects
- programmatically persist and maintain transformations for each of your client’s CRM, Marketing, and Help Desk services
Cloud Element Bulk API calls provide an option to upload a large number of resources, such as contacts, into a Cloud Service all at once.
The Bulk APIs require the name of the object identified within the cloud service and a .csv file with populated data included in each request.
Cloud Elements provides discovery services to get a list of available objects.
Cloud Elements supports customizable workflows, called Formulas. Formulas are user-defined workflows that have a trigger (incoming event, API request, timer, etc.) that, when triggered, will begin executing a series of steps. These steps can go about accomplishing a large variety of different use cases across different services. Some ways our customers are using them now include keeping their systems in sync, migrating data between systems, automating business workflows, and many more.
The OAuth Proxy feature gives you the capability to have multiple environments, such as development, QA, etc, with one endpoint application. For example some vendors only allow one callback URL per application. The proxy will allow for the same callback URL to be used with multiple application endpoints. You would then use the proxy address as the Callback URL instead of your own Callback URL. This permits multiple endpoint applications to one callback URL.
We offer two forms of the proxy. Standard OAuth Proxy Configuration: requires an API key and secret to be passed as URL parameters or in the JSON payload needed to create an instance. OAuth Proxy with API Key and Secret Management: option to input your API key and secret during the proxy creation and we will take care of the rest during instance creation.
Our goal is provide an integration platform that will allow you to leverage the functionality of our Elements to map and sync data to various applications and keep them in sync. comment: <> (NEED HELP HERE PLEASE)
Let's take a look at an example integration comprised of keeping two applications in sync. Salesforce and HubSpot will be used for this example integration.
First as with all integrations, we must create an Element Instance to each application.
Follow these steps to setup your Salesforce application with the endpoint. This application must be created in order to gain access to the Salesforce data within your account.
In order to create a Salesforce Element Instance you must have the Enterprise edition or Professional edition with API support is required. Also, to set up a new application in Salesforce, you must have Administrator privileges. Please contact your system administrator if you do not have those privileges.
Via a web browser, log in to your Salesforce account: https://login.salesforce.com/
Select "Setup" if not taken there by default:
-
In left hand nav menu, under create, select "Apps"
-
Click "New"

-
Fill out the basic information about the app
-
Make sure to select "Enable OAuth Settings"
-
You’ll be required to enter a callback URL from the endpoint. This URL will be in your application’s address space, and you will be required to retrieve some information returned on this URL by the endpoint. For our example,we’ll use a callback URL of https://mycoolapp.com/auth
-
Choose from the "Selected OAuth Scopes". "Full Access" and "Perform requests on your behalf at any time (refresh_token_, offline_access)" are the minimum needed scopes.
-
Add the selected scopes
-
Click "Save" at the bottom of the window

-
Please make a note of the "Consumer Key"
-
Please make a note of the "Consumer Secret"

Next create an instance with events enabled. Polling events will be used.
-
HTTP Header: None
-
HTTP Verb: GET
-
Request URL: /elements/{keyOrId}/oauth/url
-
Request Body: None
-
Query Parameters:
-
apiKey– the key obtained from registering your app with the provider
-
apiSecret – the secret obtained from registering your app with the provider
-
callbackUrl – the URL that you supplied to the provider when registering your app, state – any custom value that you want passed to the callback handler listening at the provided callback URL.
Description: The result of this API invocation is an OAuth redirect URL from the endpoint. Your application should now redirect to this URL, which in turn will present the OAuth authentication and authorization page to the user. When the provided callback URL is executed, a code value will be returned, which is required for the Create Instance API.
Example cURL Command:
curl -X GET
-H 'Content-Type: application/json'
'https://api.cloud-elements.com/elements/api-v2/elements/sfdc/oauth/url?apiKey=fake_salesforce_api_key&apiSecret=fake_salesforce_api_secret&callbackUrl=https://www.mycoolapp.com/auth&state=sfdc'
Response:
{
"element": "sfdc",
"oauthUrl": "https://login.salesforce.com/services/oauth2/authorize?response_type=code&client_id=fake_salesforce_api_key&client_secret=xyz789&scope=full%20refresh_token&redirect_uri=https://www.mycoolapp.com/auth&state=sfdc"
}
Handle Callback from the Endpoint:
Upon successful authentication and authorization by the user, the endpoint will redirect to the callback URL you provided when you setup your application with the endpoint, in our example, https://www.mycoolapp.com/auth. The endpoint will also provide two query string parameters: “state” and “code”. The value for the “state” parameter will be the name of the endpoint, e.g., sfdc in our example, and the value for the “code” parameter is the code required by Cloud Elements to retrieve the OAuth access and refresh tokens from the endpoint. If the user denies authentication and/or authorization, there will be a query string parameter called “error” instead of the “code” parameter. In this case, your application can handle the error gracefully.
To provision your Salesforce Element, use the /instances API.
Below is an example of the provisioning API call.
- HTTP Headers: Authorization- User , Organization
- HTTP Verb: POST
- Request URL: /instances
- Request Body: Required – see below
- Query Parameters: none
Description: An Element token is returned upon successful execution of this API. This token needs to be retained by the application for all subsequent requests involving this element instance.
A sample request illustrating the /instances API is shown below.
HTTP Headers:
Authorization: User <INSERT_USER_SECRET>, Organization <INSERT_ORGANIZATION_SECRET>
This instance.json file must be included with your instance request. Please fill your information to provision. The “key” into Cloud Elements Salesforce is sfdc. This will need to be entered in the “key” field below depending on which Element you wish to instantiate.
Here is an example cURL command to create an instance using /instances API.
Example Request:
curl -X POST
-H 'Authorization: User <INSERT_USER_SECRET>, Organization <INSERT_ORGANIZATION_SECRET>'
-H 'Content-Type: application/json'
-d @instance.json
'https://api.cloud-elements.com/elements/api-v2/instances'
{
"element": {
"key": "sfdc"
},
"providerData": {
"code": "<Code_On_The_Return_URL>"
},
"configuration": {
"oauth.callback.url": "https://www.mycoolapp.com/auth",
"oauth.api.key": "<Insert_Client_ID>",
"oauth.api.secret": "<Insert_Client_Secret>",
"event.notification.enabled": "true",
"event.notification.callback.url": "<INSERT_YOUR_APPS_CALLBACK_URL>",
"event.vendor.type": "polling",
"event.objects": "<INSERT_COMMA_SEPARATED_LIST_OF_OBJECTS_e.g_Account,Contact>"
},
"tags": [
"<Add_Your_Tag>"
],
"name": "<Insert_Instance_Name>"
}Next provision an instance to HubSpot
Follow these steps to setup your HubSpot application with the endpoint.
Via a web browser, login to your HubSpot account: http://developers.hubspot.com/.
-
Click "Create App"
-
Name your App
-
Click "Create"
-
Click on the newly created app from the dashboard
-
Fill out App info and make note of the "Client ID" and "Client Secret" (NOTE: your HubSpot Portal ID is also required for provisioning)
-
Click "Save"


Now provision a HubSpot instance with polling events enabled.
-
HTTP Header: None
-
HTTP Verb: GET
-
Request URL: /elements/{keyOrId}/oauth/url
-
Request Body: None
-
Query Parameters:
-
apiKey– the Client ID
-
apiSecret – the Portal ID
-
scopes – scopes you defined in HubSpot application setup. To use the Cloud Elements API, you must at least provide the following scopes:
contacts-rw+offline -
callbackUrl – the URL that you supplied to the provider when registering your app, state – any custom value that you want passed to the callback handler listening at the provided callback URL.
Description: The result of this API invocation is an OAuth redirect URL from the endpoint. Your application should now redirect to this URL, which in turn will present the OAuth authentication and authorization page to the user. When the provided callback URL is executed, a code value will be returned, which is required for the Create Instance API.
Input Query Parameters:
- OAuth client (apiKey): 123456789d-1234-12e4-bda9-12345b8bf20
- Portal ID (apiSecret): 123456
- The scope is notated as “scope=contacts-rw%20offline”. The API call will not work without the scope parameters.
- Callback URL: http://demonstrab.ly
- A sample request illustrating the API is shown below.
Example cURL Command:
curl -X GET
-H 'Content-Type: application/json'
'https://api.cloud-elements.com/elements/api-v2/elements/hubspot/oauth/url?apiKey=123456789d-1234-12e4-bda9-12345b8bf20&apiSecret=123456&scope=contacts-rw%20offline&callbackUrl=http://demonstrab.ly'
Response:
{
  "element": "hubspot",
  "oauthUrl": "https://app.hubspot.com/auth/authenticate?client_id=123456789d-1234-12e4-bda9-12345b8bf20&portalId=123456&redirect_uri=http%3A%2F%2Fdemonstrab.ly&scope=contacts-rw%20offline"
}
Handle Callback from the Endpoint: The URL returned in the GET /elements/{keyOrId}/oauth/url call is where you need to send your user. When that URL is executed, an authorization screen will render. Once the user has successful authorized the app, HubSpot will provide three query string parameters: “access token”, “refresh token”, and “time expiration”. The value for the “access token”, “refresh token”, and “time expiration” parameters are required by Cloud Elements to create a HubSpot Element Instance.
To provision your HubSpot Element, use the /instances API.
Below is an example of the provisioning API call.
- HTTP Headers: Authorization- User , Organization
- HTTP Verb: POST
- Request URL: /instances
- Request Body: Required – see below
- Query Parameters: none
Description: An Element token is returned upon successful execution of this API. This token needs to be retained by the application for all subsequent requests involving this element instance.
A sample request illustrating the /instances API is shown below.
HTTP Headers:
Authorization: User <INSERT_USER_SECRET>, Organization <INSERT_ORGANIZATION_SECRET>
This instance.json file must be included with your instance request. Please fill your information to provision. The “key” into Cloud Elements HubSpot is hubspot. This will need to be entered in the “key” field below depending on which Element you wish to instantiate.
Here is an example cURL command to create an instance using /instances API.
Example Request:
curl -X POST
-H 'Authorization: User <INSERT_USER_SECRET>, Organization <INSERT_ORGANIZATION_SECRET>'
-H 'Content-Type: application/json'
-d @instance.json
'https://api.cloud-elements.com/elements/api-v2/instances'
{
"element": {
"key": "hubspot"
},
"providerData": {
"apikey": "<INSERT HUBSPOT_OAUTH_CLIENT_ID>",
"access_token": "<ACCESS_TOKEN RETURNED IN OAUTH EXCHANGE>",
"refresh_token": "<REFRESH_TOKEN RETURNED IN OAUTH EXCHANGE>",
"expires_in": "<TIME FRAME IN WHICH REFRESH TOKEN EXPIRES (seconds)>"
},
"configuration": {
"oauth.api.key": "<INSERT HUBSPOT_OAUTH_CLIENT_ID>",
"oauth.api.secret": "<INSERT HUBSPOT_OAUTH_PORTAL_ID>",
"oauth.callback.url": "www.samplecallbackurl.com",
"oauth.scope": "contacts-rw+offline",
"event.notification.enabled": "true",
"event.notification.callback.url": "<INSERT_YOUR_APPS_CALLBACK_URL>",
"event.poller.urls": "contacts|accounts"
},
"tags": [
"<Add_Your_Tag>"
],
"name": "<Insert_Instance_Name>"
}Now that the we have our instances, let's create a transformation to define what our account objects look like in each system.
(TRANSFORMATION CONTENT HERE)
Now that the we have our instances, let's create a formula to keep the two services in sync.
(FORMULA CONTENT HERE)
(WHAT ELSE WOULD BE HELPFUL?)