You signed in with another tab or window. Reload to refresh your session.You signed out in another tab or window. Reload to refresh your session.You switched accounts on another tab or window. Reload to refresh your session.Dismiss alert
Leading a creative team requires a strong vision, the ability to make difficult decisions, and the willingness to take full responsibility for them. It's a challenging but rewarding role that can be made easier by following these management techniques established by Anna Wintour during her career at Vogue and Condé Nast.
1
Surround yourself with a diverse team
You're nothing without a good team, and a diverse group in terms of backgrounds, ages, and opinions can offer a point of view that you haven't considered before. Everyone has blind spots, and a diverse team will be able to cover yours.
Did you know? Somewhat hypocritically, Wintour was recently forced to admit that Vogue "has not found enough ways to elevate and give space to Black editors, writers, photographers, designers, and other creators," and she's taken full responsibility for "publishing images or stories that have been hurtful or intolerant."
2
Work with the passionate ones
Look for the self-starters who care passionately about the world they're about to enter, not the ones who see this as a stepping-stone toward something else.
Did you know? If your employee is passionate about a certain project, give it to them! Their conviction and love will show through in their work.
3
Develop a daily schedule that works for you, and stick to it
Keeping a consistent schedule means you'll be able to focus on specific tasks at a time, and your team will have a better idea of your availability.
4
Micromanaging is never in fashion
Empower those who are working with you to make their own creative and leadership decisions. They'll work much more effectively if they're encouraged to be self-starters.
5
Hold meetings in a way that benefits you and your team
While Anna Wintour prefers informal meetings with only one or two people, she also holds larger meetings every week. This way everyone has the opportunity to join the conversation, ask questions, and voice their opinions.
6
Be prompt and direct with your feedback
Keep the momentum going by giving feedback in as quick a time frame as possible. Nobody works well in a slow and lazy atmosphere, and delayed feedback will affect your team's confidence and energy. Make sure your feedback is direct---any vague or indecisive wording can be frustrating to your team.
7
Give a reason when you say no, then move on
Saying "no" to something might not be pleasant, but it eliminates any lingering hopes or uncertainty that can be kindled from a "Well, maybe..." response. Give a reason for your decision---being careful not to overexplain---and then decisively continue to the next issue.
8
Give credit to your team
It's one thing to acknowledge the success of the things you've achieved, but it's another to readily give credit to those who've worked with you to make them possible.
9
Listen to criticism, but don't let it cloud your judgment
You can't be everything to everybody, and you'll doubtlessly receive criticism from people who don't agree with you. Listen to what they have to say and learn from it, but always remain true to your vision.
10
Seek new ways to reach your audience
With multiple platforms at your disposal, it will take your creative leadership to determine how to use them most effectively. It's naive to think you only have one type of customer who only wants to be spoken to in one way or medium, so think of how your voice can be used differently for each platform.
11
Take on the bigger issues
As a leader, you have a responsibility to give back to the world and to highlight the issues that are important to your industry and audience, whether it's the #MeToo and #TimesUp movements relating to fashion models or fighting the HIV/AIDS crisis with an event like the Seventh on Sale gala. No matter your personal politics, stand up for what you believe is right and engage with these issues in a thoughtful way.
Authored by Bob Woodward - Investigative Journalist
As a journalist, your duty is to uncover the best obtainable version of the truth through evidence, sources, and testimony. This process is broken down by a man who's considered one of the greatest journalists of our time, Bob Woodward.
1
Write about the political, but don't act political
Focus on facts, not opinions---opinions belong in an op-ed column. Bleach your personal and political opinions out of your stories. If a journalist appears biased, readers might consider it a crusade or fake news and dismiss your writing.
2
Report from the beginning
Investigative journalism takes time. It's a lengthy process of gathering documents and interviews, so keep your reporting incremental. Update your editor about your status on the story and, when possible, publish bits of your investigation as it develops. People want the story as it's rising, not setting---by that point, the story is over and it's no longer news, it's history.
3
Documentation is key
In this age of fake news, the most important thing to have is documentation. Documents are often classified or private, so they're difficult to get. You have to ask for them---sometimes aggressively. Organize, save, and make copies of everything.
Did you know? Obtaining documents goes hand in hand with talking to human sources, because you need someone to give you those documents.
4
Find sources who are witnesses and participants
Make a list of people to interview who are actively involved in your story and might know the truth. Then start at the bottom---the higher up you go on the chain of command, the more likely people are to conceal things.
5
Always protect your sources
Meet where they're comfortable---at their home or office, or in parks. Use throwaway cell phones and encrypted email. Never reveal your source except to maybe one editor.
Did you know? There are three types of sources. On-the-record sources are upfront and named. Background sources are not named but can be quoted. Deep background sources won't be quoted, but you can use their general information.
6
Start interviews by establishing ground rules and being completely transparent
Let the source know if the conversation will be on the record or not. Tell the truth about who you are and if you're going to record the conversation, and do so openly and with verbal permission that's on tape.
7
Be upfront and civil during your interview
Ask relevant questions in a chronological order, sticking to the main truths you want to uncover. Don't argue or lose your cool. No one ever tells the full story---it's often a mixture of truth and untruth, and it's your job to verify.
Did you know? If confronted with a lie, say, "There's contrary information." Don't say, "You're lying" or "That's untrue." Be factual and objective.
8
Pivot your story if something substantially different develops
Time and circumstances might change the subject of your story, like when Bob Woodward's in-progress piece about George W. Bush's legacy was made obsolete after the events of 9/11. Similarly, if you cannot find the evidence for what you're writing about, let it go.
9
Fact-check everything within an inch of your life
This includes names, dates, addresses, spelling, and quotes.
10
Never gloat when your work causes change
You can feel good about the journalistic role you played, but it's ill-becoming to openly gloat once the truth you've uncovered results in something like a resignation or verdict.
There's a magic within you that makes you who you are, and it's your life's work to find this frequency and let it shine. After all, you weren't born to fit in---you were born to stand out. Society might tell you differently, but these tips from RuPaul will help you tune that out and become the person you are meant to be.
1
Regularly practice stillness and meditation
If prayer is speaking to God, then meditation is listening to God. Even 30 seconds of meditation will allow the stillness to guide you toward your personal frequency. Remember to stretch and breathe.
Did you know? Finding your personal frequency and being your true self feels like a well-worn jacket, a favorite pair of shoes, or the home you always wanted to live in.
2
Identify and change your internal negative voices
Other people---whether it's your parents, childhood bullies, or other past traumatic experiences---put those negative voices in your head, but your ego believes it's you. Weed those voices from your mental garden, then replace them with positive voices. This negativity might never fully go away, but in time you'll naturally react to it with self-love instead of self-loathing.
Did you know? The darkness of the world can make you angry, then cynical, then bitter. You can look at this darkness, but don't stare, because the more you focus on it the harder it is to move on.
3
Comfort your inner child
Your inner child is looking to you for help and love. You can't lie to your inner child, because they know your lies. You have to be sincere and tell the truth, and love them---love yourself---unconditionally.
4
Acknowledge others so you can acknowledge yourself
It's natural to want to say, "Good morning" as you pass other people on a walk. Acknowledging other people is the simplest act of human kindness, and it leads to acknowledging yourself. You cannot begin to love yourself until you acknowledge yourself.
5
Challenge your anxiety by focusing on the present
Anxiety is often caused by trauma from the past or worries about the future. Instead, stay in the present. Breathe, be aware of how you feel in the moment, and accept the emotions you're feeling.
6
Follow your failures to the next big moment
Failure seems like a negative thing, but it just means you had an expectation you didn't reach. Even if you fail, you still learned something about what does and doesn't work for you, and that can still inspire you or lead to something else.
Did you know? Being in the game is its own prize. It's not about money or fame but about being of service to humankind and doing something beautiful from your heart.
7
Don't take things too seriously
Drag is a way to laugh at life and not take yourself too seriously. After all, so much of today's society and life is an illusion. Your ego might want to remain angry, cynical, or bitter, but letting go of this will let you have more fun.
8
Create environments where you can find joy
Utilize all the joy life has to offer. Give yourself plenty of opportunities to feel joy, whether it's through singing, dancing, love, etc.
9
Shape-shift into something new
Just as the sun rises and sets, you'll frequently change throughout your life. Be flexible and embrace this on every level. You can become whatever your imagination wants, whether it's a sex kitten, old marm, or pirate queen.
10
Live as if you're surrounded by unconditional love
Know that you are perfect exactly the way you are. Imagine a situation where you felt unconditional love, where you were accepted and cared about no matter what, and live your life like that.
Did you know? It's all about liking yourself, not trying to make other people like you. Your own frequency shines like a beacon that attracts like-minded people, and they'll meet you with that same positive energy to be your true self.
As Shakespeare said, "All the world's a stage," and the buildings you design are the stages on which life is acted. These steps will help ensure you design places that are spaces where people will want to work, play, and live.
1
Embrace the uncertainty
Architecture, like all creative fields, begins with the unknown. Be curious about it, and accept that you don't know what you're going to do in advance. Don't overthink it---just follow your initial idea and see where it takes you. Architecture is like jazz: You respond and work intuitively to create something. If you know in advance what you're going to make, then you won't do it.
2
Think of the building's purpose
If you're designing the Walt Disney Concert Hall, consider that its purpose is for people to experience music. Design a building that people would like to be in while experiencing music, where they can enjoy the company of others, and where the audience and musicians can sense one another.
3
Respect your architectural neighbors
Your buildings shouldn't be identical reproductions of their neighbors, but they should respect their existence. For example, if you're building a tower in New York City next to the Woolworth Building, respect its seniority. Show homage to its beautiful structural cap by not putting a cap on your own tower.
4
Start by drawing on paper
Even a quick sketch on a piece of paper requires human touch and hand-eye coordination, whereas computer images are just geometry and drawings. Their humanity is entirely eliminated.
Did you know? Buildings are becoming less inviting and more faceless, but putting trees all over them helps retain their humanity.
5
Design something comfortable, not pristine
Think about and consciously implement what makes someone comfortable. Our world is a collision of thoughts that surround us, and it's represented through our art, music, and buildings. A neat, clean box seems like a lie, whereas messiness is a signature of the times. Houses are meant to be lived in, so it's logical that we would express that in what we build---that it's comfortable and a bit messy.
Did you know? A pristine house, like Mies van der Rohe's Farnsworth House, can be a beautiful example of architecture, but its design overpowers daily life and feels more like a museum than a house.
6
Explore your crazy ideas
If you have the urge to design a house with a suspended brick facade, don't shut down the idea as stupid just because bricks are heavy. Explore the idea. You can create the logic for it as you go along, and it's an opportunity for you to design something with a familiar material that no one has done before.
7
Expression is more important than symmetry
If your composition is symmetrical, you'll be forced to balance where the windows go, where lighting goes, etc. An asymmetrical design, however, is freer and more casual, so your buildings won't feel like an imposition.
8
Repeating yourself is a strength, not a weakness
It can feel strangely dishonest to take something you've already done and use it again. Our culture says everything has to be new and different, but you can find inspiration and beauty in looking at your old works.
Did you know? Mies van der Rohe, one of the best architects of the last century, did the same building over and over again, and when you look at his Lake Shore Towers or his black steel buildings, you'll recognize their power.
9
Do your best, no matter how small the project
Even if you are designing field latrines for army maneuvers in the swamps of Louisiana, make sure it's the best you can possibly do for that job. You never know if your building will be a success or not, but you can always do your best.
10
Look at your design until you hate it
You will have epiphanies and eureka moments, and you'll want to test them and see where they go. Designing buildings takes a considerable amount of time, and some days you'll hate what you're looking at. That's a positive thing, as it can inspire the next step.
11
Respect your deadline
Having a due date is healthy; it requires you to self-edit and recognize when you're done. Otherwise, you could go on designing forever, and going past that date causes difficulty for your clients and team.
Did you know? If the design isn't turning out the way you want, it's acceptable to ask the client for a bit more time.
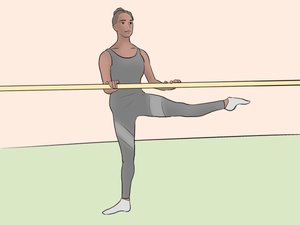
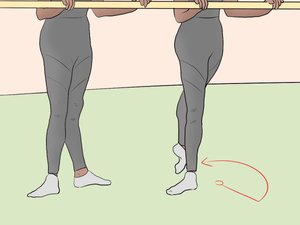
Exercising at the barre prepares you for performances. When you focus more on the quality and less on repetition, your barre work can take an almost meditative quality that will prepare you for the challenges of being a professional dancer.
METHODS
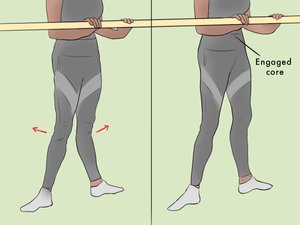
Warming Up with Pliés
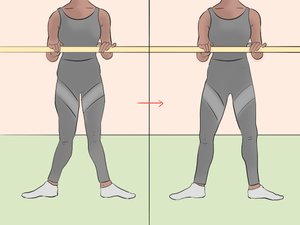
1
Face the barre in second position.
Focus on engaging your core and getting your hips wrapped and strong. Straighten your knees as much as possible as you push your weight down through your heels. Your shoulders should feel locked in and open.
Did you know? Facing the barre isn't just for children! It's a really good way to work on stability while warming up.
2
Do very small pliés.
They'll still warm you up in about 30 seconds. Stay engaged in keeping everything straight and up---each part influences the other. Focus less on repetition and more on the quality of plié.
3
Push your knees back as you plié.
Be careful not to tuck your hips or arch your lower back---they should remain tight. Lift your chest slightly upward and outward in order to keep your shoulders pushed back slightly.
4
Plant your heels and fully straighten your legs.
Don't shift your weight to the balls of your feet---this will cause you to fall out of alignment and lose your balance.
Did you know? A plié is one of the most important ballet movements and should be treated as such, with no frivolous movement or drops. Keep your body engaged and connected throughout.
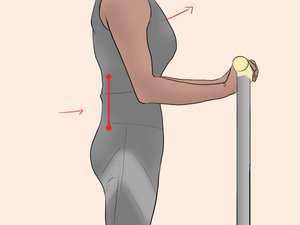
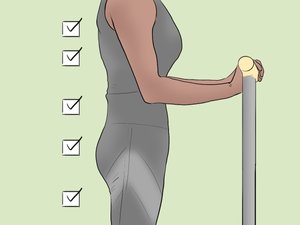
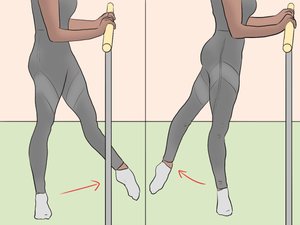
Tendus
1
Begin in first position and use your shoulders to stay symmetrical.
Engage your lat muscles---that will keep your shoulders down and your chest slightly lifted up and out.
Did you know? If you're hyperextended, don't force your feet together. Instead, keep a small space between your heels and correctly align your body.
2
Extend your leg.
First by pushing through your heels, then the ball of your foot, and finally by pointing your toes.
Did you know? Wearing socks instead of ballet slippers allows you to feel the floor and also articulate your feet. They also do not hold tension in your insteps or toes.
3
Take a moment to stretch, then continue on both sides while slightly increasing speed.
Work to stay stationary. Shift or move as little as possible within the hips. These exercises might be exhausting at first, but correct placement leads to more stamina, because you'll be utilizing less energy to move.
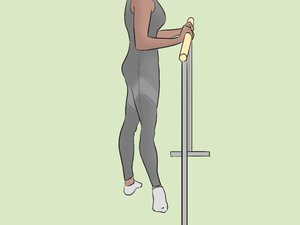
Temps Lié
1
Begin with demi-pliés, pushing your knees back as they bend.
This will keep them pointed in the same direction as when your legs are straight.
2
Check your alignment.
Shoulders down, middle back engaged, core in and up, glutes tightened, and legs straight.
3
Lift your leg, keeping both legs fully straight.
Push down on your standing heel. Fight the urge to shift side to side. Instead, press your shoulders downward and keep your back and core engaged, moving as one unit.
Did you know? You can keep your hands lightly on the barre, but don't grip it or rely on it for balance.
4
Repeat, going front to back instead of side to side.
Push through on your standing heel as you tendu forward, then tighten your glutes and back muscles as you tendu back. Your hips should remain square to the barre.
5
Come to fourth position before the next plié.
Keep your knees pointed outward as you plié. Your hips should be turned out.
Did you know? Training equally on both sides will prevent you from favoring one side over the other.
Method4
Ronds de Jambe
1
Circle your leg and pass through first position.
Don't let your leg cross your center line, or heel. This provides stability and better control of your hips. Keep your thighs and glutes tight so you don't sit in your standing hip.
2
Move from à la seconde through écarté and back to arabesque.
This can be challenging, so be sure to keep both hips still and square to the barre.
3
Turn outward.
Keep your shoulders, back, hips, and legs in unison. No one piece should lead the other.
4
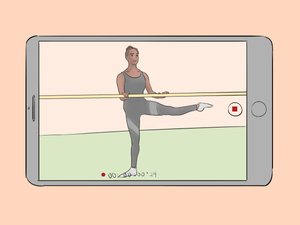
Record your technique and review.
This will eventually feel like second nature, but for now, reviewing your warm-ups and practices will set you up for consistent and balanced arabesques.
As a documentary filmmaker, you're here to be an emotional archaeologist, not to excavate the dry dates and facts of the past. Your documentaries will take the audience by the hand and show them the drama of history, and these tips from Ken Burns will show you how.
1
Don't choose the documentary topic; let the topic choose you
You might have lots of ideas in your head, but you'll know which one is worth pursuing when that idea leaves your head and goes down to your heart. It will literally take years to make this film, so when you say yes to something, make sure it really speaks to you.
Did you know? Never choose your documentary subject based on marketing or potential profitability---there's no such thing in the world of documentary filmmaking.
2
Research, research, research!
Accumulate thousands of sources: photographs, newspapers, footage, internet articles, paintings, etchings, sketches, letters, journals, diaries, etc. Keep researching and investigating until your film is finished, because at any point you could find something that entirely changes your perspective or inspires a new chapter in your documentary.
3
Write a compelling narrative arc
Poorly written documentaries are like lessons that taste bad. The laws of storytelling also apply to documentaries. Create an arc with a beginning, middle, and end that is filled with details, not summaries. Saying, "By 1866, the Confederate amy's supplies were almost gone" means nothing, but including a description of sloosh---a mixture of fried cornmeal and bacon fat that starving soldiers ate off their ramrods---makes that fact memorable and affecting.
4
Let your narrator speak with the voice of God's stenographer
Your narrator is one of the most important forces in your film, and hopefully one of the most invisible. Their voice should tell a story without shouting or sounding like an advertisement---they must speak with all of the importance of history but none of the ego.
Did you know? Never record voice-over to picture. The imagery should be added much later in the editing process, and matching the narration to the picture will result in rushed pacing that's unfit for the words.
5
Keep your interview questions simple and general
They'll lead to the most detailed of answers. For example, in the documentary Jazz, the question "What is jazz?" led Wynton Marsalis to reenact the entire Count Basie Orchestra. This could never have happened as truthfully if you'd asked, "Can you reenact what the Count Basie Orchestra was like?"
6
Record the music early on
This might seem antithetical to filmmaking, as music is traditionally added once a film is done. Your music is one of your directors, and the emotion it evokes can help determine which images to use and the pace and rhythm of those scenes.
7
Begin the editing process with a blind assembly
A "blind assembly" is a rougher-than-rough cut with only scratch narration, rough edits of your talking heads, no music, and---most importantly---no visuals. With only dialogue to focus on, you'll find the shape of your story. You can add imagery on the next pass.
Did you know? Editing is the most important part of making a documentary, as you're synthesizing every other aspect into one whole. It's your time to weed out the extraneous so that you get a smooth narrative arc within the context of each scene, chapter, and episode of your documentary.
8
Your source photos are your story; the camera movements are how you tell it
Of the thousands of photos you've researched, maybe 1 in 40 will make it into your documentary. To give them impact, hold on the photos or move the camera to convey the story. For example, a photo of a Civil War soldier might start by focusing on two revolvers, then tilting up to see the soldier wielding them is an angelic, baby-faced kid.
9
Make your sound design so realistic that it's startling
Your supplemental sounds will add life to your narrative. It's not enough to add soldiers marching or cannons firing. Think about what you most want to hear and how many individual components make up that sound. For example, if you're showing a house, do you include a dog barking and a screen door slamming, or do you also include cars passing, light traffic, and birds?
Did you know? The Gettysburg sequence in The Civil War used 26 audio tracks, and the Tet Offensive sequence in The Vietnam War included 160, and both were built from scratch.
10
Get feedback from your historical advisers and interviewees
Once you have a rough cut, hold a screening followed by an energetic and complex discussion during which the people involved in your documentary can provide feedback. Use this feedback as you complete your edits.
As a writer, building a fictional universe is like playing God. While this might appear to be a daunting task, author Neil Gaiman provides some tools to use---and pitfalls to avoid---when bringing your imaginary world to life.
1
Remember your childhood influences
Whether it's J.R.R. Tolkien or C.S. Lewis or P.L. Travers or Ursula K. Le Guin or even Neil Gaiman, think about the authors you read when you were young, and think about how they affected you on a primal and different level. Their worlds are places you'd recognize if you saw them, and you should strive to create something similar---something that feels like a real place.
Did you know? Fight the urge to create from an already established fictional place, like Narnia or Middle-earth. This is a fan fiction urge, and while fan fiction is great in its place, it's not appropriate here.
2
Start with intimate details from your own life
Remember the places you've lived in and visited, even if they're right outside your window. Then change them up a bit. You could modify your school so it's the size of a city, or on an island, or floating in the sky---but it all starts with your real memories of your actual school.
3
Ground it in realism
No matter how fantastic your world is, even if it's a floating school, include real-world details that are weird and unusual---the smell of cooking cabbage or the scent of unwashed sports clothes in lockers, for example. It will feel real to the readers, but more importantly, it will feel real to you.
4
Decide what's important about the world
Even if your fictional world is really just a soap bubble that can easily pop, it must appear very solid and real. What's important to you must be given importance in the story and then filled with people and characters who deal with these matters.
5
Ask yourself weird questions
Even if you have no intention of including these details in the book, it's good to know where the toilets are at this floating school, for example, or where the school gets its food from. The answers to these questions might create more details for your world.
6
Do your homework
If your world is set during medieval times, research medieval times. If your book is set in a graveyard, visit as many different graveyards as you can. Learn their history, their function, and their form, and add these details into your story.
Did you know? Neil Gaiman incorporated the ruined chapel in Abney Park and the topography of Glasgow Necropolis---both of which he studied during his numerous graveyard explorations---into his fictional graveyard in The Graveyard Book.
7
Always carry a notebook
Whether it's a physical notebook or just a voice app on your phone, you never know when you'll be struck by an observation or idea. Taking notes is vital, even if you never go back and read them again---they'll usefully rot away on the compost heap of your imagination, and they'll be there if you need them.
8
Know---but don't necessarily tell---the rules of your world
This is especially important if you're creating anything in the realm of the fantastic, where many physical laws might be different. Your world will have implicit rules, explicit rules, social rules, laws, customs, etc., and you should know what they are.
9
Let your characters discover the rules by making mistakes
In the real world, we aren't given a rulebook telling us how everything works. We must either be taught about gravity, fire, basic economics, etc. or figure them out for ourselves. The same is true of your characters. Let them bump into things, make mistakes, get burned---or perhaps subvert this by letting them occasionally take advantage of the rules---and the reader will learn them along the way.
Did you know? It's fine if your readers say, "I don't really understand the rules of your world." Nobody knows the rules of New York, either. They'll eventually figure out what they are, either by hanging out with people who know what they are or by making mistakes.
When you're directing an independent film like She's Gotta Have It, you might also be the caterer, producer, screenwriter, actor, and even your own 1st AD. And yet you can't make an independent film all by yourself; you'll need to work with a cast and crew to bring your vision to the screen.
METHODS
Working with a Crew
1
Budgeting takes compromise.
You can only make the film that you can afford. Scale down your plans for equipment, locations, etc. For example, you probably don't have the budget to shoot atop the Empire State Building, but this limitation can inspire you to come up with a creative idea that might be better than your original, expensive idea.
Did you know? The biggest way to cut costs is to defer pay. This is hard to do with strangers, so staff your team with people you know who have faith in your ability, the script, and the project. They'll be more likely to sign an agreement and work for deferment.
2
No matter what, feed your crew.
The easiest way to have a revolt on your set is to not feed your crew, especially if their payment is getting deferred. Don't skimp on craft services. It's a considerable cost, but it will keep your crew happy.
3
Be on time.
Your crew is watching you, and it will be hard to regain their respect if you show up late to your own set. However, if you prove you're dedicated to the work, they'll go above and beyond to get the shots you need.
4
Share information with your crew.
Once everyone is on set, talk about your plans for the whole day with your cameraperson, 1st AD, key grip, gaffer, script supervisor, and any other vital crew members. They should all know the answer to the question "What are we shooting?"
5
Respect your locations.
Treat your locations, particularly people's homes, like it's your own home, and make sure your crew does the same. A lot of this is just simple respect---cleaning up at the end of the day, not leaving shit around, and being quiet during outdoor shoots, especially ones that start early in the morning or go late at night. Otherwise you might lose your location and have to scramble to find a new one.
6
Always have a backup location, just in case.
You might lose a location due to budget, scheduling, or weather, so always have a cover set, or backup. You don't want to lose a day of shooting or be forced to make a last-minute rewrite.
Working with Actors
1
Take your time when casting.
When auditioning, bring in your leads three to four times, both by themselves and with their costars to test their chemistry. Just because they're great when performing alone doesn't mean they'll work well together on screen. The camera never lies when it comes to chemistry.
2
Earn your actors' trust and respect.
Working with actors can be intimidating, but you have to learn how to speak to them and listen to what they're saying, especially during preproduction and rehearsal. If you don't settle any issues with the script during rehearsal, it'll come up on set in front of the whole crew, and that will cost time, money, and respect.
3
Bond with your cast outside of rehearsal
You'll want your cast to feel like a family. This can be accomplished by having dinners together or, if you're making a heist film like Inside Man, by watching Dog Day Afternoon three or four times. Little things like this can go a long way and will pay off when they don't complain about a particularly long shoot.
4
Treat every take as a sacred moment.
Once you're shooting, be very respectful of actors and their craft. It shows the utmost disrespect when a phone rings or buzzes, or people move or talk, during a take.
5
Give your actors enough takes.
The easiest way to get a better performance from your actors is to do more takes. They aren't robots and won't hit it out of the park every time. Some actors are great on the first take; others are great on the eighth, ninth, or tenth. Give them the opportunity to hit their stride.
Did you know? Even if you get the perfect shot, many actors will ask for one more take. Give it to them---but only one or two! Actors love getting another take to try things a little differently, but you have to stick to a schedule.
6
Encourage their best performance.
It's your job to get the best possible performance from your actors, but not everybody responds to the same type of direction, so you'll have to quickly learn what they respond to best. If you have notes to give, call cut and have a quiet one-on-one conversation; don't embarrass them in front of the crew. And at the end of the day, let them sincerely know they've done great work.
Scrambled eggs are a much beloved morning staple, but there's an art to perfecting even this breakfast classic, as taught by Gordon Ramsay.
1
Prepare your ingredients
Gather your ingredients and set them up in your cooking area. Because scrambled eggs cook very quickly---three and a half to four minutes max---it won't be easy to slow down once you begin cooking.
5 large eggs
2 tablespoons cold butter
5 sea urchin tongues
1 teaspoon crème fraîche
1 teaspoon finely chopped chives or spring onions
Salt
Freshly ground black pepper
Shaved white truffle or truffle oil, optional
2
Crack eggs into the pan
Lightly tap the eggs on the edge of your nonstick pan, lift, and crack them open. Two to three eggs are recommended per individual.
Did you know? A nonstick pan gives a much greater yield on making scrambled eggs and provides a nice comfort that nothing will burn, as opposed to a stainless steel pan.
3
Add butter
The butter will make the eggs nice and creamy.
4
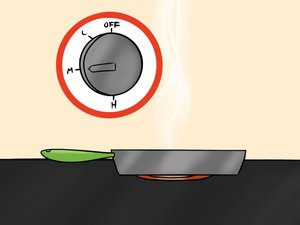
Cook on medium heat
Now it's time to cook your eggs!
5
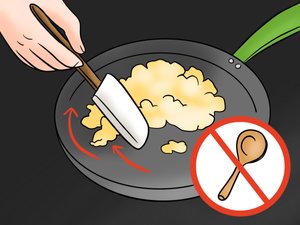
Turn and whisk your eggs with a spatula
The spatula is the secret to making sure your eggs are cooked evenly. Turn the eggs every time from the top of the pan to the bottom, making sure to remove all the eggs and butter from the bottom of the pan and scrape down the sides as well.
Did you know? A spatula is preferable to a wooden spoon, as it properly lifts the eggs off the pan and doesn't let any go to waste.
6
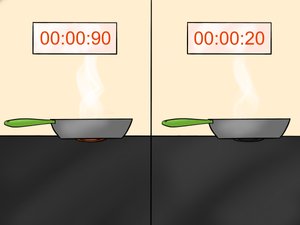
Alternate taking the eggs off and on the heat
Cooking your eggs too quickly will make them go runny. Be sure to give the butter a chance to melt nicely by taking the eggs on and off the heat: on for 90 seconds, then off for 20 seconds. Repeat for approximately four minutes.
7
Add one sea urchin tongue
Mix in one sea urchin tongue and chop it up with your spatula for a rich and creamy texture.
8
Add in remaining ingredients
Add a teaspoon of crème fraîche in with your chives whilst seasoning with salt and pepper. Fold into the eggs and sea urchin until everything is folded in together.
Did you know? Seasoning the eggs before they're cooked will cause them to get runny, go gray, and essentially ruin the dish.
9
Taste your scrambled eggs before plating
This is the most important step. Be sure that the flavors complement one another, and add more seasoning if necessary.
10
Plate your eggs with more sea urchins
Add a sea urchin tongue at the bottom of the bowl for a rich, creamy, and delicate surprise. Top with eggs---the heat from the eggs will cook the sea urchin on the bottom. Add one atop the eggs to truly elevate your scrambled eggs.
11
Add white truffle
Take some white truffle and lightly grate close to the eggs so as not to waste any shavings. A small drizzle of truffle oil can work as a substitute.
Did you know? Truffles are best stored in rice to preserve them and protect them from exposure to the air.
12
Teach your children
Optional: This is an easy recipe that you can share with your family, as your kids probably eat a lot of scrambled eggs.
13
Train as a chef in France
Optional: If you want to follow in Chef Gordon Ramsay's footsteps, studying in France is recommended, ideally under Guy Savoy and/or at one of Joël Robuchon's restaurants, as eggs were one of the first things Gordon Ramsay mastered whilst in Paris.
Learning how to make music is a wonderful creative endeavor. On the other hand, learning how to navigate the music industry is challenging and filled with many pitfalls. Electronic music artist deadmau5 offers his experience to help emerging musicians make their way through the industry.
1
Learn the system
There are many cautionary tales about musicians who were exploited in the business, and the best way to avoid that is to teach yourself a basic knowledge of music law, publishing, etc.
Did you know? The music industry is like a nightmare, but with some knowledge, it can be like a lucid dream where you have an understanding of the situation and some control to make it work for you.
2
Beware of major labels
There's a climate of fear around everybody who's trying to get a major record label deal, and with good reason. The major label's main focus is to make money, and they do so with their top talent. You won't have a person at a major label who's looking after you, let alone looking out for you.
3
Build a team you can trust
Your team should consist of three parts: accounting, legal, and management. Make sure you like them---don't ever work with someone you can't stand to be around, even if they do their job better than anyone else. You want your team to be an efficient, harmonious, well-oiled machine that will communicate openly.
Did you know? The sign of a good accountant is one who can answer "How much money do I have?" in one simple sentence.
4
Build an online presence and following
Before you can sell your music online, you'll need a following, and before you gain a following, you'll need some kind of website. It doesn't need to be anything fancy, just a source with a gateway payment system (e.g., PayPal) to begin aggregating your stuff out.
5
Cautiously move into bigger marketplaces
The most effective way to sell your tracks online is through iTunes, but it takes some time to get to that stage. Other services might not be as beneficial to you. For example, you can't actually sell anything on SoundCloud. Be very careful whenever it comes to signing a contract and working with a company and why.
6
Albums are not entirely necessary
There's a traditional reason why major labels want to sell music in packaged albums---they're the most cost-efficient way to make money. Albums are nice but not necessary, especially in electronic music. If you prefer, you could just release singles whenever you want, as this is faster and simpler, and they can eventually be put together into an album, if you want.
7
However, create a total package of yourself as an artist
Labels, especially Mau5trap, look for self-sufficiency. This means not just creating solid music but understanding your branding and unique style as a musician, including art direction for album or LP covers.
8
Don't stress over song and album titles
Deadmau5 literally named a track "Right This Second" when told by his manager that he needed a title for it "right this second." Unless you're deliberately trying to come up with a horrible title, the name of a song isn't going to change its popularity.
9
Develop your network along the way
As you develop your music, be a part of your local music community as an actual human being and not some email address. Build your connections by meeting with like-minded individuals, and share information, stories, and experiences regarding the industry.
Did you know? No record label likes the person who constantly sends out demos. If you're good, your network will share it, and word of your skill will get around.
10
Evolve and grow
Think about YouTube stars who are hot for a minute but eventually fade when people move on to something else. You need to evolve, grow, and learn not just as an industry professional but as a creative artist, because otherwise you might just be around for one summer and then you'll be left behind and forgotten.
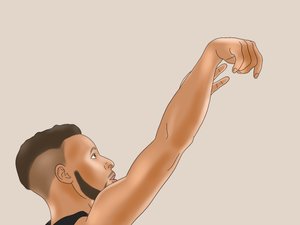
Whether you've played basketball since you were five, like Stephen Curry, or are starting at the age of 55, the jump shot is one of the most vital moves in the game, and it all starts from the ground up.
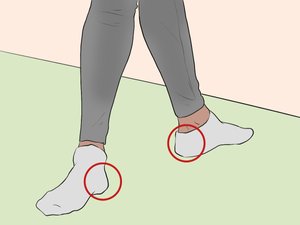
1
Face your 10 toes to the rim
Square up your toes so they face the basket. Your hips and chest should also face that direction.
Did you know? Your feet might naturally point 10 to 15 degrees to either side of the basket. This is fine as long as you point them in the same direction and remain as square as possible.
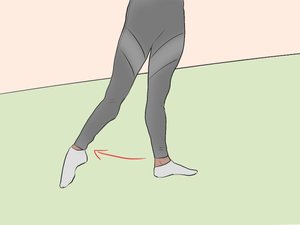
2
Plant the arch of your foot
Firmly plant the arch of your foot into the ground in order to increase strength and balance on your jump shot. This also prevents you from rolling on the outside of your foot, which not only decreases your strength and balance but can cause an injury.
3
Use your legs as the foundation of your shot
The greatest shooters don't shoot with their arms; they shoot with their legs to bring energy, flow, motion, and power to their jump shot. Keep your legs square with your shoulders and bend your knees properly so they load into your hips and backside.
Did you know? If you extend your knees beyond your toes, your legs won't provide power to your jump shot, and you might lose your balance. Avoid bending your knees in or out too far---bending inward decreases your power and balance and can cause an injury, and bending outward means you'll be at a disadvantage against your defender.
4
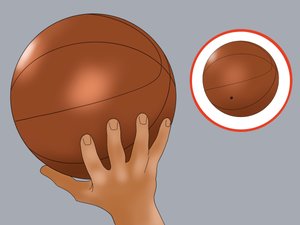
Hold the basketball so it sits on the pads of your fingertips
Keep a bit of space in between your palms and the ball---don't let it just sit in the palm of your hands---for proper spin, rotation, and control.
5
Place your lead finger on the ball's air valve
This makes sure your hand is centered on the ball and will let you properly release the ball and keep it in line with your arm toward the basket.
6
Aim for the net's hooks
No matter where you're shooting from, you'll be able to see two or three hooks connecting the net to the rim. These are almost the same width as the basketball, and by aiming for the hooks at the front of the rim, you'll get the ball just over and through the hoop.
7
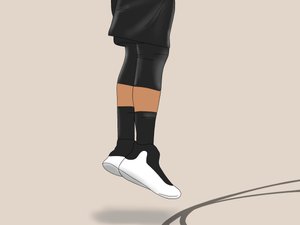
Jump straight up and down
Use the power from your arched foot and bent knees to jump with as little change in direction as possible. If you twist and/or jump toward the basket, your accuracy will decrease.
8
Raise the ball high and release it at a 45- to 48-degree arc
The release point is the most important part of the shot because it determines how close your defender needs to be in order to block. A higher release point is harder to defend, but releasing too soon means the shot will start low, your opponent won't have to get as close to block, and your opponent can also block your line of sight with the basket.
Did you know? A flat jump shot will most likely hit the back of the rim and bounce out. You'll want to shoot at a 45- to 48-degree arc---anything higher than that and you'll lose control and accuracy---so the ball travels downward as it comes to the rim.
9
Finish with your elbows high and your lead hand in a "goose neck" position
Your elbows should be fully extended and above your eyes, not out to the sides like a chicken wing. The "goose neck" provides a visual of putting your fingers right in front of the basket.
10
Record and review your practice
Film never lies, and watching videos of your shooting techniques is a vital part of your success. You can break down your form and technique, see how you're getting better, and learn from your mistakes. Be purposeful in how you watch---it's different than watching basketball as a fan.
Putting on makeup is an individual way to make yourself feel better about how you look. While there are no exact rules for everyone, Bobbi Brown provides her experience as a professional makeup artist to help you look like the best version of yourself.
METHODS
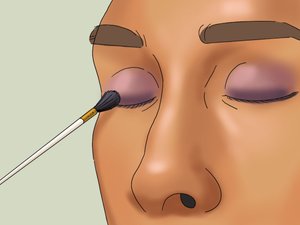
Applying Eyeshadow and Eyeliner
You'll need three colors: a light color, a medium color, and the darkest color. The type of eyeshadow can be whatever you prefer---powder, cream, shimmer, pencil, etc.
1
Blend the lightest color all over the lid.
This lightens a bit of the eyelid and takes out all the oil.
Did you know? Depending on your skin tone, the color can range from white/bone/ivory for fair skin to warmer tones for medium skin and deeper tones for dark skin.
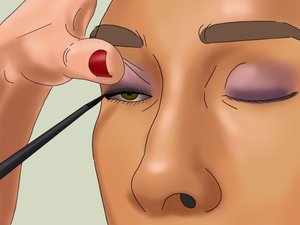
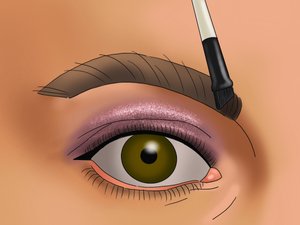
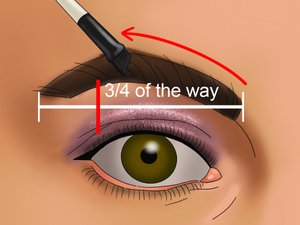
2
Apply the medium color from the lash line three-quarters of the way up.
Use a color and formula that's easy to blend. Apply it close to the lash line, then go three-quarters of the way up to create depth and bring out the eye.
Did you know? Flat eyeshadow is also known as matte eyeshadow, and some are very dry and don't blend easily. Make sure yours blends easily into the skin.
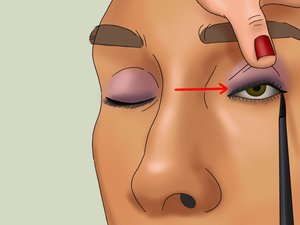
3
Apply the darkest color for eyeliner.
Have the eye closed, but gently pull up the lid so you can get right into the lash line. Start thicker on the outside and gently go in so it almost tapers off. Go over this a few times, then go a little bit lighter underneath the eye so it isn't so intense.
Did you know? Stick with brown, black, or navy (not blue) eyeliner. The color should enhance the eyes, not distract from them, and eyeliner is what makes the eye stand out more so than eyeshadow.
4
Do the same to the other eye.
Be sure to stop and look as you build to make sure they match.
Did you know? If you have excess eyeshadow on your brush, remove it by tapping or blowing on the brush. Otherwise, always use a cotton swab---the wooden ones are stronger and less likely to blend---before any kind of eye makeup remover to avoid making a mess.
5
Add a bit of sparkle if desired.
Sparkle or shimmer can be used during the day for a bit of fun---it isn't just for evening or black tie.
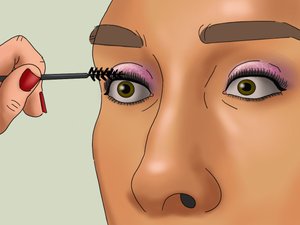
Applying Mascara and Curling Lashes
1
Apply two to three coats of black mascara.
Keep your eyes open, and hold your eyelid to protect the eye. This prevents getting mascara in your eye if you blink. Separate their lashes as you apply the mascara.
Did you know? The type of lashes you have is usually determined by the hair on your head. People with a thick head of hair often have thin lashes, and people with coarse hair often have great, super-curly lashes.
2
Line the bottom of the eye, if you prefer.
It's not usually necessary, but if you choose to line the bottom lashes, make sure the application is much softer than the top.
Did you know? Use a spoolie to separate lashes that get stuck together. They're an all-around useful tool that can also be used for eyebrows, and clean ones can even be used to remove chia seeds that get stuck between your teeth.
3
Curl the lashes as they dry.
You don't need an eyelash curler---simply hold the lashes upward so they'll curl as the mascara dries.
Your Eyebrows
It's up to you whether you prefer to do your eyebrows before or after you put on your eyeshadow and mascara. You can also use any material you prefer, though it's preferred to use the same shadow as your eyeshadow or slanted pencils made specifically for eyebrows that are slanted and have a nice spoolie on the end.
1
Start at the inside of the eyebrow.
Use the whole eyebrow. Brush up, fill in, and use the eyeshadow to create a shape that makes the eye stand out.
2
Create your eyebrow's arch around three-quarters of the way to the outside of your eye.
Frame the eye, and make sure both eyebrows match.
3
Fix anything that looks overdone.
You can use powder to soften a brow that's gone too dark, use a spoolie to remove or blend in excess makeup, or bring in some face powder to make it look more diffused.
The best interior design celebrates the comfort and joy of family life while helping you live better and feel better. It can also be a daunting task, as there are so many choices, colors, and materials to choose from. When it comes to properly lighting and furnishing your home, Kelly Wearstler has advice on how to simplify the process.
METHODS
Lighting
The importance of lightning cannot be overstated. It can change or alter the architecture of your room, highlight certain pieces, and create an overall mood.
1
Go natural whenever you can.
Natural light is the most beautiful light---it's warm, it's sexy, and it makes you look and feel good. Let it in wherever you can, even if it's just a sliver of the sun.
Did you know? Linen curtains work well in rooms that get too much natural light. This gauzelike fabric blocks a lot of the strong rays while still letting in plenty of light.
2
Provide lights at different heights.
Successful lighting lets your eye travel around. Place light sources at different levels of the room---low, medium, and high---to create visual interest and enhance the architecture. For variety, include a combination of floor lamps, table lamps, pendants, etc.
3
Use architectural lighting for wayfinding.
Architectural lighting means any source of lighting that's attached to the architecture, like a step light, sconce, or pendant that hangs above a table. These provide wayfinding, which means they guide people through the environment and help them better understand and experience the space.
4
Dimmers make a huge difference.
Dimmability is important, as it can easily create a mood or enhance a task. There are many different dimming solutions on the market, so choose a material that fits the design of your room. An electrician or handyperson can help with installation.
Did you know? If you have dimmability on your light fixtures, you might as well go with a high wattage of bulb---up to 100 watts, depending on your wiring and fixtures---because you can then dim it as low as you want.
5
Experiment with bulbs and shades.
Every type of bulb, whether clear, etched, frosted, etc., has its own glow. Furthermore, every shade will direct or diffuse the bulb's light in a different way. See how the two interact and which combination achieves the desired warmth and illumination for your room.
Did you know? LED strips, while architecturally popular, can be initially cold. They become noticeably warmer around 2,700 Kelvins.
6
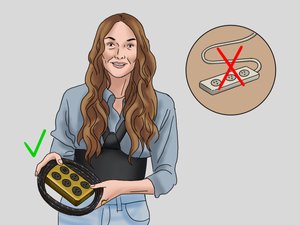
Manage your cords.
Cords don't just have to be functional, they can also be decorative. Power strips are available with cotton and silk cords and come in a variety of colors, and swag cords are an option that can enhance the design of your room.
Furnishing
1
Comfort is key.
Functionality and warmth are more important than looking cool and being sculptural. You want a comfortable, intimate sense of place.
Did you know? Always test out a chair before you buy it. If the chair isn't suitably comfortable but does a lot for the design of the room, make sure there are other, more comfortable options in the room as well.
2
Items can be different and still balanced and symmetrical.
Your furniture doesn't have to have the exact same size or weight to be symmetrical---there just needs to be a balance. A square table could be larger than a rectangular one, but the balance and proportion can still work.
Did you know? Just like you don't have to wear the same pair of earrings, you don't have to have the same pair of chairs next to each other. Opposites attract.
3
Tell a story of form and design.
All these shapes come together to tell a story and create movement and magic in the room. Whether you furnish your room with items that look like they were found at the beach and are rounded, soft, and warm or something more cubist and sharp, follow that story. Not everything has to have that shape, and you can certainly have some contradictions, but it's a great way to start out.
4
Vary the materials.
Different materials make the room look and feel more interesting. This doesn't apply to just the furniture---if you have two rugs, make sure they have a different construction pile. If your walls are painted with a high gloss, then your ceiling could be flat.
5
Use mirrors to make a small space feel larger.
This isn't limited to just a mirror attached to the architecture. You can use a collection of several mirrors, freestanding mirrors, or even a single small mirror to open up the space.
Did you know? You can also use furniture with legs to give the room the appearance of height, as it gives your eye somewhere to travel between the floor and your furniture. However, if you have a small room, make sure your furniture doesn't have a high back, because this will make the space seem smaller.
Music is a language that's purely about expressing emotion. When the writers have run out of words and the cinematographers have run out of pictures, the director's final tool is music, and that's why the musical score is such a vital element of every film.
1
Get the director's version of the story
Having a conversation with the director is much more effective than reading the script. They'll tell you what's in their head, what to emphasize, and where their thoughts are headed. Stick with this story, and never abandon or betray those themes.
2
Sit on your hands until you have an idea
Don't immediately touch the keyboard and begin playing---your muscle memory will take over and you'll retreat to old territory. Wait until you have the slightest bit of inspiration, even if it's just one note, and go from there.
3
Play your tune with one finger
Focus on four bars that are short, succinct, and say a lot. If the heart of your tune is intellectually and emotionally tight, it can then expand outward.
Did you know? The theme from Batman Begins is just two notes, but that's enough to create many variations, depending on how expressively they're played or how they're modified by LFOs and faders.
4
Be practical and strategic when choosing your key
Pick a key that gives you the most freedom and possibilities. Keep it simple and come back to this home key as often as you can.
Did you know? Hans Zimmer prefers writing in D, not only because it's simple but because it's the final string that a bass can play openly and still achieve vibrato.
5
Create your own samples from scratch
Premade samples create a sort of gray sound, as the emotion behind each note is identical. Experiment with samples and create a unique set that fits your film. Avoid using presets, as they'll corrupt the sound you're imagining in your head.
Did you know? Of the many synth programs---Cubase, Logic, Pro Tools, Ableton Live, etc.--- the best software is the one you know and like best. Software is an instrument and tool, just like a Fender Stratocaster, and you use it to amplify your individual musicality.
6
Create unique sound palettes for different story atmospheres
Let the music seep into a more abstract sound of atmosphere and room tones. Consider the different soundscapes in Batman Begins' Gotham City, which contains the grandeur and wonderful architecture of a city made up of shiny steel and glass versus the grubby night scenes. Like two sides of the same coin, the sound palettes show the hope and beauty of the city before it gets destroyed.
7
Complement the film's light and color
The DP tells their version of the story through light and sound. Your score should coexist in that visual world.
Did you know? The acclaimed cinematographer Vittorio Storaro's book Writing with Light is an excellent study on the subjects of light and color, and though it's not musical in nature, it's an indispensable read for composers in order to create this cohesion.
8
Play something the audience doesn't expect
Surprise them right out of the gate with the very first note. For example, an audience seeing Sherlock Holmes will expect classical violin music. Instead, use a Roma-inspired violin, the kind that might have been played in a Victorian pub near Baker Street. Avoid clichés like giving bass notes for the villains or violins for romantic music.
9
Keep organized!
A film score can have over 1,000 tracks. Maintain an efficient naming and numbering system or you can lose vital tunes, like Hans Zimmer did with Black Hawk Down.
10
Budget is not a factor
The creative process takes place entirely in your head, and it isn't limited by budget. If you think you need a huge symphony orchestra, that isn't a budget issue, it's a creative issue---you're limited by your imagination because you haven't figured out how to make this sound with four musicians or with an as-yet-uncreated sample.
Being able to consistently serve well is vital to the sport of tennis, as it's the only shot where you have complete control, and it's an opportunity for you to score an ace without spending any energy running toward the next shot. However, it's also one of the hardest shots in tennis, so it requires a lot of practice and effort to master.
1
Bounce the ball and clear your mind
Many players bounce their balls several times before serving and take this moment to mentally prepare for the moments ahead. Bounce the ball five times before your first serve and twice before your second serve.
2
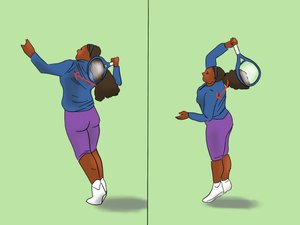
Have proper posture
Start out with a good shoulder turn---you'll use your whole body instead of using only your arm, and will avoid arm strain and injury. Be sure to bend your knees, as the momentum from this bend will help with follow-through on your serve.
3
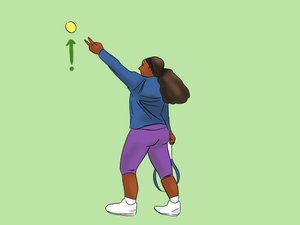
Perfect your toss
A consistent toss is necessary for a consistent serve. Stand in a serving position and toss the ball up (not too low!) as your hand comes closer to your head. Keep your arm straight and make sure it always lands in the same line as your arm. You can also see whether the ball falls too far to the right, left, or in front of you and readjust accordingly. Best of all, this requires zero cardio!
Did you know? To increase your serving speed, you can practice your toss by using a light medicine ball.
4
Jump and catch the toss before it drops too low
Jumping helps you get more power through the ball and should feel natural because your knees will be bent. Connect with the ball when it's still above your head. A common mistake is to connect with the ball too low, which forces it down---it's important to connect with the serve at a higher strike zone.
5
Pronate your wrist
Pronation is when you turn your wrist out during the end of your serve. This creates a much flatter serve and will go through the court faster.
Did you know? You can improve your pronation by throwing footballs.
6
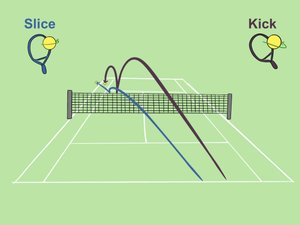
Mix up your serves
Whether it's a change in direction, strength, or topspin, a change in your serving style means your opponent won't know what to expect.
Method 1: The Kick Serve. Connect more behind the ball and create more spin so when it bounces off the court it will jump high...and out of your opponent's strike zone.
Method 2: The Slice Serve. The slice serve is the opposite of a kick serve and turns the ball away from your opponent. It stays low, gets your opponent out of position, and opens up the court for you to end the point faster. It's best used on fast surfaces like grass, indoor courts, or carpet.
Did you know? A kick serve works well against smaller opponents, against opponents who don't like to hit balls high, or on clay courts where the ball naturally bounces higher.
7
Practice, practice, practice
Practice is vital to getting your serve down. Whether it's just practicing your toss or hitting a shopping cart full of tennis balls with your sister Venus, you'll only improve by practicing.
Did you know? Exaggerating your follow-through will improve your follow-through. Exaggerate your follow-through so much that your opponent sees your back when you've finished serving.
8
Practice...with other balls
Practice your toss with a light medicine ball. Throw a football to your sister Venus to improve your wrist pronation.
9
Watch how professional tennis players serve
See what makes them successful. In the case of Pete Sampras, it wasn't necessarily his power but his placement. He was able to hit so many aces because his opponents never knew where he was going to serve.
People spend way too much time and money in film school, but the essentials of filmmaking can be learned on your own within two weeks. Instead of collecting garbage with your camera, follow these lessons from Werner Herzog to quickly and cheaply shoot a film.
1
Don't worry about your gear
You don't need a state-of-the-art camera to make a film. You just need a camera.
Did you know? Jean Rouch shot Les maîtres fous with a single-lens, batteryless camera that could only shoot for 24 seconds before it needed to be cranked by hand, and it is one of the finest documentaries ever made.
2
Set the visual mood for light
If, for example, you are making a film like Nosferatu, which has a lot to do with darkness and shadows and night, consider how to illuminate a face with only candlelight. Consult with your cinematographer, and study the late medieval paintings of Georges de La Tour as opposed to the pastel look of Vermeer.
3
Be the only one unprepared on set
This keeps the actors on edge, but they know their dialogue and movements and what they're doing. Stage the scene and choreography while on set to capture the "pura vida"---not the literal translation of purity of life, but its full scope and exuberance.
Did you know? Storyboards are an instrument of cowards. They might be necessary and useful for digital effects, but otherwise they lead to lifeless days of shooting and stale films.
4
Set up quickly and on a small scale
Keep your lighting equipment small, especially when making a documentary, as you have to be flexible and quick. Otherwise you lose the moment and intensity. Avoid heavy cables and big reflectors. Sometimes a small reflector---or even just a white piece of paper---will be enough to get some light onto the face.
5
Aim for momentum over style
Once you are on set with actors, you are there to film the scene, not adjust background lights. Otherwise you'll lose all the magic and the momentum.
Did you know? Aesthetics are a natural concomitant of what you're doing. If you force it, it will come close to feeling kitschy or artsy-fartsy. Let it seep into your film on its own. How it does that, you won't know, and best of all, you won't even care.
6
Make camera decisions on set, not in post
There's a tendency now to shoot all angles and decide during postproduction which shots to use or where to push in for a close-up. This is devastatingly stupid. Make up your mind when you're filming right then and there. That's where you win or lose the battle.
7
Use your whole body to shoot the camera
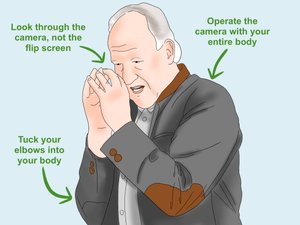
When shooting with a handheld camera, tuck your elbows into your body and operate it with your entire body, not just your arms and hands.
Look through the camera, not the flip screen. Weave your movements into the scene you are creating and physically move the camera.
Did you know? Zoom lenses can be helpful for complicated scenes where there are lots of extras or where you have to shift very quickly from a closer to a wider shot, but in general it's better to move the camera yourself and not rely on a technical piece or lens.
8
Shoot in a single shot to save time
This gives your film a sense of urgency and cohesion. Leave everything that's not important and try to shoot the whole sequence in one single shot. Move with your actors as you do it.
9
Only shoot a scene three to five times, and don't shoot much coverage
If the scene doesn't function after five takes, there's something wrong with the dialogue or the scene and you'll need to rewrite it. As for coverage, use it when you know you'll absolutely need it---for example, shooting a reverse shot for a dialogue scene. On Hollywood sets, it's all the rage to shoot a sequence in four to five hours, then spend eight to 11 hours on coverage that will never end up on screen.
10
Collect the remarkable, not the garbage
You are not a squirrel accumulating little nuts with the hopes that by keeping the camera rolling and rolling you'll have a great film afterward when you find the gems in your pile of footage. You won't. It's a waste of material and time. You are not a garbage collector. You are a filmmaker, and you do only the truly intense and remarkable.
Authored by Neil deGrasse Tyson- Pop Science Personality
Science is based on asking questions and progressing from ignorance to an understanding of established, objective truth. These steps will empower you to think for yourself and figure out what is true---and not because of what you know but because of how you think.
1
State your assumptions
Although assumptions are a type of bias, if you have assumptions about something, just say them out loud or record them in some way. You'll soon discover whether or not they're objectively true.
Did you know? There's value in experiments that have a false assumption, as once they're proven false, you'll know not to make that assumption again.
2
Be a skeptic and ask questions
True skepticism means asking questions when you're unsure what to believe and making up your mind once valid evidence is presented. Asking questions takes you down a path of inquiry toward the truth.
3
Demand evidence, not testimonials
The degree to which you believe in something should be in proportion to the evidence that supports it. The court of science considers eyewitness testimony to be the lowest form of testimony. Anyone can say they looked through a telescope and saw an alien waving at them, but can they provide physical, tangible, recorded proof?
Did you know? This even applies to noted experts! If someone's words have authority over what you think, they can get you to believe anything. Objective truth can't just flow from the statements of authority figures---even astrophysicists like Neil deGrasse Tyson---without evidence.
4
Repeat experiments multiple times with different investigators
One experiment is never enough, but if it's repeated, and the experiment consistently repeats with slight variation, then you can conclude that the results are objectively true.
5
Question whether patterns are really there
People can make patterns out of anything. This is called pareidolia, and it especially results in patterns we're familiar with. For example, if you programmed a computer to randomly lay down dots on a page, people would mentally connect those dots to form a picture. However, it would be a made-up pattern. To the computer---and a scientific observer---that picture wouldn't be real.
6
Beware of confirmation bias
Confirmation bias is the most insidious of the cognitive biases, and it's a flaw in everyone's reasoning. People naturally assume that they are correct and look for information that supports their belief in what's true.
Did you know? Internet search engines are the epitome of confirmation bias, and a way to fight it is to learn perspectives different than yours. If you only watch TV or read books that agree with what you already think, you're putting yourself in a bubble and feeding your confirmation bias.
7
Let go of cultural, religious, and political biases
Everybody is influenced by their society; these biases more commonly appear in sciences that have humans as their subject, like anthropology. However, your beliefs on how the world works cannot interfere with how you accept or view evidence based on scientific research.
8
Look at things from a cosmic perspective
One of humanity's greatest biases is that people want to feel special, but from the perspective of the cosmos, people aren't different. We're all the same. By understanding and accepting this cosmic perspective, you can recognize that your ego is unjustified in the grandest scheme of things, and it can help you reset what you think is important in life.
9
Admit when the evidence proves you wrong
If you want to get closer to objective truth, you have to admit when your assumptions are wrong. If you can't say that, you'll never be a person who actually discovers things in this world. After all, science is true whether you believe in it or not, and that's why it's so powerful and why every country does it exactly the same way---because it's an objective truth that is as free from bias as possible.
Everyone has an interesting story to tell, but the way you tell it should be interesting as well. This advice from David Sedaris will help you create your own humorous essays.
1
Engage with the world for inspiration
First you have to find an idea for your essay. Life can feel like a story, but only if you pay attention and tune in to the world. It's not enough to stare at your phone all day; you have to look away from the screen and have experiences big and small, like feeding a kookaburra bird, as David Sedaris wrote about in his essay "Laugh, Kookaburra."
Did you know? Saying no to opportunities shuts everything down, but saying yes can lead to a mini adventure. However, always focus on the experience---don't pull out your notebook to write about it or else you'll disrupt the beauty and authenticity of what's happening. Just let it play out and see what happens next.
2
Skip the small talk and ask interesting questions
When talking with people, don't ask the sort of question you'd ask a stranger in a hotel or store. Questions like "How's your morning going so far?" or "Any big plans for the weekend?" don't leave you with anywhere to go. Ask something unexpected like "Have you ever run for office?" or "How long has it been since you touched a monkey?" These will bring about conversations that dig below the surface.
3
Write every single day
Especially if you don't know what to write about. Sit at your desk without the internet to distract you and see what you can come up with. So much happens when you don't have an idea, and the only way to find out is to do the work.
Did you know? If you're stuck, make a list of moments from your life that you find interesting. Go beyond the first three ideas---they might have already been done to death, but your eighth or tenth idea will have promise.
4
Keep a diary
A diary is a mine of inspiration, so write in one every single day. The entries will be short, maybe only incidents or vignettes, but you can rewrite the ones that are funny or interesting, and that second draft might have potential as a full-on story or essay.
5
Connect these vignettes so they tell a bigger story
Find entries that have a shared or connected theme, and expand upon that so it's not just an account of a visit to a taxidermist's shop but an essay about how your macabre inclinations were understood by the taxidermist, like in David Sedaris' essay "Understanding Owls."
Did you know? People want to connect with your writing, and they'll do so if you write about things they can relate to or see themselves in, even tangentially. They might not be into taxidermy, but they'll understand what it means to have an unusual interest in something.
6
Give your essay's theme some emotional weight
Essays can be simple and make people laugh and laugh, but then they'll forget about them. Sorrow or emotion gives weight to the humor and makes it more memorable because they mean something.
7
Write about people you like, and honor and celebrate them
Your duty as a writer is to let the reader see the people in your life through your eyes. You don't want to embarrass them or expose any of their secrets. Always get the approval of the people you're writing about, and show them what you've written. Make any edits or removals they ask you to make.
Did you know? It's all right to express complicated relationships. It's challenging to write about, but these complications make your essays richer. Discussing someone's faults makes them seem complicated but doesn't necessarily diminish them.
8
Don't overcrowd the story
The reader can only hold so many characters in their head. Don't include everyone at a dinner party, only the members who are pertinent to the story. The same is true for themes, incidents, or vignettes.
9
Focus on your own horrible characteristics
You're your own gold mine, and you contain a wealth of experiences, stories, and, most importantly, reactions. Be honest about those, especially when they make you look bad. You need to be able to laugh about yourself, and then the readers will laugh along with you.
10
Sacrifice some of your laughs for truth
It's not your job to be pretty or funny all the time. Sometimes you'll need to get rid of a funny line and admit how you honestly feel. Dig deeper, be vulnerable, and your essay might go to a completely different place.
Did you know? Talking about emotions and talking about truth are two different things. Emoting can be cheap or manipulative. Instead, dig for the moment that connects everyone. This universally human connection will feel like touching a nerve, and it's what you should strive for in your writing.
People think that suspense and high stakes are the only things necessary to write a thriller, but those elements exist in every story. According to Dan Brown, thrillers are about much more, and he has other advice on how to write your own gripping page-turner.
1
Start with a world---and a question---that excites you
Thrillers don't always have to be high stakes; they can just as easily take place in the world of winemaking. As long as you're interested in this world and excited about it, it's a good choice for your story.
Did you know? Don't be limited by the adage "Write what you know." It's more important to "Write what you want to know about," since you'll spend hours researching this world. Pick something you're enthusiastically curious about.
2
Decide the dramatic question of your novel
This world will have a single dramatic question that's simple and easy to follow, such as "Will Robert Langdon find the virus and save the world?" or "Will the hero save their family's vineyard?" This dramatic question sums up your novel.
3
Create your villain
It may seem counterintuitive to work on your villain before your hero, but the villain represents the world, and their actions define the hero. Give your villain a morally gray perspective to add complexity, but make sure their actions are clearly villainous.
4
Choose a hero that fits this world
Thrillers often put ordinary people in extraordinary circumstances, so your main character doesn't have to be particularly "heroic." However, they should have some expertise within this world.
Did you know? Adding some flaws to your hero not only makes them more relatable but also gives you opportunities to put them in peril.
5
Check for the Three C's: Contract, Clock, and Crucible
The contract is the promise you're making to the reader---that this will be a thriller, that the hero has a dire situation, and that the hero will solve the dramatic question you've posed. The clock is the ticking clock in the background of the story. Suspense must have the pressure of time. The crucible means the hero can't run away or escape from this situation. They must face the villain. It will be miserable for them but exciting for the reader.
6
Introduce everything right away
Writing that first chapter seems daunting, but you already know what you need to share: the world, the hero, the villain, the conflict, and the stakes. The sooner you get to this, the better and more exciting your novel.
7
Skip to the finale
You already know certain things about the finale due to your contract with the reader: The hero will defeat the villain in an exciting and surprising way. You'll come up with the details later, but realize that's how this novel will end.
8
Use locations to muddle through the middle
The middle is often the hardest part to write, but if you keep your world in mind, you can use important locations for must-have scenes. For example, a thriller about winemaking could have a chase scene through the grapevines or a sequence around the grape-smashing machine.
9
Develop supporting characters
Your hero interacts with supporting characters who have a different skill set and bring something new to the equation. There's an added bonus if they can provide some sort of tension, whether it's character-driven, emotional, or romantic.
10
Add more peril with obstacles
Keep it thrilling! If your story starts with legal problems, heighten to physical danger. Turn up the tension with secret backstories that make things more personal or dangerous. Increase the conflict with obstacles---facing big obstacles is what makes a character heroic. Have them discover the unexpected, and as they find bits of the puzzle, add more questions to the story.
Did you know? Cliffhangers are great for adding suspense. You can easily create cliffhangers by ending the chapter with a twist, a revelation, or a reaction from the character but not revealing the cause until the next chapter. This is called withholding.
11
Don't just follow the hero, follow the villain
The villain adds suspense as they commit more and more villainous acts and get closer to victory. These parallel plots also remind the reader of the stakes and the moral ambiguity of your world.
12
Wrap up your story with an exciting "how."
The hero uses their unique skills to win in an unexpected way. The villain's punishment fits the crime, so if there was murder, they can die, but if it was a stolen wine recipe, killing them is going overboard. Make sure your moral foundation is upheld to the end and the reader will be satisfied that your story was fair and fit the world you've established.
The act of writing about others is an opportunity to investigate the contents of someone else's mind and present it to readers so they can transcend their own experience and see something from someone else's perspective. But to do that, you must portray your character in a compelling and accurate way.
1
Summon the character's spirit
Describe their words and actions and the unique details in how they say/do them so that the reader gets a glimpse of how wonderfully and spectacularly weird they are. For example, if you're writing a profile on Wall Street trader Nassim Taleb, include the fact that he repeatedly and affectionately calls one of his employees "lazy" but in a way that actually means "genius."
2
Describe the character by describing other people
Other characters can provide a vivid contrast to your main subject, such as this description of Nassim Taleb's coworker: "[Mark] Spitznagel is a blond Midwesterner and does yoga; in contrast to Taleb, he exudes a certain laconic levelheadedness. In a bar, Taleb would pick a fight. Mark would break it up."
3
Stack your descriptions
On its own, describing someone as blond (so you think he's not that smart), or as a Midwesterner (he's boring), or as one who does yoga (he's some kind of dreamy millennial) is rather simple and clichéd, but if you stack them, you quickly paint a portrait of someone who's a bit more three-dimensional---even if they're not your main character.
Did you know? You don't need to be like Proust and write pages and pages of description. Stacking images is an efficient way to quickly establish characters.
4
Write about your character from the perspective of others
Your friends, family, and coworkers describe you very differently than you describe yourself, so when you construct a profile this way, it can be very telling about the main character.
5
Describe your character's world
There is as much value in describing the physical space someone inhabits as there is in describing the person themselves. It can be just as strong, if not stronger, to describe their bedroom, as their location can paint an incredibly effective portrait.
Did you know? You can be even more specific by showcasing the location where they do the primary action of your story. For example, focusing on the affluence and 1960s aesthetic of the advertising agency where Viennese psychoanalyst Herta Herzog worked as a motivational researcher.
6
Set the stage for what's interesting about your character
Locate the thing---whether it's an idea or context---that draws readers into your story. If you're writing a story about Ron Popeil, the infomercial pitchman, the significant conflicts in his life are with his own heritage and family legacy, so focusing on that is a powerful way to introduce Ron as a character. Then when he's shown delivering his infomercial pitch, the audience is doubly awed by his skills and the adversity he overcame to achieve them.
7
Write on your character's behalf
Your characters aren't writers---they can't explain themselves to the world. As a writer, YOU can write about them so they would feel like they were represented accurately and treated fairly. Render your character as they see themselves.
8
Practice your writing
Think of being a writer as similar to being an athlete---they practice much more frequently than they compete, and you should follow suit. Use any of the methods above to "summon the spirit" of a friend: Interview their friends and family to compile a profile, spend time in their personal environment, and write about that for practice.