Software testing can be stated as the process of verifying and validating whether a software or application is bug-free, meets the technical requirements as guided by its design and development, and meets the user requirements effectively and efficiently by handling all the exceptional and boundary cases.
Collected defination from Geeksforgeeks
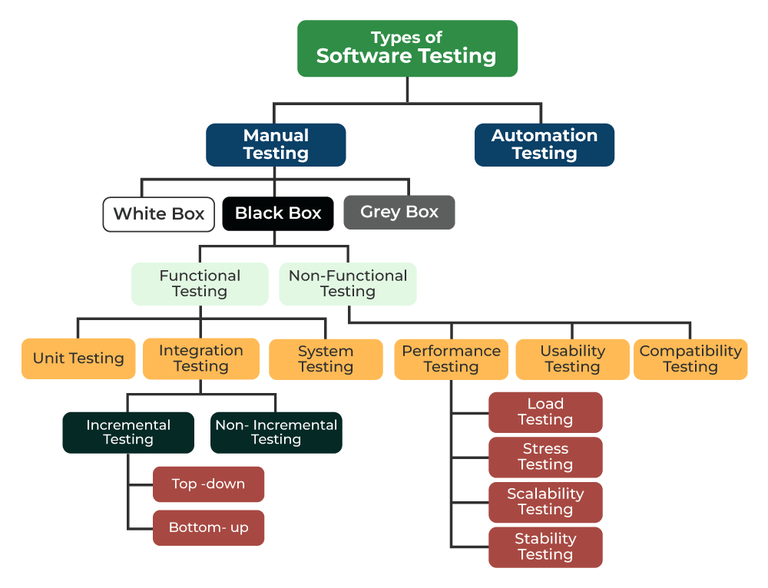
Unit testing is one of the software testing types which includes the initial testing phase where the smallest components or the modules of a software are tested individually
In this artile we will implement PHPUnit testting on WordPress plugin.
To setup local environment for PHPUnit Testing on WordPress plugin we must need
If you don't have Composer and WP CLI on your machine, you can install these following links.
Inside plugin directory we need run the following command.
```wp scaffold plugin-tests my-plugin```

After running this command we will find insdie plugin directory two folders.
- bin
- tests
We will also find some files
- phpunit.xml.dist
- phpcs.xml.dist
We need to rename phpunit.xml.dist as phpunit.xml
We need to run the following command.
bash bin/install-wp-tests.sh wordpress_test root password localhost latest
This command will install a copy of WordPress setup for testing insdie/tmp directory on your local machine.
-
wordpress_test: Testing database name. We need to make sure that this database name should be different from our actual database name. Otherwise it will delete all your data.
-
root: Mysql username. In my case I use root. We should use our own mysql username.
-
password: It is mysql password. We need to use our myswl password.
-
localhost: It is optional. If your hostname is local host you can skip it.
-
latest: It WordPress version. It is optional. We can specify WordPress version or it will install latest vetsion of WordPress.
To run PHPUnit testing, we need some php packages. To install these packages create composer.json file inside plugin root directory.
{
    "require-dev": {
        "phpcompatibility/phpcompatibility-wp": "dev-master",
        "wp-phpunit/wp-phpunit": "dev-master",
        "phpunit/phpunit": "^9.6",
        "yoast/phpunit-polyfills": "^1.0"
    }
}
After adding this run composer install
Or we can install it via termianl. To do this, run the following command.
composer require --dev phpcompatibility/phpcompatibility-wp:dev-master wp-phpunit/wp-phpunit:dev-master phpunit/phpunit:^9.6 yoast/phpunit-polyfills:^1.0
Now we are ready to test our test files. We need run the command to check everything is working fine.
vendor/bin/phpunit
It will run all of our tests file, although we don't have any test file right now. Its time to write test case for our plugin.
Let's test our test cases.
In our plugin we have feature Calculator. This calculator do 4 tasks.
- Add
- Subtract
- Multiply
- Divide
We will write test cases for that.
Let's create test file inside tests folder like tests/test-calculator.php
<?php
class SampleTest extends WP_UnitTestCase {

	public function setUp() {
		parent::setUp();

		set_current_screen('edit.php');
		// this will cause is_admin to return true.

		$this->assertTrue( is_admin() );
	}

	// Rest of the code.

    public function test_adding_multiple_number() {
        $calculator = new Calculator();

        $result = $calculator->add([1, 4, 5]);

        $this->assertEquals(10, $result);
    }

    public function test_subtract() {
        $calculator = new Calculator();

        $result = $calculator->subtract([50, 30]);

        $this->assertEquals(20, $result);
    }

    public function test_multiply() {
        $calculator = new Calculator();

        $result = $calculator->multiply([3, 4]);

        $this->assertEquals(12, $result);
    }

    public function test_divide() {
        $calculator = new Calculator();

        $result = $calculator->multiply([12, 4]);

        $this->assertEquals(3, $result);
    }
}