Skip to content

Instantly share code, notes, and snippets.

@isaacarnault
Last active November 18, 2022 16:09
Show Gist options
  • Star 0 You must be signed in to star a gist
  • Fork 1 You must be signed in to fork a gist
  • Save isaacarnault/8770fb21f037645383ffb085870593a9 to your computer and use it in GitHub Desktop.
Save isaacarnault/8770fb21f037645383ffb085870593a9 to your computer and use it in GitHub Desktop.
Deploying a serverless web app using an API Gateway and Lambda function on AWS
________ ________ ___ __ ___
|\_____ \|\ __ \|\ \|\ \ |\ \
\|___/ /\ \ \|\ \ \ \/ /|\ \ \
/ / /\ \ __ \ \ ___ \ \ \
/ /_/__\ \ \ \ \ \ \\ \ \ \ \
|\________\ \__\ \__\ \__\\ \__\ \__\
\|_______|\|__|\|__|\|__| \|__|\|__|
Other cloud platforms such as GCP, Azure.

Deploying a serverless web app using an API Gateway and Lambda function on AWS - Hands-on

Project Status: Concept – Minimal or no implementation has been done yet, or the repository is only intended to be a limited example, demo, or proof-of-concept.

I'm currently preparing AWS Certified Solution Architect - Associate certificate.
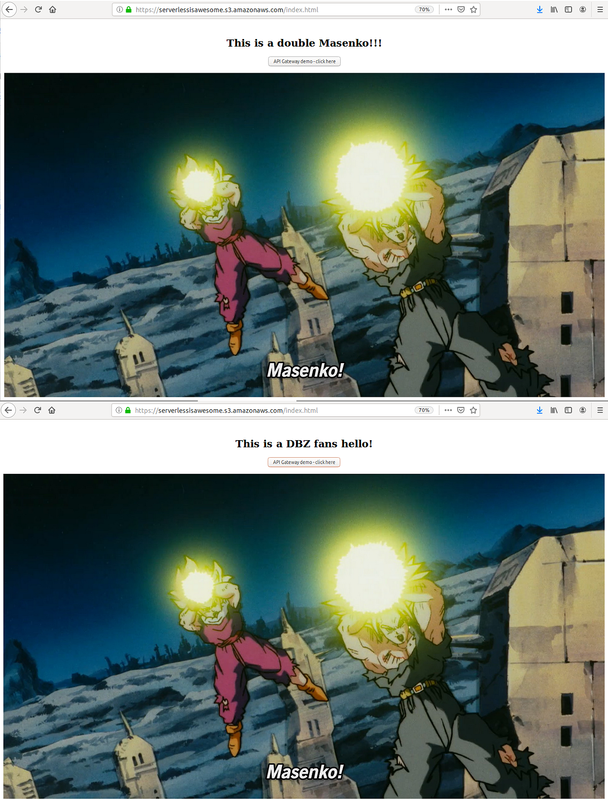
The following gist is intended for anyone looking to create a Serverless website or web app on AWS.
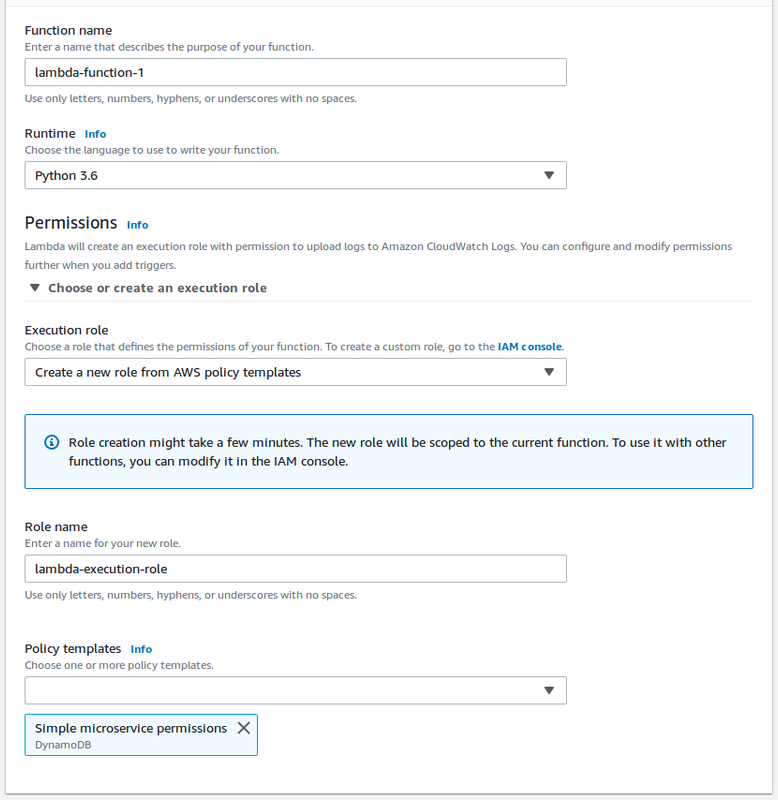
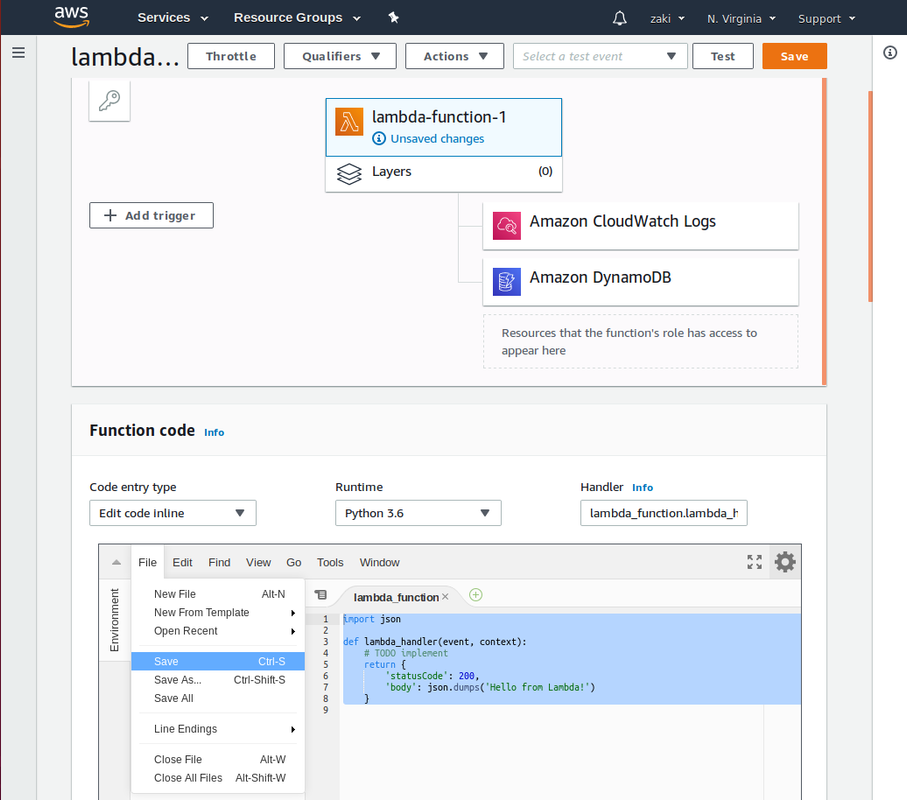
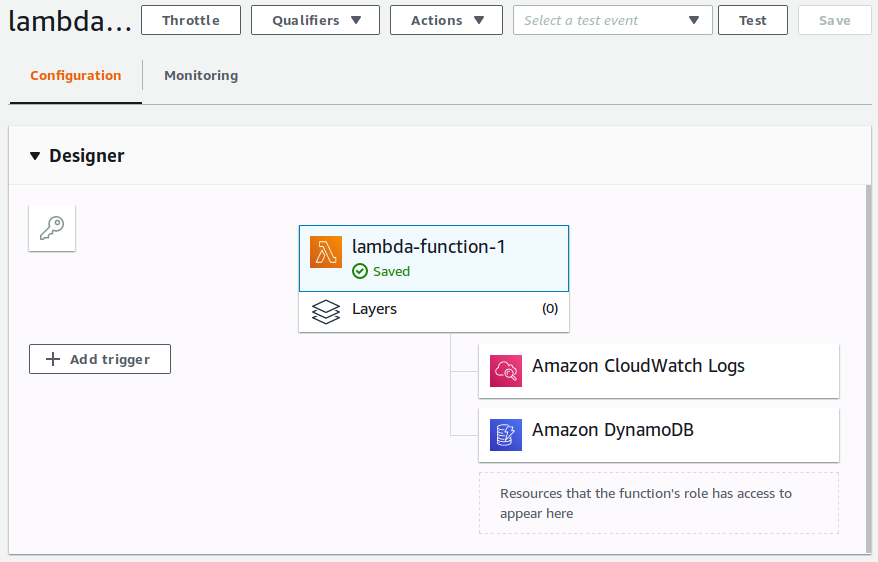
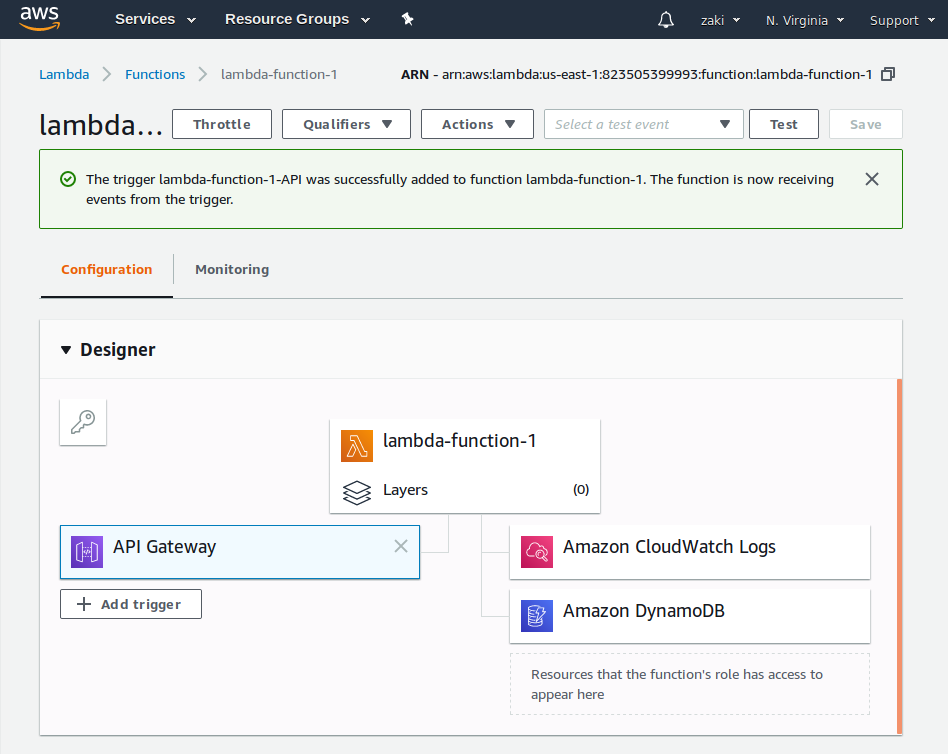
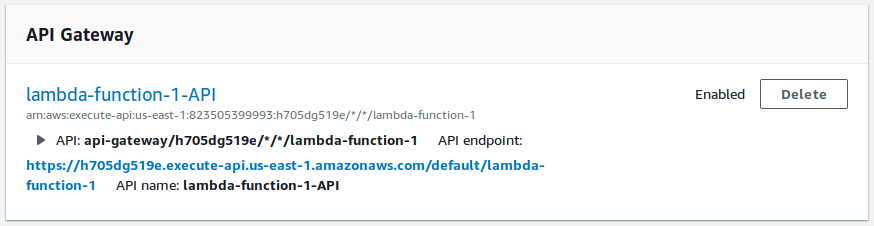
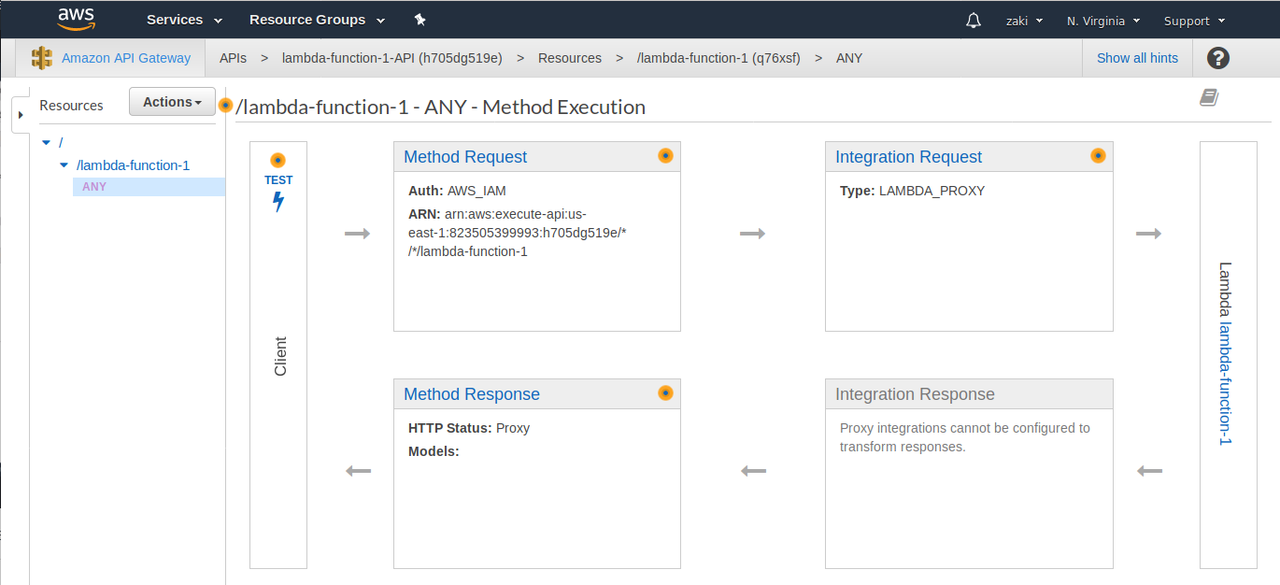
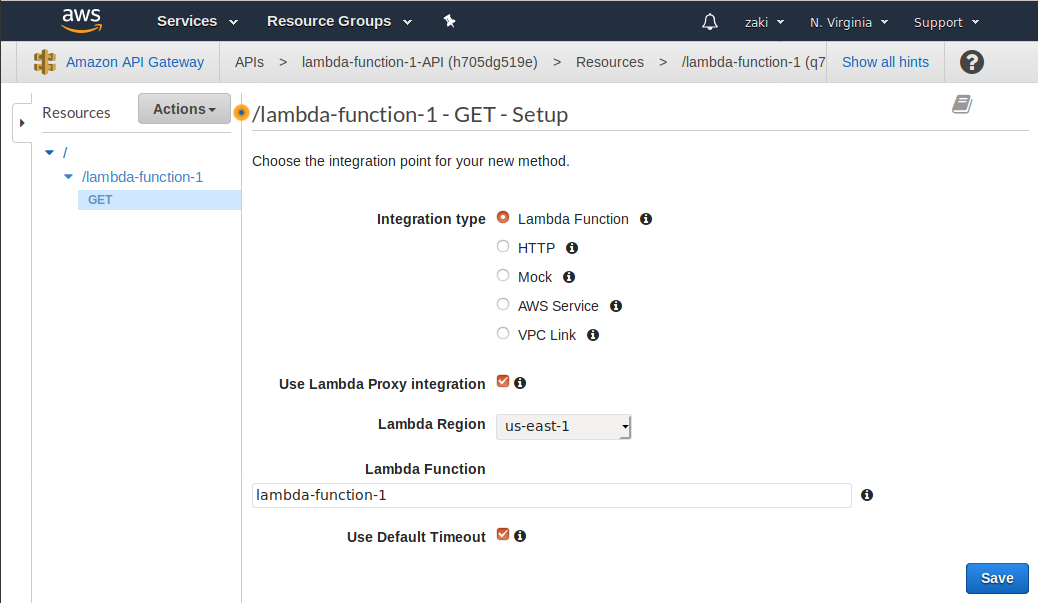
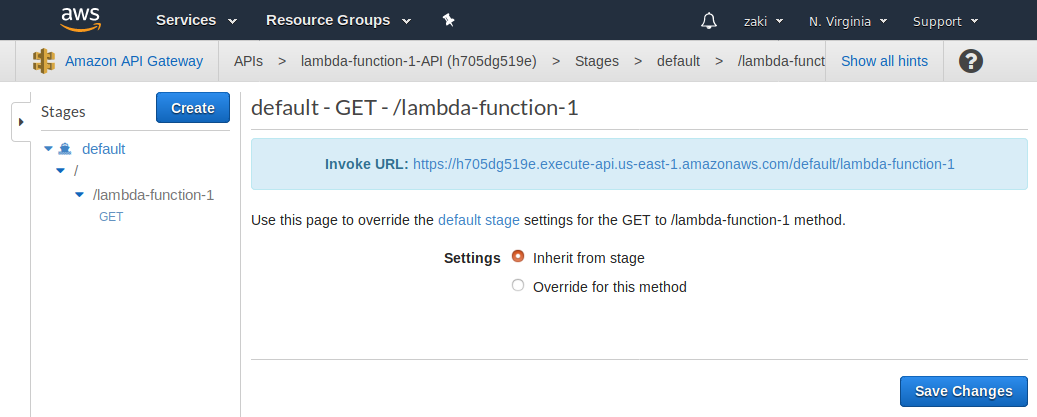
We're going to be using Amazon Route 53, Amazon S3 Bucket, Amazon API Gateway as well as a Amazon Lambda Function.
I performed this setup on my Ubuntu 18.04.2 LTS.
To check your OS version, execute $ lsb_release -a in your Terminal.

Installations

None. Just log into your AWS management console, https://console.aws.amazon.com.
You'll need to perform several tasks in your CLI regarding SSH keygen, so make sure you check the following prerequisites.

Prerequisites

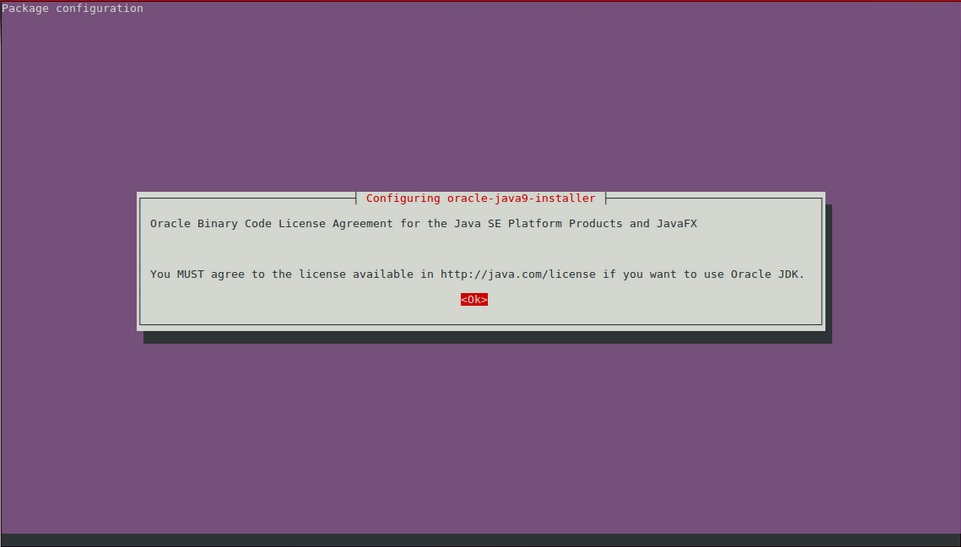
First, make sure Oracle jdk is installed. I recommend java 1.8.0
To uninstall effectively your current jdk, perform this:
$ sudo apt-get remove openjdk*
$ sudo apt-get remove --auto-remove openjdk*
$ sudo apt-get purge openjdk*
$ sudo apt-get purge --auto-remove openjdk*

To install java 1.8.0, open Terminal Ctrl+Alt+T and run the command:
$ sudo add-apt-repository ppa:webupd8team/java // adds PPA repository
$ sudo apt-get update // updates package list
$ sudo apt-get install openjdk-8-jdk // installs openjdk

java-8.png
$ javmyDataBaseServermyDataBaseServerac -version // shows your new java version

Author

  • Isaac Arnault - AWS Cloud series - Related tags: #EC2 #EFS #AWSCLI #Linux

Part1: create a Lambda function

  • Connect to your AWS management console, https://console.aws.amazon.com/
  • Go to Services > Lambda (Under Compute) > Create a function > Select "Author from scratch"
  • Function name: lambda-function-1 > Runtime: We choose Python 3.6 to write our Lambda function
  • Create a new role from AWS policy templates > Role name: lambda-execution-role
  • Policy templates: choose Simple microservice permissions > Create function
πŸ”΄ See output

isaac-arnault-AWS-103.png


  • Go to Lambda > Functions > lambda-function-1
  • In Function code screen, double-click lambda_function.py and use the provided code (see lambda_function.py)
  • Click on File > Save and click on the top right button Save
πŸ”΄ See output

isaac-arnault-AWS-104.png


Go to Basic settings window and use as description: Lambda function 1 > Hit Save

πŸ”΄ See output

isaac-arnault-aws-105.png


Part 2: deploy an API Gateway

  • Click on "Add trigger" then select API Gateway
πŸ”΄ See output

isaac-arnault-AWS-106.png


  • API dropdown: select "Create a new API"
  • Security: select AWS IAM then click "Add"
πŸ”΄ See output

isaac-arnault-AWS-106.png


Your Designer dashboard should now get updated with our new API Gateway as a trigger

πŸ”΄ See output

isaac-arnault-AWS-107.png


  • In API Gateway window click on "lambda-function-1-API"
πŸ”΄ See output

isaac-arnault-AWS-108.png

  • We should now see our first Lambda Function Execution method
πŸ”΄ See output

isaac-arnault-AWS-110.png


  • We could keep this method, but for the purpose of this gist, we're going to delete it and create a new one.

  • Click on "Actions" > Delete Method > "Actions" > Create Method

  • On lambda-function-1 click on the dropdown and select "GET" to create a GET request.

  • Click on the check mark to save and create the GET request

πŸ”΄ See output

isaac-arnault-AWS-110.png

  • Check "Use Lambda Proxy integration" > in Lambda Function, type: lambda-function-1 >, click "Save"
πŸ”΄ See output

isaac-arnault-AWS-112.png


  • When prompted by the console (Add Permission to Lambda Function), click OK.

  • Now let's go to "Actions" > Deploy API

πŸ”΄ See output

isaac-arnault-AWS-113.png


  • Deployment stage: use "default"
  • Deployment description: use "prod-deployment" then click on "Deploy"
  • On Stages, select default > lambda-function-1 > GET > copy Invoke URL
  • Go to your and create a index.html file. Copy paste the provided code in this gist (index.html) into your file.
πŸ”΄ See output

isaac-arnault-AWS-114.png


Part 3: create and provision a s3 bucket

  • Let's now configure S3. Go to Services > Storage > S3 > Create bucket: we call it "serverlessisawesome"
  • Select bucket > Edit public access settings > uncheck all options, click Save and Confirm it.
πŸ”΄ See output

isaac-arnault-AWS-119.png


  • Click on serverlessisawesome bucket > go to Properties > Static website hosting

  • Select "Use this bucket to host a website" > Index document: type "index.html" > Error document: type "error.html"

  • Click Save

  • Open Notepad and create a error.html file. Copy/paste code provided in this gist (error.html)

  • Now we should have two files that we are going to upload to our S3 bucket: index.html and error.html

  • We go back to serverlessisawesome bucket, click on Overview > Upload > we select both files we've created

πŸ”΄ See output

isaac-arnault-AWS-120.png


  • Click on "Upload" > Select both files > Click on "Actions" > Make public
πŸ”΄ See output

isaac-arnault-AWS-121.png


To check if everything is running fine, click on index.html > click on Object URL

πŸ”΄ See output

isaac-arnault-AWS-122.png


On a browser page we should see our API Gateway in action by clicking on the button.

The text is refreshing upon clicking on the button which means our trigger is working.

πŸ”΄ See output

isaac-arnault-AWS-126.png


That's all for now guys. Feel free to fork it and to spread the word about it. Thanks.

{
"Version":"2012-10-17",
"Statement":[
{
"Sid":"PublicReadGetObject",
"Effect":"Allow",
"Principal":"*",
"Action":"s3:GetObject",
"Resource":"ARN here/*"
}
]
}
<html><body><h1>There has been an error!</h1></body></html>
<html>
<script>
function myFunction() {
var xhttp = new XMLHttpRequest();
xhttp.onreadystatechange = function() {
if (this.readyState == 4 && this.status == 200) {
document.getElementById("my-demo").innerHTML = this.responseText;
}
};
xhttp.open("GET", "paste_here_invoke_url_of_GET_lambda_function_1", true);
xhttp.send();
}
</script>
<body><div align="center"><br><br><br><br>
<h1>Hello <span id="my-demo">Masenko!!!</span></h1>
<button onclick="myFunction()">Click me</button><br>
<img src="https://pbs.twimg.com/media/DkT9xQNWwAAttbE.jpg:large"></div>
</body>
</html>
def lambda_handler(event, context):
print("In lambda handler")
resp = {
"statusCode": 200,
"headers": {
"Access-Control-Allow-Origin": "*",
},
"body": "Isaac Arnault"
}
return resp
πŸ”΅ See solution architecture

isaac-arnault-AWS-solution-architecture-2.png

Sign up for free to join this conversation on GitHub. Already have an account? Sign in to comment