You signed in with another tab or window. Reload to refresh your session.You signed out in another tab or window. Reload to refresh your session.You switched accounts on another tab or window. Reload to refresh your session.Dismiss alert
This file contains bidirectional Unicode text that may be interpreted or compiled differently than what appears below. To review, open the file in an editor that reveals hidden Unicode characters.
Learn more about bidirectional Unicode characters
Deploying a Wordpress site using AWS RDS and free tier EC2 instance - Hands-on
I'm currently preparing AWS Certified Solution Architect - Associate certificate.
The following gist is intended to anyone looking to launch a Wordpress blog or website on AWS.
We gonna be using Amazon RDS (Amazon Relational Database Service) as well as an EC2 instance.
I performed this setup on my Ubuntu 18.04.2 LTS.
To check your OS version, execute $ lsb_release -a in your Terminal.
Installations
None. Just log into your AWS management console, https://console.aws.amazon.com.
You'll need to perform several tasks in your CLI regarding SSH keygen, so make sure you check the following prerequisites.
Prerequisites
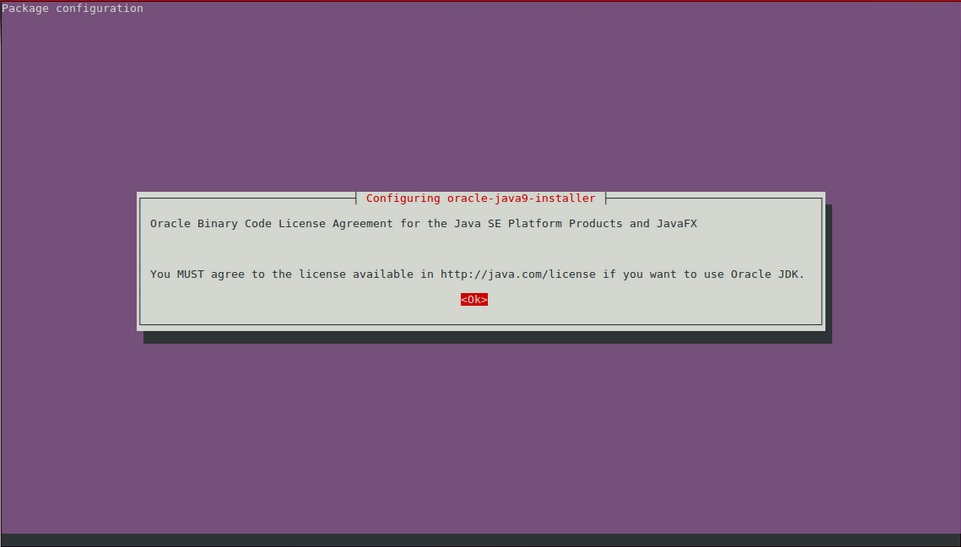
First, make sure Oracle jdk is installed. I recommend java 1.8.0
To uninstall effectively your current jdk, perform this: $ sudo apt-get remove openjdk* $ sudo apt-get remove --auto-remove openjdk* $ sudo apt-get purge openjdk* $ sudo apt-get purge --auto-remove openjdk*
To install java 1.8.0, open Terminal Ctrl+Alt+T and run the command: $ sudo add-apt-repository ppa:webupd8team/java // adds PPA repository $ sudo apt-get update // updates package list $ sudo apt-get install openjdk-8-jdk // installs openjdk
$ javac -version // shows your new java version
Author
Isaac Arnault - AWS Cloud series - Related tags: #EC2 #EFS #AWSCLI #Linux
We log into our AWS management console using $ https://console.aws.amazon.com.
I'm using MFA to secure my root account access coupled with Google Authenticator on my Android smartphone.
We can bypass this step and login normally to AWS Management Console.
🔴 See output
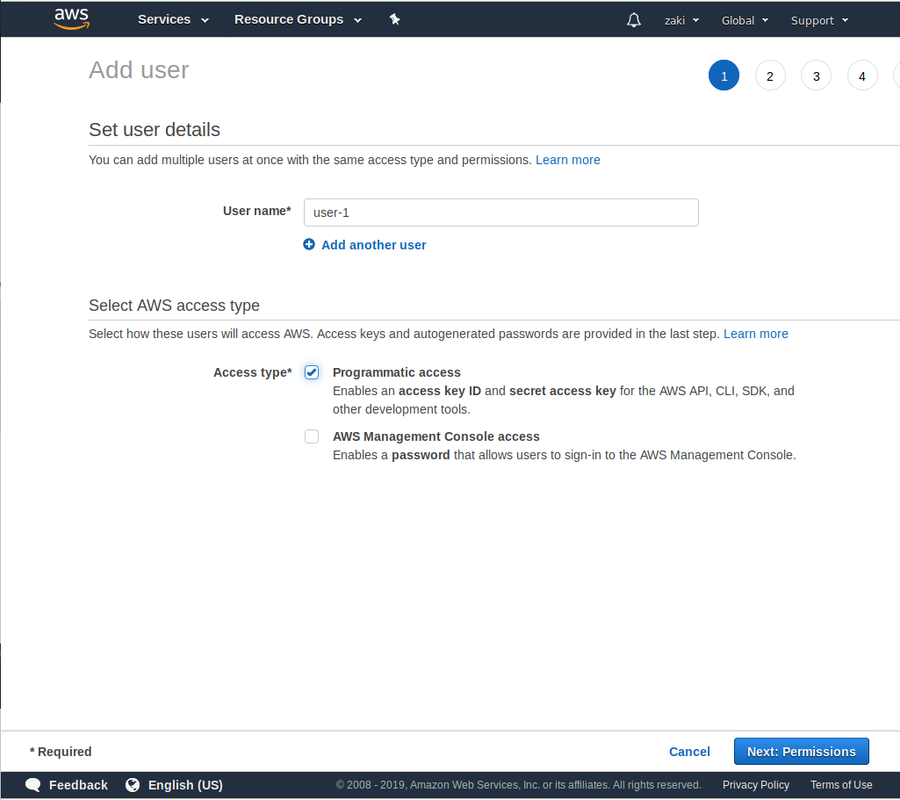
We go to Services > IAM > Users > Add user
User name : user-1
Access type : Programmatic access
🔴 See output
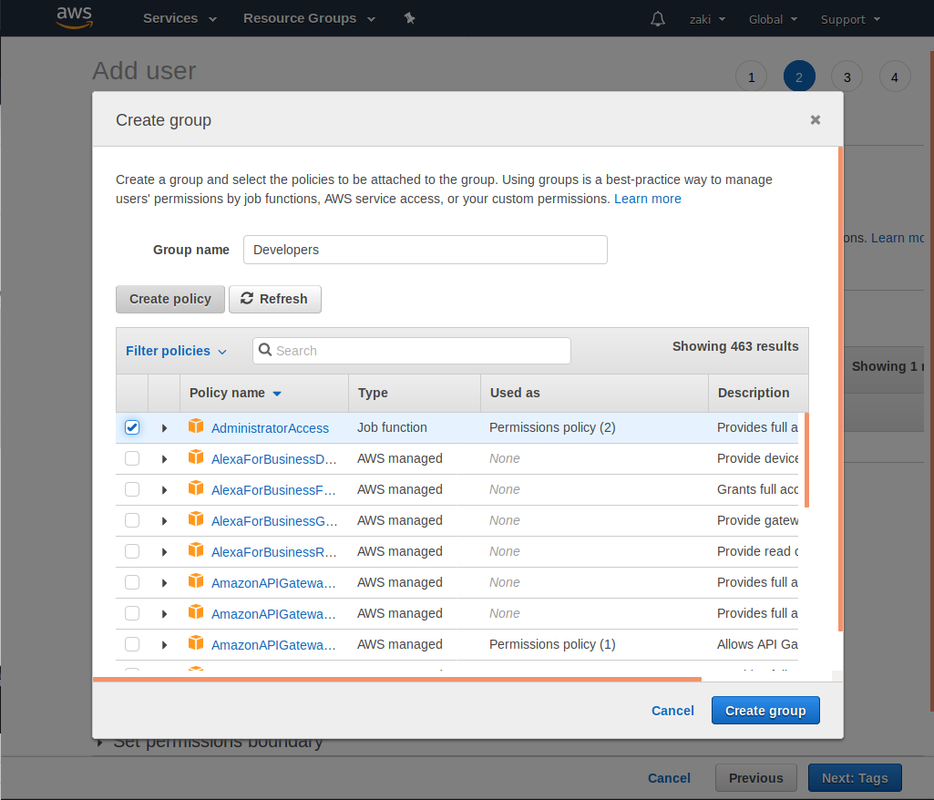
Next : Permissions > Create group
Group name : Developers
Administrator Access > Create group
🔴 See output
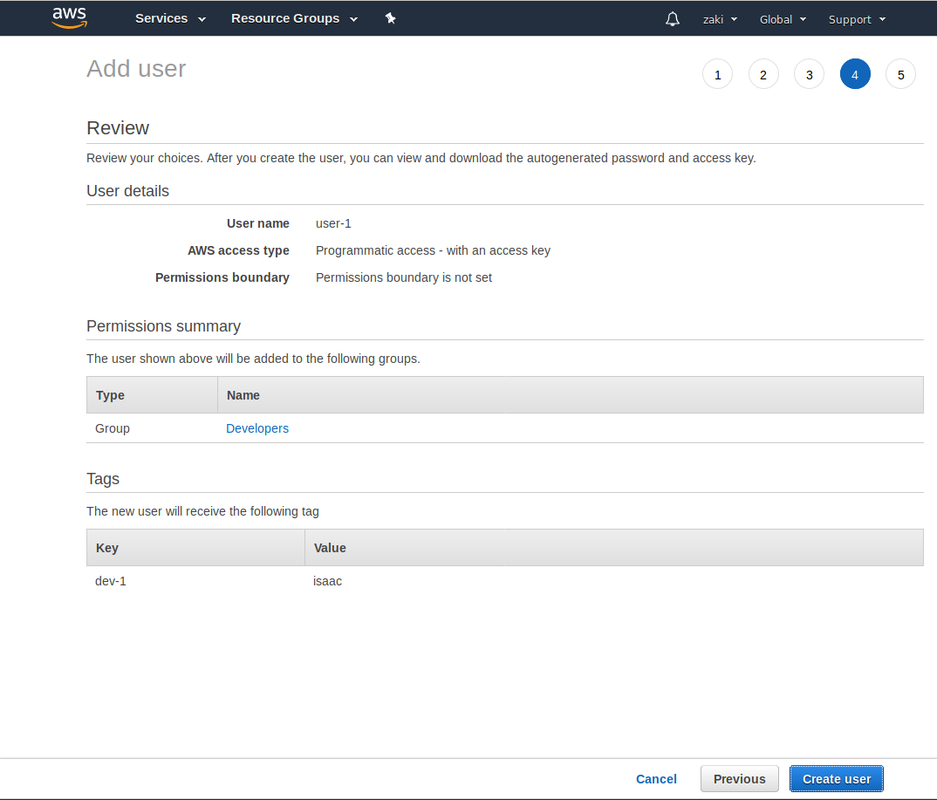
Next : Tags
Key: dev-1 | Value: name of the developer
Create user
🔴 See output
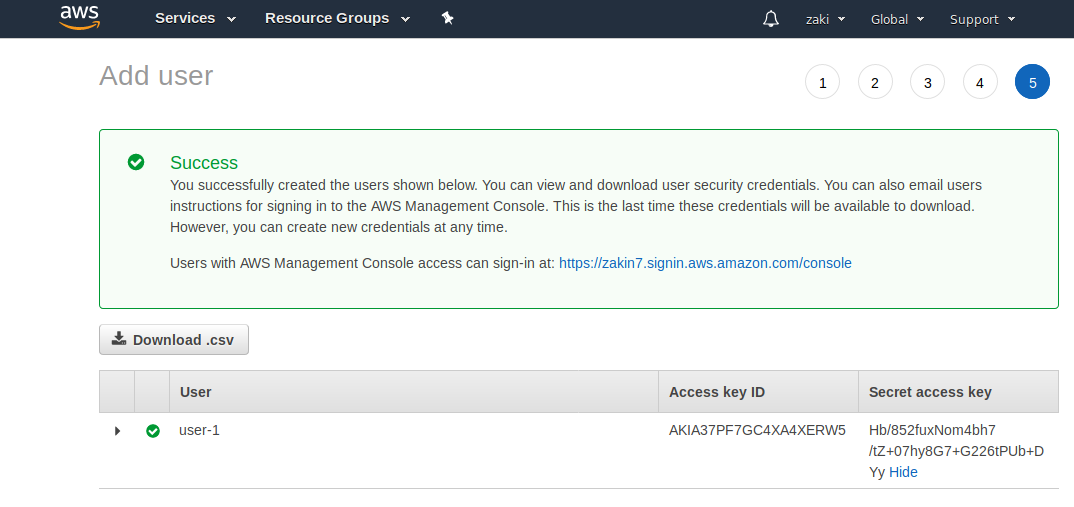
Download .csv (you're going to use these credentials later on in this tutorial)
We write down our Access key ID and Secret access key > close the window
🔴 See output
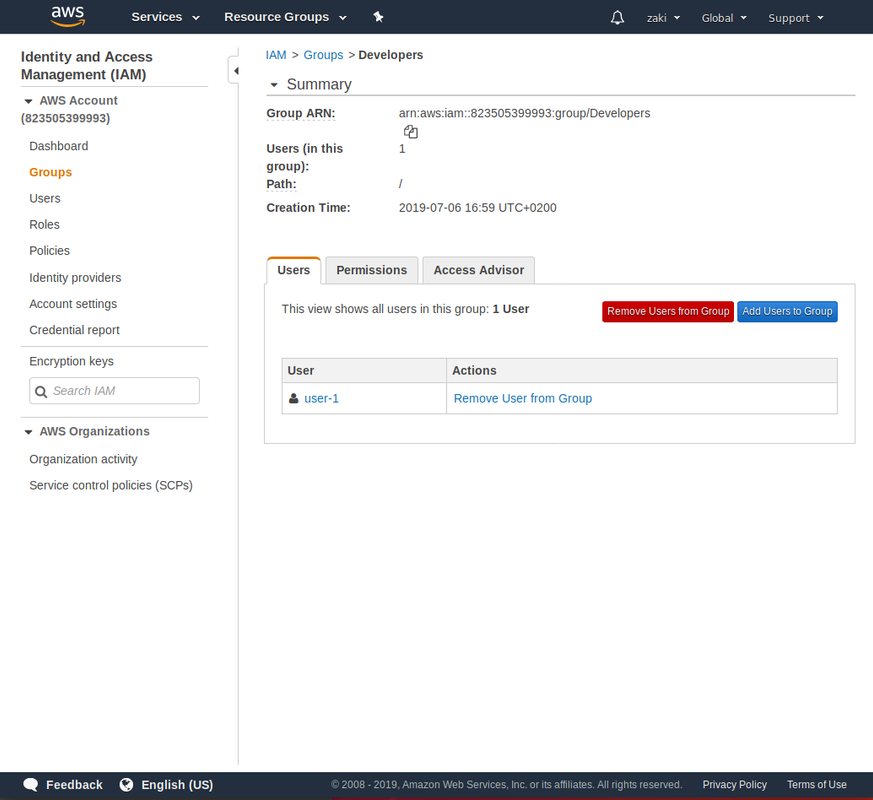
Now in Groups we should have one group named Developers which should list user-1.
🔴 See output
Part 2 : deploy one EC2 instance using a custom script
Services > EC2
In "Create Instance" section, click on "Launch Instance"
We're going to choose 2 instances
We select Amazon Linux 2 AMI (HVM), SSD Volume Type
Instance type: choose t2.micro (Free tier eligible). Instance comes with 1vCPU and 1 GiB (memory).
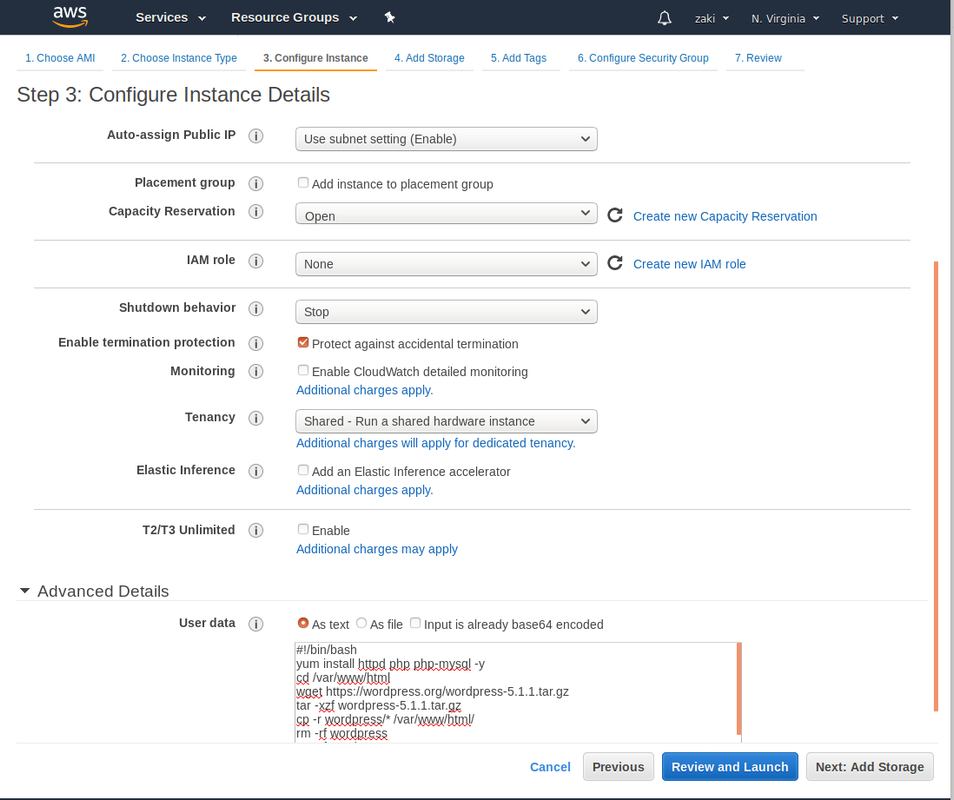
Next: Configure instance details
We choose to deploy one instances and we provision the Advanced details section with the following script:
🔵 See script
#!/bin/bash
yum install httpd php php-mysql -y
cd /var/www/html
wget https://wordpress.org/wordpress-5.1.1.tar.gz
tar -xzf wordpress-5.1.1.tar.gz
cp -r wordpress/* /var/www/html/
rm -rf wordpress
rm -rf wordpress-5.1.1.tar.gz
chmod -R 755 wp-content
chown -R apache:apache wp-content
service httpd start
chkconfig httpd on
We leave all fields as they're by default, we just Enable termination protection.
🔴 See output
Next : Add Storage
We leave all fields as they're by default.
Next : Add Tags
We use as Key : Name and Value : WP-Server.
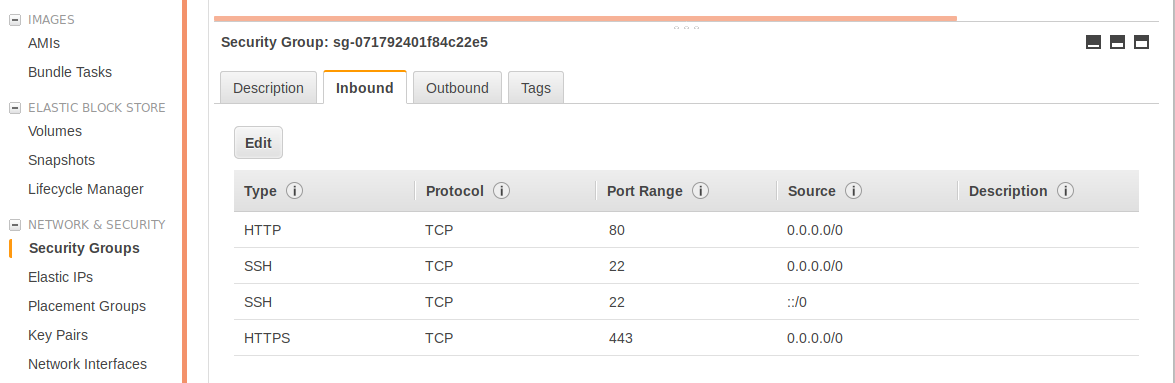
Next : Configure Security Group
We create a new security group > Security group name: WP-SG > Description : WordPress Server Security Group
Make sure you Add Rule (add 4 new rules):
HTTP- This will enable access to Port 80.
SSH - This will enable access to Port 22 using source 0.0.0.0/0
SSH - This will enable access to Port 22 using source::/0
HTTPS - This will enable access to Port 443.
🔴 See output
Review and launch > Launch > Create New Key Pair > Key Pair Name : EC2KP > Download Key Pair.
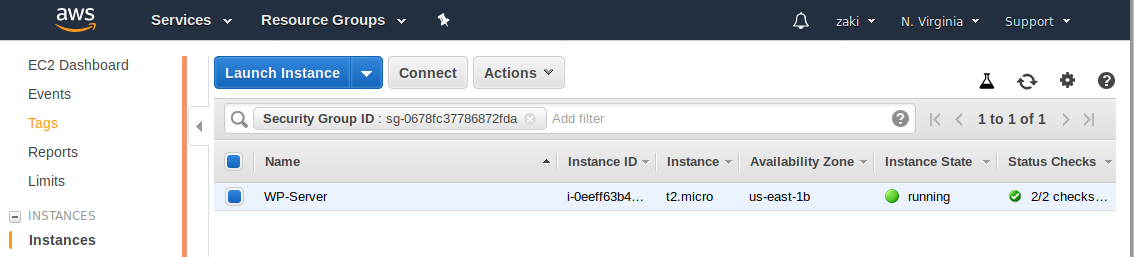
Launch Instances > View Instances
🔴 See output
At this point of the tutorial, we should have one running EC2 instance, a User and a Group created via IAM.
Part 3 : create a RDS instance
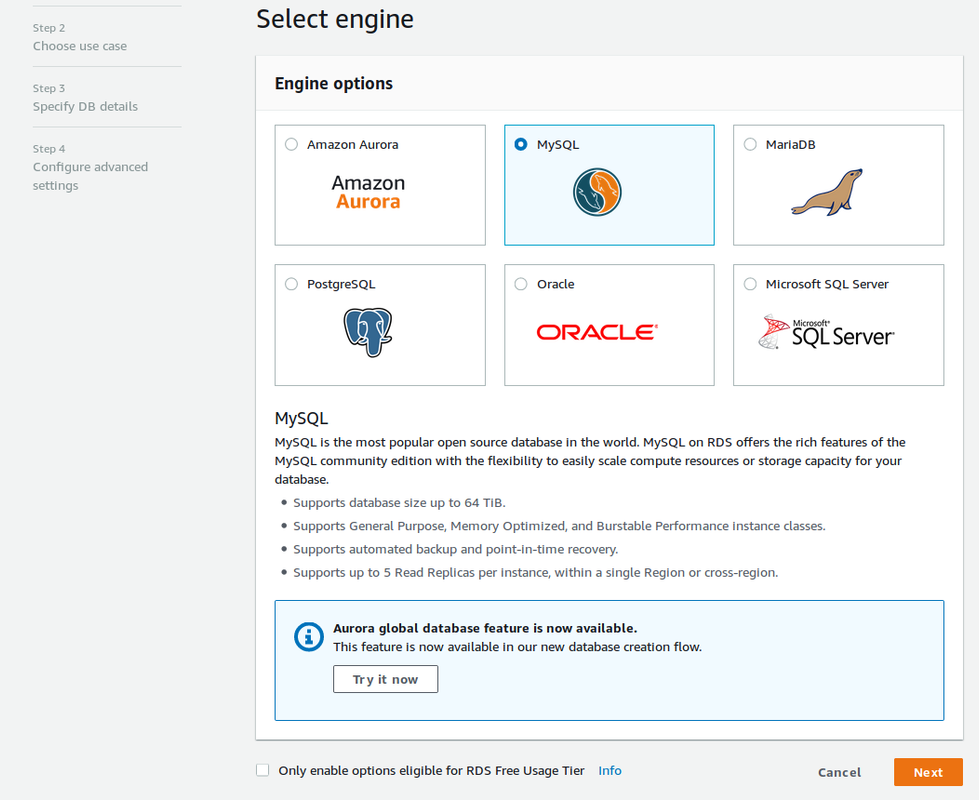
Go to Services > Database > RDS
We'll click on "Create database" and select "MySQL" then "Next"
🔴 See output
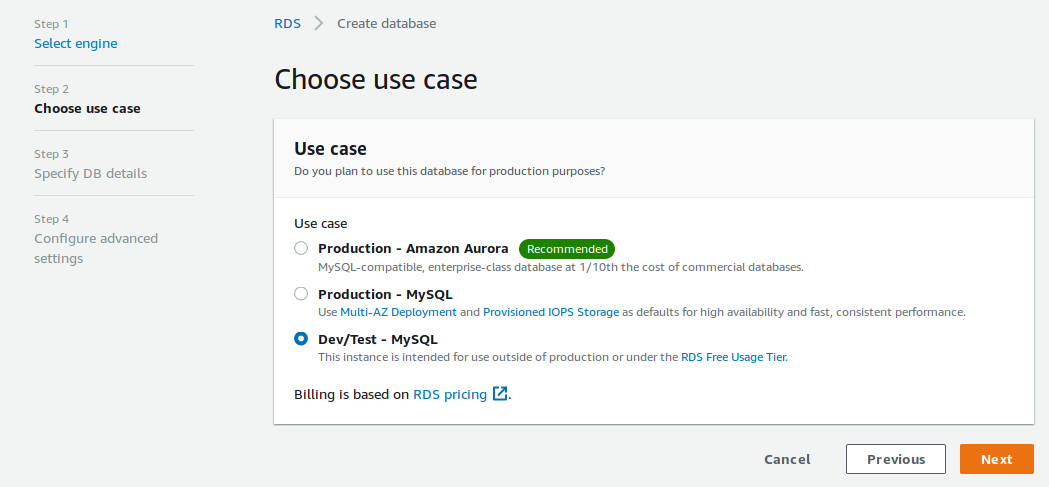
Choose use case - select Dev/Test - MySQL
🔴 See output
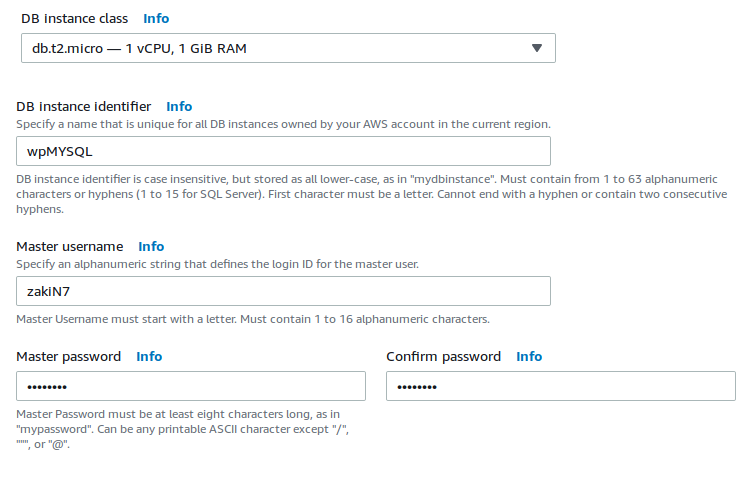
Specify DB details : we'll leave all fields as they're by default, except :
DB instance class : select db.t2.micro which comes with 1 vCPU and 1 GiB RAM. Obviously, if you need more computational resources, feel free to scale it up.
DB instance identifier : wp_mySQL
🔴 See output
Configure advanced settings
Database options : Database name
🔴 See output
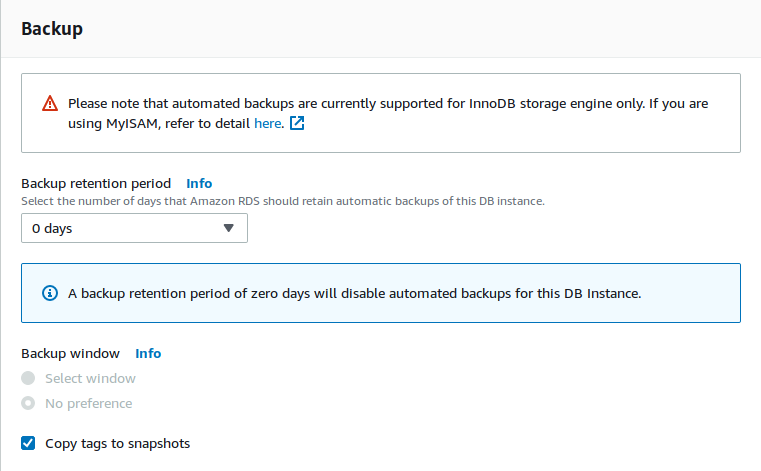
Backup : Backup retention period
Set it to 0 days
🔴 See output
Deletion protection : we enable deletion protection, then we "Create database".
🔴 See output
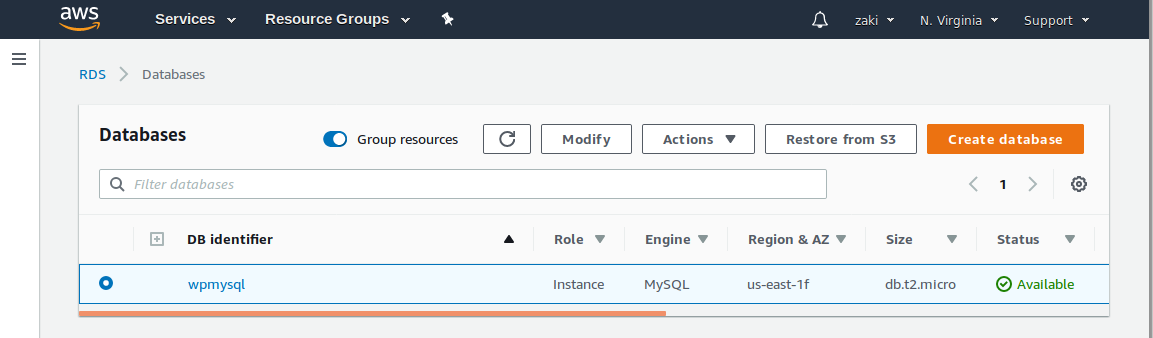
To verify that our RDS instance is deployed, we go to RDS > atabases
🔴 See output
Part 4 : make both security groups talk to each other
We'll now enable the communication between our originate Security Group and the one created once we set an Amazon RDS instance.
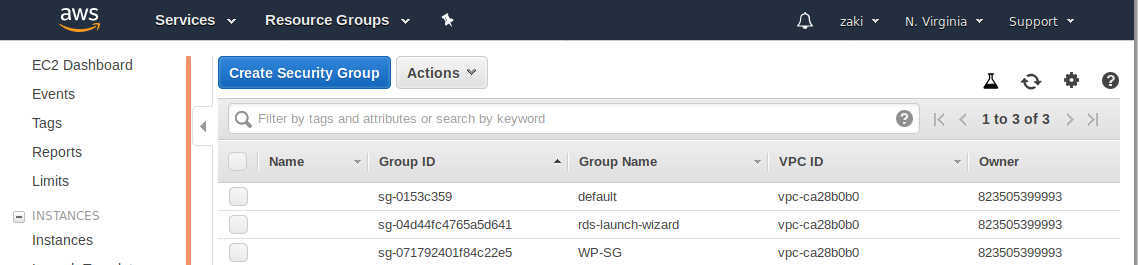
Go to EC2 > Security Groups. At this stage of the tutorial you should see 3 security groups : one is default, the second one is the one created by the Amazon RDS instance which starts wich Group Name is rds-launch-wizard, and the last one is the one we manually created.
🔴 See output
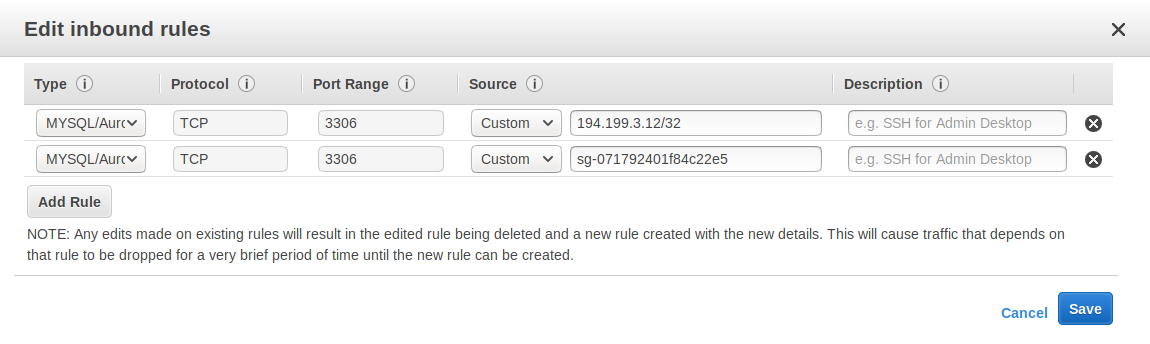
Select rds-launch-wizard and go to "Inbound". Click "Edit" > Add Rule > Select MYSQL/Aurora and enter GroupID of WP-SG, then "Save". See below output.
🔴 See output
Once this is done, move on Part 5 to deploy your Wordpress site.
Part 5 : deploy your Wordpress site
5.1: tune your WP server on your web browser
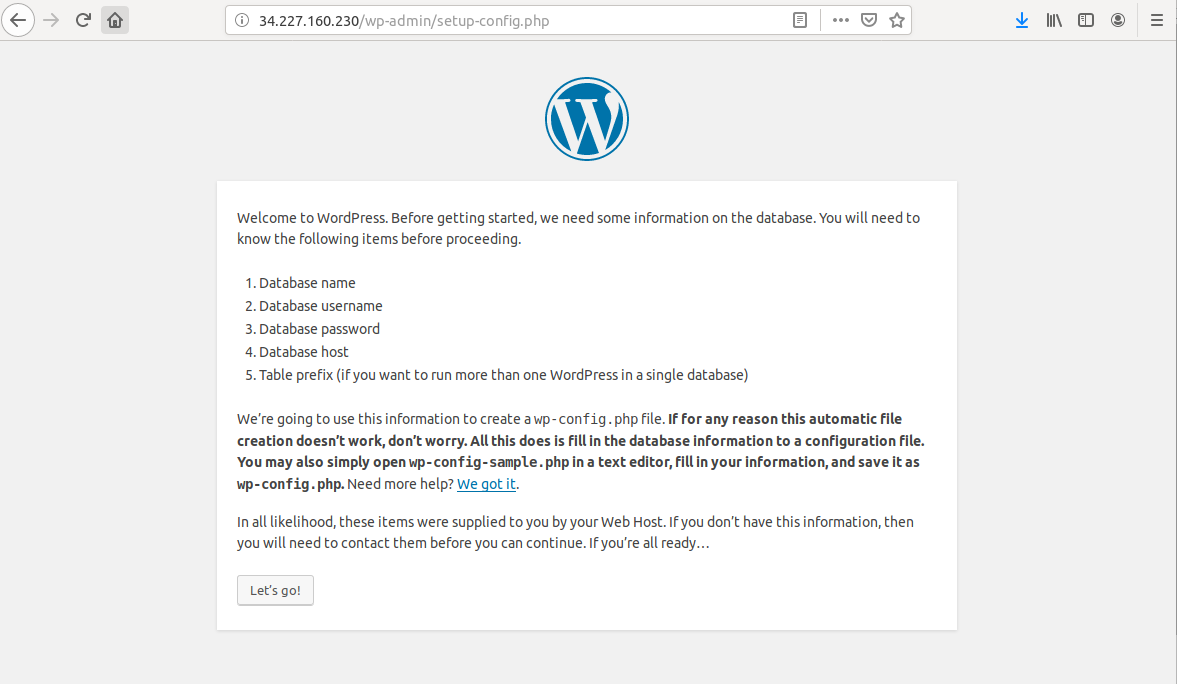
Connect to IPv4 Public IP of your EC2 instance in your web browser. You should see the below screen.
🔴 See output
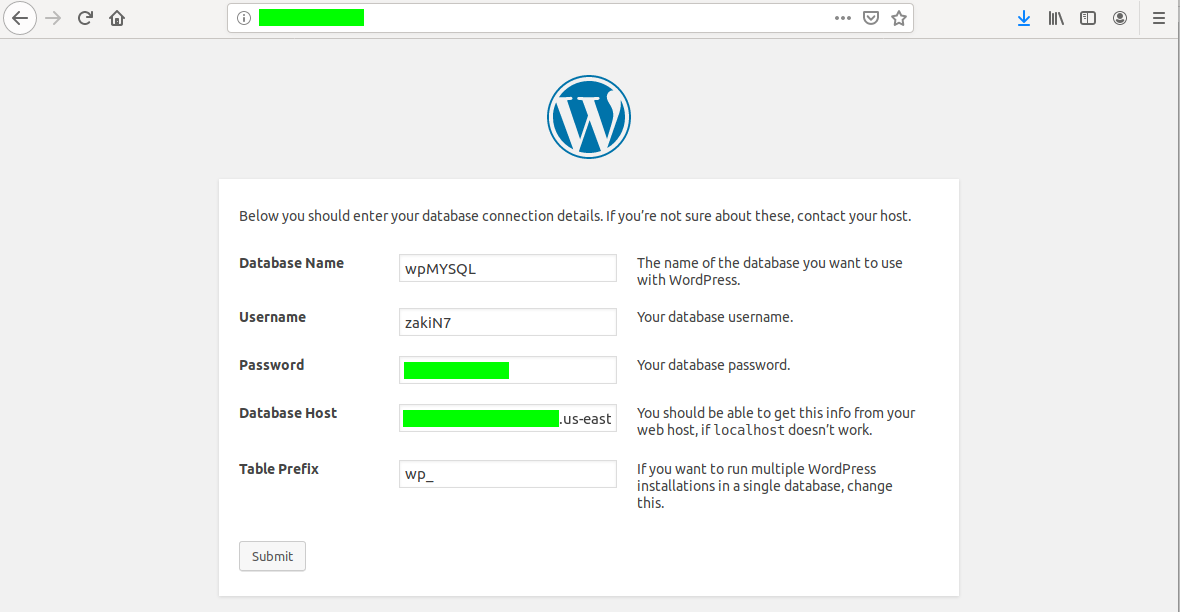
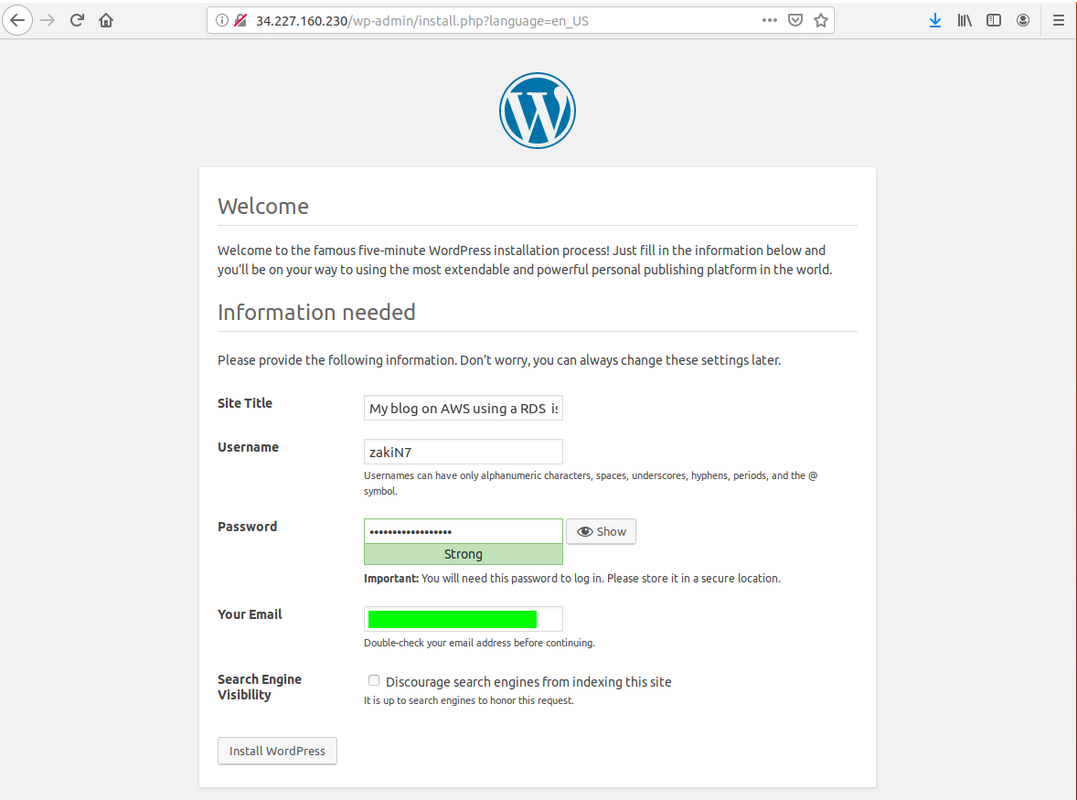
Click "Let's go" and fill up the provided fields.
Replace "localhost" in "Database host" filed by your RDS endpoint. Go to RDS > Databses > select your database and copy "Endpoint url". Paste it into "Database Host" field.
🔴 See output
Before you "Run the installation", connect to your EC2 instance.
5.2: connect to your EC2 instance
We should remember that we've downloaded an EC2KP.pem file earlier. We will now move this file to a newly created directory.
Ctrl + Alt + T to open a new CLI window
$ cd Desktop > $ mkdir SSH - Creates an SSH directory to store our Key Pair (credentials).
$ cd Downloads > $ sudo mv /home/zaki/Downloads/EC2KP.pem /home/zaki/Desktop>SSH
Go to your SSH directory and check that the file persists there : $ cd Desktop/SSH > ls
We change the permissions to .pem file, ie: $ chmod 400 EC2KP.pem.
🔴 See output
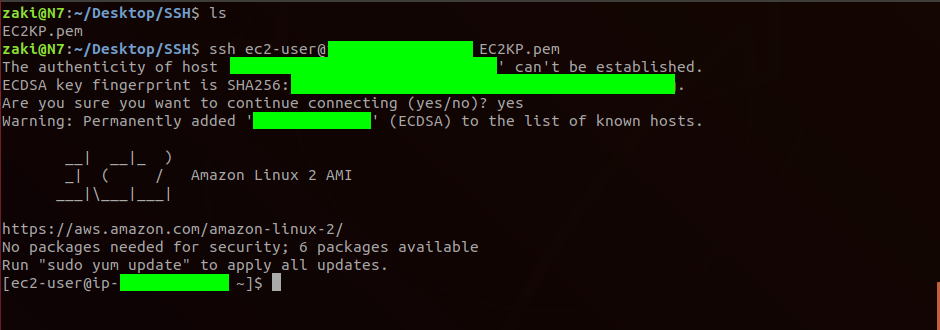
We will now connect to our EC2 instance using our CLI
Use : $ ssh ec2-user@your-ipv4-public-address -i EC2KP.pem.
Type "yes" when prompted by the CLI
🔴 See output
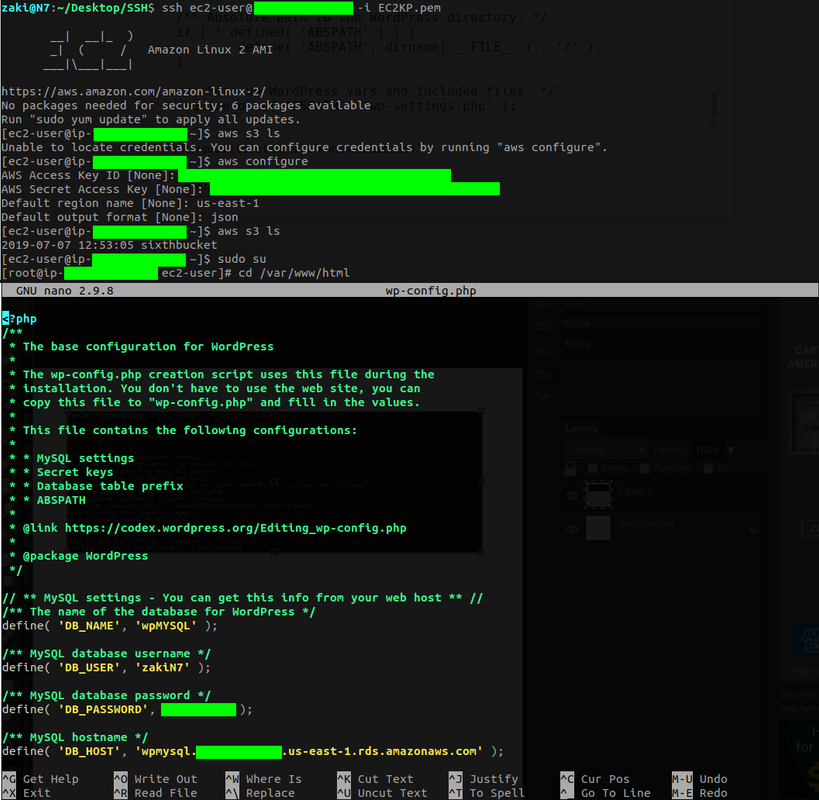
Go in root mode : $ sudo su and use $ aws s3 ls. The last command should return "Unable to locate credentials. We can configure credentials by running "aws configure".
To use your provided credentials use : $ aws configure
Remember that we wrote down our Access Key ID and Secret access key when creating our EC2 Instances. We use the provided credentials.
We connect to our EC2 instance using the following command:
$ ssh ec2-user@your-ipv4-address -i EC2KP.pem
We provide Access Key ID > AWS Secret Access Key > Default region name (use the Availability Zone of our EC2 instance, ie : us-east-1) > default output format : we can use "text" or "json". In this tutorial we use "json".
🔴 See output
Important
If buckets do not show up, we can go to Users > Security credentials > Create a new access key. Or we can create a new EC2 instance and restart the procedure in our `AWS` CLI.
When you Create access key, you'll have to download a file "access.Keys.csv".
When connected to SSH, we should perform the following commands :
$ sudo su - to elevate our priviledges
$ cd /var/www/html - to enter html directory
$ nano wp-config.php - to create and set up a Wordpress conf file
At this step, we should go back to our web browser and copy/paste the provided script upon Wordpress installation. We paste it into our config.php file. See below :
🔴 See output
Ctrl + x and y - to exit from our config.php file and save the file
Now we can go back to our web browser to complete the installation. Click "Run the installation" and fill out the form.
🔴 See output
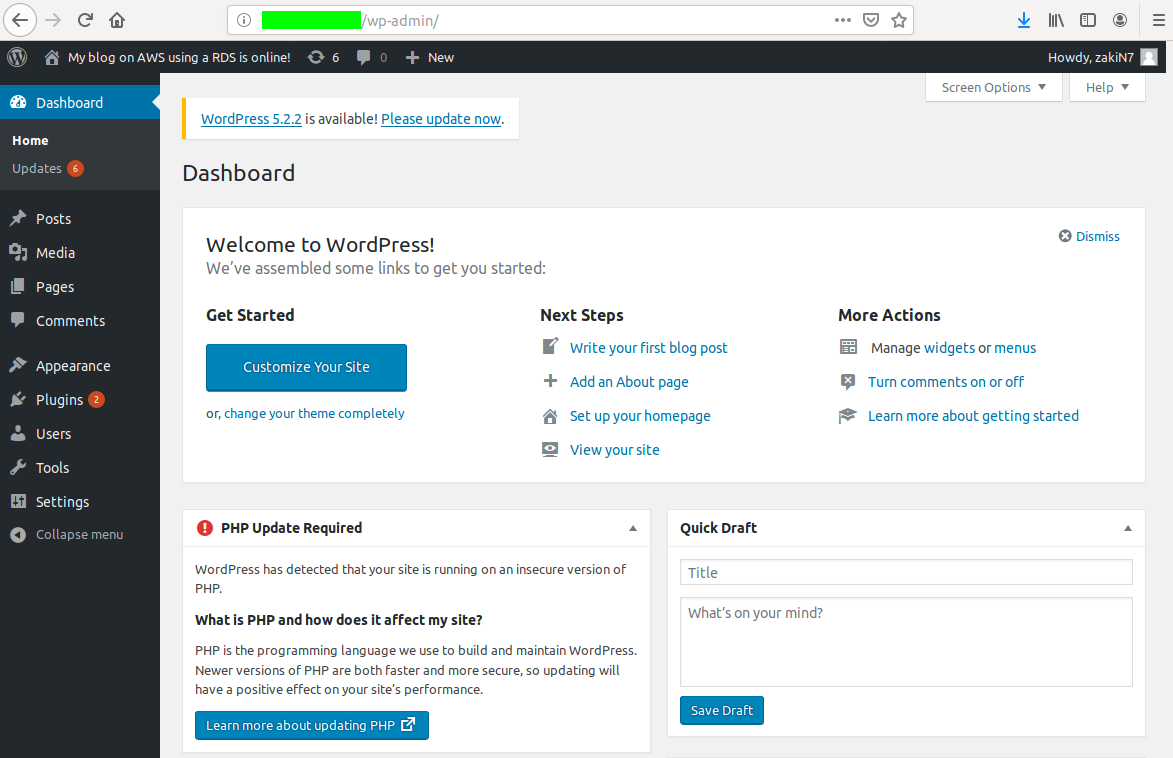
We should be able to log into our Wordpress dashboard if everything went fine.
🔴 See output
🔵 See dashboard
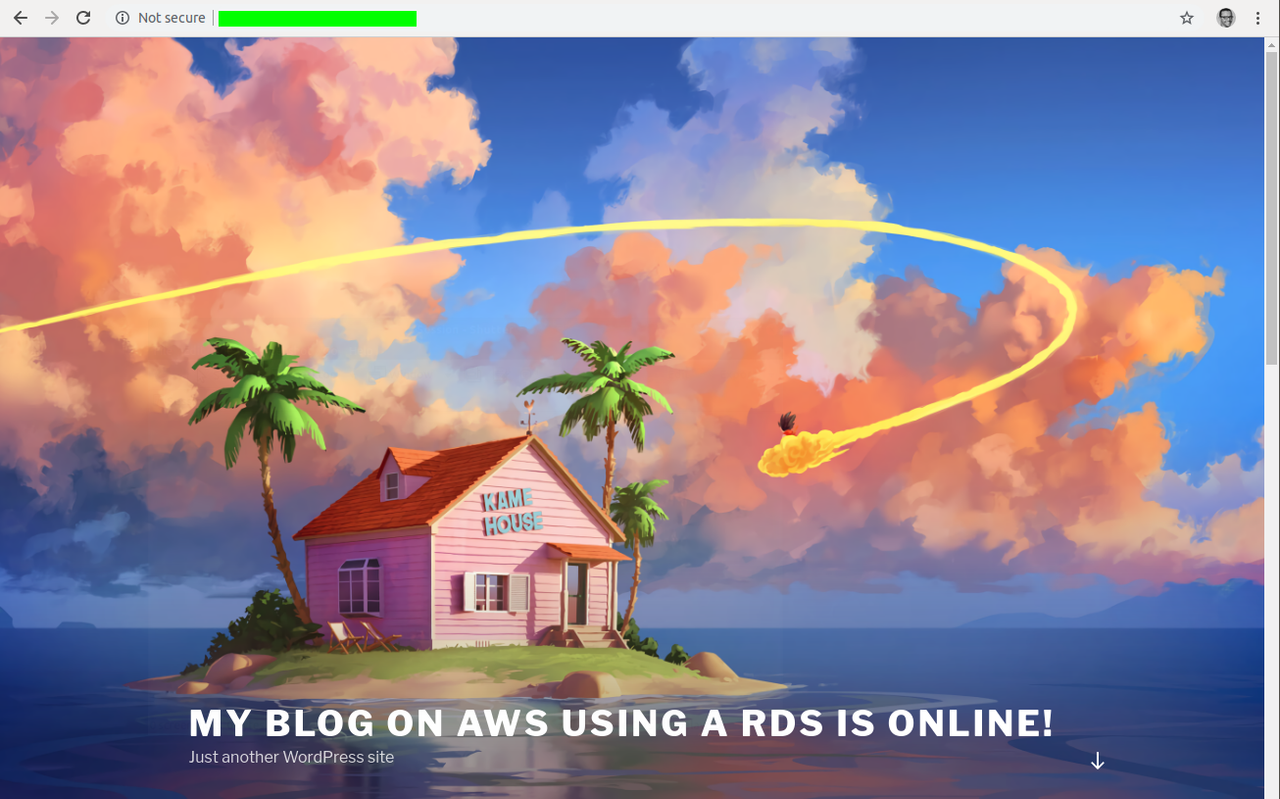
Go to appearance and activate your desired theme.
🔴 See output
That's all for now guys. Please fork this gist and feel free to spread a word about it. Thanks.