
What is Kubernetes?
- Deploy a Kubernetes cluster on Digital Ocean using kubeadm
- Deploy the Socks Shop Microservices Application on Digital Ocean
- Use Weaveworks for Microservices Visualization (Optional)
- Deploy the Socks Shop Microservices Application on Google Container Engine (Optional)
- Deploy Kubernetes Dashboard (Optional)
- tl;dr - Kubernetes is a container orchestration engine.
- tl;dr - Microservices are software components that are independently deployable and scalable.
- tl;dr - Weaveworks provides monitoring and visualization.
- A Digital Ocean Account
- SSH Public Key Uploaded to access droplets
- A Weaveworks Account (optional)
- A Google Compute Platform Account (optional)
- Kubeadm Documentation: https://kubernetes.io/docs/getting-started-guides/kubeadm/
- Weaveworks: https://www.weave.works/
- Kubernetes Dashboard: https://github.com/kubernetes/dashboard
- Sock Shop: https://github.com/microservices-demo/microservices-demo
Kubeadm is a tool that helps you bootstrap a simple Kubernetes cluster and simplifies the deployment process.
It performs the actions necessary to get a minimum viable cluster up and running such that it passes Kubernetes Conformance tests.

Digitial Ocean is a Cloud Provider providing developers and businesses a reliable, easy-to-use cloud computing platform of virtual servers.
Provision three or four Ubuntu droplets (virtual machines) on Digital Ocean.
Distribution: Ubuntu 16.04.2 x64 ($5 or $10 or $20)
I find the $20 droplets have the best performance for this exercise.
Don't forget to add your SSH key to SSH into the droplets.
If you want to use Digital Ocean for this exercise, use this referral link to get $10 in credit.
- Referral Link: https://m.do.co/c/ac62c560d54a
This example assumes Ubuntu as the Operating system for the Masters and Worker Nodes.
For additional security setup a Firewall on Digital Ocean and apply these inbound rules:
Inbound rules for the Master node(s)
- TCP Inbound 6443 - Kubernetes API Server (This port is configurable)
- TCP Inbound 2379–2380 - etcd servcer client API
- TCP Inbound 10250 - Kublet API
- TCP Inbound 10251 - kube-scheduler
- TCP Inbound 10252 - kube-controller-manager
- TCP Inbound 10253 - Read-Only Kublet API
Inbound rules for the Worker node(s)
- TCP Inbound 10250 - Kublet API
- TCP Inbound 10255 - Read-Only Kublet API
- TCP Inbound 30000–32767 - NodePort Services
On master and workers nodes:
ubuntu-s-2vcpu-4gb-sgp1-01- Master Node -kubeadm-001ubuntu-s-2vcpu-4gb-sgp1-02- Worker Node#1 -kubeadm-002ubuntu-s-2vcpu-4gb-sgp1-03- Worker Noce #2 -kubeadm-003ubuntu-s-2vcpu-4gb-sgp1-04- Worker Node #3 -kubeadm-004
Do the following as root to set up the Kubernetes package repository:
alias cls=clear
apt-get update && apt-get install -y apt-transport-https
Add the Key for Repository
curl -s https://packages.cloud.google.com/apt/doc/apt-key.gpg | apt-key add -
Add the Sources for Xenial Main
cat <<EOF >/etc/apt/sources.list.d/kubernetes.list
deb http://apt.kubernetes.io/ kubernetes-xenial main
EOF
Update for new sources
apt-get update
Now install the Docker Engine:

apt-get install -y docker.io
Now install various Kubernetes Tools
- The kubelet binary - worker node
- The kubeadm CLI - Kubernetes installer
- The kubectl client - Kubernetes API client
- The kubernetes-cni - the Container Networking Interface (CNI) plug-in
apt-get install -y kubelet kubeadm kubectl kubernetes-cni
apt-mark hold kubelet kubeadm kubectl
Enable bash tab completion for kubectl on the master node : ubuntu-s-2vcpu-4gb-sgp1-01 or kubeadm-001
source <(kubectl completion bash) - setup autocomplete in bash into the current shell
echo "source <(kubectl completion bash)" >> ~/.bashrc - add autocomplete permanently to your bash shell
kubeadm init first runs a series of prechecks to ensure that the machine is ready to run Kubernetes.
These prechecks expose warnings and exit on errors. It then downloads and installs the cluster control plane components.
On master virtual machine: ubuntu-s-2vcpu-4gb-sgp1-01 start bootstrapping your Kubernetes cluster:
kubeadm config images pull
kubeadm init
Starting in Version 1.8, tokens will expire after 24 hours by default (if you require a non-expiring token use --token-ttl 0)
kubeadm init --token-ttl 0
After 24 hours use the following command: kubeadm token create --print-join-command
Grab the final output of this command BUT DO NOT EXECUTE ON WORKER NODES YET, COMPLETE STEPS BELOW FIRST.
Sample Output - Your output will look different - specifically the IP and Token
kubeadm join 209.97.160.77:6443 --token dz70zb.gq8br2z7r7p94qxf --discovery-token-ca-cert-hash sha256:cff53808eb9f2f5f4a4eda60d9ac7cc7979007cee76dbd416bc69dc23cef94b1
Perform some housekeeping to make kubectl work for your non-root user.
mkdir -p $HOME/.kube
sudo cp -i /etc/kubernetes/admin.conf $HOME/.kube/config
sudo chown $(id -u):$(id -g) $HOME/.kube/config
If you are the root user, you can run: export KUBECONFIG=/etc/kubernetes/admin.conf
Check if kubectl is properly configured and has access to the cluster
kubectl cluster-info
Install the overlay network:
kubectl apply -f "https://cloud.weave.works/k8s/net?k8s-version=$(kubectl version | base64 | tr -d '\n')"
Check Status
watch -n1 kubectl get all --all-namespaces -o wide
The Metrics Server is required to implement Horizontal Pod Autoscaling.
To make this magic happen kubectl autoscale deployment.apps/nginx --min=5 --max=10 --cpu-percent=80
git clone https://github.com/kubernetes-incubator/metrics-server.git
cd metrics-server
kubectl create -f deploy/1.8+/
On the master node execute these commands:
sudo git clone https://github.com/ahmetb/kubectx /opt/kubectx
sudo ln -s /opt/kubectx/kubectx /usr/local/bin/kubectx
sudo ln -s /opt/kubectx/kubens /usr/local/bin/kubens
git clone https://github.com/jonmosco/kube-ps1.git
echo "source /root/kube-ps1/kube-ps1.sh" >> ~/.bashrc
add PS1='[\u@\h \W $(kube_ps1)]\$ ' to .bashrc
wget https://github.com/zegl/kube-score/releases/download/v0.2.0/kube-score_0.2.0_Linux_x86_64.tar.gz
tar -xvf kube-score_0.2.0_Linux_x86_64.tar.gz
sudo mv kube-score /usr/local/bin/.
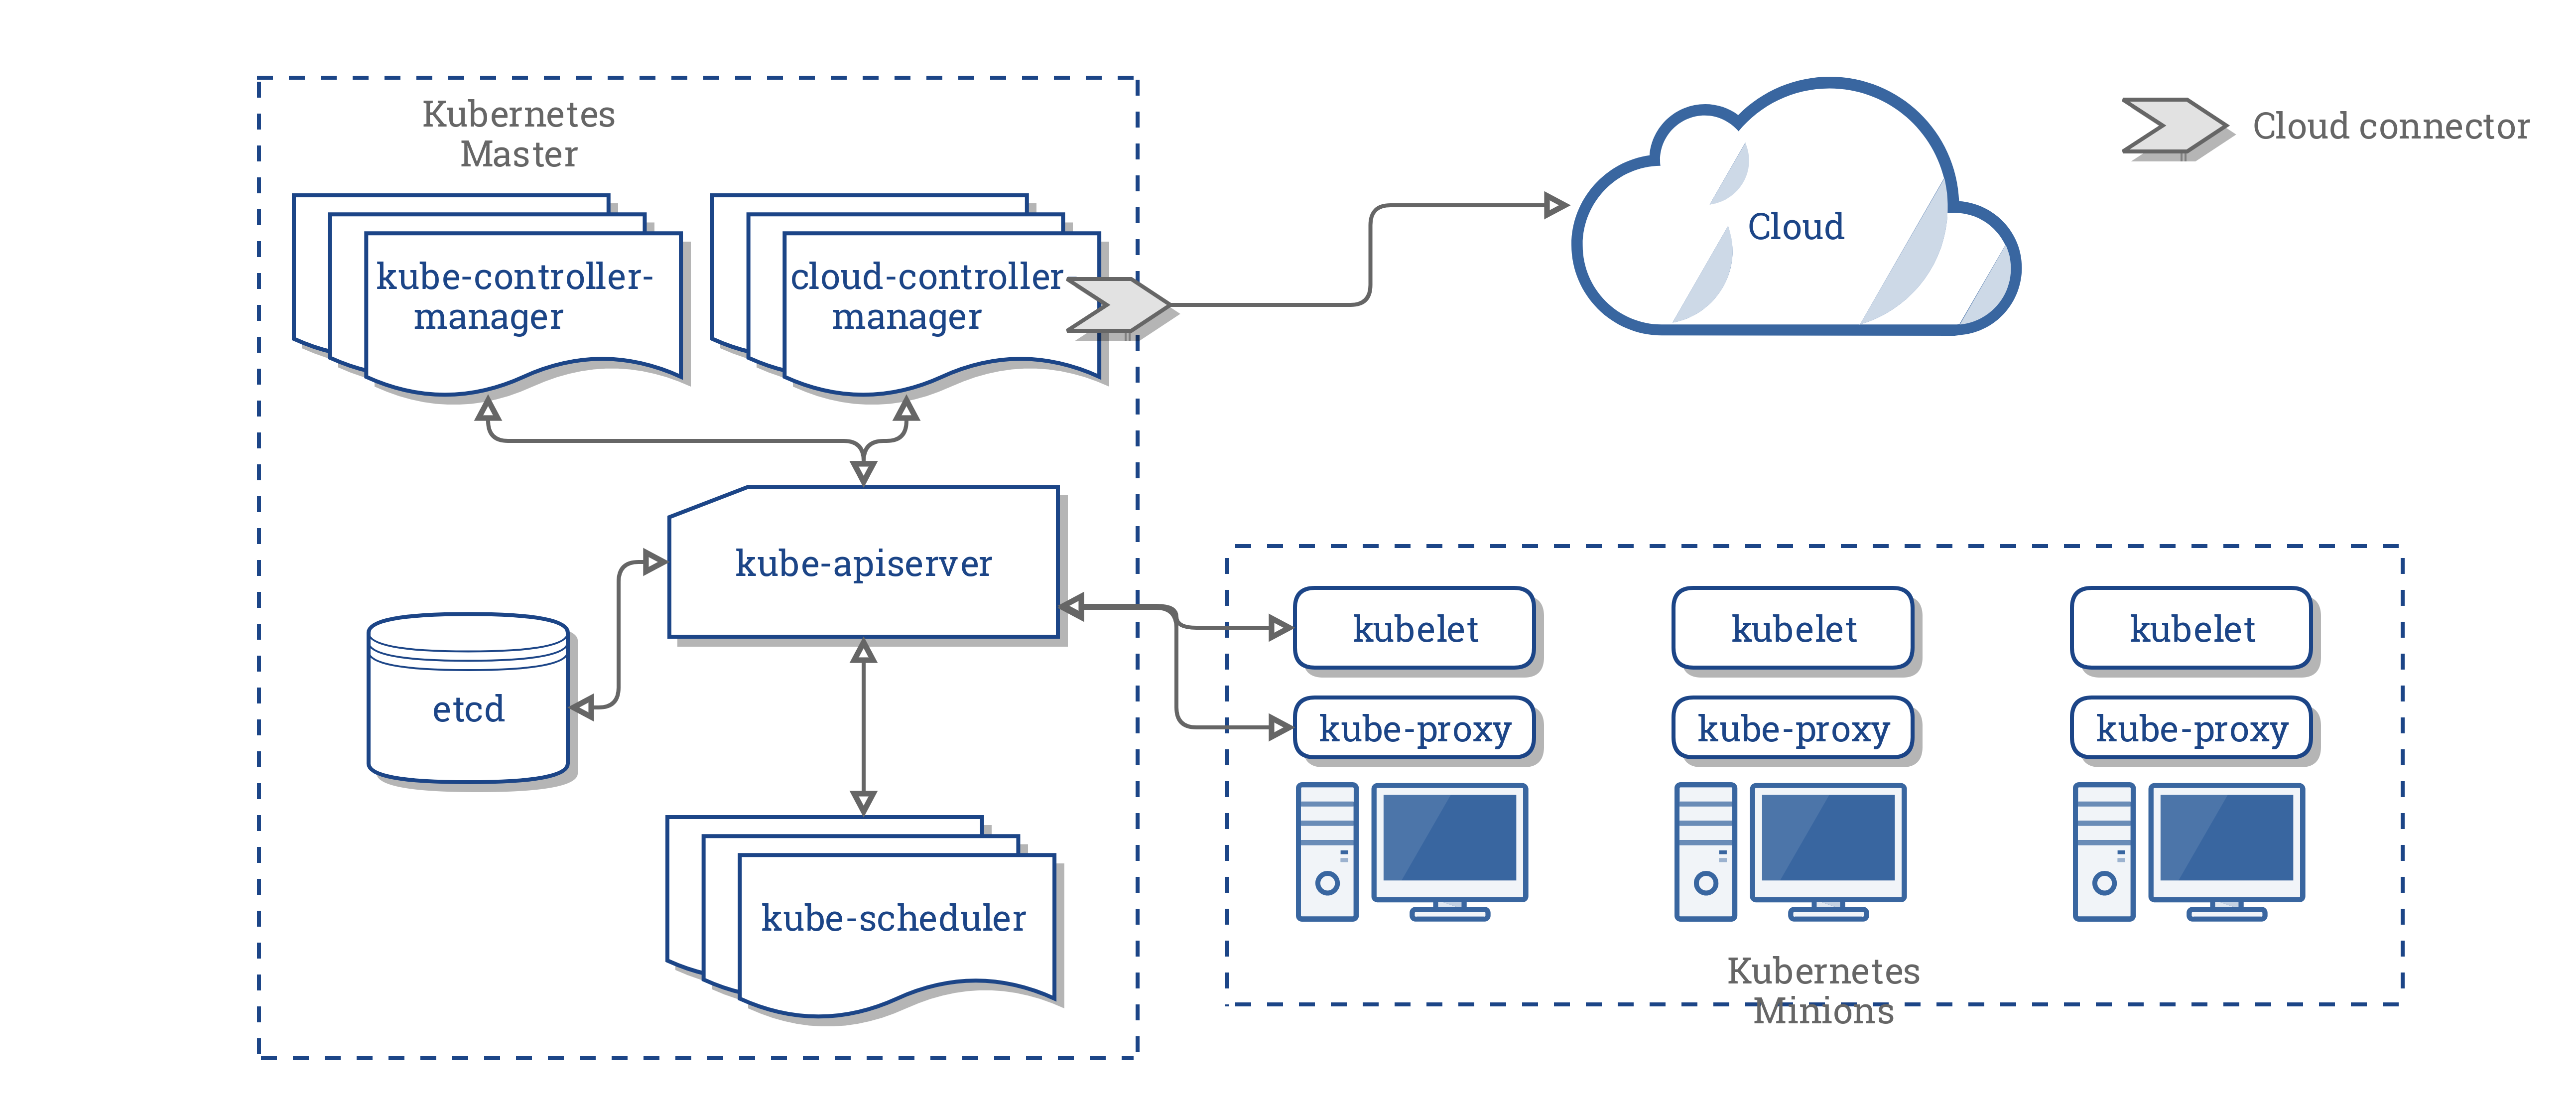
kube-apiserver - API server process that gives access to the Kubernetes API via a HTTP REST API or kubectl.
etcd - distributed, reliable key-value store, configuration database holding actual and desired state of the cluster.
kube-controller-manager - communicates with the API server to create, update, and delete the resources they manage so that the cluster gets back to its ideal state.
kube-scheduler - determines which node should run a pod.
container runtime - docker runtime to rin containers.
kubelet - agent that Kubernetes uses to manage the lifecycle of a node and relay its health to the master every few seconds.
On workers nodes:
ubuntu-s-2vcpu-4gb-sgp1-02ubuntu-s-2vcpu-4gb-sgp1-03ubuntu-s-2vcpu-4gb-sgp1-04
Example
kubeadm join --token=<token> <master-ip> --skip-preflight-checks
Sample (will not work for you as this has my cluster IP and token)
kubeadm join <master IP>:6443 --token dz70zb.gq8br2z7r7p94qxf --discovery-token-ca-cert-hash sha256:cff53808eb9f2f5f4a4eda60d9ac7cc7979007cee76dbd416bc69dc23cef94b1
In separate terminal on ubuntu-s-2vcpu-4gb-sgp1-01 execute this to watch the status of the kubernetes services.
watch -t -n1 'echo kube-system Pods && kubectl get pods -o wide -n kube-system && echo && echo kube-system Services && kubectl get svc -n kube-system && echo && echo Nodes && kubectl get nodes -o wide'
Verify the kubelet service on worker nodes
systemctl status kubelet.service
To undo what kubeadm did, you should first drain the node and make sure that the node is empty before shutting it down.
On ubuntu-s-2vcpu-4gb-sgp1-01 the master node run:
kubectl drain <kubeadm-004-example> --delete-local-data --force --ignore-daemonsets
kubectl delete node <kubeadm-004-example>
Then, on the worker node being removed, reset all kubeadm installed state: kubeadm reset
To rejoin the worker node execute the kubeadm join command.
tl;dr - Example microservices application

Only do this part if you want to deploy a sample microservices application.
Socks Shop Documentation: https://microservices-demo.github.io/
On master virtual machine: ubuntu-s-2vcpu-4gb-sgp1-01 create a namespace.
kubectl create namespace sock-shop
Install the sock shop microservice application from a URL:
kubectl apply -n sock-shop -f "https://github.com/microservices-demo/microservices-demo/blob/master/deploy/kubernetes/complete-demo.yaml?raw=true"
In separate terminal on ubuntu-s-2vcpu-4gb-sgp1-01 execute this to watch the status of the socks shop application.
watch -t -n1 'echo sock-shop Pods && kubectl get pods -n sock-shop -o wide && echo && echo sock-shop Services && kubectl get svc -n sock-shop && echo && echo Nodes && kubectl get nodes -o wide'
Delete the sock shop microservice application :
kubectl delete -n sock-shop -f "https://github.com/microservices-demo/microservices-demo/blob/master/deploy/kubernetes/complete-demo.yaml?raw=true"
Clone the project so we can examine the manifest file
git clone https://github.com/microservices-demo/microservices-demo.git
cd microservices-demo/deploy/kubernetes
vi complete-demo.yaml
Install the sock shop microservice application from file:
kubectl apply -n sock-shop -f /microservices-demo/deploy/kubernetes/complete-demo.yaml
- Never do this in production, use a Load Balancer and Ingress
To Access the Shock Shop UI = On any worker node:
ubuntu-s-2vcpu-4gb-sgp1-02:30001ubuntu-s-2vcpu-4gb-sgp1-03:30001ubuntu-s-2vcpu-4gb-sgp1-04:30001
On any worker node get the IP address: ip a | grep eth0
On master get the port of the front-end service : kubectl get svc -n sock-shop | grep front-end : 30001
In a browser <Worker Node Public IP>:<front-end service port>
OR a better way to do this
I created a Load Balancer sgp1-load-balancer-01 on Digital Ocean that load balances to
ubuntu-s-2vcpu-4gb-sgp1-02on port30001ubuntu-s-2vcpu-4gb-sgp1-03on port30001ubuntu-s-2vcpu-4gb-sgp1-04on port30001
With a DNS record for sockshop.jamesbuckett.com pointing to the Load Balancer.
Sockshop UI: http://sockshop.jamesbuckett.com/
User ID's and Passwords to access the Socks Shop Application.
Username and Passwords:
- user/password
- user1/password
- Eve_Berger/eve
tl;dr - Visualization and Monitoring
Only do this part if you want to deploy visualization and monitoring for a sample microservices application.
Setup your own trail account at: https://cloud.weave.works/
On master virtual machine: ubuntu-s-2vcpu-4gb-sgp1-01
curl -Ls https://get.weave.works | sh -s -- --token=xxx
Your curl command will have a token specific to your account.

To demonstrate workload mobility spin up a Preemptible Virtual Machine GKE Regional cluster.
This requires you to have a Google Compute Cloud account and the gcloud utility setup.
Preemptible Virtual Machine are Google Compute Engine VM instances that last a maximum of 24 hours and provide no availability guarantees.
Preemptible VMs are priced lower than standard Compute Engine VMs and offer the same machine types and options.
You can use preemptible VMs in your Kubernetes Engine clusters or node pools to run batch or fault-tolerant jobs that are less sensitive to the ephemeral, non-guaranteed nature of preemptible VMs.
A regional cluster provides a single static endpoint for the entire cluster, providing you with the ability to access the cluster's control plane regardless of any outage or downtime in an individual zone.
How regional Clusters work
- Regional clusters replicate cluster masters and nodes across multiple zones (data centers) within in a single region.
- For example, a regional cluster in the us-east1 region creates masters and nodes in all three us-east1 zones:
- us-east1-b
- us-east1-c
- us-east1-d

This ensures higher availability of resources and protects clusters from zonal downtime, as regional clusters and their resources do not fail if a single zone fails.
In the event of an infrastructure outage, the regional control plane remains available and nodes can be rebalanced manually or using cluster autoscaler.
There are several benefits to using regional clusters, including:
- Resilience from single zone failure.
- Because regional clusters are available across a region rather than a single zone within a region, if a single zone goes down, your Kubernetes control plane and your resources are not impacted.
- Zero downtime master upgrades and reduced downtime from master failures.
- By using a high availability control plane, your control plane’s availability is unaffected, even during upgrades.
Creating a cluster or node pool with preemptible Virtual Machines
Details:
- Create a cluster in Taiwan
- Latest version: 1.10.5
- Stackdriver: enabled
- Location: Regional
- Regional spins up 3 VM's in each zone on the region
- asia-east1-a
- asia-east1-b
- asia-east1-c
In the Google Cloud Shell execute:
gcloud beta container --project "levvel-devops-testing" clusters create "tw-cluster" \
--preemptible \
--region "asia-east1" \
--username "admin" \
--cluster-version "1.10.5-gke.3" \
--machine-type "n1-standard-1" \
--image-type "COS" \
--disk-size "100" \
--scopes "https://www.googleapis.com/auth/compute","https://www.googleapis.com/auth/devstorage.read_only","https://www.googleapis.com/auth/logging.write","https://www.googleapis.com/auth/monitoring","https://www.googleapis.com/auth/servicecontrol","https://www.googleapis.com/auth/service.management.readonly","https://www.googleapis.com/auth/trace.append" \
--num-nodes "3" \
--network "default" \
--enable-cloud-logging \
--enable-cloud-monitoring \
--subnetwork "default" \
--enable-autoscaling --min-nodes 3 --max-nodes 10 \
--no-enable-autorepair
kubectl get nodes
james_buckett@levvel-devops-testing:~$ kubectl get nodes
NAME                                        STATUS    ROLES     AGE       VERSION
gke-tw-cluster-default-pool-63614500-5l1b   Ready     <none>    23m       v1.10.5-gke.3
gke-tw-cluster-default-pool-63614500-n85s   Ready     <none>    23m       v1.10.5-gke.3
gke-tw-cluster-default-pool-63614500-z40t   Ready     <none>    12m       v1.10.5-gke.3
gke-tw-cluster-default-pool-864c822f-6pxt   Ready     <none>    23m       v1.10.5-gke.3
gke-tw-cluster-default-pool-864c822f-fg4s   Ready     <none>    23m       v1.10.5-gke.3
gke-tw-cluster-default-pool-864c822f-z4xm   Ready     <none>    23m       v1.10.5-gke.3
gke-tw-cluster-default-pool-d1a6460f-d4dg   Ready     <none>    23m       v1.10.5-gke.3
gke-tw-cluster-default-pool-d1a6460f-wdjs   Ready     <none>    23m       v1.10.5-gke.3
gke-tw-cluster-default-pool-d1a6460f-xjzl   Ready     <none>    23m       v1.10.5-gke.3
In the Google Cloud Shell execute the exact same command that was executed on Digital Ocean to deploy the same application on to Google Container Engine.
kubectl create namespace sock-shop
kubectl apply -n sock-shop -f "https://github.com/microservices-demo/microservices-demo/blob/master/deploy/kubernetes/complete-demo.yaml?raw=true"
Execute this to watch the status of the socks shop application.
watch -t -n1 'echo sock-shop Pods && kubectl get pods -n sock-shop -o wide && echo && echo sock-shop Services && kubectl get svc -n sock-shop && echo && echo Nodes && kubectl get nodes -o wide'
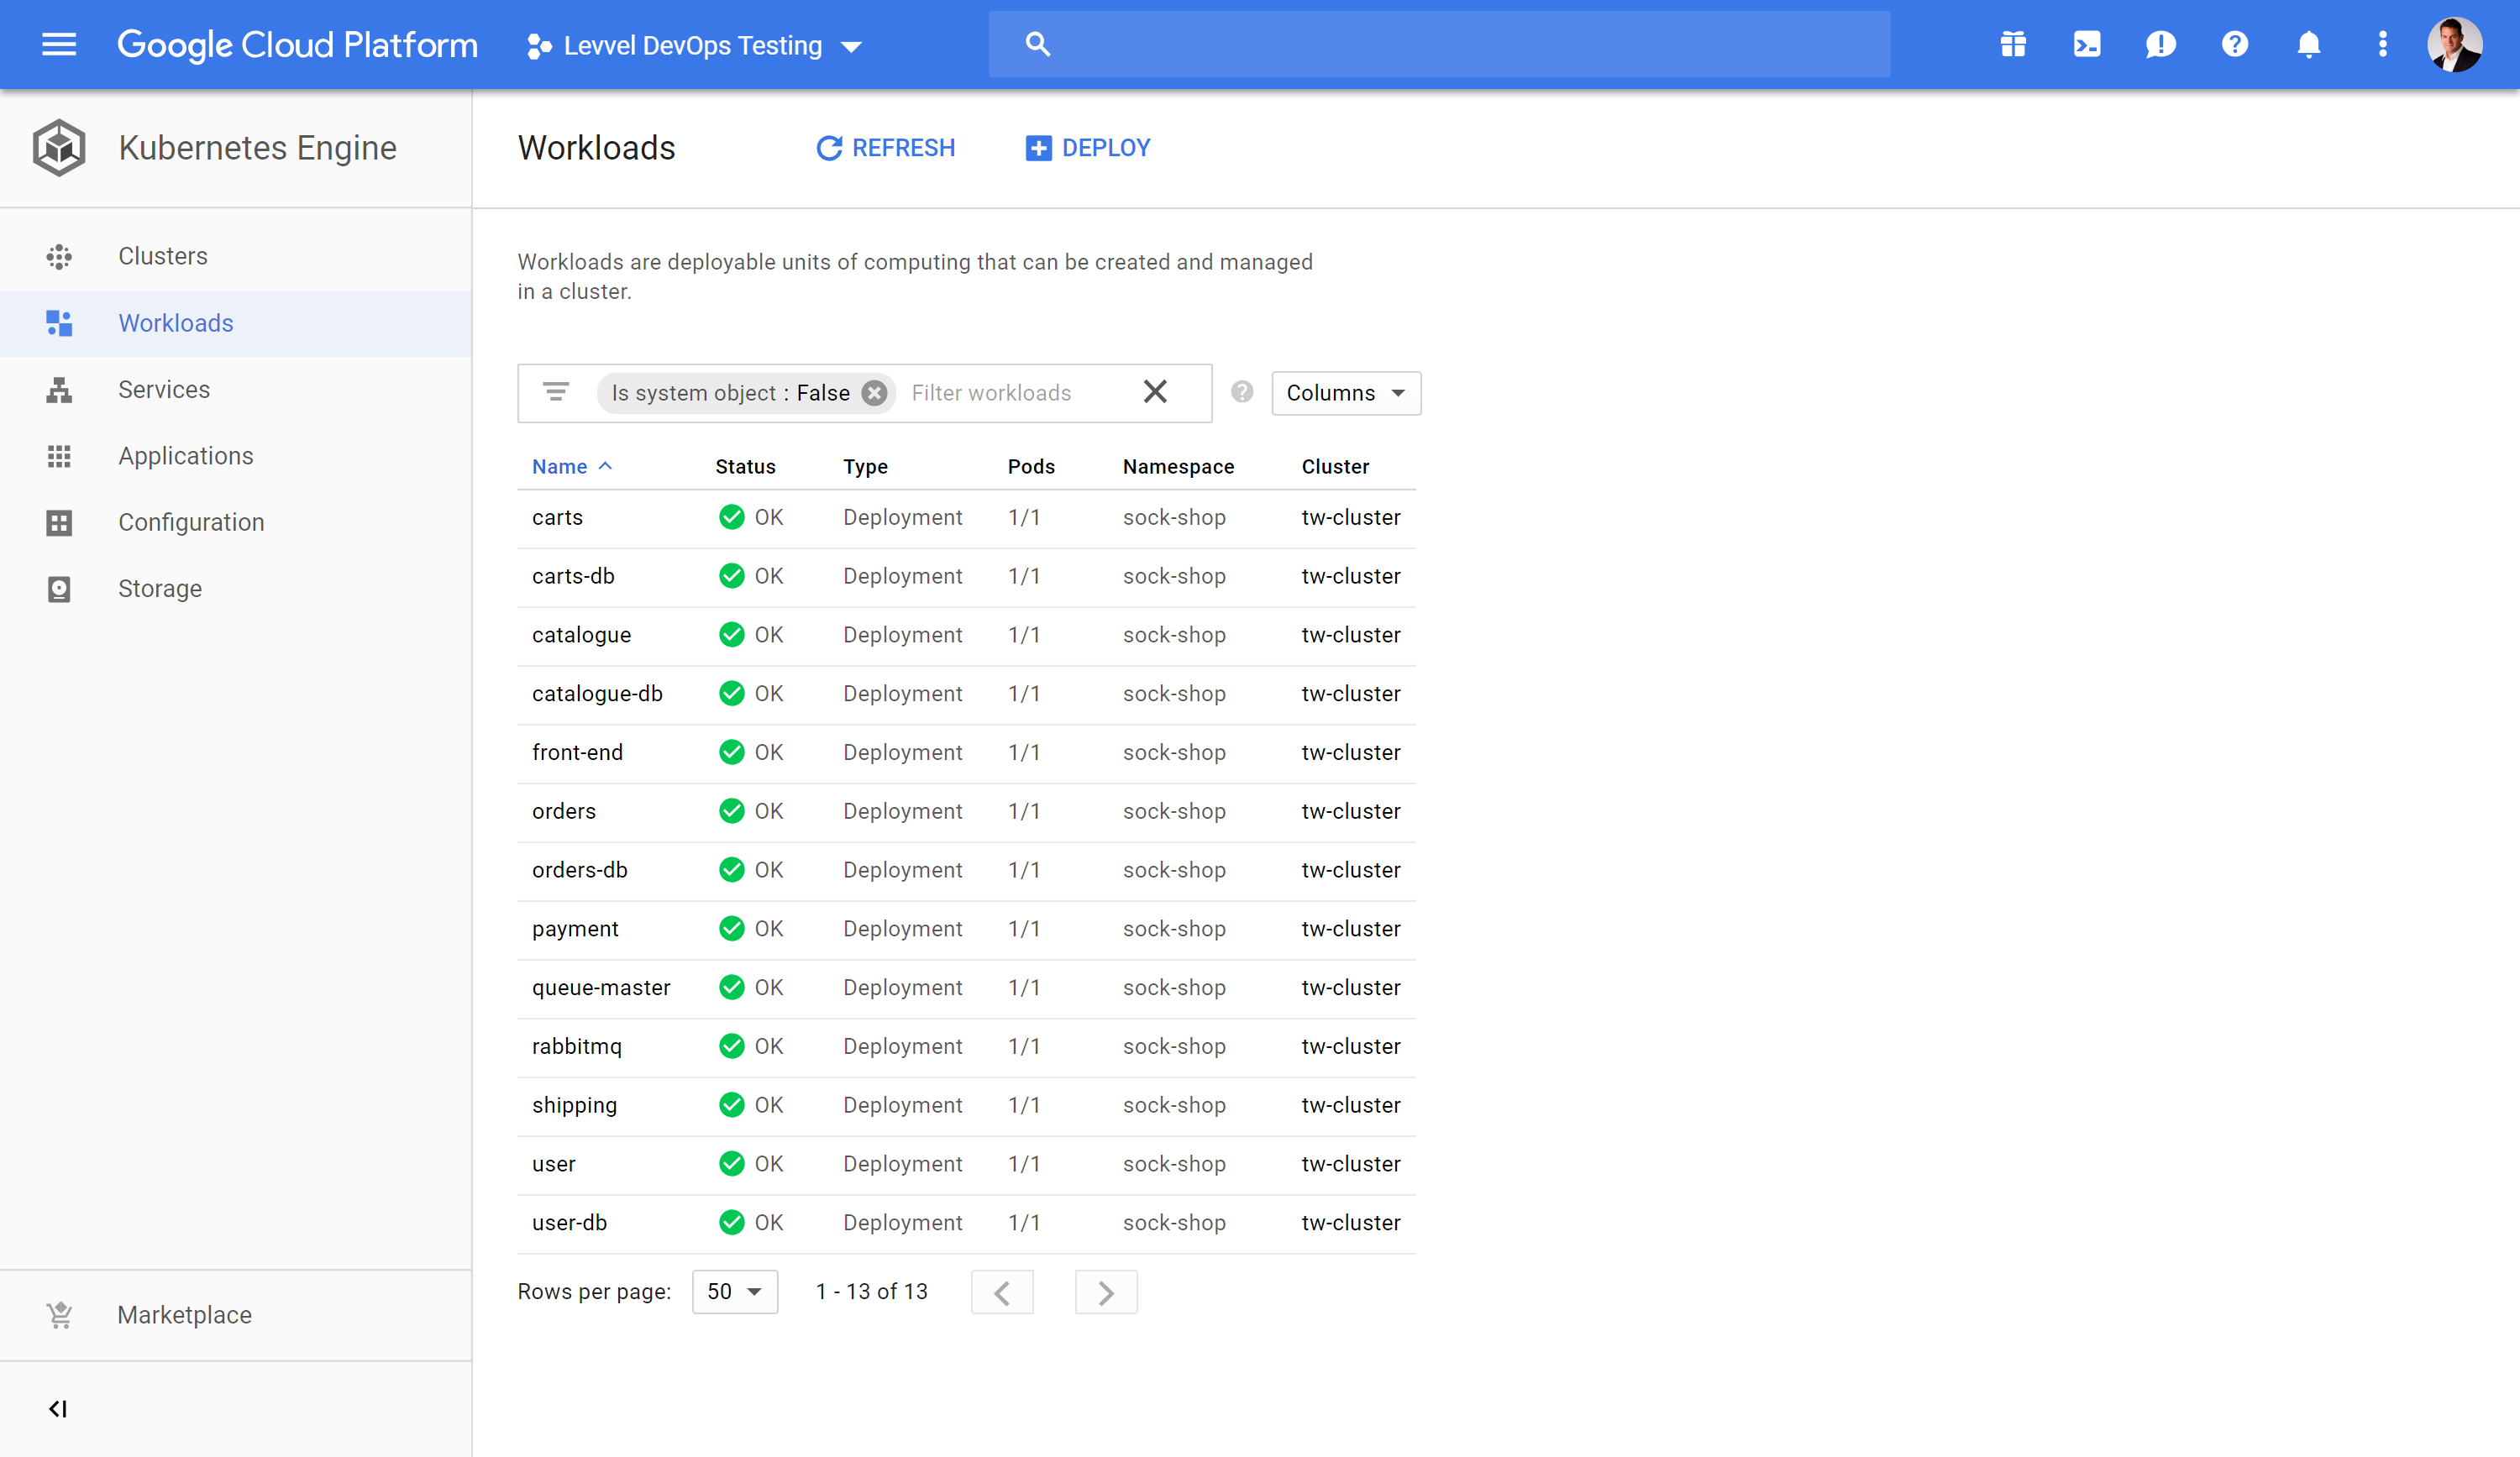
This demonstrates the workload mobility and ability to avoid vendor lock in capabilities of Kubernetes.
tl;dr - General-purpose web UI for Kubernetes clusters

Only do this part if you want to explain Kubernetes primitives.
Use the Kubernetes Dashboard as a GUI for Kubernetes.
On master virtual machine: ubuntu-s-2vcpu-4gb-sgp1-01
Set up RBAC for the Kubernetes Dashboard.
vi dashboard-admin.yaml
apiVersion: rbac.authorization.k8s.io/v1beta1
kind: ClusterRoleBinding
metadata:
  name: kubernetes-dashboard
  labels:
    k8s-app: kubernetes-dashboard
roleRef:
  apiGroup: rbac.authorization.k8s.io
  kind: ClusterRole
  name: cluster-admin
subjects:
- kind: ServiceAccount
  name: kubernetes-dashboard
  namespace: kube-system
kubectl create -f dashboard-admin.yaml
Install the Kubernetes Dashboard.
kubectl apply -f https://raw.githubusercontent.com/kubernetes/dashboard/master/src/deploy/recommended/kubernetes-dashboard.yaml
Copy the config to a local machine as the Kubernetes Dashboard should not be exposed publicly.
NOTE: Dashboard should not be exposed publicly using kubectl proxy command as it only allows HTTP connection. For domains other than localhost and 127.0.0.1 it will not be possible to sign in. Nothing will happen after clicking Sign in button on login page.
From local Linux instance:
mkdir .kube
cd .kube

scp -i /home/jamesb/do/id_rsa-do root@<master node ip>:/etc/kubernetes/admin.conf .

mv admin.conf config

kubectl get nodes
Ensure that local linux instance has kubectl installed
kubectl proxy
Dashboard UI: http://localhost:8001/api/v1/namespaces/kube-system/services/https:kubernetes-dashboard:/proxy/
Click Skip to login.
Now add storage to your cluster by completing the steps in Rook on Digital Ocean.
kubetail is a Bash script to tail Kubernetes logs from multiple pods at the same time
wget https://raw.githubusercontent.com/johanhaleby/kubetail/master/kubetail
chmod +x kubetail
mv ./kubetail /usr/local/bin/kubetail
kubectl get pods -n sock-shop
./kubetail cart -n sock-shop
kube-bench is a Go application that checks whether Kubernetes is deployed securely by running the checks documented in the CIS Kubernetes Benchmark.
kubectl run --rm -i -t kube-bench-master --image=aquasec/kube-bench:latest --restart=Never --overrides="{ \"apiVersion\": \"v1\", \"spec\": { \"hostPID\": true, \"nodeSelector\": { \"kubernetes.io/role\": \"master\" }, \"tolerations\": [ { \"key\": \"node-role.kubernetes.io/master\", \"operator\": \"Exists\", \"effect\": \"NoSchedule\" } ] } }" -- master --version 1.8
kubectl run --rm -i -t kube-bench-node --image=aquasec/kube-bench:latest --restart=Never --overrides="{ \"apiVersion\": \"v1\", \"spec\": { \"hostPID\": true } }" -- node --version 1.8
End of Section