Hopefully this will answer "How do I setup or start a Django project?" I was trying to set up my own website, and there was a lot to read, learn and digest! Therefore, I put this together which is a collection of all the guides/blog posts/articles that I found the most useful. At the end of this, you will have your barebones Django app configured and ready to start building :)
NOTE: This guide was built using Django 1.9.5, NodeJS 4+ with NPM 3+
If working on Mac OSX, follow this guide.
- PostgreSQL
- virtualenv
- virtualenvwrapper
- git
- NodeJS 4+ with NPM 3+
It’s common practice to use a virtual environment for your Python projects in order to create self-contained development environments. The goal of virtualenv is to prevent different versions of libraries/packages from messing with each other. It’s like an isolated, soundproof room within your home where you can scream as loud as you want, about anything you want, and nobody else outside that room can hear it.
Use virtualenvwrapper to create a virtual environment for your project:
mkvirtualenv -p /usr/local/bin/python3 [project-name]
After running this command you should see (project-name) before your prompt, indicating that you’re running within the project-name virtualenv.
You should see something like this:
(project-name) MacBook-Air:~ michaelgonzalez$
I start off every project with the same 7 Python packages:
pip install django-webpack-loader
pip install dj-database-url
pip install django
pip install gunicorn
pip install psycopg2
pip install python-decouple
pip install requests
pip install whitenoise
This one is easy:
mkdir [project-name]
cd [project-name]
Now lets automagically generate some code that establishes a Django project. Run the following command:
django-admin startproject [project-name] .
This should have created the following folder structure:
[project-name]/
    manage.py
    [project-name]/
        __init__.py
        settings.py
        urls.py
        wsgi.py
This file will obviously be very simple to start, but it doesn't hurt to start describing your project :). You can fill in all the details as you develop! Make sure to visit this Markdown cheatsheet, which will allow you to create well designed and organized README files.
This file will specify intentionally untracked files that Git should ignore. For more info, look here.
The contents of .gitignore:
venv
*.pyc
staticfiles
.env
env
node_modules
[project-name]/static/build
db.sqlite3
.DS_Store
__pycache__
I personally choose to use git for my software version control. I also use GitHub, which is a web-based Git repository hosting service. These tools help with deployment, working on teams, etc. This makes your life so much easier, trust me!
First things first, make sure to create a new repo at GitHub.com and DO NOT initialize with a README.md.
After you have created the repo, run these commands:
git init
git add .
git commit -m "first commit"
git remote add origin https://github.com/user-name/[project-name].git
git push -u origin master
EditorConfig helps developers define and maintain consistent coding styles between different editors and IDEs. This file will initialize the coding style for this project.
I base my .editorconfig on PEP 0008 and AirBnB JavaScript Style Guide. Here are the contents of .editorconfig:
root = true

# Unix-style newlines with a newline ending every file
[*]
end_of_line = lf
insert_final_newline = true

# Set default charset for JavaScript and Python
[*.{js,py}]
charset = utf-8

# Python settings
[*.py]
indent_style = space
indent_size = 4
trim_trailing_whitespace = true

# JavaScript, JSX, CSS, SCSS, HTML settings
[*.{js,jsx,css,scss,html}]
indent_style = space
indent_size = 2
trim_trailing_whitespace = true

# Markdown settings
[*.md]
trim_trailing_whitespace = false
Initialize the base Python package requirements for your Django project:
pip freeze > requirements.txt
Now create a requirements folder, so we can manage different required packages for different environments:
mkdir requirements
echo "r- base.txt" > requirements/production.txt
echo "r- base.txt" > requirements/local.txt
echo "r- base.txt" > requirements/testing.txt
cp requirements.txt requirements/base.txt
Lets transform the project settings into a package. This ensures we have the flexibility to have different settings for different environments.
Your Django project should now look like:
[project-name]/
    README.md
    manage.py
    config/
        __init__.py
        settings/
            __init__.py
            base.py #This was settings.py but was renamed to base.py
            local.py
            production.py
            testing.py
        urls.py
        wsgi.py
    requirements/
        base.txt
        local.txt
        production.txt
        testing.txt
    requirements.txt
The DJANGO_SETTINGS_MODULE environment needs to be changed in two places:
manage.pyconfig/wgsi.py
Lets update the manage.py file.
Before:
#!/usr/bin/env python
import os
import sys

if __name__ == "__main__":
    os.environ.setdefault("DJANGO_SETTINGS_MODULE", "[project-name].settings")

    from django.core.management import execute_from_command_line

    execute_from_command_line(sys.argv)
After:
#!/usr/bin/env python
import os
import sys

if __name__ == "__main__":
    os.environ.setdefault("DJANGO_SETTINGS_MODULE", "config.settings.base")

    from django.core.management import execute_from_command_line

    execute_from_command_line(sys.argv)
Lets update the config/wgsi.py file.
Before:
"""
WSGI config for [project-name] project.

It exposes the WSGI callable as a module-level variable named ``application``.

For more information on this file, see
https://docs.djangoproject.com/en/1.9/howto/deployment/wsgi/
"""

import os

from django.core.wsgi import get_wsgi_application

os.environ.setdefault("DJANGO_SETTINGS_MODULE", "[project-name].settings")

application = get_wsgi_application()
After:
"""
WSGI config for [project-name] project.

It exposes the WSGI callable as a module-level variable named ``application``.

For more information on this file, see
https://docs.djangoproject.com/en/1.9/howto/deployment/wsgi/
"""

import os

from django.core.wsgi import get_wsgi_application

os.environ.setdefault("DJANGO_SETTINGS_MODULE", "config.settings.base")

application = get_wsgi_application()Now that we have rearragned Django settings, we need to make some changes in the base settings to reflect this.
We will make a few changes to the config/settings/base.py file:
- BASE_DIR
- Before:
BASE_DIR = os.path.dirname(os.path.dirname(os.path.abspath(__file__)))- After:
BASE_DIR = os.path.dirname(os.path.dirname(os.path.dirname(os.path.abspath(__file__))))- ROOT_URLCONF
- Before:
ROOT_URLCONF = '[project-name].urls' - After:
ROOT_URLCONF = 'config.urls'
- WSGI_APPLICATION
- Before:
WSGI_APPLICATION = '[project-name].wsgi.application' - After:
WSGI_APPLICATION = 'config.wsgi.application'
We will make this change near the top of the config/settings.base.py file near the BASE_DIR variable:
Before:
BASE_DIR = os.path.dirname(os.path.dirname(os.path.dirname(os.path.abspath(__file__))))After:
BASE_DIR = os.path.dirname(os.path.dirname(os.path.dirname(os.path.abspath(__file__))))
APPS_DIR = '{0}/apps'.format(BASE_DIR)
5. Adjust config/settings/base.py settings to take common project templates and static assests into account
In order for the project to know to look for common project templates, we need to adjust the TEMPLATE variable, specifically the DIRS key.
Before:
TEMPLATES = [
    {
        'BACKEND': 'django.template.backends.django.DjangoTemplates',
        'DIRS': [],
        'APP_DIRS': True,
        'OPTIONS': {
            'context_processors': [
                'django.template.context_processors.debug',
                'django.template.context_processors.request',
                'django.contrib.auth.context_processors.auth',
                'django.contrib.messages.context_processors.messages',
            ],
        },
    },
]
After:
TEMPLATES = [
    {
        'BACKEND': 'django.template.backends.django.DjangoTemplates',
        'DIRS': [
            '{0}/templates'.format(APPS_DIR),
        ],
        'APP_DIRS': True,
        'OPTIONS': {
            'context_processors': [
                'django.template.context_processors.debug',
                'django.template.context_processors.request',
                'django.contrib.auth.context_processors.auth',
                'django.contrib.messages.context_processors.messages',
            ],
        },
    },
]
In order for the project to know to look for common project staticfiles, we need to add the STATICFILES_DIRS, STATIC_ROOT, and WEBPACK_LOADER variables. I put these variables right under the STATIC_URL variable.
STATICFILES_DIRS:
STATICFILES_DIRS = [
    '{0}/static'.format(APPS_DIR),
]
STATIC_ROOT:
STATIC_ROOT = os.path.join(BASE_DIR, 'staticfiles')WEBPACK_LOADER:
WEBPACK_LOADER = {
    'DEFAULT': {
        'BUNDLE_DIR_NAME': 'bundles/',
        'STATS_FILE': os.path.join(BASE_DIR, '../webpack-stats.json')
    }
}In the config/settings/base.py file, find the INSTALLED_APPS variable.
Before:
INSTALLED_APPS = [
    'django.contrib.admin',
    'django.contrib.auth',
    'django.contrib.contenttypes',
    'django.contrib.sessions',
    'django.contrib.messages',
    'django.contrib.staticfiles',
]
After:
DJANGO_APPS = [
    'django.contrib.admin',
    'django.contrib.auth',
    'django.contrib.contenttypes',
    'django.contrib.sessions',
    'django.contrib.messages',
    'django.contrib.staticfiles',
]

THIRD_PARTY_APPS = [
    'webpack_loader',
]

PROJECT_APPS = []

INSTALLED_APPS = DJANGO_APPS + THIRD_PARTY_APPS + PROJECT_APPSThe use of Decouple helps you to organize your settings so that you can change parameters without having to redeploy your app. We will be able to store project parameters in our .env file.
In the import section of config/settings/base.py add:
import dj_database_url
from decouple import configIn config/settings/base.py we will update SECRET_KEY:
- Before:
SECRET_KEY = '3@@5e9=4ux8lbi-uwkb4bqa2a(7276spkiyl3&-w7v_p)iqd+%' - After:
SECRET_KEY = config('SECRET_KEY')
In config/settings/base.py we will update DEBUG:
- Before:
DEBUG = True - After:
DEBUG = config('DEBUG', cast=bool)
In config/settings/base.py we will update ALLOWED_HOSTS:
-
Before:
ALLOWED_HOSTS = [] -
After:
ALLOWED_HOSTS = config(
    'ALLOWED_HOSTS',
    cast=lambda v: [d for d in [s.strip() for s in v.split(' ')] if d],
    default='',
)- Before:
DATABASES = {
    'default': {
        'ENGINE': 'django.db.backends.sqlite3',
        'NAME': os.path.join(BASE_DIR, 'db.sqlite3'),
    }
}- After:
DATABASES = {
    'default': dj_database_url.parse(config('DATABASE_URL')),
}MAKE SURE .env is in your .gitignore file!. You need to keep that file private!
The contents of .env:
SECRET_KEY=3@@5e9=4ux8lbi-uwkb4bqa2a(7276spkiyl3&-w7v_p)iqd+%
DEBUG=true
ALLOWED_HOSTS=localhost .project-url.com 127.0.0.1 0.0.0.0
DATABASE_URL=postgres://user:password@localhost:5432/database_name
Initiate PostgreSQL shell
psql
Create project database
CREATE DATABASE [project-name];
Create database user
CREATE USER user WITH PASSWORD 'password';
ALTER ROLE user SET client_encoding TO 'utf8';
ALTER ROLE user SET default_transaction_isolation TO 'read committed';
ALTER ROLE user SET timezone TO 'UTC';
GRANT ALL PRIVILEGES ON DATABASE [project-name] TO user;
We will use NPM to manage frontend dependencies instead of managing them manually in one of the static files directories.
npm init
npm install --save-dev react webpack webpack-bundle-tracker babel-core babel babel-loader webpack-dev-server react-hot-loader
mkdir -p apps/static/js
touch webpack.config.js
touch apps/static/js/index.js
Populate webpack.config.js with:
var path = require("path")
var webpack = require('webpack')
var BundleTracker = require('webpack-bundle-tracker')


module.exports = {
  context: __dirname,
  entry: [
      'webpack-dev-server/client?http://localhost:3000',
      'webpack/hot/only-dev-server',
      './apps/static/js/index'
  ],

  output: {
      path: path.resolve('./apps/static/bundles/'),
      filename: '[name]-[hash].js',
      publicPath: 'http://localhost:3000/static/bundles/', // Tell django to use this URL to load packages and not use STATIC_URL + bundle_name
  },

  plugins: [
    new webpack.HotModuleReplacementPlugin(),
    new webpack.NoErrorsPlugin(), // don't reload if there is an error
    new BundleTracker({filename: './webpack-stats.json'}),
  ],

  module: {
    loaders: [
      // we pass the output from babel loader to react-hot loader
      { test: /\.jsx?$/, exclude: /node_modules/, loaders: ['react-hot', 'babel'], },
    ],
  },

  resolve: {
    modulesDirectories: ['node_modules', 'bower_components'],
    extensions: ['', '.js', '.jsx']
  }
}Open package.json and add the following:
  ...
  "scripts": {
  "build": "webpack --config webpack.config.js --progress --colors",
  "build-production": "webpack --config webpack.prod.config.js --progress --colors",
  "watch": "node server.js"
  }
Create a file server.js with:
var webpack = require('webpack')
var WebpackDevServer = require('webpack-dev-server')
var config = require('./webpack.config')

new WebpackDevServer(webpack(config), {
  publicPath: config.output.publicPath,
  hot: true,
  inline: true,
  historyApiFallback: true
}).listen(3000, '0.0.0.0', function (err, result) {
  if (err) {
    console.log(err)
  }

  console.log('Listening at 0.0.0.0:3000')
})
As you develop have a terminal running:
node server.js
Now as you develop, any changes made to the react components will reflect in the browser. No reload needed. Magic! right? Just run:
npm run watch
This will do continous builds as things change. The only exception is if you make any changes to the webpack configuration though.
Congrats! Your Django project is now set up. Lets run migrations and then verify everything is set up correctly.
python manage.py makemigrations
This will output:
No changes detected
python manage.py migrate
This will output:
Operations to perform:
  Apply all migrations: admin, contenttypes, auth, sessions
Running migrations:
  Rendering model states... DONE
  Applying contenttypes.0001_initial... OK
  Applying auth.0001_initial... OK
  Applying admin.0001_initial... OK
  Applying admin.0002_logentry_remove_auto_add... OK
  Applying contenttypes.0002_remove_content_type_name... OK
  Applying auth.0002_alter_permission_name_max_length... OK
  Applying auth.0003_alter_user_email_max_length... OK
  Applying auth.0004_alter_user_username_opts... OK
  Applying auth.0005_alter_user_last_login_null... OK
  Applying auth.0006_require_contenttypes_0002... OK
  Applying auth.0007_alter_validators_add_error_messages... OK
  Applying sessions.0001_initial... OK
Now you are ready to run your application locally!
Run this command:
python manage.py runserver
This will output:
Performing system checks...

System check identified no issues (0 silenced).
April 16, 2016 - 13:21:27
Django version 1.9.5, using settings 'config.settings.base'
Starting development server at http://127.0.0.1:8000/
Quit the server with CONTROL-C.
In your web browser, open the followig URL: http://127.0.0.1:8000/.
You should see something like this:
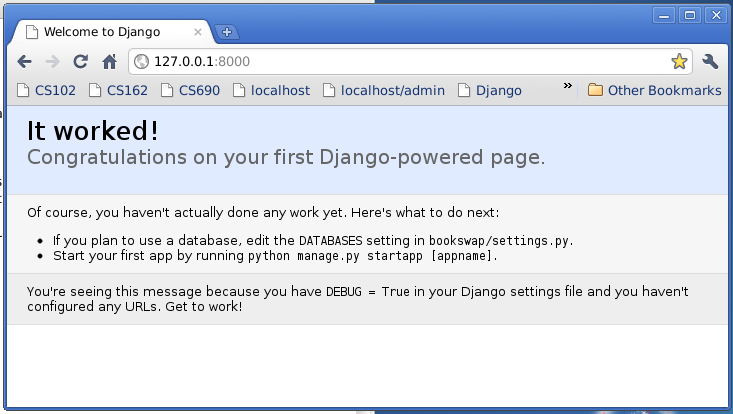
Congrats Your Django up is set up and running correctly :)
Congrats! You have made it through this guide and have your Django + ReactJS project up and running :)
Follow this guide to set up your first Django app.