As we all know, MaxCDN can do wonders to speed up the client side load of web applications. For those using Express on Node.js and serving assets from Amazon S3, niftylettuce has written a the express-cdn module. It takes all the work out of compressing and synchronizing your assets with S3.
To keep this short and sweet, it's assumed that those reading this have installed Node.js and are at least a bit familiar with it and [npm] (node's package manager).
With that said, the first step is to create a directory for the sample express application.
mkdir ~/app
cd ~/app
From inside the application directory, create an empty package.json file (run npm init to generate a more complete package) and install express and express-cdn. Additionally, install the Jade templating language for this example.
echo '{}' > package.json
npm install --save express jade express-cdn
# output omitted...
After installing the aforementioned modules, package.json should look something like this, although perhaps not exactly.
{
  "dependencies": {
    "express": "^4.0.0",
    "jade": "^1.3.1",
    "express-cdn": "^0.1.9"
  }
}Now that package.json is setup and the required modules are installed, create a few files and their directories for the application.
touch app.js
mkdir views public
touch views/index.jade public/script.js public/style.css
What are these?
app.js– Express applicationviews/index.jade– the template to be renderedpublic/script.jsandpublic/style.css– sample asset files to be uploaded to S3 and served via MaxCDN
Once created, the application directory should look like this.
.
├── app.js
├── node_modules/...
├── package.json
├── public
│   ├── script.js
│   └── style.css
└── views
    └── index.jade
With the basic scaffold created, open app.js and add the following code. For a details on what's going on here, see express's documentation.
'use strict';
var path = require('path');
var express = require('express');
var app = express();

app.configure(function() {
    app.set('view engine', 'jade');
    app.set('view options', { layout: false });
    app.use(express.static(path.join(__dirname, 'public')));
});

app.get('*', function(req, res, next) {
    return res.render('index');
});

app.listen(1337, function() {
    console.log("Server started: http://localhost:1337");
});
The application will now successfully start, but on request load a blank page – as the template is currently empty. The next step, add a simple header to the jade template, including the CSS and JavaScript asset files.
html
  head
    script(src='/script.js')
    link(rel='stylesheet', type='text/css', href='/style.css')
  body(onload="setSubHeading()")
    #content
      h1 Express CDN w/ MaxCDN
        span.subhead > Main
At this point, starting the app (node app.js) and hitting http://localhost:1337/ will show the rendered template. However, before doing so, add script.js and style.css asset files, to round everything off.
Here is an example of a simple pure JavaScript function for generating a sub-header based on the path requested. This function is called via the onload attribute in the templates body tag.
function setSubHeading() {
    var h2 = document.getElementsByClassName('subhead').item(this);
    var subhead = window.location.pathname;
    if (subhead && subhead !== '/') {
        h2.innerHTML = '> '+subhead;
    }
};
Lastly, add some basic style to neaten things up.
// file: style.css
body {
  margin: 0px;
}
#content {
  background-color: #f0f0f0;
  width: 100%;
  margin: 0px;
  padding: 1px 15px;
}
#content h1 {
  font: Verdana Helvetica sans-serif 20px;
}
#content h1 .subhead {
  font-size: 75%;
  color: darkgrey;
  margin-left: 10px;
}
This is now a fully functional Express application, complete with JavaScript and CSS assets to be served via MaxCDN.
Start the application with the following.
$ node app.js
Server started: http://localhost:1337
The result will be the following.
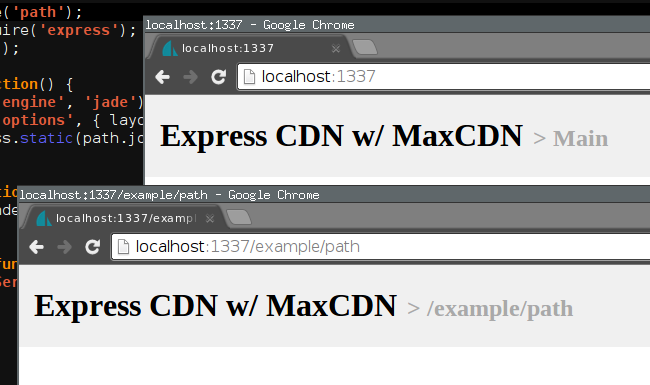
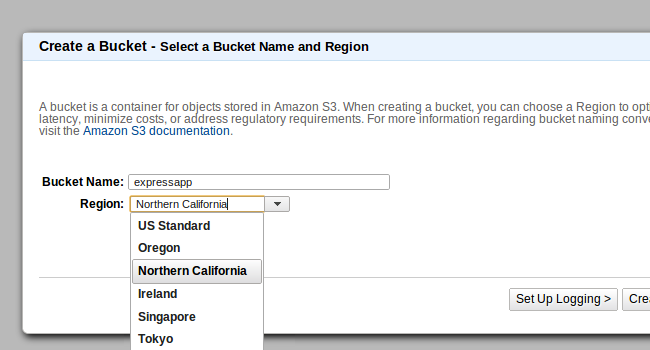
Assuming you already have an AWS account, setting up an Amazon S3 bucket for use with MaxCDN is as easy as 1... 2... 3...
1. Click the "Create Bucket" button from the AWS S3 Console
3. Under "Properties", activate "Static Website Hosting" by selecting "Enable website hosting" and entering a benign "Index Document", e.g. "index.html".
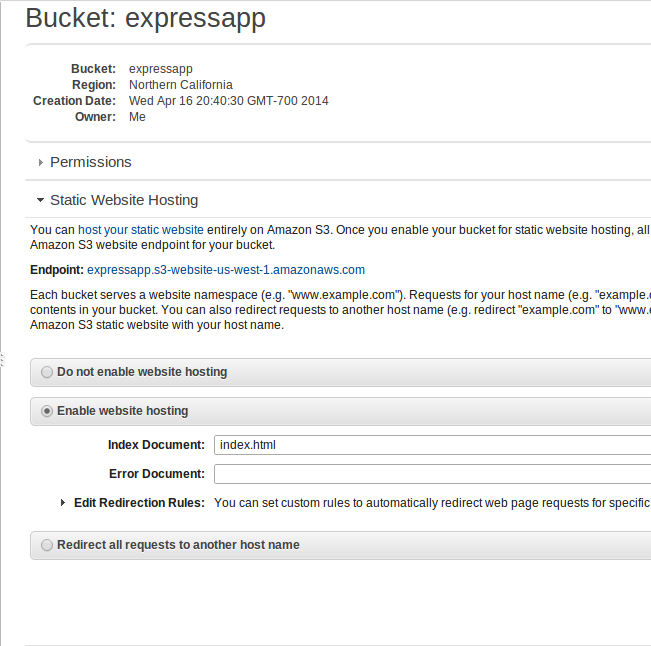
Note: While here, note the S3 Endpoint, as it's needed later when setting up the MaxCDN pull zone.
As mentioned above, express-cdn is a Node.js module created by niftylettuce "for delivering optimized, minified, mangled, gzipped assets with Express and Amazon's CDN". While not specifically designed with MaxCDN in mind, it works flawlessly.
To incorporate express-cdn, we'll need to make a few changes to our application and template.
'use strict';
var path = require('path');
var express = require('express');
var app = express();

// Setup options for
var options = {
    publicDir  : path.join(__dirname, 'public'),
    viewsDir   : path.join(__dirname, 'views'),
    domain     : 'yours.netdna-cdn.com',
    bucket     : 'your_bucket',
    key        : 'aws_key',
    secret     : 'aws_secret',
    hostname   : 'localhost',
    port       : 1337,
    ssl        : false,
    production : true
};

// Initialize the CDN magic
var CDN = require('express-cdn')(app, options);

// NOTE: This is the configure block that already exists in your code.
//       It's shown for placement context.
app.configure(function() {
    app.set('view engine', 'jade');
    app.set('view options', { layout: false });
    app.use(express.static(path.join(__dirname, 'public')));
});

app.locals({ CDN: CDN() });

app.get('*', function(req, res, next) {
    return res.render('index');
});

app.listen(1337, function() {
    console.log("Server started: http://localhost:1337");
});
By exporting the CDN module to app.locals, the helper is surfaced to the jade template. This helper dynamically generates a correctly formatted tag for just about any kind of asset needed. Additionally, the helper includes a cache buster based on the asset's modification time, to ensure that fresh content is always being displayed.
Next, the asset tags – in this case <script> and <link> are replaced with the CDN helper within the template.
html
  head
    !=CDN('/script.js')
    !=CDN('/style.css')
  body(onload="setSubHeading()")
    #content
      h1 Express CDN w/ MaxCDN
        span.subhead > Main
Note: for full usage of the
CDNhelper, including how to add custom attributes, please ready [express-cdn's documentation].
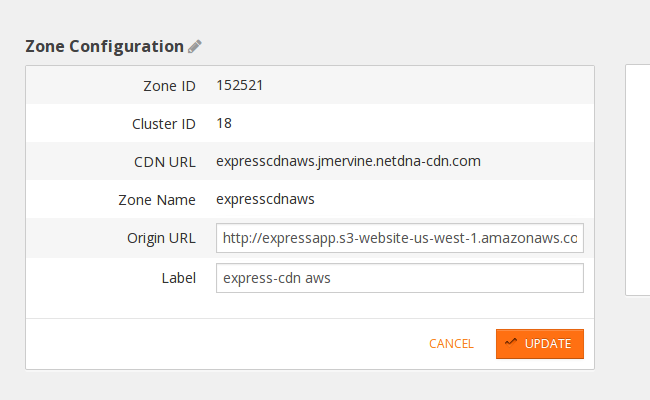
At that, the application is ready to go. The final step is to setup a MaxCDN pull zone to pull assets from S3. To do so, create a new pull zone or update an existing one and add an S3 Endpoint domain as the "Origin URL".
Now that everything is setup, upon starting the application, express-cdn will output some messaging reporting it's interactions with S3. If all is setup correctly, the output should resemble this.
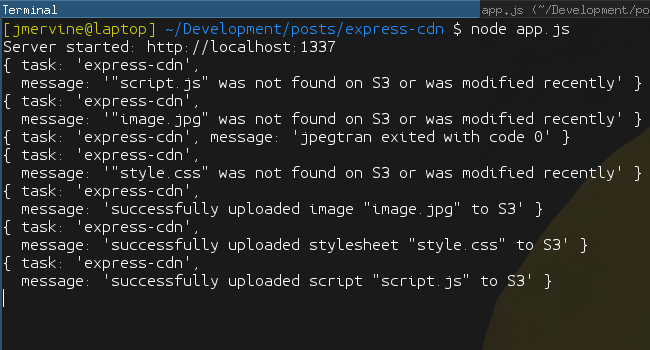
Note: If an existing application is being updated, which already has the most current assets in S3, running the
touchcommand on an asset and restarting the application should return a message that the file has been successfully uploaded. I recommend doing this to ensure that everything is worked.
Once the app is started, hitting http://localhost:1337/ should result in an unmodified experience from above.
hawt