The installation and configuration of SharePoint 2013 Cumulative Updates, Service Packs and Security Updates are a time intensive and tedious process. In an effort to reduce the installation time, a series of PowerShell scripts was developed to reduce the effort required in patch installation and PSCONFIG execution. Each script described in this guide is independent from one another, allowing a SharePoint administrator to execute any number of scripts to aid with patch installation.
The majority of the scripts referenced in this document require PowerShell Remoting to be configured on each of the SharePoint servers in the farm. PowerShell Remoting allows a PowerShell script to execute commands on each of the SharePoint servers, without an administrator having to logon to the SharePoint server and manually execute a script. The following section outlines the steps necessary to configure PowerShell Remoting on the servers in the SharePoint farm.
On Windows Server® 2012, Windows PowerShell remoting is enabled by default. If the SharePoint servers are not running Windows 2012 or higher, or your environment has a non-default configuration, an administrator will need to enable PowerShell Remoting. To enable PowerShell remoting, execute the following cmdlet from an elevated PowerShell console window:
Enable-PSRemotingThe Credential Security Support Provider (CredSSP) enables PowerShell to use a client-side Security Support Provider (SSP) to delegate user credentials from the client computer (a SharePoint server) to the target server (the other SharePoint servers in the farm). Credential delegation allows a PowerShell script block to execute on remote SharePoint servers as a specific domain user, like the farm administrator. Credential delegation is a requirement for several of the scripts.
- On each server in the SharePoint farm, open a PowerShell console window and execute the following command. Choose Yes to enable the CredSSP authentication provider.
Enable-WSManCredSSP -Role ServerThis step must be performed on the SharePoint server acting as the client machine. Best practice dictates that all SharePoint servers in the farm are configured identically so it is recommended that the following step be done on all servers in the farm.
- Open the Local Group Policy Editor (gpedit.msc). Navigate to Computer Configuration > Administrative Templates > System > Credentials Delegation and enable the Allow Delegating Fresh Credentials setting.
To validate that PowerShell Remoting and CredSSP are configured correctly on all servers in the farm, administrators can execute the Test-PowerShellRemoting.ps1 script. This script will execute a PowerShell Remoting call to each of the target SharePoint servers in the farm and validate the response. The script will output the results for each server in the farm. A response of True indicates the connection and response from the remote server was successful.
It is recommended to execute this script after configuring PowerShell Remoting and CredSSP, as well as prior to any patch installations. Periodic verification of the configuration will minimize any negative impact if configuration changes have caused PowerShell Remoting or CredSSP to not work correctly.
Some administrators prefer to install SharePoint updates from a common UNC share that is accessible from all SharePoint servers. However, many administrators prefer to copy the updates to a local drive on each SharePoint server and install from the local source. To aid in copying the updates to all servers in the farm, administrators can utilize the Copy-SharePointUpdateToServer.ps1 script.
To configure the script, you will need to update the source and destination directory paths. The first value (yellow) is the UNC path to the source files that need to be copied to the farm servers. The second value (green) is the destination directory path on the SharePoint server. The destination drive letter (C:, E:, etc.) must exist on all servers. The script will create the specified folder structure automatically, so it is not required to pre-create the specified folder structure.
Script Parameters:
$foldersToCopy = [ordered]@{
   # July 2014 CU
   "\\server\_binaries\SharePointUpdates\2014_07_CU\" = "C:\_SharePointUpdates\2014_07_CU\";
}
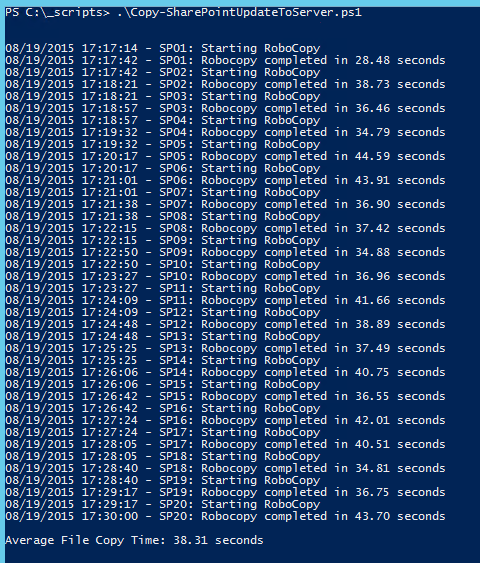
The script will report progress as it starts and completes the copy to each server in the farm.
Installing the SharePoint update packages is one of the more tedious and time consuming steps in the SharePoint patching process. To automate this process, administrators can use the Install-SharePointUpdate.ps1 script. The script has numerous configuration options, but at its core, the script allows administrators to install SharePoint updates on all servers in the farm in parallel, without having to physically login to each server and manually start the package installation.
When the script starts, an installation job will be created for each server in the farm and the job will be added to the installation queue. By default, the script will execute the installations simultaneously on all servers in the farm, but can be adjusted with $numberOfConcurrentInstallations variable. Setting the $stopServicesDuringPatching variable to true will instruct the script to stop and disable the IISADMIN, OWSTIMER and Search Services on the SharePoint servers prior to patch installation. The script will enable and restart the respective services after the patch installation completes. Testing by the Microsoft Premier Field Engineer (PFE) Russ Maxwell has shown significant time reductions when the services are stopped on the server during patch installations.
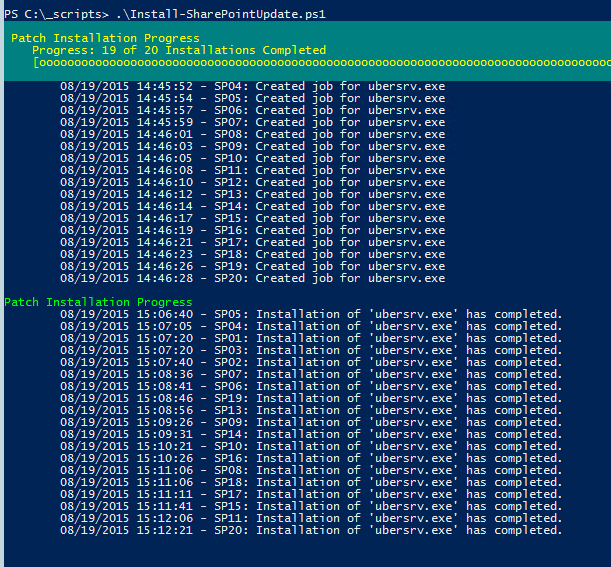
As each of the patch installation jobs complete, the console will be updated. As you can see in the screenshot below, 19 of 20 servers in the farm have completed the installation process.
After the installation processes have completed, a table is displayed with the installation results, as well as a summary of the results written to a .csv file in the local execution directory.
Administrators can use the data in the .csv file to report installation statistics for future reference. Here’s an example of the summary data in table format.
| Computer Name | Patch Name | Start Time | End Time | Total Installation | Time Result Message |
|---|---|---|---|---|---|
| SP01 | ubersrv.exe | 14:45:21 | 15:07:10 | 00:21:49 | Success: Reboot Required |
| SP02 | ubersrv.exe | 14:45:50 | 15:07:33 | 00:21:43 | Success: Reboot Required |
| SP03 | ubersrv.exe | 14:45:52 | 15:07:14 | 00:21:22 | Success: Reboot Required |
| SP04 | ubersrv.exe | 14:45:55 | 15:06:56 | 00:21:01 | Success: Reboot Required |
| SP05 | ubersrv.exe | 14:45:57 | 15:06:29 | 00:20:32 | Success: Reboot Required |
| SP06 | ubersrv.exe | 14:45:59 | 15:08:34 | 00:22:35 | Success: Reboot Required |
| SP07 | ubersrv.exe | 14:46:01 | 15:08:26 | 00:22:25 | Success: Reboot Required |
| SP08 | ubersrv.exe | 14:46:03 | 15:11:00 | 00:24:57 | Success: Reboot Required |
| SP09 | ubersrv.exe | 14:46:06 | 15:09:18 | 00:23:12 | Success: Reboot Required |
| SP10 | ubersrv.exe | 14:46:08 | 15:10:14 | 00:24:06 | Success: Reboot Required |
| SP11 | ubersrv.exe | 14:46:10 | 15:12:01 | 00:25:51 | Success: Reboot Required |
| SP12 | ubersrv.exe | 14:46:13 | 15:16:27 | 00:30:14 | Success: Reboot Required |
| SP13 | ubersrv.exe | 14:46:15 | 15:08:51 | 00:22:36 | Success: Reboot Required |
| SP14 | ubersrv.exe | 14:46:17 | 15:09:24 | 00:23:07 | Success: Reboot Required |
| SP15 | ubersrv.exe | 14:46:19 | 15:11:36 | 00:25:17 | Success: Reboot Required |
| SP16 | ubersrv.exe | 14:46:22 | 15:10:19 | 00:23:57 | Success: Reboot Required |
| SP17 | ubersrv.exe | 14:46:24 | 15:11:06 | 00:24:42 | Success: Reboot Required |
| SP18 | ubersrv.exe | 14:46:26 | 15:11:00 | 00:24:34 | Success: Reboot Required |
| SP19 | ubersrv.exe | 14:46:28 | 15:08:37 | 00:22:09 | Success: Reboot Required |
| SP20 | ubersrv.exe | 14:46:30 | 15:12:12 | 00:25:42 | Success: Reboot Required |
A drawback of these automation scripts is the progress bars and dialog windows administrators rely on to determine if a process is still executing or has finished are no longer present. To mitigate this deficiency, administrators can leverage the Watch-SharePointProcess.ps1 script. This script will query all SharePoint servers in the farm, searching for the specified process. The script will refresh the table every 10 seconds (configurable) and will exit automatically after three refresh cycles where no matching processes were found running on the servers.
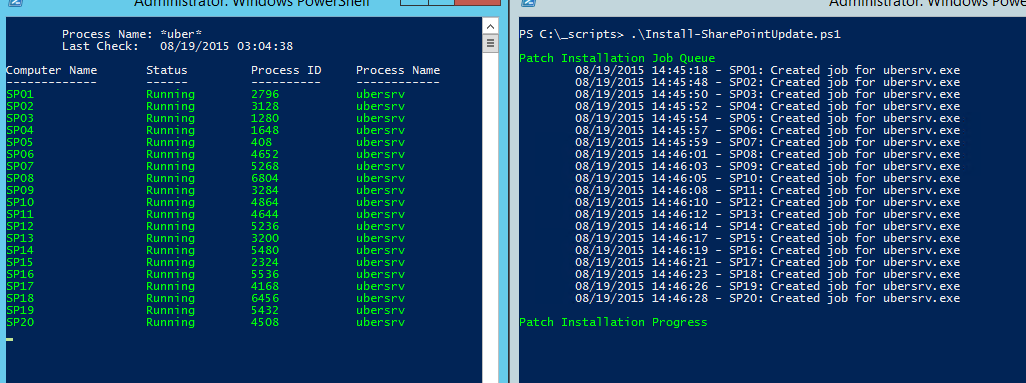
In the case of SharePoint patches, administrators will query for “ubersrv” during patch installation. As seen in the screenshot below, all 20 servers in this farm are being patched actively as they all have an instance of ubersrv.exe running.
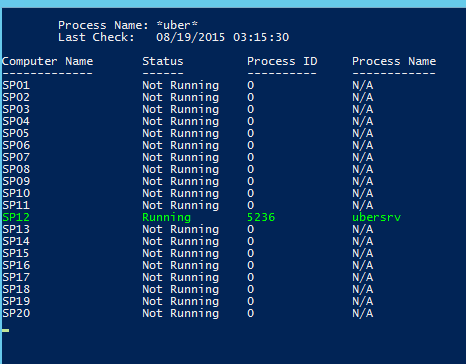
Much later in the installation process, the screenshot below shows server SP12 is the only remaining server with an instance of ubersvr.exe running.
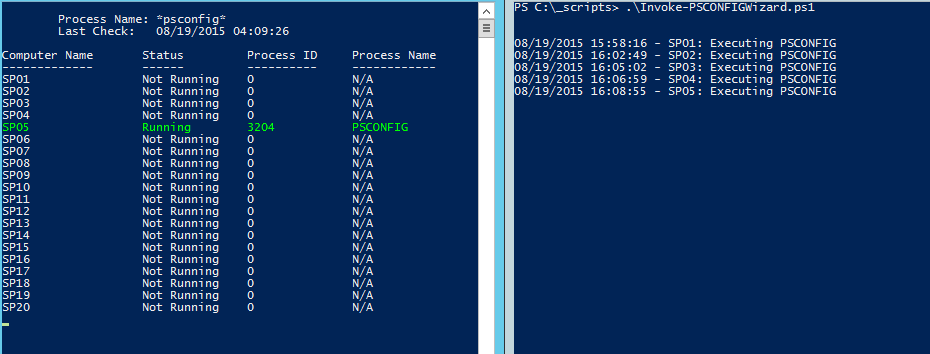
Administrators also can use the Watch-SharePointProcess.ps1 script to monitor the servers in the farm while PSCONFIG is upgrading a server. In the screenshot below, server SP05 is the only server with PSCONIFG running.
Administrators can snap the two console windows side by side to see a near real-time status of the patch installation process. Updates to the progress list for Install-SharePointUpdate.ps1 will lag behind by several seconds if you have chosen to stop and start the Windows services as part of the patch installation script.
Many of the Sharepoint updates require a restart after installation, which can be determined from the patch installation summary .csv file. To automate restarting the servers in the farm, administrators can use the Restart-SharePointServers.ps1 script. This script will restart all servers in the farm, except for the server executing the script. The local machine will need to be restarted manually. After issuing the restart command to all remote servers, the script will continuously query the WinRM service, refreshing the results table every 10 seconds. The script will exit after all servers have responded successfully to the WinRM query.
On SharePoint farms with thousands of site collections and multiple terabytes of data, execution of PSCONFIG is often the longest part of the patch process. When the PSCONFIG wizard executes, step 9 of the wizard executes an upgrade content database command against each of the content databases in the farm. The reason this step of PSCONFIG takes a long time is it executes the content database upgrades sequentially. For example, if you have 400 content databases, PSCONFIG will upgrade all 400 content databases, one after another. To significantly reduce the time spent in step 9 of the PSCONFIG wizard, administrators can use the Upgrade-ContentDatabaseB2B.ps1 script.
The Upgrade-ContentDatabaseB2B.ps1 script is designed to run after the updates have been applied to all servers in the farm and before PSCONFIG is executed. This script will execute content database upgrades like PSCONFIG does, but it will execute the upgrades in parallel. The parallel nature of the script allows the total content database upgrade time to be much shorter then executing the upgrade sequentially. In large SharePoint farms, this script can be executed simultaneously from multiple servers, allowing administrators to substantially scale out content database upgrades.
When the Upgrade-ContentDatabaseB2B.ps1 script executes, the user will see an upgrade job created for each content database specified in the configuration. As upgrade jobs complete the databases will be listed in the status table. After all of the content database upgrade jobs have finished, the results will be written to the screen as well as a summary .csv file. In the event of a failure, the script can be run repeatedly without modification. The script will not execute the upgrade command against any content database with the NeedsUpgrade property equal to false.
Before the Upgrade-ContentDatabaseB2B.ps1 script is executed, the upgrade status page in Central Admin will show the databases in compatibility mode. After the script executes, all of the content databases should show No action required. Executing PSCONFIG will upgrade the configuration database, central admin content database and service application databases.
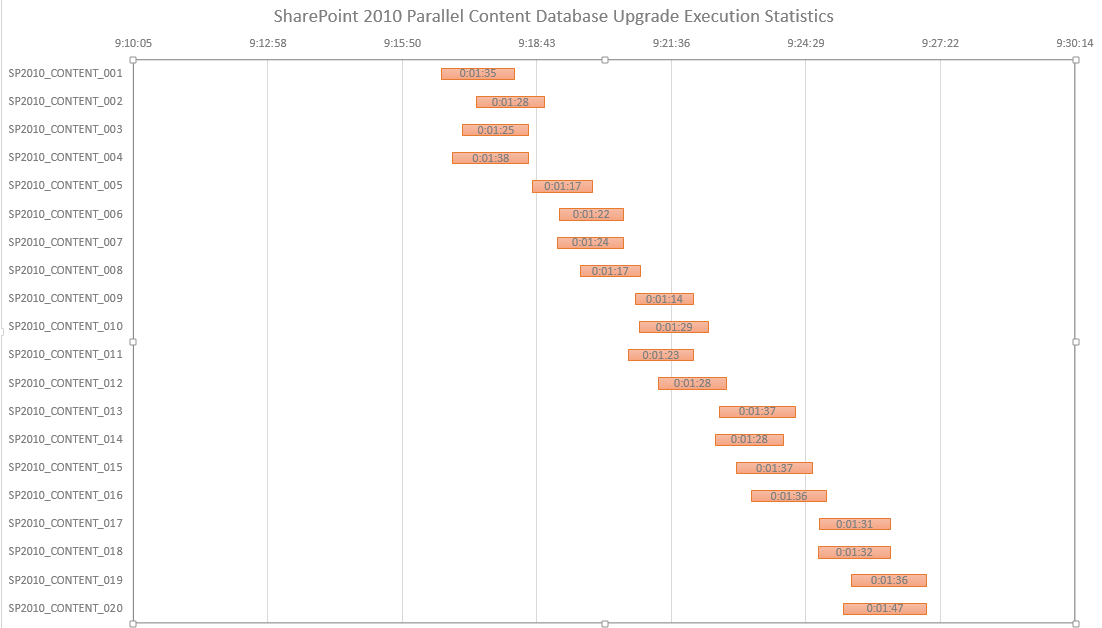
The data from the Upgrade-ContentDatabaseB2B.ps1 script output file can be displayed in Excel and used to report content database upgrade statistics. Below is an example of the data being reported in an Excel chart, which shows the individual database upgrade execution times and cumulative execution time.
Logging onto each server in the farm, executing PSCONFIG and watching it run is a monotonous and time consuming process. To reduce the administrative overhead, administrators can leverage the Invoke-PSCONFIGWizard.ps1 script. This script will execute PSCONFIG on every server in the farm that has an installation status of “Upgrade Required” or “Upgrade Available.”
It is advisable, but not required, to execute PSCONFIG on one server in the farm successfully before running the Invoke-PSCONFIGWizard.ps1 script. Any errors that occur during the first PSCONFIG execution should be remediated prior to running the Invoke-PSCONFIGWizard.ps1 script.
NOTE: Launch a new SharePoint management shell window to execute this script. A new console window will prevent any issues with cached or stale data.
As a reminder, administrators can leverage the Watch-SharePointProcess.ps1 script by snapping the two console windows side by side to see a near real-time status of the PSCONFIG execution across the server farm.
If an administrator copied the updates to each SharePoint server in the farm, it is good practice to remove those files from the server after patching. To automate the removal process, administrators can leverage the Remove-SharePointUpdateFromServer.ps1 script. The script will delete the specified directories from all the servers in the farm.
After patching a SharePoint farm or upgrading a content database it is recommended that an administrator review the respective upgrade log(s) for errors and warnings. To aid in the collection of upgrade logs, an administrator can leverage the Copy-SharePointServerUpgradeLogs.ps1 script. This script will copy all logs files that match the upgrade.log name convention to the specified directory. The script will create a sub-folder under the target directory for each server the farm.
After patching a SharePoint farm, an administrator should confirm all the servers have been patched. To the aid the verification, administrators can use the Get-PatchReferenceCount.ps1 script. The script will query the registry on each server and total the number of references to the specified KB number(s). The screenshot below shows that each server in the farm has 36 reference to KB 2883068. If the reference counts are not identical on all servers, further investigation is required by an administrator.











Thanks for writing all these scripts, very helpful. Found a minor issue thou , may be time to revisit "Get-SP2013UpgradeLogInfo.ps1" It returns empty/blank csv file every time i run against the upgrade logs. Seems like script is looking for "Upgrade Content Database [SPContentDatabase Name=" but its not any where in any Upgrade*.log.
Thanks.