Installation of Tensorflow 2 with GPU support is easy, there are just a couple things to check before proceeding:
-
CUDA compatibility with your Nvidia Graphics Card. Please check here for your hardware version.
-
Tensorflow also lists a compatibility table. It is advised to install compatible Tensorflow-CUDA-cuDNN versions, otherwise it may lead to issues related to versions of shared libraries in tensorflow.
-
CUDA version also requires a minimum Nvidia driver version which can be checked in the following CUDA COMPATIBILITY TABLE.
NOTE: To install locally in a conda environment check the last section of this post.
For CUDA installation, check the CUDA releases archive and select the desired CUDA version and then select OS, architecture, etc. For Ubuntu 20.04 amd64 it is:
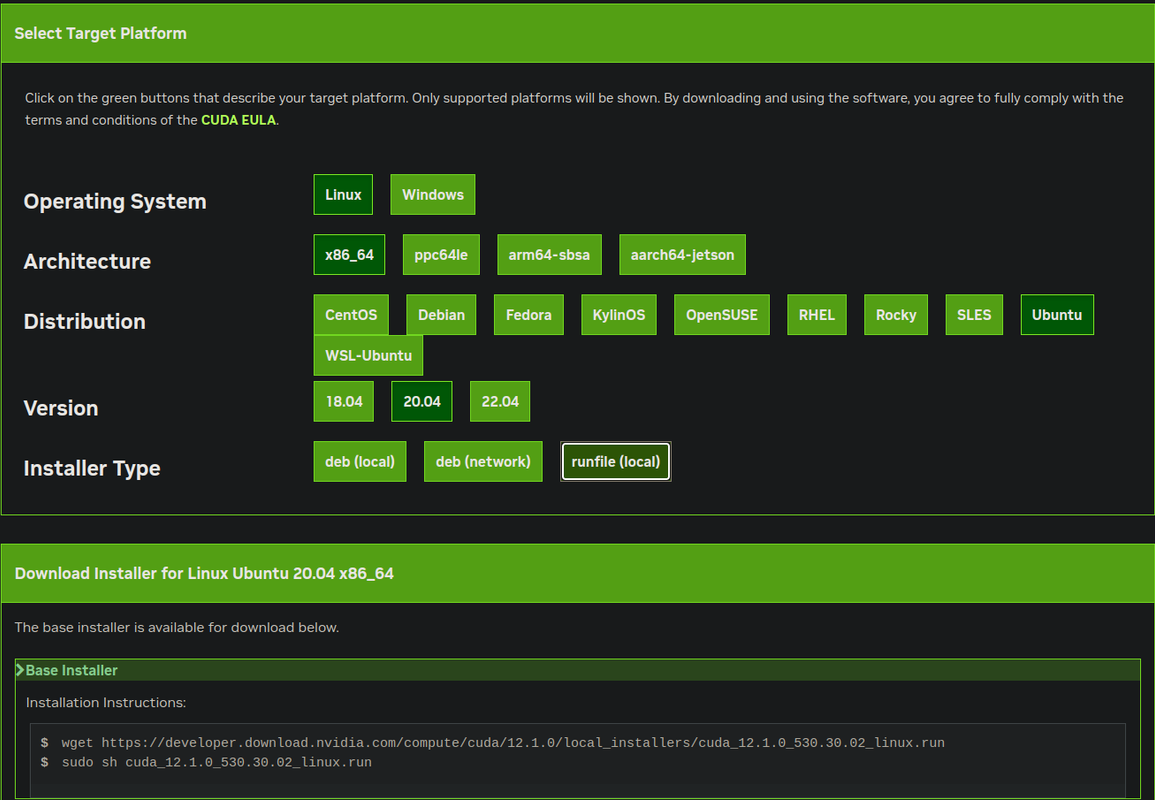
Select the runfile(local) Installer Type. Then copy the commands shown in the text box just like at the bottom of the image above and execute one by one. The first one will download the runfile and next one will install the NVIDIA driver as well as the CUDA toolkit by default. This can be changed once you execute the second command. There will be options to choose what to install and by default everything will be selected. So, if you're installing this in a fresh OS it should be fine, but if you already have the drivers then you can uncheck those.
For the cuDNN installation, if you have the tar file then just follow the commands below, otherwise we have to start downloading the cuDNN version from Nvidia (an account is required to be logged in the website to proceed with the dowload) through this link. In the website look for the cuDNN version compatible with your CUDA version.
Next we have to uncompress the file and copy the extracted libs to the cuda installation folder.
$ tar xvf cudnn*.tar.gz
$ sudo cp -P cudnn*/lib64/* /usr/local/cuda/lib64/
$ sudo cp cudnn*/include/* /usr/local/cuda/include/
Now, we have to configure some enviroment variables to help the system locate these libraries:
$ echo 'export LD_LIBRARY_PATH="$LD_LIBRARY_PATH:/usr/local/cuda/lib64:/usr/local/cuda/extras/CUPTI/lib64"' >> ~/.bashrc
$ echo 'export CUDA_HOME=/usr/local/cuda' >> ~/.bashrc
$ echo 'export PATH="/usr/local/cuda/bin:$PATH"' >> ~/.bashrc
Reload the bash config with the following or close the terminal and open a new one:
$ source ~/.bashrc
It is always recommended to use virtual environments. Create a conda environment, the docs are really beginner-friendly.
Once done, activate the environment and install Tensorflow with PIP: For tf < 2.11:
pip install tensorflow-gpu
For tf >= 2.11:
pip install tensorflow
By default it will install the latest version, so be sure to specify version like pip install tensorflow-gpu==2.9 or pip install tensorflow==2.11.
Now once installation has finished, open a terminal, activate the environment and enter a python shell, then execute:
>>> import tensorflow as tf
>>> tf.test.is_gpu_available()
It should return True.
tf.test.is_gpu_available is depricated in newer versions of tf, so use:
>>> tf.config.list_physical_devices("GPU")
It should return a non-empty list like:
[PhysicalDevice(name='/physical_device:GPU:0', device_type='GPU')]
with the number of elements in the list equal to the number of GPUs (PhysicalDevices) connected.
First, download the desired version TensorRT TAR file from the official archive.
Then extract the tar file with:
tar -xvzf TensorRT{*ver}.tar.gz
where *ver corresponds to the version, architecture, cuda, cuDNN versions.
Now there are some wheel (.whl) files to be installed, with the environment activated:
cd TensorRT*/python
pip install tensorrt-*-cp{3x}*.whl # where {3x} is the python version you have installed.

cd TensorRT*/uff
pip install uff*.whl

cd TensorRT*/graphsurgeon
pip install graphsurgeon*.whl

cd TensorRT*/onnx_graphsurgeon
pip install onnx_graphsurgeon*.whl
Lastly, copy all the files from include, targets/x86_64-linux-gnu/lib/ and targets/x86_64-linux-gnu/bin/ folders to the respective include, lib and bin folders in /usr/local/cuda
cd TensorRT*/
sudo cp include/* /usr/local/cuda/include
sudo cp targets/x86_64-linux-gnu/lib/* /usr/local/cuda/lib64
sudo cp targets/x86_64-linux-gnu/bin/* /usr/local/cuda/bin
- Install CUDA, cuDNN and TF locally inside a conda environment here
- Install Tensorflow-docker
- LearnOpenCV
- Tensorflow docs
- TensorRT install guide