-
Authentication with Flask, React, and Docker
see: flask-react-auth
-
Developing a Real-Time Taxi App with Django Channels and React
-
My Code: https://github.com/jonwhittlestone/learn-testdrivenio-courses/tree/main/fastapi-celery-project
-
Michael Yin's Code: https://github.com/jonwhittlestone/fastapi-celery-project
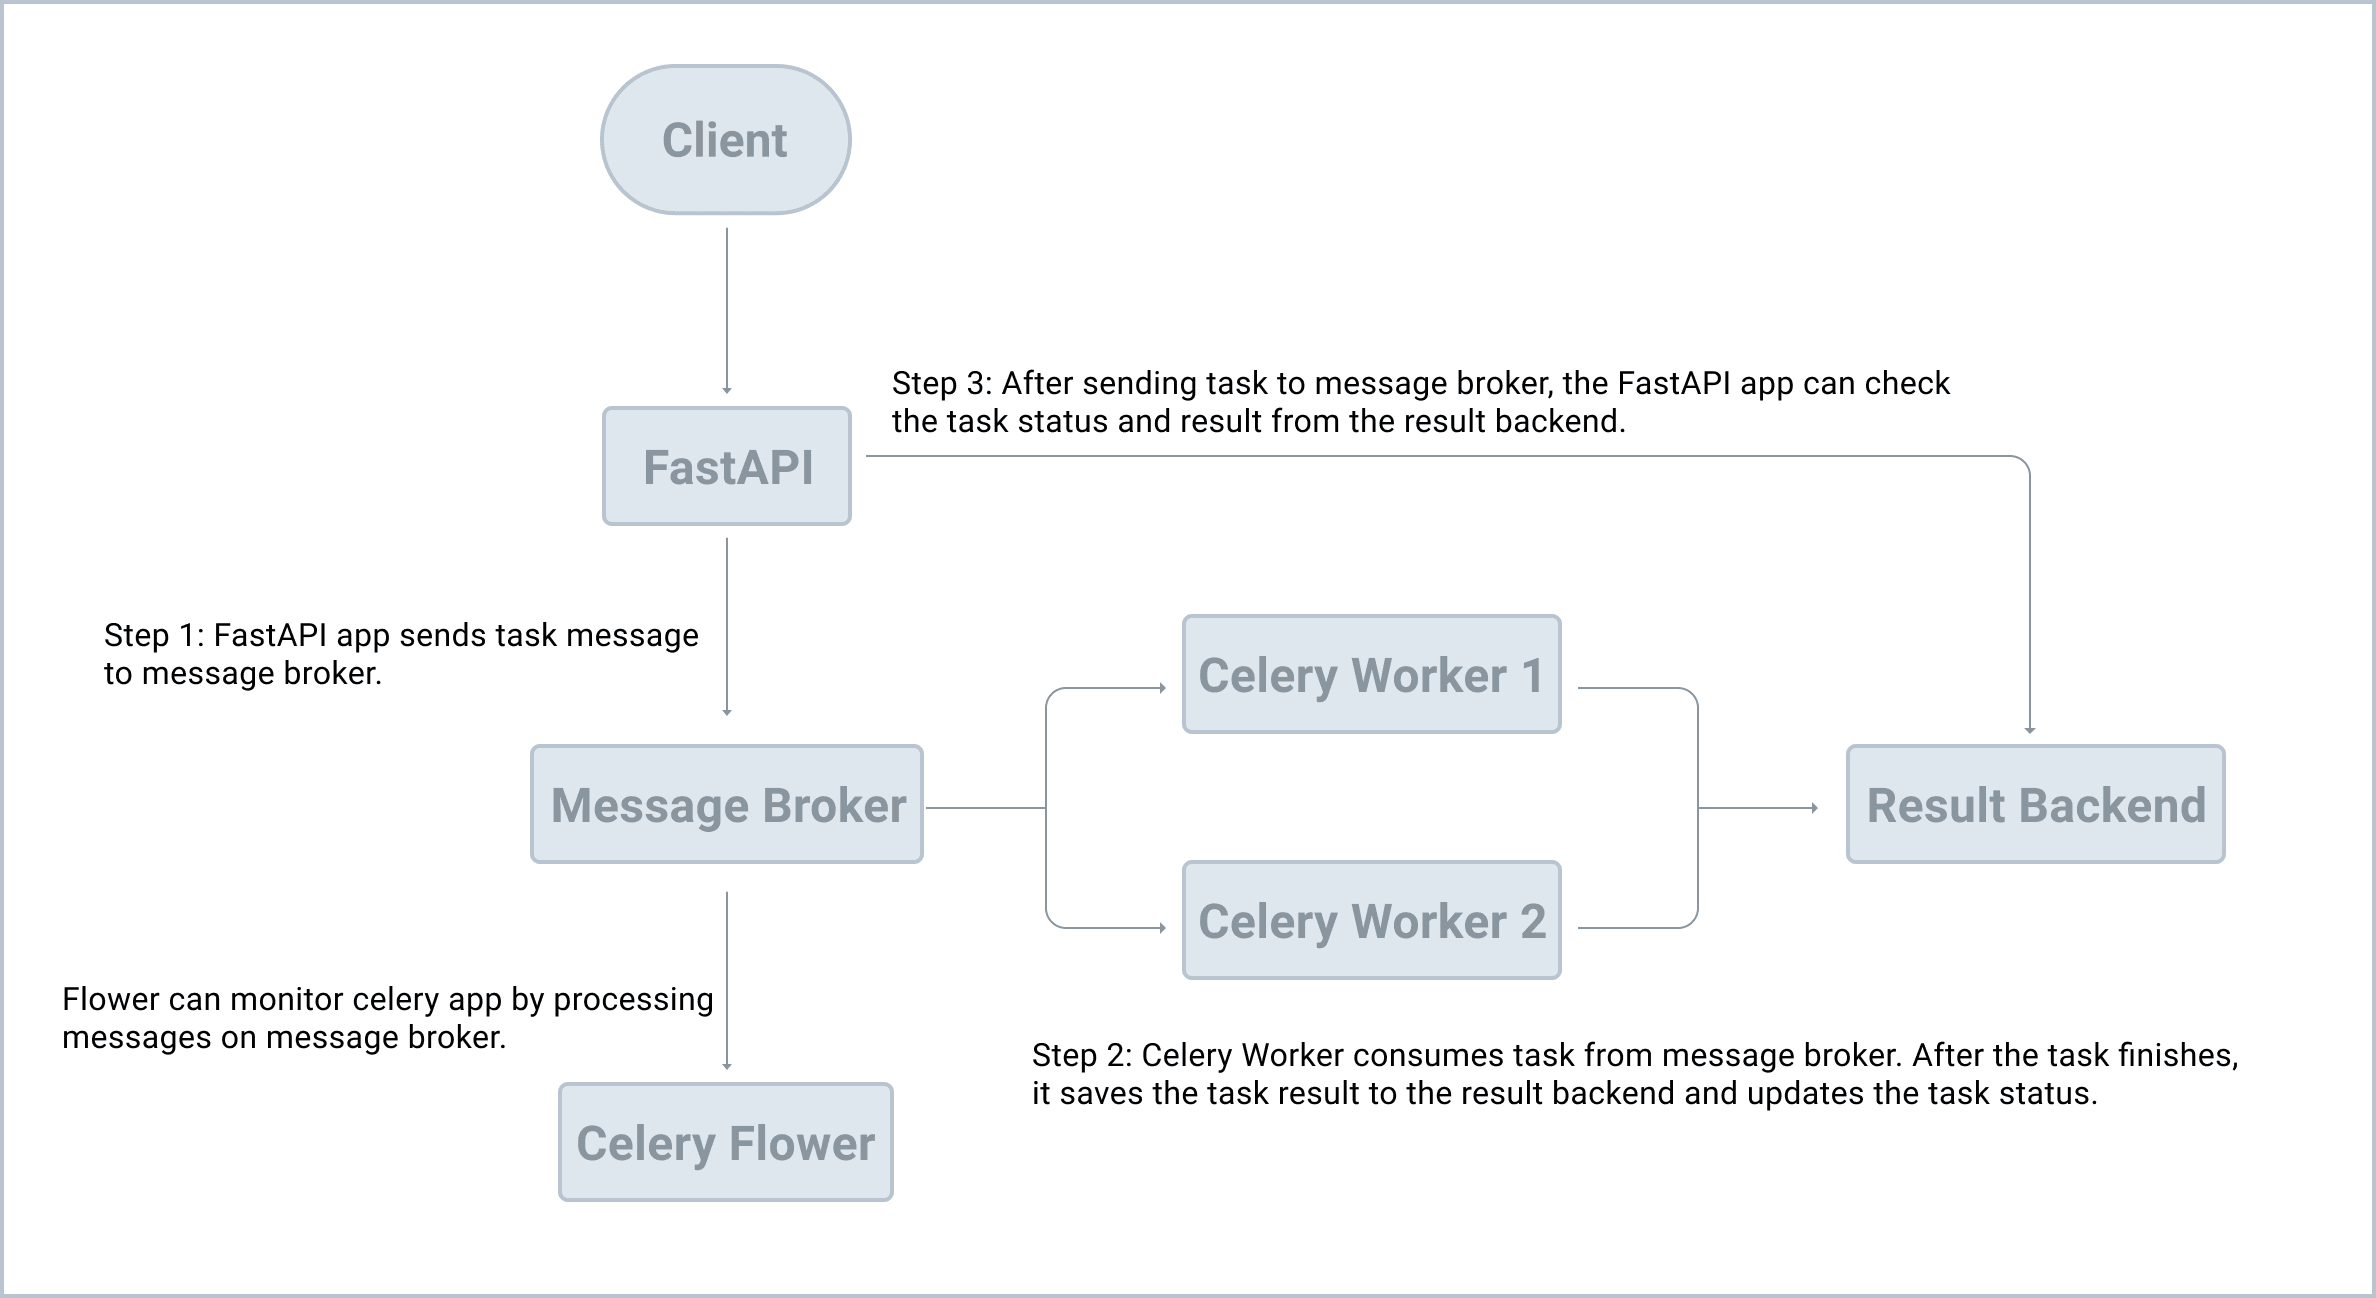
- Part 1: Concepts
- Containerise FastAPI, Celery and Redis
- Ensure Celery tasks execute correctly with validation and debugging
- Create and manage Celery tasks
- Use Broadcaster and Python-Socket.IO to receive realtime push notification from Celery
- Part 2: Deployment / Testing
- Set up logging with Papertrail
- Practice TDD
- Deploy FastAPI, Celery, RabbitMQ to DO
- Configure Monitoring
https://testdriven.io/courses/fastapi-celery/getting-started/
- Redis
docker run -p 6379:6379 --name some-redis -d redis
- app name: fastapi-celery-project
- Add a new task and query
task.stateandtask.result
https://testdriven.io/courses/fastapi-celery/app-factory/
-
Use the factory pattern to make scaling and testing easier.
create_appis a factory function that can be called multiple times and will return a FastAPI app for us to use. -
Multiple environment config
- allows us to provide an environment variable to specify which groups of settings to use for a given environment, eg
developmentorproduction- eg
export FASTAPI_CONFIG=development
- eg
- add with
@lru_cacheto make retrieval cached
- allows us to provide an environment variable to specify which groups of settings to use for a given environment, eg
-
alembic init alembic -
create an empty db.sqlite3 by running the Python repl and running
Base.metadata.create_all(bind=engine) -
then migrate the database
-
alembic revision --autogenerate
-
-
after creating a new
Usermodel, create a new migration:alembic revision --autogenerate
-
interact with db and new user model
-
>>> from main import app
>>> from project.database import SessionLocal
>>> from project.users.models import User
>>> user = User(username='test1', email='test1@example.com')
>>> session = SessionLocal()
>>> session.add(user)
>>> session.commit()
>>> new_session = SessionLocal()
>>> new_session.query(User).first().username
'test1'
-
-
add celery factory and use
current_appso that shared tasks work as expected -
when defining a celery tasks, use
@shared_tasksto avoid problems with circular imports -
Test it out by running a worker and also run a Python REPL in a new window to send a task to the Celery worker.
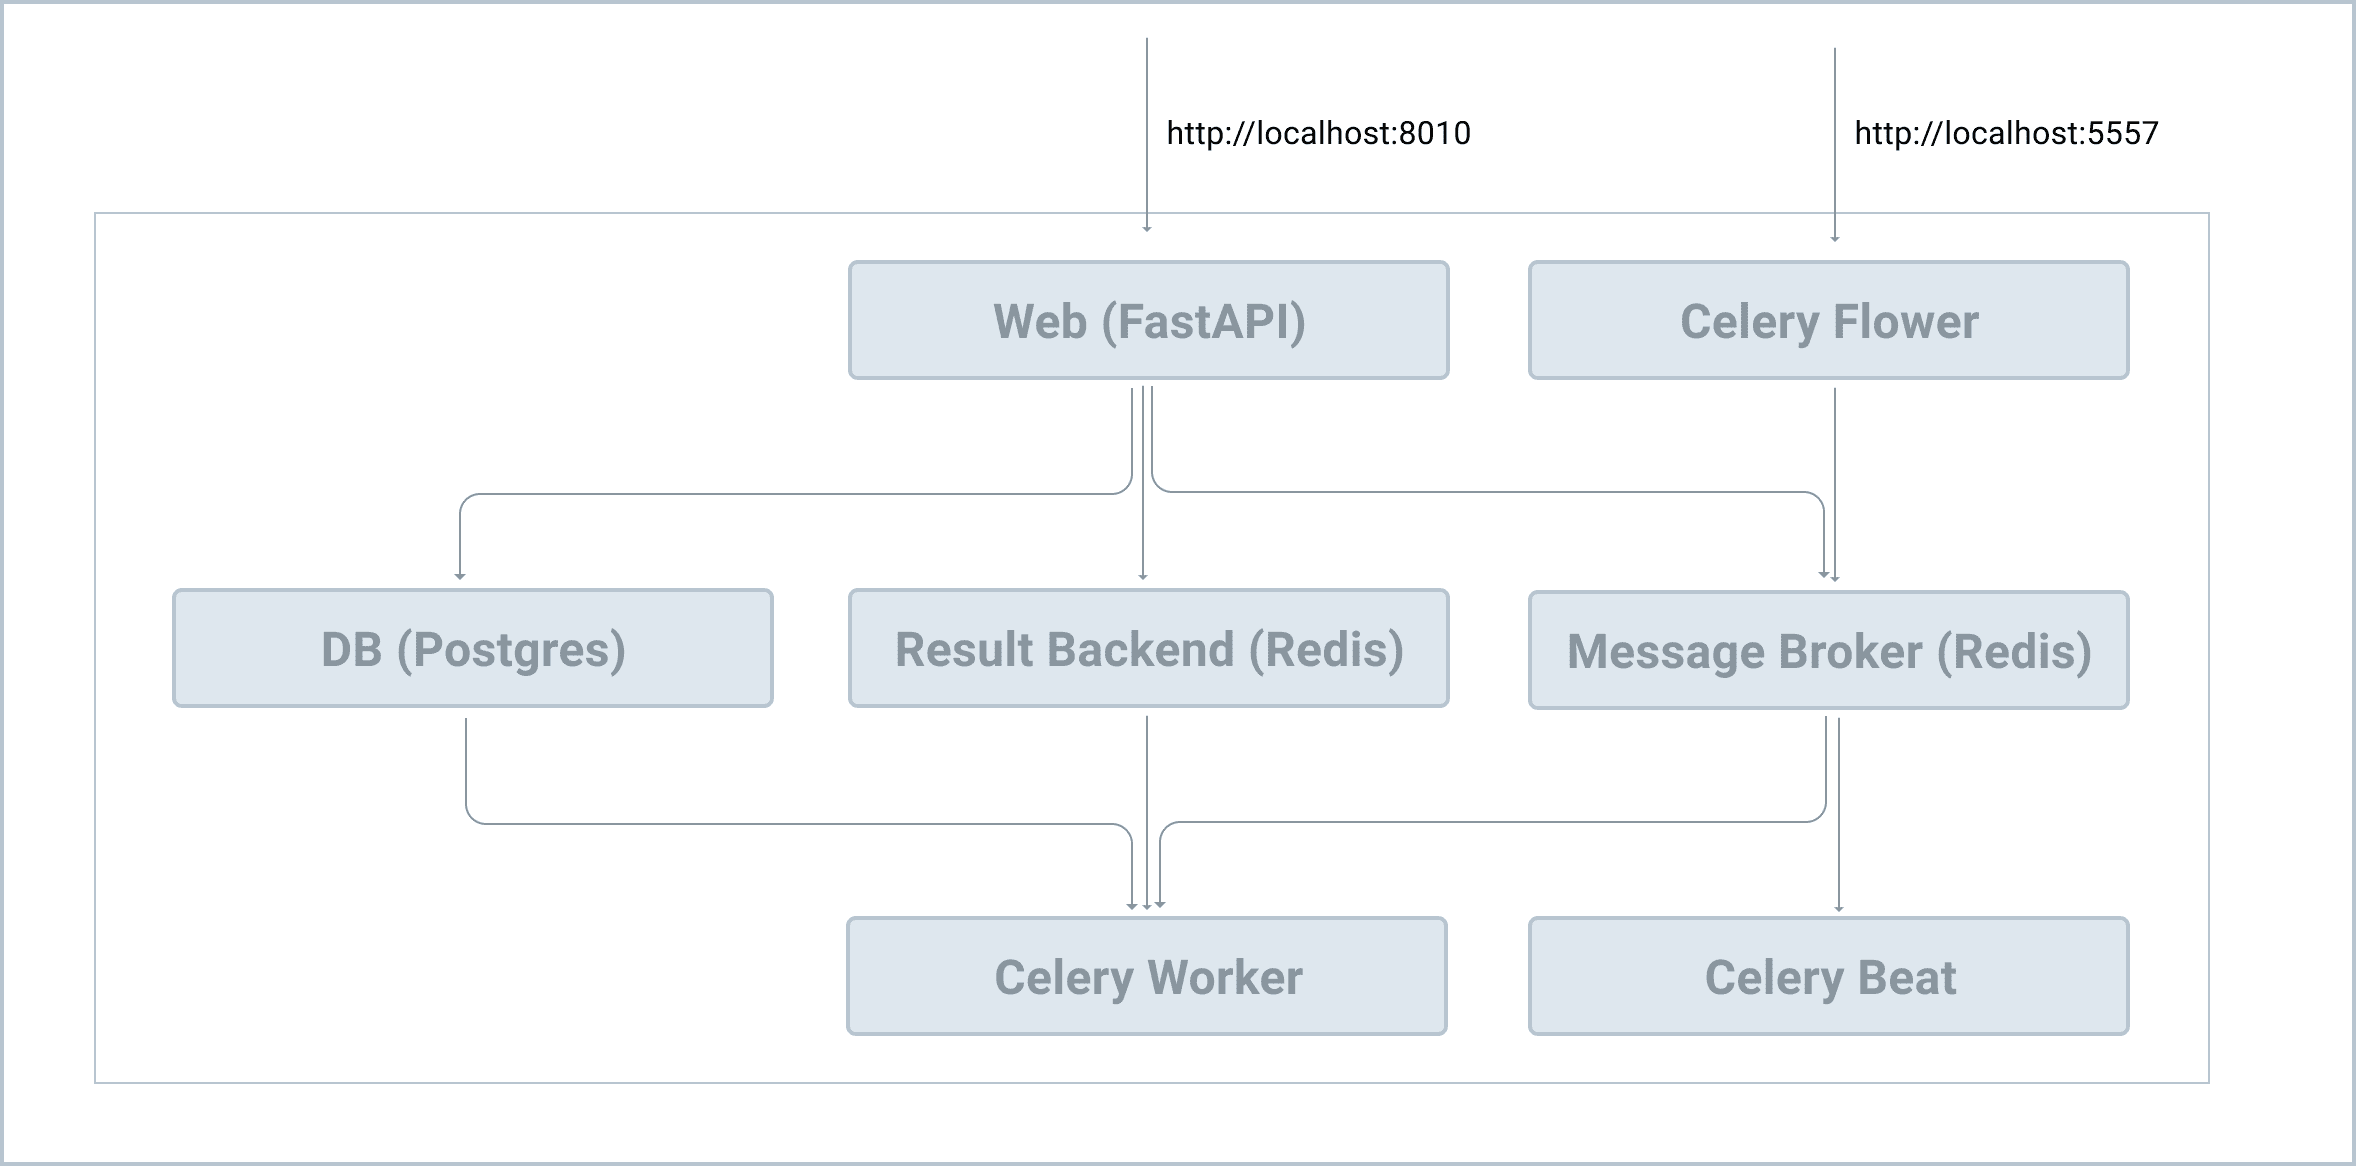
Use docker-compose to define services and aid development
https://testdriven.io/courses/fastapi-celery/docker/
-
├── alembic
├── # files omitted for brevity
├── alembic.ini
├── compose
│   └── local
│       └── fastapi
│           ├── Dockerfile
│           ├── celery
│           │   ├── beat
│           │   │   └── start
│           │   ├── flower
│           │   │   └── start
│           │   └── worker
│           │       └── start
│           ├── entrypoint
│           └── start
├── docker-compose.yml
├── main.py
├── project
├── # files omitted for brevity
├── requirements.txt
-
define an
entrypointfor the fastapi service (and others) to wait for postgres to be ready that we can actually connect to the database before spinning up thewebservice. -
add start scripts to each service
-
docker-compose build-
This will spin up each of the containers based on the order defined in the depends_on option:
- redis and db containers first
- Then the web, celery_worker, celery_beat, and flower containers
- redis and db containers first
-
-
docker-compose logs -f -
Useful commands
-
Enter shell of a specific container
-
docker-compose exec web python
>>> from main import app
>>> from project.users.tasks import divide
>>>
>>>divide.delay(1, 2)
<AsyncResult: 0cadb60e-cdac-4d0e-beba-6db169df0c4d>
-
-
Run a command against a new container that's not currently running
docker-compose run --rm web bash
-
Verify task in redis service
-
docker-compose exec redis sh
/data # redis-cli

127.0.0.1:6379> MGET celery-task-meta-0cadb60e-cdac-4d0e-beba-6db169df0c4d
1) "{\"status\": \"SUCCESS\", \"result\": 0.5, \"traceback\": null, \"children\": [], \"date_done\": \"2023-10-16T09:35:52.896294\", \"task_id\": \"0cadb60e-cdac-4d0e-beba-6db169df0c4d\"}"
-
-
also can be seen in flower:
-
When a code change is made, how to restart workers (so it's not having to be done manually)
https://testdriven.io/courses/fastapi-celery/auto-reload/
- use watchFiles to reload the celery worker
If you aren't using Pycharm, you can either set
task_always_eagerto run task synchronously instead of being sent to the queue (and then using breakpoints/print statements) OR usingrdb
https://testdriven.io/courses/fastapi-celery/debugging-celery/
Speed up the dev process by exposing your RESTful API to call or send notifications to your app with webhooks. This chapter looks at how not to decrease overall app performance byt using Celery to integreate 3rd party services without blocking the web process.
https://testdriven.io/courses/fastapi-celery/third-party-services/
-
Three uvicorn workers with Gunicorn, then you'll have three worker processes avaiable to process each HTTP request to the entrypoint.
3 users submitting at the same time means 3 processes may be blocked for at least 5 seconds -
One solution is to move away from
requestswhich is a synchronous library to one that leverages asyncio such ashttpxoraiohttp- If the 3rd party SDK (like sendgrid or mailgun) doesn't have asyncio, Celery is a better option.
-
If we need to call a third-party API within a view, the call can be done in an async Celery task to prevent the web process from being blocked
-
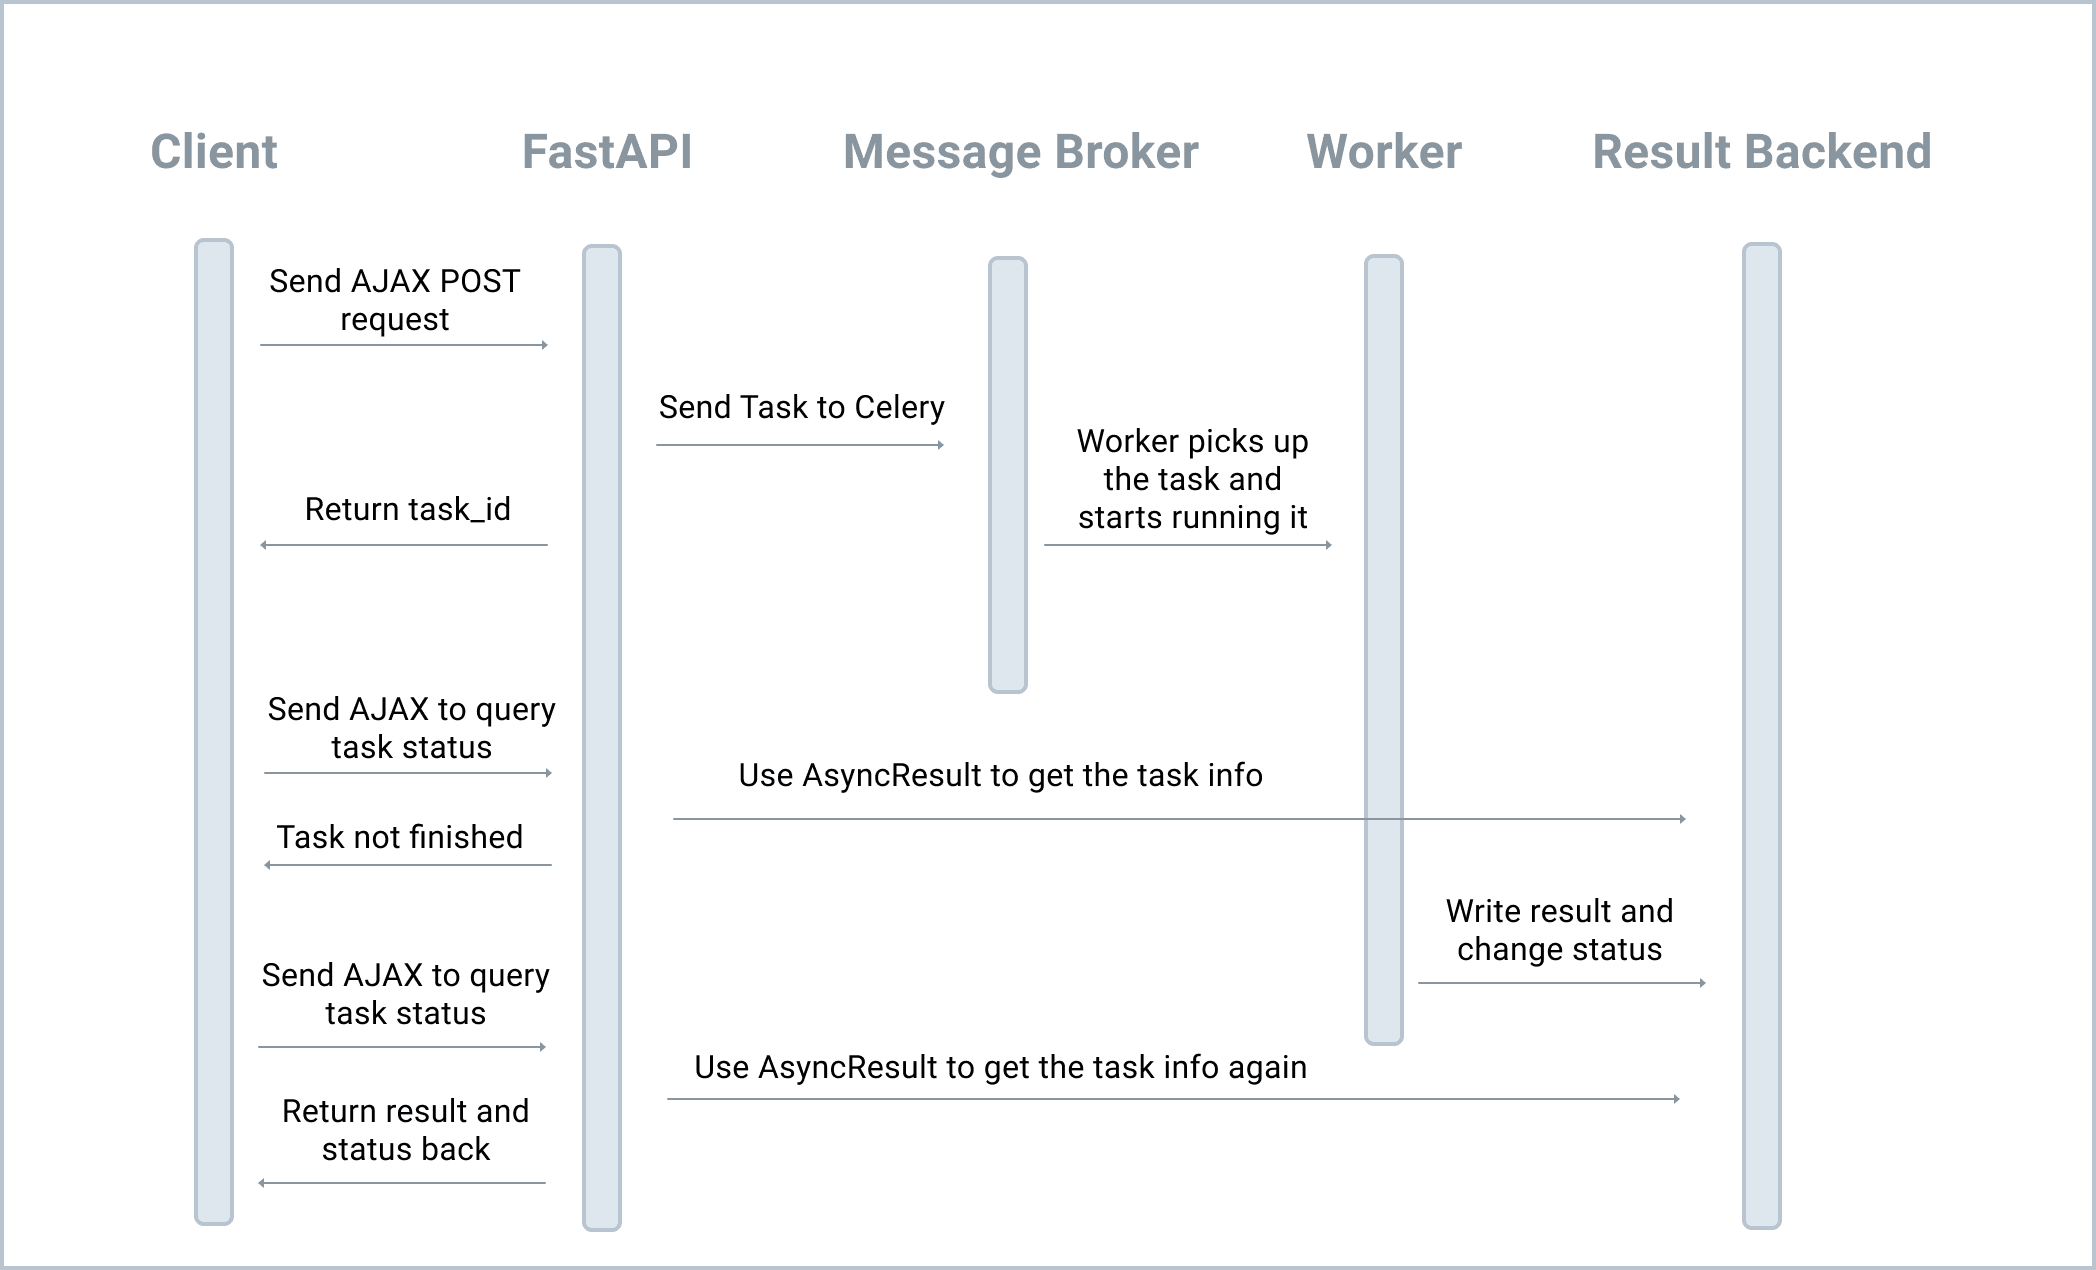
Adding a template with JS to intercept form submission and send data with ajax request
-
A new task is enqued to call the external API, the response is a task ID
-
With that taskID, the browser checks the state of the task with another AJAX request.
-
When task finishes, display the appropriate message based on whether task has succeeded or failed.
-
Use Broadcaster and WebSockets instead of XHR short-polling to make states updates to the browser more efficient and accurate.
https://testdriven.io/courses/fastapi-celery/websockets-and-celery/
FastAPI WebSocket docs:
-
Workflow
-
ASGI vs WSGI
-
WS_MESSAGE_QUEUEwill be used for multi-process communication by FastAPI and the Celery Worker. -
add
asgirefandbroadcasterandasyncio_redistorequirements.txt -
instance of
Broadcastonly used by FastAPI -
see
project/ws/views.py- use
@ws_router.websocket("/ws/{task_id}")to declare Websocket path - accept the connection, and obtain the task ID and subscribe to channel in
async def ws_task_status(websocket: WebSocket)
- use
-
add a celery signal handler that will be called after each Celery task is executed

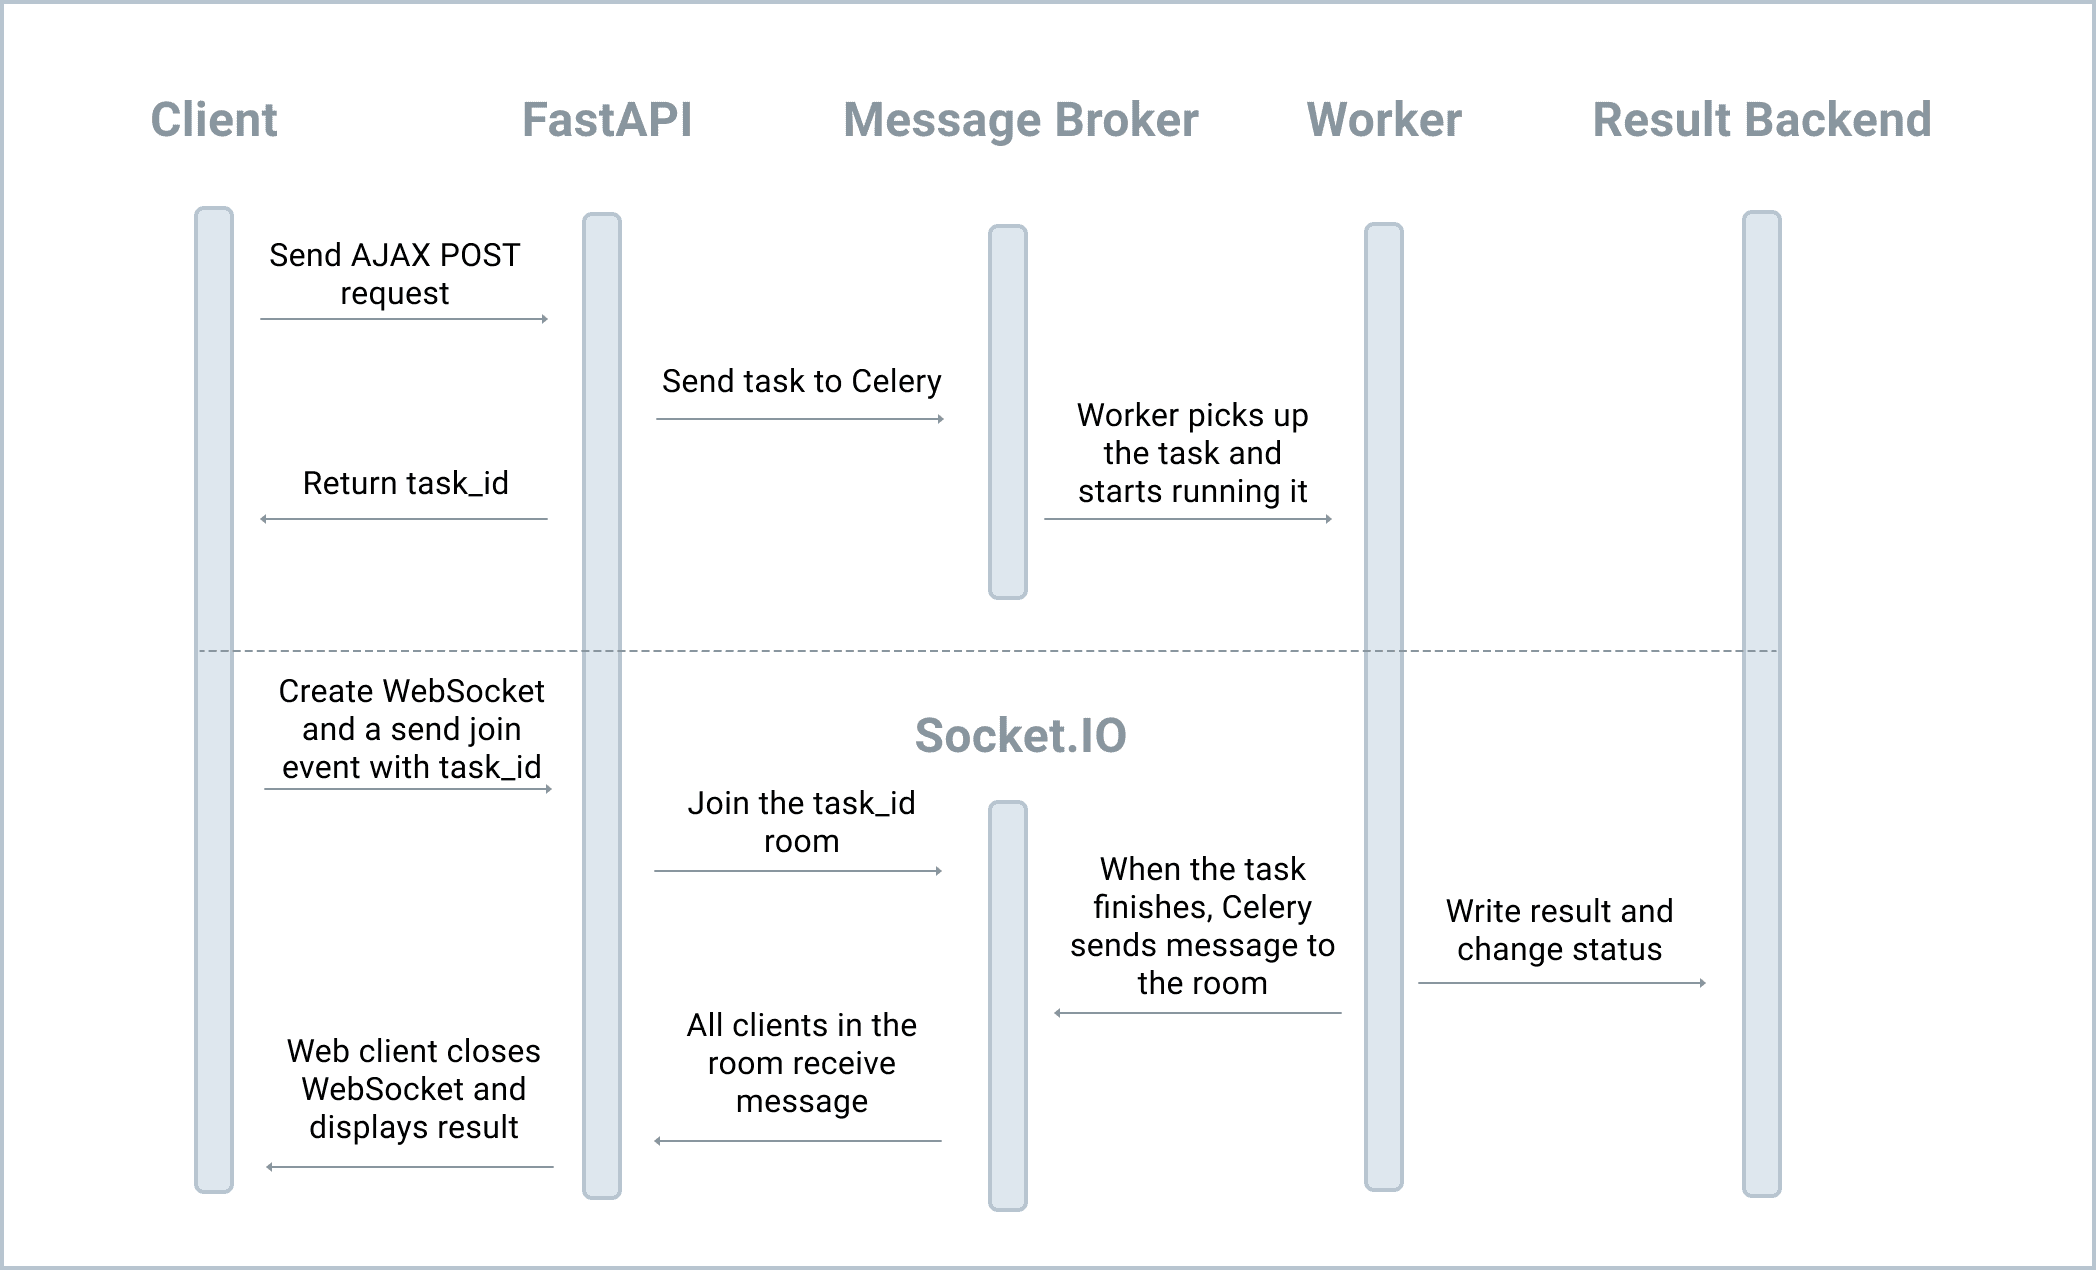
Use Socket.IO to achieve the same effect as the previous WebSocket example.
https://testdriven.io/courses/fastapi-celery/socket-io-celery/
- workflow
Repeatedly executed tasks at specific time intervals in the background (Celery Beat)
Use-cases:
-
Generating periodic reports
-
Sending batch e-mail notifications
-
Running nightly maintenance jobs
-
Celery Beat is a scheduling tool used to enqueue tasks at reular intervals which are executed by Celery workers
- It sends tasks to the queue based on defined config.
- Only one Celery beat process to prevent duplicate tasks being enqueued.
-
Add test task
Route tasks to a specific queue, to be processed by a specific worker and basing that on priority if needed.
https://testdriven.io/courses/fastapi-celery/multiple-queues/
-
Rather than the default queue, could have a
high_priorityand alow_priorityto be executed by different workers. -
modify queues, add
Queueto app config inBaseConfig -
update the celery worker start script for docker-compose to use
high_priorityanddefault

Being able to retry a failed task or use an exponential backoff approach to retries so as not to overwhelm a service.
https://testdriven.io/courses/fastapi-celery/retrying-failed-tasks/
Celery supports this by default
@shared_task(bind=True, autoretry_for=(Exception,), retry_backoff=True, retry_kwargs={"max_retries": 5})
def task_process_notification(self):
    if not random.choice([0, 1]):
        # mimic random error
        raise Exception()

requests.post("https://httpbin.org/delay/5")-
To avoid a thundering herd (many processes all trying to handle an event at once, where all process compete for respources causing a frozen computer), Celery introduces the
retry_jitterwhich adds randomness into the delay calculation. This prevents all tasks from being executed simultaneously.@shared_task(bind=True, autoretry_for=(Exception,), retry_backoff=5, retry_jitter=True, retry_kwargs={"max_retries": 5}) def task_process_notification(self): if not random.choice([0, 1]): # mimic random error raise Exception() requests.post("https://httpbin.org/delay/5")
Prevent a Celery task from executing if it's dependent on a SQLAlchemy database transaction from executing first.
https://testdriven.io/courses/fastapi-celery/database-transactions/
-
Examine states of a SQLAlchemy database instance
>>> session.flush()
>>>
>>> insp.transient
False
>>> insp.pending
False
>>> insp.persistent
True
>>> print(user.id)
-
Add the model to a session which will move it to pending.
-
`flush' communicates a series of operations to the database. The database maintains them as pending operations.
-
The changes aren't persisted permanently to disk until 'commit' is called.
-
'commit' calls 'flush' beforehand, so you don't need to explicitly call 'flush'.
-
Add
transaction_celery/view and getdb_contextindatabase.py- Withsession: Session = Depends(get_db_session), the session is the yield value of theget_db_session. Here, we leveraged FastAPI's dependency injection system. - Withdb_context = contextmanager(get_db_session),we used the database session with Celery in clean way. We'll look more at this shortly. - Thetransaction_celeryview creates a random user and saves it to the database.- If the database operation fails,
session.rollbackwill run and an exception will be raised. - A new task is only enqueued if the database operation is successful. Notice how we passed a reference to the data -- e.g.,
user.id-- rather than the email itself.
- If the database operation fails,
-
Configure and Customise logging and send logs to Papertrail
https://testdriven.io/courses/fastapi-celery/logging/
Build serverless applications with FastAPI and Vue that run on AWS!
https://testdriven.io/courses/serverless-fastapi/
Someone's code:
- Part 1: CI/CD pipeline, API, DynamoDB, Cognito
- 01/18 Introduction
- 02/18 Changelog
- 03/18 Git repository
- 04/18 API Skeleton
- 05/18 Tests and Code quality
- 06/18 Deployment
- 07/18 TODOs
- 08/18 DynamoDB
- 09/18 Authentication with Cognito
- 10/18 API
- Part 2: Vue Application
- 11/18: UI Skeleton
- 12/18: Vue Deployment
- 13/18: Vue Authentication
- 14/18: Vue App
- Part 3: Going to Production
- 15/18: Going to Production
- 16/18: Logs and Mpnitoring
- 17/18: Conclusion
- 18/18: Appendix - Destroy cloud resources
Set up
https://testdriven.io/courses/serverless-fastapi/git/
barebones api for
- create a task
- list open tasks
- list closed tasks
- close a task
https://testdriven.io/courses/serverless-fastapi/api-skeleton/
Code quality tests
make code-quality-api- github action : code quality job
- github action : tests job
https://testdriven.io/courses/serverless-fastapi/tests-code-quality/
app deployment with Mangum, an adapter for using ASGI applications with AWS Lambda and API Gateway:
https://testdriven.io/courses/serverless-fastapi/deployment/
- add and use Mangum python dep
- follow serverless tutorial
- when deploying, the following resources are created on AWS:
- Lambda function
- Log stream for the Lambda function in CloudWatch
- API Gateway for invoking our FastAPI application running on Lambda
- add serverless config for generating Lambda function
- add
deploy-developmentGA job - to run
serverless deploy --stage developmentlocally:- requires python39 runtime on nixos
- nix-shell -p python39
- create github IAM user and add credentials as github secrets
- add
AWS_ACCESS_KEY_IDandAWS_SECRET_ACCESS_KEY
- add
- https://qrlf97nhw0.execute-api.eu-west-2.amazonaws.com/development/api/health-check/
Task model and routes for creating a task, listing open tasks, list closed tasks and close a task
https://testdriven.io/courses/serverless-fastapi/todos/
- set up a test with a fixture that specifies the
KeySchema - all data (tasks, users, models) stored in single table as per single table design
-
PK (HASH) SK (RANGE) Status Owner ID Title - - - - - - john@does.com 1234 OPEN john@doe.com 1234 Clean your office - PK and SK are for storing mechanism only, they're not parsed or mapped back to the
Taskobject - set
export AWS_DEFAULT_REGION=eu-west-2for boto - list open/closed tasks and add Global Secondary Indexes (used to have additional index special PKs and SKs)
Now we've used Moto to mock the DynamoDB API, now add a DynamoDB table to cloud resources
- create a dynamodb.yml in
services/tasks_api/resources - update
services/tasks_api/serverless.ymlspecifying IAM role permissions (using CloudFormationFn::GetAttandFn::Join) - run Dynamo DB locally with Docker
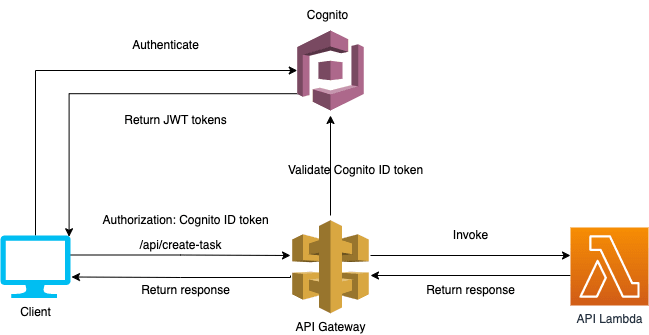
leverage Cognito
-
create user pool
-
API Call > API Gateway reads token from header and validate it using Cognito user pool
-
If token is valid, user is authetnicated, else, it
Unauthorizedresponse.
add the API itself
- Create a task
- List open tasks
- closing a task
- creating dynamodb locally
Use vue for a client for the api using the same approach as before:
- create basic app skeleton
- set up a CI/CD pipeline to deploy app to AWS
- add authentication, sign-up and log-in using Cognito
- Integreate our API to vue app
https://testdriven.io/courses/serverless-fastapi/ui-skeleton/
- Create app skeleton
Deploy using an S3 bucket
https://testdriven.io/courses/serverless-fastapi/vue-deployment/
- configure S3 bucket and bucket policy with Serverless using the S3 Sync plugin (used for deploying SPAs)
- add GH action to deploy
TODO.
https://testdriven.io/courses/django-full-text-search/
Original Code: https://github.com/ParentJA/django-postgres-elasticsearch
https://testdriven.io/courses/auth-flask-react/
-
Part 1: Foundation and Concepts
- 01/25 Introduction
- 02/25 Changelog
- 03/25 Getting started
- 04/25 React setup
- 05/25 Testing React
- 06/25 React Forms
- 07/25 Type Checking
- 08/25 React and Docker
- 09/25 Linting and Code formatting
- 10/25 Continuous Integration
-
Part 2: Access the Frontend
- 11/25 Flask Bcrypt
- 12/25 JWT Setup
- 13/25 Auth routes
- 14/25 React router
- 15/25 React Bulma
- 16/25 Formik and Yup
-
Part 3: Testing and Deployment
- 17/25 React Authentication - part 1
- 18/25 Mocking user authentication
- 19/25 React authentication - part 2
- 20/25 React Alert messages
- 21/25 Update components
- 22/25 Deployment
- 23/25 Workflow
- 24/25 Structure
- 25/25 Next Steps
Using an existing dockerised Flask API to get users
👀 https://testdriven.io/courses/auth-flask-react/getting-started/
- Use existing Flask API
- refactor into
services/directory - rebuild and reseed docker volume/db
- create user
http --json POST http://localhost:5004/users username=jon email=jon@howapped.comCreating a simple react frontend getting user list from dockerised API and rendering in a functional react component
👀 https://testdriven.io/courses/auth-flask-react/react-setup/
Bring in react-testing-library and setting up basic component test and snapshot test
👀 https://testdriven.io/courses/auth-flask-react/testing-react/
Test-driven dev to render a form as a functional component and have parent pass the prop. Using a controlled component to obtain input and pass to users service on backend.
https://testdriven.io/courses/auth-flask-react/react-forms/
using
PropTypeslibrary for type checking
https://testdriven.io/courses/auth-flask-react/type-checking/
dockerizing the react app
https://testdriven.io/courses/auth-flask-react/react-and-docker/
- A linter (ESLint) is used in conjunction with a code formatter (prettier).
Using ESLink and Prettier for code linting and style formatting, respectively.
https://testdriven.io/courses/auth-flask-react/linting-and-code-formatting/
Use GitLab CI
https://testdriven.io/courses/auth-flask-react/continuous-integration/
- Builds failing build in CI because of path issue
Password hashing
https://testdriven.io/courses/auth-flask-react/flask-bcrypt/
- refactor api so
add_user()accepts password - add flask-bcrypt to hash the password
- to allow hashing of password when user is created in admin, hash the password any time its value changes
Token-based authentication: users send their crendetials to auth server to get a signed token. Prevent XSS attacks by storing the token in a cookie with
httpOnlyand secure flags, or in memory.
https://testdriven.io/courses/auth-flask-react/jwt-setup/
-
Token-based authentication
- Benefits
- Drawbacks
- Storing in memory vs LocalStorage vs cookie
-
Workflow
- access tokens
-
Add
SECRET_KEYto GitLab's CI/CD variables because it's an environment varible used in Dockerfile.prod- RHrD5qlQSKOL9eMeOOs9vikKi9LVv6nG22zW8lbFf9psPysKRy
Write code for authentication routes and ensure test coverate does not decrease as we add the new routes.
- Add
/authroutes withflask_restx - Add tests in the happy path as well as failures like email already exists and invalid payload
- TDD Test cycle
- add failing test for register route, and then the view to make the tests pass
- add failing test for login route, and then the implementation code/view to make the tests pass
- add failing test for refresh route, and then the implementation code/view to make the tests pass
- add failing test for status route, and then the implementation code/view to make the tests pass, and ensure
@auth_namespace.expect(parser)is set on the get route to allow to test in swagger
-
Before:
96%- src/api/auth.py:
93%
- src/api/auth.py:
-
After:
97%- src/api/auth.py:
95%
- src/api/auth.py:
Using monkeypatch/mocked data to cover if user object isn't valid
see: https://alex-jacobs.com/posts/fastapitests/
see above
Todo.
Create a new database table to store the valid refresh token
Todo.
Manage navigation between different frontend components
https://testdriven.io/courses/auth-flask-react/react-router/
For each component, we'll roughly follow these steps:
- Write a unit test
- Run the test to ensure it fails
- Create the component file
- Add the component
- Wire up the component to App.jsx, passing down any necessary props
- Manually test it in the browser
- Ensure the unit tests pass
- Write a snapshot test
Style a Navbar and add routes in preperation for form
👀 https://testdriven.io/courses/auth-flask-react/react-bulma/
For each component, we'll roughly follow these steps:
- Write a unit test
- Run the test to ensure it fails
- Create the component file
- Add the component
- Wire up the component to App.jsx, passing down any necessary props
- Manually test it in the browser
- Ensure the unit tests pass
- Write a snapshot test
Refactor the
AddUserform to use Formik and Yup, and add styles that can be imported
👀 https://testdriven.io/courses/auth-flask-react/formik-and-yup/
- Only passing in
addUservia a prop - No longer seeing
statebecause<Formik>hasinitialValues - Updating the
Appcomponent to removehandleChangehandler as well as bind in the constructor
Configure the forms for handling a user registration, log in and log out
👀 https://testdriven.io/courses/auth-flask-react/authentication-part-one/
- Wire up the Formik form to invoke the Ajax request
- Ater succesful login, when the access token has been returned in the response, we want to:
- add the access token to the state
- save the refresh token in the browser's LocalStorage
- Redirect the user to
/
- save the refresh token to LocalStorage and use it to get a new access token if needed. So if a refresh token is valid, we can silently log a user in.
Test user interactions with React Testing Library
👀 https://testdriven.io/courses/auth-flask-react/mocking-user-interaction/
- Refactor RegisterForm.text.jsx by wrapping it in a describe block
- Refactor by converting functions to arrow functions and removing binds in the constructor
- to test Formik validation, it happens asynchronosly, so we must mock the handler functions and
awaitfor the validation to finish.- in component add html attribute:
data-testid="error-password"and test for it
- in component add html attribute:
Finish user auth with the
/statuslink
👀 https://testdriven.io/courses/auth-flask-react/authentication-part-two/
- As always, start with a test: UserStatus.test.jsx
- create a stateful, class-based component with its own internal state.
- test for the redirect
- updating the navbar
Adding alerts for success and error
https://testdriven.io/courses/auth-flask-react/react-alert-messages/
- Add a message as sanity check, with failing test
- Add success and error messages
- Delete message when user clicks
xon the right side of the message
Refactoring
UsersListandAddUser
- Remove AddUsers from homepage in App.jsx
- Add a table
- Add modal, and close it after registration
- Can you think of a better way to handle the case where a user already exists? Since we're closing the modal right now we're losing the state of the form. Instead of having the end user retype everything, display the error message on the modal itself and leave it open so they can make changes.
- Only show add and delete buttons for authenticated users
todo.
Add the ability to update a user. Can you reuse the same modal for this?
Prevent the currently logged in user from deleting themselves.
Deploy to Heroku
todo.
todo.
todo.
todo.
https://testdriven.io/courses/aws-flask-react/
-
Part 1: Concepts, ECR and CodeBuild
- 01/18 Introduction
- 02/18 Changelog
- 03/18 Microservices
- 04/18 Getting Started
- 05/18 Container Orchestration
- 06/18 AWS Setup
- 07/18 Elastic Container Registry
- 08/18 Production Docker
- 09/18 CodeBuild
-
Part 2: RDS, ECS and Terraform
- 10/18 Elastic Load Balancer
- 11/18 Setting up RDS
- 12/18 Elastic Container Service / ECS
- 13/18 ECS CodeBuild
- 14/18 CodeBuild Workflow
- 15/18 Fargate
- 16/18 Wrkflow
- 17/18 Structure
- 18/18 Next Steps
https://testdriven.io/courses/aws-flask-react/intro/
Prerequisite: https://testdriven.io/courses/auth-flask-react/
AWS AWS is a cloud service platform that provides Infrastructure as a Service (IaaS) and Platform as a Service (PaaS) solutions. They offer compute (EC2, Elastic Beanstalk, Lambda, ECS, and Fargate), storage (S3), database (RDS, DynamoDB, and Redshift), analytics (Athena and Kinesis), application (SQS and MQ), and DevOps (CodePipeline, CodeBuild, and CodeDeploy) services.
With regard to AWS, we'll start off by configuring all services via the web console before moving to Terraform, an infrastructure as code as code solution. It's highly, highly recommended to start your AWS journey in this manner. Experiment with the web console first since it handles a lot of the complexity beneath the scenes, such as creating service roles, IAM permissions, log groups, and so on. Once you feel comfortable, jump into Terraform to learn a bit more about what's happening and to better manage the building, changing, and versioning of your infrastructure.
https://testdriven.io/courses/aws-flask-react/changelog/
https://testdriven.io/courses/aws-flask-react/microservices/
- pros
- separation of concerns
- smaller code bases
- accelerated feedback loops
- cons
- design complexity
- network complexity
- infrastructure
- need the right tools and human resources in place to manage it
- data persistence
- re-route traffic appropriately when a new instance of a particular service is stood up ("service discovery")
- data management (microservice patterns)
- database per service
- shared database
- api composition
- command query responsobility segregation (CQRS)
- event sourcing
- integration tests
Base project structure
https://testdriven.io/courses/aws-flask-react/getting-started/
ECS, instead of Swarm, Mesos or Kubernetes
https://testdriven.io/courses/aws-flask-react/container-orchestration/
-
ECS is simpler to set up and easy to integrate into other AWS services like scheduling, service dscovery, load balancing and auto-scaling.
-
If you are going to manage the tool yourself, then Kubernetes, Swarm or Messos can be used.
| Feature | Info | AWS Service |
|---|---|---|
| Health checks | Verify when a task is ready to accept traffic | ALB |
| Path-based routing | Forward requests based on the URL path | ALB |
| Dynamic port-mapping | Assign ports dynamically when a new container is spun up | ALB |
| Zero-downtime deployments | Deployments do not disrupt the users | ALB |
| Service discovery | Automatic detection of new containers and services | ALB, ECS |
| High availability | Containers are evenly distributed across Availability Zones | ECS |
| Auto scaling | Scaling resources up or down automatically based on fluctuations in traffic patterns or metrics (like CPU usage) | ECS |
| Provisioning | New containers should select hosts based on resources and configuration | ECS |
| Container storage | Private image storage and management | ECR |
| Container logs | Centralized storage of container logs | CloudWatch |
| Monitoring | Ability to monitor basic stats like CPU usage, memory, I/O, and network usage as well as set alarms and create events | CloudWatch |
| Secrets management | Sensitive info should be encrypted and stored in a centralized store | Parameter Store, KMS, IAM |
Configure a new AWS user with IAM and set up the AWS CLI
https://testdriven.io/courses/aws-flask-react/aws-setup/
-
IAM - https://testdriven.io/courses/aws-flask-react/aws-setup/#H-0-iam
- WHO is trying to access (authentication)
- WHICH service are they trying to access (authorization)
- WHAT are they trying to do (authorization)
-
As well as root user, create IAM user with relevant permissions as well as access key and add to
~/.aws/credentials(or use some other method to authenticate)-
# ~/.aws/credentials
[howapped]
aws_access_key_id=AKIAZWCVHCILWF3ZB2V3
aws_secret_access_key=changeme
-
Push docker images to the ECR, a private image registry
https://testdriven.io/courses/aws-flask-react/elastic-container-registry/
-
Create the ECR
- Go to: https://eu-west-2.console.aws.amazon.com/ecs/v2/clusters?region=eu-west-2
-
aws ecr create-repository --repository-name test-driven-users --region eu-west-2

aws ecr create-repository --repository-name test-driven-client --region eu-west-2
# verify at: https://eu-west-2.console.aws.amazon.com/ecr/repositories?region=eu-west-2
-
Build & Push to ECR
production versions of the Docker files and push them to ECR
https://testdriven.io/courses/aws-flask-react/production-docker/
-
client/Dockerfile.prod -
push built prod images to ECR
Configure Codebuild for building and testing Docker images
https://testdriven.io/courses/aws-flask-react/code-build/
- What is continuous delivery
- Create a CodeBuild project
- Add a buildspec.yml file in the project root
- Add policy, AmazonEC2ContainerRegistryPowerUser to the service role in the IAM Dashboard
- Add tests
- docker layer caching
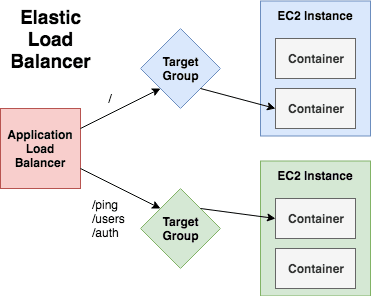
Add an Application Load Balancer to distribute traffic and create a more reliable app with automatic scaling and failover.
https://testdriven.io/courses/aws-flask-react/elastic-load-balancer/
- Create Application Load Balancer and target groups (use default VPC)
- create a client and users target group
- target groups are attached to the ALB and are used to route traffic to the containers found in the ECS service
Before configuring ECS, let's set up Amazon Relational Database Service (RDS).
https://testdriven.io/courses/aws-flask-react/setting-up-rds/
-
create RDS on free tier
-
u: webapp | p: secrets.md
-
# get status aws --region eu-west-2 rds describe-db-instances \ --db-instance-identifier flask-react-db \ --query 'DBInstances[].{DBInstanceStatus:DBInstanceStatus}' -
# get address aws --region eu-west-2 rds describe-db-instances \ --db-instance-identifier flask-react-db \ --query 'DBInstances[].{Address:Endpoint.Address}' -
postgres://webapp:<YOUR_RDS_PASSWORD>@<YOUR_RDS_ADDRESS>:5432/api_prod
-
Configure a Task Definition along with a Cluster and a Service within Elastic Container Service (ECS)
- 4 main components
- Task Definitions
- Tasks
- Services
- Clusters
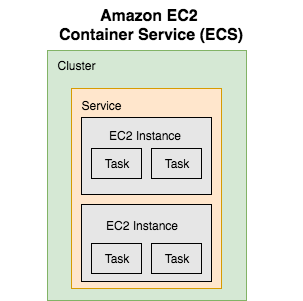
- Create a new task definition. You can think of them as blueprints, similar to a Docker Compose file. for the 'client' service
https://eu-west-2.console.aws.amazon.com/ecs/v2/create-task-definition?region=eu-west-2
Creating an Uber App Using Django Channels
https://testdriven.io/courses/taxi-react/#Overview
-
Part 1: Setup a Real-time Endpoint with Django/DRF
- 01/32 Introduction
- 02/32 Changelog
- 03/32 Getting Started
- 04/32 Authentication
- 05/32 HTTP
- 06/32 WebSockets - Part One
- 07/32 WebSockets - Part Two
- 08/32 WebSockets - Part Three
- 09/32 UI Support
- 10/32 User Photos
- 11/32 Conclusion
-
Part 2: Build a React Frontend
- 12/32 Introduction
- 13/32 React Setup
- 14/32 React Routing
- 15/32 Cypress Testing
- 16/32 React Bootstrap
- 17/32 React Forms
- 18/32 HTTP Requests - Log In and Out
- 19/32 HTTP Requests - Sign up
- 20/32 Docker
- 21/32 Cypress Refactor
- 22/32 Conclusion
-
Part 3: Finalise the Frontend
- 23/32 Introduction
- 24/32 The User
- 25/32 Testing Loading Trips
- 26/32 Loading Trip Details
- 27/32 Ride Requests
- 28/32 Updating Trips
- 29/32 Pop-Up Alerts
- 30/32 Google Maps
- 31/32 Conclusion
- Create a RESTful API with Django REST Framework.
- Implement token-based authentication with JSON Web Tokens (JWT).
- Use Django Channels to create and update data on the server.
- Send messages to the UI from the server via WebSockets.
- Test asyncio coroutines with pytest.
project set up
https://testdriven.io/courses/taxi-react/getting-started/
-
install django and venv
-
docker postgres
-
docker run --name some-postgres -p 5432:5432 \
  -e POSTGRES_USER=taxi -e POSTGRES_DB=taxi -e POSTGRES_PASSWORD=taxi -d postgres
docker run --name some-redis -p 6379:6379 -d redis
-
Username: default-superuser Email address: default-superuser@mail.com Password: default-superuser
Add auth with Django Rest Framework, and using token authentication over a WebSocket connection.
https://testdriven.io/courses/taxi-react/authentication/
Query the server for data on past, present and future trips.
https://testdriven.io/courses/taxi-react/http/
- add Trip model
- add Serializer
- add View
Connecting to the web sockets server, sending/receiving messages, authentication on sockets
https://testdriven.io/courses/taxi-react/websockets-part-one/
- pytest to test client/server messages
- modeling a user talking to himself
- one app talk to another through broadcast messaging (via a group)
- modeling a user talking to a room full of people
- authenticating socket connection
- JS WebSocket API does not support custom headers (authorization header)
- community consensus - sending the access token in a wuery string param
- write a test to show that a connection fails if the handshake request does not include a valid access token
- define and implement asgi middleware to wrap URL router in our middlreware stack so all incoming connection requests will go through our authentication method
Deploy a Django APP to AWS ECS with Terraform