⚡PW² Library and Tools is a group of three projects that easily allows you to re-scale your images to the right power of two dimensions.
Games and real-time applications, in general, tend to prefer images and textures with power-of-two dimensions, because they make it easier to generate mipmaps, consume less GPU memory, and increase the overall performance for shader operations.
Even when your textures are NPOT (non-power-of-two) most engines re-scale their dimensions to power-of-two values at the application loading (threejs for instance), so in some cases, they can also decrease loading time.
However, finding the right power-of-two values for each dimension of each texture of each model in your application sounds time-consuming, and it is. ⚡PW² born from the necessity to make this a no-brainer, quick and easy process.
⚡PW² - The typescript library itself ready to be integrated into your projects.
⚡PW² CLI - The command-line-interface for you that don't want to code and just want to quickly resize images on your computer only typing a few characters.
⚡PW² React - The live website for you to just drag and drop your images, choose the resizing method, and download them in a .zip file.
Overview
The typescript library itself ready to be used in your nodeJS, web, and ReactJS applications. Just import the library, create a new ⚡PW² object, and feed him image paths or buffers, to be resized. Check some usage examples below
Installation
npm i pw2
Backend Usage
Combine ⚡PW² with fs and resize your texture with only 8 lines of code.
const fs = require('fs')
const {createPw2, RESIZING_MODES} = require('pw2')
const  pw2 = createPw2()

async function main() {
	const inputFile = await fs.readFileSync('./inputFile.jpg')
	const nearestBuffer = await pw2.resizeAndGetBuffer(inputFile, RESIZING_MODES.NEAREST_PW2)
	fs.writeFileSync('./resizedFile.jpg', nearestBuffer)
}
FrontEnd Usage
Hook the handleFileUpload function to your file input 'change' event, and use file-saver to download the blob easilly.
import {saveAs} from 'file-saver'
import {createPw2, RESIZING_MODES} from 'pw2'
const  pw2 = createPw2()

async function handleFileUpload(evt) {
	const fileReader = new  FileReader()

	fileReader.onload = async() => {
		const resizedFile = await pw2.resizeAndGetBuffer(fileReader.result, RESIZING_MODES.NEAREST_PW2)
		const resizedFileBlob = new Blob([resizedFile])
		saveAs(resizedFileBlob, 'resized_image.png')
	}

	const file = evt.target.files[0]
	fileReader.readAsArrayBuffer(file)
}Overview
If you don't want to develop something from scratch, use ⚡PW² CLI, and with just a few characters (seven to be more precise) resize single or multiple images in your computer.
Installation
npm i -g pw2-cli
Usage
# will resize all .png images inside the path using the previous-pw2 resizing mode
./pw2-cli -f png -i ./my-images-path -m prev

# will resize the image.jpg file using the next-pw2 resizing mode
./pw2-cli -i ./my-folder/image.jpg -m next

# will resize all .jpg, .jpeg and .png files inside the current directory using the nearest-pw2 resizing mode (did I mention seven characters?)
./pw2-cli
Parameters
Commands:
help Display help
version Display version
Options:
-f, --filter [value] File extensions to filter (defaults to "png,jpg,jpeg")
-h, --help Output usage information
-i, --input [value] Input file or directory with files to resize, if the path is a directory it will filter all files using the filter option (defaults to process.cwd())
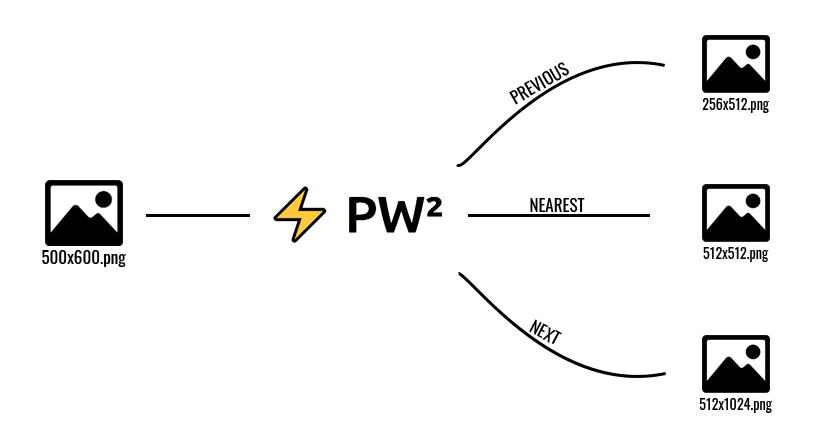
-m, --mode [value] Resizing mode to be used (near, prev, next) (defaults to "near")
-v, --version Output the version number
Overview
If you too don't want to write any code neither are used to CLI's, but still, want your textures with the right power-of-two dimensions, don't worry ⚡PW² React comes to the rescue.
Usage
- Access the Live Website.
- Drag and drop your images.
- Choose a Resizing Mode.
- Download the images individually or all at once in a .zip file.
At first, ⚡PW² was supposed to be only a simple script for personal use, but the idea grew from a mix of factors
- A desire to make the library more robust and available to other users.
- An opportunity to publish an npm package for the first time.
From there during the development, I thought it would be really nice if I could use the same library for either backend and frontend applications, more than that, for frontend applications would be even cooler to use it on standard web applications and in ReactJS also.
To make this possible I wrote two side projects to test my library and make sure it was compatible with all intended use cases. While developing these test applications, I notice I could use them as real products and use cases for the library, and make ⚡PW² accessible for a larger range of users, besides programmers or technicians.
So the backend test application became ⚡PW² CLI, that would help advanced users to resize their images without writing any code, only running short commands from their console applications.
And finally, ⚡PW² React which made the whole project really accessible, for any kind of user, as a simple website where you just need drag and drop your images and click a button to download them as power-of-two compatible images.
It was a really long journey so far. But this final assignment project was a wonderful opportunity to produce something for the community, something really reusable, and also an opportunity to use some technologies that I've been studying lately (typescript, jest, and ReactJS).
Also, it was an extremely valuable situation to learn more in-depth the lifecycle of npm packages, and the compilation process of typescript. And this way to be able to build a library compatible with frontend and backend applications.
Finally, I'd really like to thanks Professor David J. Malan, Brian Yu, the entire CS50 crew, the cs50 communities on Facebook and Discord, and Harvard for making these top-quality courses available for free for everyone!
This was CS50!