Redis Cloud is a fully-managed service for running your Redis dataset. It overcomes Redis’ scalability limitation by supporting all Redis commands at any dataset size. Your dataset is constantly replicated, so if a node fails, an auto-switchover mechanism guarantees data is served without interruption. Redis Cloud provides various data persistence options as well as remote backups for disaster recovery purposes.
Redis Cloud completely frees you from dealing with nodes, clusters, scaling, data-persistence configuration and failure recovery, while guaranteeing absolutely no data loss. The service guarantees the highest performance - no matter how much memory you use, you always get the highest throughput and lowest latency like if you were running on the strongest EC2 instance.
You can quickly and easily get your apps up and running with Redis Cloud through the Redis Cloud add-on for Heroku, just tell us how much memory you need and get started instantly with your first Redis DB. You can then add as many as possible Redis databases (each running on a dedicated process in a non-blocking manner), increase or decrease your memory capacity as needed and without affecting your existing data.
Start by installing the add-on:
:::term
$ heroku addons:add rediscloud:plan_name
Valid values for plan_name values are: 20MB(free), 250MB, 500MB, 1GB, 5GB, 10GB. For example:
:::term
$ heroku addons:add rediscloud:20MB
$ heroku addons:add rediscloud:1GB
... etc ...
Once Redis-Cloud has been added, you will notice a REDISCLOUD_URL config vars in your heroku config containing the username, password, hostname and port of your first Redis-Cloud database.
:::term
$ heroku config:get REDISCLOUD_URL
http://username:password@hostname:port
Next, setup your app to start using the Redis-Cloud add-on. In the following sections we have documented the interfaces with several languages and frameworks supported by Heroku.
Note: as database provisioning is carried out asynchronously, please wait until the creation and initialization of the database complete. This process shouldn't take more than 60 seconds
The redis-rb is a very stable and mature redis client and the easiest way to access Redis from Ruby.
Install redis-rb:
:::term
sudo gem install redis
For Rails 2.3.3 up to rails 3.0, update the config/environment.rb to include the redis gem:
:::ruby
config.gem 'redis'
For Rails 3.0 and above, update the Gemfile:
:::ruby
gem 'redis'
And then install the gem via Bundler:
:::term
bundle install
Lastly, create a new redis.rb initializer in config/initializers/ and add the following:
:::ruby
uri = URI.parse(ENV["REDISCLOUD_URL"])
$redis = Redis.new(:host => uri.host, :port => uri.port, :password => uri.password)
Add these lines to your configure block:
:::ruby
configure do
	. . .
	require 'redis'
	uri = URI.parse(ENV["REDISCLOUD_URL"])
	$redis = Redis.new(:host => uri.host, :port => uri.port, :password => uri.password)
	. . .
end
The Redis class exports methods that are named identical to the commands they execute. For instance, the SET and GET commands can be called like this:
:::ruby
$redis.set("foo", "bar")
# => "OK"
$redis.get("foo")
# => "bar"
Jedis is a blazingly small, sane and easy to use Redis java client. You can download the latest build from github or use it as a maven dependency:
:::java
<dependency>
	<groupId>redis.clients</groupId>
	<artifactId>jedis</artifactId>
	<version>2.0.0</version>
	<type>jar</type>
	<scope>compile</scope>
</dependency>
Configure connection for your Redis-Cloud service using REDISCLOUD_URLconfig vars and the following code snippet:
:::java
try {
		URI redisUri = new URI(System.getenv("REDISCLOUD_URL"));
		JedisPool pool = new JedisPool(new JedisPoolConfig(),
	    		redisUri.getHost(),
	    		redisUri.getPort(),
	    		Protocol.DEFAULT_TIMEOUT,
	    		redisUri.getUserInfo().split(":",2)[1]);
} catch (URISyntaxException e) {
   	    // URI couldn't be parsed.
}
:::java
Jedis jedis = pool.getResource();
jedis.set("foo", "bar");
String value = jedis.get("foo");
// return the instance to the pool when you're done
pool.returnResource(jedis);
(example taken from Jedis docs).
redis-py is the most common module to access Redis from Python.
Use pip to install it:
:::term
sudo pip install redis
Configure connection for your Redis-Cloud service using REDISCLOUD_URLconfig vars and the following code snippet:
:::python
import os
import urlparse
import redis
url = urlparse.urlparse(os.environ.get('REDISCLOUD_URL'))
r = redis.Redis(host=url.hostname, port=url.port, password=url.password)
:::python
>>> r.set('foo', 'bar')
True
>>> r.get('foo')
'bar'
Redis can be used as the back-end cache for Django.
To do so, install django-redis-cache:
:::term
pip install django-redis-cache
Next, configure your CACHES in the settings.py file:
:::python
import os
import urlparse
redis_url = urlparse.urlparse(os.environ.get('REDISCLOUD_URL'))
CACHES = {
	'default': {
	'BACKEND': 'redis_cache.RedisCache',
	'LOCATION': '%s:%s' % (redis_url.hostname, redis_url.port),
	'OPTIONS': {
        'PASSWORD': redis_url.password,
		'DB': 0,
    }
  }
}
####Testing (Django)
:::python
from django.core.cache import cache
cache.set("foo", "bar")
print cache.get("foo")
Predis is a flexible and feature-complete PHP client library for the Redis.
Instructions for installing the Predis library can be found here.
Loading the library to your project should be straightforward:
:::javascript
<?php
// prepend a base path if Predis is not present in your "include_path".
require 'Predis/Autoloader.php';
Predis\Autoloader::register();
Configure connection for your Redis-Cloud service using REDISCLOUD_URLconfig vars and the following code snippet:
:::javascript
$redis = new Predis\Client(array(
	'host' => parse_url($_ENV['REDISCLOUD_URL'], PHP_URL_HOST),
	'port' => parse_url($_ENV['REDISCLOUD_URL'], PHP_URL_PORT),
	'password' => parse_url($_ENV['REDISCLOUD_URL'], PHP_URL_PASS),
));
:::javascript
$redis->set('foo', 'bar');
$value = $redis->get('foo');
node_redis is a complete Redis client for node.js.
You can install it with:
:::term
npm install redis
Configure connection for your Redis-Cloud service using REDISCLOUD_URLconfig vars and the following code snippet:
:::javascript
var redis = require('redis');
var url = require('url');
var redisURL = url.parse(process.env.REDISCLOUD_URL);
var client = redis.createClient(redisURL.port, redisURL.hostname, {no_ready_check: true});
client.auth(redisURL.auth.split(":")[1]);
###Testing (Node.js)
:::javascript
client.set('foo', 'bar');
client.get('foo', function (err, reply) {
    console.log(reply.toString()); // Will print `bar`
});
Our dashboard allows you to get all the performance and usage metrics of your Redis-Cloud service in one screen. Here's a screenshot of the dashboard:
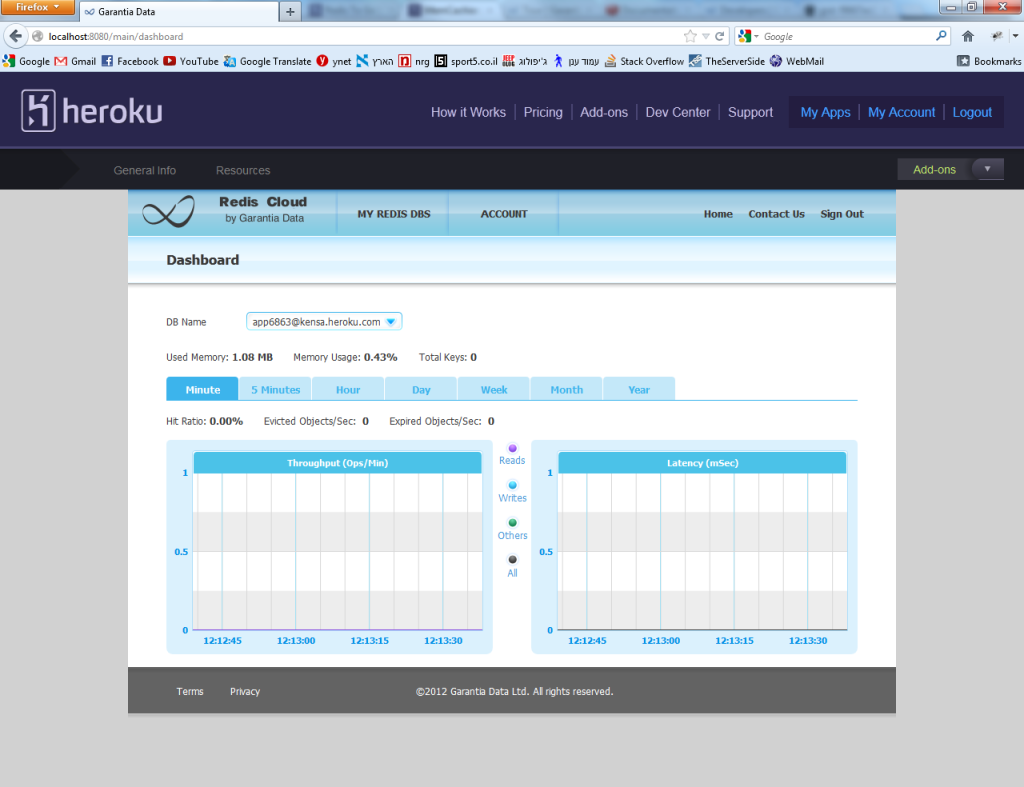
To access your Redis-Cloud dashboard run:
:::term
heroku addons:open rediscloud
You can then find your dashboard under the MY REDIS DBs menu.
Alternatively, open Redis-Cloud add-on from your application's dashboard on heroku.com.
Redis-Cloud allows you to add multiple Redis databases to your plan, each database will be running on a dedicated process and in a non-blocking manner (i.e. without interfering your other databases). You can create as many as possible databases until your plan's memory limit is reached. Your first Redis database is created automatically upon launching the Redis-Cloud add-on, and its URL and credentials are maintained in REDISCLOUD_URLconfig vars. To add more databases, simply access your Redis-Cloud console and click on the New Redis DB button in the MY REDIS DB > Manage page. You will have to manually set the connection with your Redis databases created through the Redis-Cloud console, as only one canonical URL is supported by the current add-on scheme of heroku.com.
You can also delete Redis databases created through your Redis-Cloud console. However, your first Redis database can only be deleted by removing the add-on.
Note: this capability is not supported during the alpha stage
Plans migration is easy and instantly, it requires no code change and has no effect on your existing datasets. You can use the 'heroku addons:upgrade' command to migrate to a new plan:
:::term
$ heroku addons:upgrade rediscloud:10GB
Note: only plan upgrade is supported during the Alpa stage
Redis Cloud can be removed via the CLI.
:::term
$ heroku addons:remove rediscloud
All Redis-Cloud support and runtime issues should be submitted via on of the Heroku Support channels. Any non-support related issues or product feedback is welcome via email at: service@garantiadata.com.