Memcached Cloud is a fully-managed service that operates your Memcached in a reliable and fail-safe manner. Your dataset is constantly replicated, so if a node fails, an automatic failover mechanism guarantees that your data is served without interruption. Memcached Cloud provides various data persistence options as well as remote backups for disaster recovery purposes. You can quickly and easily get your apps up and running with Memcached Cloud through its add-on for Cloud Foundry, just tell us how much memory you need and start using your Memcached bucket instantly.
A Memcached bucket is created in seconds and from that moment on, all operations are fully automated. The service completely frees developers from dealing with nodes, clusters, server lists, scaling and failure recovery, while guaranteeing absolutely no data loss.
Start by installing the add-on:
A list of all plans available can be found [here](http://addons.heroku.com/memcachedcloud).
:::term
$ heroku addons:add memcachedcloud:25
Once Memcached Cloud has been added, you will notice a three new config vars in your heroku config containing the servers, username and password of your first Memcached Cloud bucket:
MEMCACHEDCLOUD_SERVERS, MEMCACHEDCLOUD_USERNAME, MEMCACHEDCLOUD_PASSWORD .
Use the following heroku command to view them:
:::term
$ heroku config
Next, setup your app to start using the Memcached Cloud add-on. In the following sections we have documented the interfaces with several languages and frameworks supported by Heroku.
Dalli is a high performance, pure Ruby client for accessing Memcached servers that uses binary protocol.
To use Dalli with Rails 3.x, update your gems with:
gem 'dalli'
And then install the gem via Bundler:
bundle install
Lastly, add the following line in your config/environments/production.rb:
config.cache_store = :dalli_store, ENV[MEMCACHEDCLOUD_SERVERS], { :username => ENV[MEMCACHEDCLOUD_USERNAME], :password => ENV[MEMCACHEDCLOUD_PASSWORD] }
Add this code snippet to your configure block:
configure do
    . . .
	require 'dalli'

$cache = Dalli::Client.new(ENV[MEMCACHEDCLOUD_SERVERS].split(','), :username => ENV[MEMCACHEDCLOUD_USERNAME], :password => ENV[MEMCACHEDCLOUD_PASSWORD])
    . . .
end
No special setup is required when using Memcached Cloud with a Unicorn server. Users running Rails apps on Unicorn should follow the instructions in the Configuring Memcached from Rails section and users running Sinatra apps on Unicorn should follow the instructions in the Configuring Memcached on Sinatra section.
$cache.set("foo", "bar")
# => true
$cache.get("foo")
# => "bar"
spymemcached is a simple, asynchronous, single-threaded Memcached client written in Java. You can download the latest build from: https://code.google.com/p/spymemcached/downloads/list.
If you are using Maven, start by adding the following repository:
<repositories>
    <repository>
      <id>spy</id>
      <name>Spy Repository</name>
      <layout>default</layout>
      <url>http://files.couchbase.com/maven2/</url>
      <snapshots>
        <enabled>false</enabled>
      </snapshots>
    </repository>
</repositories>
Then, specify the actual artifact as follows:
<dependency>
  <groupId>spy</groupId>
  <artifactId>spymemcached</artifactId>
  <version>2.8.9</version>
  <scope>provided</scope>
</dependency>
Configure the connection to your Memcached Cloud service by using the VCAP_SERVICES environment variable as shown in the following code snippet:
try {
	String vcap_services = System.getenv("VCAP_SERVICES");
	if (vcap_services != null && vcap_services.length() > 0) {
		// parsing Memcached Cloud credentials
		JsonRootNode root = new JdomParser().parse(vcap_services);
		JsonNode "memcachedcloudNode = root.getNode("memcachedcloud-<your_app_name>");
		JsonNode credentials = "memcachedcloudNode.getNode(0).getNode("credentials");

		// building the Memcached client
		AuthDescriptor ad = new AuthDescriptor(new String[] { "PLAIN" },
		        new PlainCallbackHandler(credentials.getStringValue("username"), credentials.getStringValue("password")));

		MemcachedClient mc = new MemcachedClient(
		          new ConnectionFactoryBuilder()
		              .setProtocol(ConnectionFactoryBuilder.Protocol.BINARY)
		              .setAuthDescriptor(ad).build(),
		          AddrUtil.getAddresses(credentials.getStringValue("servers")));

	}
} catch (InvalidSyntaxException ex) {
	// vcap_services could not be parsed.
} catch (IOException ex) {
	// the Memcached client could not be initialized.
}
mc.set("foo", 0, "bar");
Object value = mc.get("foo");
bmemcached is a pure, thread safe, python module to access memcached via binary protocol.
Use pip to install it:
pip install python-binary-memcached
Configure the connection to your Memcached Cloud service using VCAP_SERVICES environment variable as shown in the following code snippet:
import os
import urlparse
import bmemcached
import json

memcachedcloud_service = json.loads(os.environ['VCAP_SERVICES'])['"memcachedcloud-<your_app_name>'][0]
credentials = memcached_service['credentials']
mc = bmemcached.Client(credentials['servers'].split(','), credentials['username'], credentials['password'])
mc.set('foo', 'bar')
print client.get('foo')
Memcached Cloud can be used as a Django cache backend with django-bmemcached.
To do so, install django-bmemcached:
pip install django-bmemcached
Next, configure your CACHES in the settings.py file:
import os
import urlparse
import json

memcachedcloud_service = json.loads(os.environ['VCAP_SERVICES'])['memcachedcloud-<your_app_name>'][0]
credentials = memcachedcloud_service['credentials']
CACHES = {
	'default': {
		'BACKEND': 'django_bmemcached.memcached.BMemcached',
		'LOCATION': credentials['servers'].split(','),
		'OPTIONS': {
        			'username' credentials['username'],
        			'password': credentials['password']
	        }
  	}
}
from django.core.cache import cache
cache.set("foo", "bar")
print cache.get("foo")
PHPMemcacheSASL is a simple PHP class with SASL support.
Include the class in your project and configure a connection to your Memcached Cloud service using VCAP_SERVICES environment variable as shown in the following code snippet:
<?php
include('MemcacheSASL.php');

$vcap_services = getenv("VCAP_SERVICES");
$"memcachedcloud_service = json_decode($vcap_services, true)[""memcachedcloud-<your_app_name>"][0]
$credentials = $"memcachedcloud_service["credentials"]

$mc = new MemcacheSASL;
list($host, $port) = explode(':', $credentials['servers']);
$mc->addServer($host, $port);
$mc->setSaslAuthData($credentials['username], $credentials['password']);
$mc->add("foo", "bar");
echo $mc->get("foo");
Our dashboard displays all of the performance and usage metrics for your Memcached Cloud service on a single screen, as shown in the following screenshot:
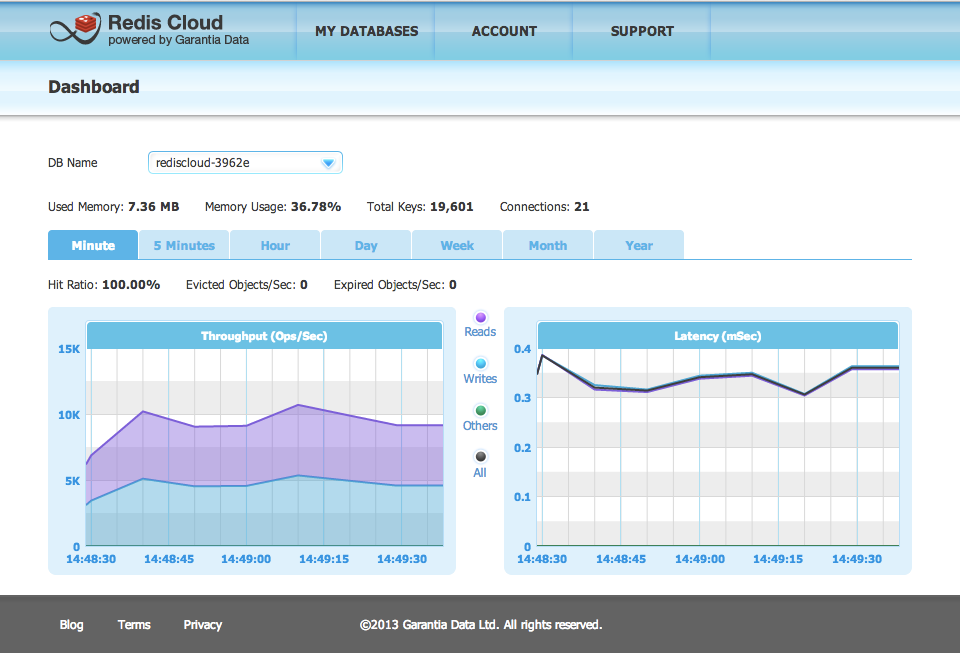
To access your Memcached Cloud dashboard, simply click the 'Manage' button next to the Memcached Cloud service on your app space console.
You can then find your dashboard under the MY DATABASES menu.
You can continue managing your services from the command line.
All Memcached Cloud support issues or product feedbacks are welcome via email to support@garantiadata.com or our helpdesk (available from your dashboard under the SUPPORT menu).
Please make sure you are familiar with the CloudFoundry method of contacting service providers for support.