Lets talk about Linux and Bash.
Notes were taken from edx.org of LFS101x Introduction to Linux.
Date: Sun Sep 28 00:30:48 EDT 2014
The preferred method to shut down or reboot the system is to use the shutdown command. This sends a warning message and then prevents further users from logging in. The init process will then control shutting down or rebooting the system. It is important to always shut down properly; failure to do so can result in damage to the system and/or loss of data.
The halt and poweroff commands issue shutdown -h to halt the system; reboot issues shutdown -r and causes the machine to reboot instead of just shutting down. Both rebooting and shutting down from the command line requires superuser (root) access.
When administering a multiuser system, you have the option of notifying all users prior to shutdown as in:
$ sudo shutdown -h 10:00 "Shutting down for scheduled maintenance."
Depending on the specifics of your particular distribution's policy, programs and software packages can be installed in various directories. In general, executable programs should live in the /bin, /usr/bin,/sbin,/usr/sbin directories or under /opt.
One way to locate programs is to employ the which utility. For example, to find out exactly where the diff program resides on the filesystem:
$ which diff
If which does not find the program, whereis is a good alternative because it looks for packages in a broader range of system directories:
$ whereis diff
ln can be used to create hard links and (with the -s option) soft links, also known as symbolic links or symlinks. These two kinds of links are very useful in UNIX-based operating systems. The advantages of symbolic links are discusssed on the following screen.
Suppose that file1 already exists. A hard link, called file2, is created with the command:
$ ln file1 file2
Note that two files now appear to exist. However, a closer inspection of the file listing shows that this is not quite true.
$ ls -li file1 file2
The -i option to ls prints out in the first column the inode number, which is a unique quantity for each file object. This field is the same for both of these files; what is really going on here is that it is only one file but it has more than one name associated with it, as is indicated by the 3 that appears in the ls output. Thus, there already was another object linked to file1 before the command was executed.
Symbolic (or Soft) links are created with the -s option as in:
$ ln -s file1 file4
$ ls -li file1 file4
Notice file4 no longer appears to be a regular file, and it clearly points to file1 and has a different inode number.
Symbolic links take no extra space on the filesystem (unless their names are very long). They are extremely convenient as they can easily be modified to point to different places. An easy way to create a shortcut from your home directory to long pathnames is to create a symbolic link.
Unlike hard links, soft links can point to objects even on different filesystems (or partitions) which may or may not be currently available or even exist. In the case where the link does not point to a currently available or existing object, you obtain a dangling link.
Hard links are very useful and they save space, but you have to be careful with their use, sometimes in subtle ways. For one thing if you remove either file1 or file2 in the example on the previous screen, the inode object (and the remaining file name) will remain, which might be undesirable as it may lead to subtle errors later if you recreate a file of that name.
If you edit one of the files, exactly what happens depends on your editor; most editors including vi and gedit will retain the link by default but it is possible that modifying one of the names may break the link and result in the creation of two objects.
Extension:
[What is the difference between hardlink and softlink?] (http://www.geekride.com/hard-link-vs-soft-link/)
[What is the difference between a hard link and a symbolic link?] (http://askubuntu.com/questions/108771/what-is-the-difference-between-a-hard-link-and-a-symbolic-link)
The cd command remembers where you were last, and lets you get back there with cd -. For remembering more than just the last directory visited, use pushd to change the directory instead of cd; this pushes your starting directory onto a list. Using popd will then send you back to those directories, walking in reverse order (the most recent directory will be the first one retrieved with popd). The list of directories is displayed with the dirs command.
When commands are executed, by default there are three standard file streams (or descriptors) always open for use: standard input (standard in or stdin), standard output (standard out or stdout) and standard error (or stderr). Usually, stdin is your keyboard, stdout and stderr are printed on your terminal; often stderr is redirected to an error logging file. stdin is often supplied by directing input to come from a file or from the output of a previous command through a pipe. stdout is also often redirected into a file. Since stderr is where error messages are written, often nothing will go there.
In Linux, all open files are represented internally by what are called file descriptors. Simply put, these are represented by numbers starting at zero. stdin is file descriptor 0, stdout is file descriptor 1, and stderr is file descriptor 2. Typically, if other files are opened in addition to these three, which are opened by default, they will start at file descriptor 3 and increase from there.
On the next screen and in chapters ahead, you will see examples which alter where a running command gets its input, where it writes its output, or where it prints diagnostic (error) messages.
Through the command shell we can redirect the three standard filestreams so that we can get input from either a file or another command instead of from our keyboard, and we can write output and errors to files or send them as input for subsequent commands.
For example, if we have a program called do_something that reads from stdin and writes to stdout and stderr, we can change its input source by using the less-than sign (<) followed by the name of the file to be consumed for input data:
$ do_something < input-file
If you want to send the output to a file, use the greater-than sign (>) as in:
$ do_something > output-file
Because stderr is not the same as stdout, error messages will still be seen on the terminal windows in the above example.
If you want to redirect stderr to a separate file, you use stderr’s file descriptor number (2), the greater-than sign (>), followed by the name of the file you want to hold everything the running command writes to stderr: $ do_something 2> error-file
A special shorthand notation can be used to put anything written to file descriptor 2 (stderr) in the same place as file descriptor 1 (stdout): 2>&1
$ do_something > all-output-file 2>&1
bash permits an easier syntax for the above:
$ do_something >& all-output-file
The UNIX/Linux philosophy is to have many simple and short programs (or commands) cooperate together to produce quite complex results, rather than have one complex program with many possible options and modes of operation. In order to accomplish this, extensive use of pipes is made; you can pipe the output of one command or program into another as its input.
In order to do this we use the vertical-bar, |, (pipe symbol) between commands as in:
$ command1 | command2 | command3
The above represents what we often call a pipeline and allows Linux to combine the actions of several commands into one. This is extraordinarily efficient because command2 and command3 do not have to wait for the previous pipeline commands to complete before they can begin hacking at the data in their input streams; on multiple CPU or core systems the available computing power is much better utilized and things get done quicker. In addition there is no need to save output in (temporary) files between the stages in the pipeline, which saves disk space and reduces reading and writing from disk, which is often the slowest bottleneck in getting something done.
Being able to quickly find the files you are looking for will make you a much happier Linux user! You can search for files in your parent directory or any other directory on the system as needed.
** locate **
The locate utility program performs a search through a previously constructed database of files and directories on your system, matching all entries that contain a specified character string. This can sometimes result in a very long list.
To get a shorter more relevant list we can use the grep program as a filter; grep will print only the lines that contain one or more specified strings as in:
$ locate zip | grep bin
which will list all files and directories with both "zip" and "bin" in their name . (We will cover grep in much more detail later.) Notice the use of | to pipe the two commands together.
locate utilizes the database created by another program, updatedb. Most Linux systems run this automatically once a day. However, you can update it at any time by just running updatedb from the command line as the root user.
You can search for a filename containing specific characters using wildcards.
| Wildcard | Result |
|---|---|
? |
Matches any single character |
* |
Matches any string of characters |
[set] |
Matches any character in the set of characters, for example [adf] will match any occurrence of "a", "d", or "f" |
[!set] |
Matches any character not in the set of characters |
To search for files using the ? wildcard, replace each unknown character with ?, e.g. if you know only the first 2 letters are 'ba' of a 3-letter filename with an extension of .out, type ls ba?.out .
To search for files using the * wildcard, replace the unknown string with *, e.g. if you remember only that the extension was .out, type ls *.out
find is extremely useful and often-used utility program in the daily life of a Linux system administrator. It recurses down the filesystem tree from any particular directory (or set of directories) and locates files that match specified conditions. The default pathname is always the present working directory.
For example, administrators sometimes scan for large core files (which contain diagnostic information after a program fails) that are more than several weeks old in order to remove them. It is also common to remove files in /tmp (and other temporary directories, such as those containing cached files) that have not been accessed recently. Many distros use automated scripts that run periodically to accomplish such house cleaning.
Using find
When no arguments are given, find lists all files in the current directory and all of its subdirectories. Commonly used options to shorten the list include -name (only list files with a certain pattern in their name), -iname (also ignore the case of file names), and -type (which will restrict the results to files of a certain specified type, such as d for directory, l for symbolic link or f for a regular file, etc).
Searching for files and directories named "gcc":
$ find /usr -name gcc
Searching only for directories named "gcc":
$ find /usr -type d -name gcc
Searching only for regular files named "test1":
$ find /usr -type f -name test1
Another good use of find is being able to run commands on the files that match your search criteria. The -exec option is used for this purpose.
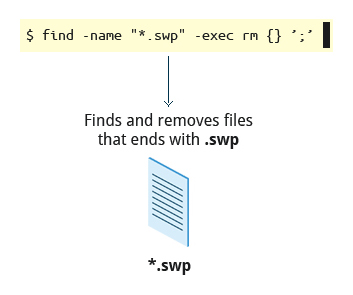
To find and remove all files that end with .swp:
$ find -name "*.swp" -exec rm {} ’;’
The {} (squiggly brackets) is a place holder that will be filled with all the file names that result from the find expression, and the preceding command will be run on each one individually.
Note that you have to end the command with either ‘;’ (including the single-quotes) or ; Both forms are fine.
One can also use the -ok option which behaves the same as -exec except that find will prompt you for permission before executing the command. This makes it a good way to test your results before blindly executing any potentially dangerous commands.
It is sometimes the case that you wish to find files according to attributes such as when they were created, last used, etc, or based on their size. Both are easy to accomplish.
Finding based on time:
$ find / -ctime 3
Here, -ctime is when the inode meta-data (i.e., file ownership, permissions, etc) last changed; it is often, but not necessarily when the file was first created. You can also search for accessed/last read (-atime) or modified/last written (-mtime) times. The number is the number of days and can be expressed as either a number (n) that means exactly that value, +n which means greater than that number, or -n which means less than that number. There are similar options for times in minutes (as in -cmin, -amin, and -mmin).
Finding based on sizes:
$ find / -size 0
Note the size here is in 512-byte blocks, by default; you can also specify bytes (c), kilobytes (k), megabytes (M), gigabytes (G), etc. As with the time numbers above, file sizes can also be exact numbers (n), +n or -n. For details consult the man page for find.
For example, to find files greater than 10 MB in size and running a command on those files:
$ find / -size +10M -exec command {} ’;’
In Linux (and all UNIX-like operating systems) it is often said “Everything is a file”, or at least it is treated as such. This means whether you are dealing with normal data files and documents, or with devices such as sound cards and printers, you interact with them through the same kind of Input/Output (I/O) operations. This simplifies things: you open a “file” and perform normal operations like reading the file and writing on it (which is one reason why text editors, which you will learn about in an upcoming section, are so important.)
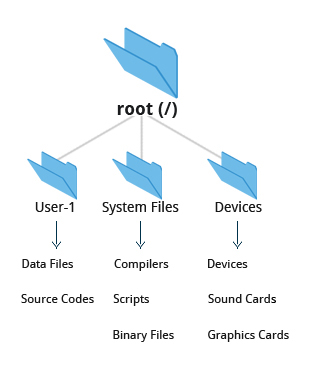
On many systems (including Linux), the filesystem is structured like a tree. The tree is usually portrayed as inverted, and starts at what is most often called the root directory, which marks the beginning of the hierarchical filesystem and is also some times referred to as the trunk, or simply denoted by /. The root directory is not the same as the root user. The hierarchical filesystem also contains other elements in the path (directory names) which are separated by forward slashes (/) as in /usr/bin/awk, where the last element is the actual file name.
In this section, you will learn about some basic concepts including the filesystem hierarchy as well as about disk partitions.
The Filesystem Hierarchy Standard (FHS) grew out of historical standards from early versions of UNIX, such as the Berkeley Software Distribution (BSD) and others. The FHS provides Linux developers and system administrators with a standard directory structure for the filesystem, which provides consistency between systems and distributions.
Visit http://www.pathname.com/fhs/ for a list of the main directories and their contents in Linux systems.
Linux supports various filesystem types created for Linux, along with compatible filesystems from other operating systems such as Windows and MacOS. Many older, legacy filesystems, such as FAT, are supported.
Some examples of filesystem types that Linux supports are:
- ext3, ext4, btrfs, xfs (native Linux filesystems)
- vfat, ntfs, hfs (filesystems from other operating systems)
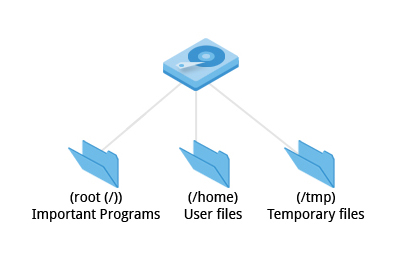
Each filesystem resides on a hard disk partition. Partitions help to organize the contents of disks according to the kind of data contained and how it is used. For example, important programs required to run the system are often kept on a separate partition (known as root or /) than the one that contains files owned by regular users of that system (/home). In addition, temporary files created and destroyed during the normal operation of Linux are often located on a separate partition; in this way, using all available space on a particular partition may not fatally affect the normal operation of the system.
** Mount Points **
Before you can start using a filesystem, you need to mount it to the filesystem tree at a mount point. This is simply a directory (which may or may not be empty) where the filesystem is to be attached (mounted). Sometimes you may need to create the directory if it doesn't already exist.
Warning: If you mount a filesystem on a non-empty directory, the former contents of that directory are covered-up and not accessible until the filesystem is unmounted. Thus mount points are usually empty directories.
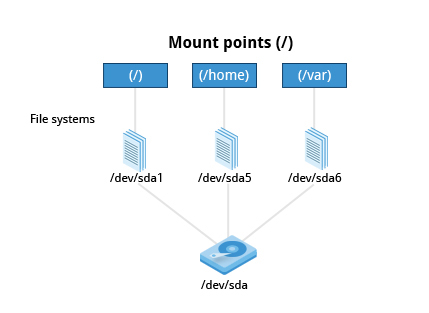
The mount command is used to attach a filesystem (which can be local to the computer or, as we shall discuss, on a network) somewhere within the filesystem tree. Arguments include the device node and mount point. For example,
$ mount /dev/sda5 /home
will attach the filesystem contained in the disk partition associated with the /dev/sda5 device node, into the filesystem tree at the /home mount point. (Note that unless the system is otherwise configured only the root user has permission to run mount.) If you want it to be automatically available every time the system starts up, you need to edit the file /etc/fstab accordingly (the name is short for Filesystem Table). Looking at this file will show you the configuration of all pre-configured filesystems. man fstab will display how this file is used and how to configure it.
Typing mount without any arguments will show all presently mounted filesystems.
The command df -Th (disk-free) will display information about mounted filesystems including usage statistics about currently used and available space.
Using NFS (the Network Filesystem) is one of the methods used for sharing data across physical systems. Many system administrators mount remote users' home directories on a server in order to give them access to the same files and configuration files across multiple client systems. This allows the users to log in to different computers yet still have access to the same files and resources.
NFS on the Server
We will now look in detail at how to use NFS on the server machine.
On the server machine, NFS daemons (built-in networking and service processes in Linux) and other system servers are typically started with the following command: sudo service nfs start
The text file /etc/exports contains the directories and permissions that a host is willing to share with other systems over NFS. An entry in this file may look like the following:
/projects *.example.com(rw)
This entry allows the directory /projects to be mounted using NFS with read and write (rw) permissions and shared with other hosts in the example.com domain. As we will detail in the next chapter, every file in Linux has 3 possible permissions: read (r), write (w) and execute (x).
After modifying the /etc/exports file, you can use the exportfs -av command to notify Linux about the directories you are allowing to be remotely mounted using NFS (restarting NFS with sudo service nfs restart will also work, but is heavier as it halts NFS for a short while before starting it up again).
On the client machine, if it is desired to have the remote filesystem mounted automatically upon system boot, the /etc/fstab file is modified to accomplish this. For example, an entry in the client's /etc/fstab file might look like the following:
servername:/projects /mnt/nfs/projects nfs defaults 0 0
You can also mount the remote filesystem without a reboot or as a one-time mount by directly using the mount command:
$ mount servername:/projects /mnt/nfs/projects
Remember, if /etc/fstab is not modified, this remote mount will not be present the next time the system is restarted.
Certain filesystems like the one mounted at /proc are called pseudo filesystems because they have no permanent presence anywhere on disk.
The /proc filesystem contains virtual files (files that exist only in memory) that permit viewing constantly varying kernel data. This filesystem contains files and directories that mimic kernel structures and configuration information. It doesn't contain real files but runtime system information (e.g. system memory, devices mounted, hardware configuration, etc). Some important files in /proc are:
/proc/cpuinfo
/proc/interrupts
/proc/meminfo
/proc/mounts
/proc/partitions
/proc/version
/proc has subdirectories as well, including:
/proc/<Process-ID-#>
/proc/sys
The first example shows there is a directory for every process running on the system which contains vital information about it. The second example shows a virtual directory that contains a lot of information about the entire system, in particular its hardware and configuration. The /proc filesystem is very useful because the information it reports is gathered only as needed and never needs storage on disk.
Now that you know about the basics of filesystems, let's learn about the filesystem architecture and directory structure in Linux.
Each user has a home directory, usually placed under /home. The /root (slash-root) directory on modern Linux systems is no more than the root user's home directory.
The /home directory is often mounted as a separate filesystem on its own partition, or even exported (shared) remotely on a network through NFS.
Sometimes you may group users based on their department or function. You can then create subdirectories under the /home directory for each of these groups. For example, a school may organize /home with something like the following:
/home/faculty/
/home/staff/
/home/students/
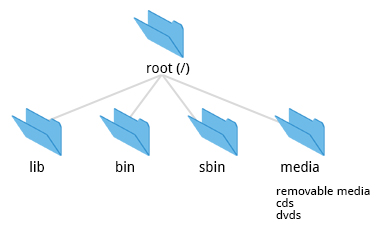
The /bin directory contains executable binaries, essential commands used in single-user mode, and essential commands required by all system users, such as:
| Command | Usage |
|---|---|
| ps | Produces a list of processes along with status information for the system. |
| ls | Produces a listing of the contents of a directory. |
| cp | Used to copy files. |
To view a list of programs in the /bin directory, type: ls /bin
Commands that are not essential for the system in single-user mode are placed in the /usr/bin directory, while the /sbin directory is used for essential binaries related to system administration, such as ifconfig and shutdown. There is also a /usr/sbin directory for less essential system administration programs.
Sometimes /usr is a separate filesystem that may not be available/mounted in single-user mode. This was why essential commands were separated from non-essential commands. However, in some of the most modern Linux systems this distinction is considered obsolete, and /usr/bin and /bin are actually just linked together as are /usr/sbin and /sbin
The /dev directory contains device nodes, a type of pseudo-file used by most hardware and software devices, except for network devices. This directory is:
Empty on the disk partition when it is not mounted Contains entries which are created by the udev system, which creates and manages device nodes on Linux, creating them dynamically when devices are found. The /dev directory contains items such as:
/dev/sda1 (first partition on the first hard disk)
/dev/lp1 (second printer)
/dev/dvd1 (first DVD drive)
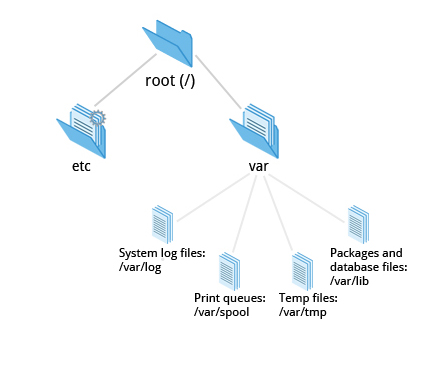
The /var directory contains files that are expected to change in size and content as the system is running (var stands for variable) such as the entries in the following directories:
- System log files: /var/log
- Packages and database files: /var/lib
- Print queues: /var/spool
- Temp files: /var/tmp
The /var directory may be put in its own filesystem so that growth of the files can be accommodated and the file sizes do not fatally affect the system. Network services directories such as /var/ftp (the FTP service) and /var/www (the HTTP web service) are also found under /var.
The /etc directory is the home for system configuration files. It contains no binary programs, although there are some executable scripts. For example, the file resolv.conf tells the system where to go on the network to obtain host name to IP address mappings (DNS). Files like passwd,shadow and group for managing user accounts are found in the /etc directory. System run level scripts are found in subdirectories of /etc. For example, /etc/rc2.d contains links to scripts for entering and leaving run level 2. The rc directory historically stood for Run Commands. Some distros extend the contents of /etc. For example, Red Hat adds the sysconfig subdirectory that contains more configuration files.
The /boot directory contains the few essential files needed to boot the system. For every alternative kernel installed on the system there are four files:
vmlinuz: the compressed Linux kernel, required for bootinginitramfs: the initial ram filesystem, required for booting, sometimes called initrd, not initramfsconfig: the kernel configuration file, only used for debugging and bookkeepingSystem.map: kernel symbol table, only used for debugging
Each of these files has a kernel version appended to its name.
The Grand Unified Bootloader (GRUB) files (such as /boot/grub/grub.conf or /boot/grub2/grub2.cfg) are also found under the /boot directory.
/lib contains libraries (common code shared by applications and needed for them to run) for the essential programs in /bin and /sbin. These library filenames either start with ld or lib, for example, /lib/libncurses.so.5.7.
Most of these are what are known as dynamically loaded libraries (also known as shared libraries or Shared Objects (SO)). On some Linux distributions there exists a /lib64 directory containing 64-bit libraries, while /lib contains 32-bit versions.
Kernel modules (kernel code, often device drivers, that can be loaded and unloaded without re-starting the system) are located in /lib/modules/.
The /media directory is typically located where removable media, such as CDs, DVDs and USB drives are mounted. Unless configuration prohibits it, Linux automatically mounts the removable media in the /media directory when they are detected.
The following is a list of additional directories under /and their use:
| Directory name | Usage |
|---|---|
| /opt | Optional application software packages. |
| /sys | Virtual pseudo-filesystem giving information about the system and the hardware. Can be used to alter system parameters and for debugging purposes. |
| /srv | Site-specific data served up by the system. Seldom used. |
| /tmp | Temporary files; on some distributions erased across a reboot and/or may actually be a ramdisk in memory. |
| /usr | Multi-user applications, utilities and data. |
The /usr directory contains non-essential programs and scripts (in the sense that they should not be needed to initially boot the system) and has at least the following sub-directories:
| Directory name | Usage |
|---|---|
| /usr/include | Header files used to compile applications. |
| /usr/lib | Libraries for programs in /usr/bin and /usr/sbin. |
| /usr/lib64 | 64-bit libraries for 64-bit programs in /usr/bin and /usr/sbin. |
| /usr/sbin | Non-essential system binaries, such as system daemons. |
| /usr/share | Shared data used by applications, generally architecture-independent. |
| /usr/src | Source code, usually for the Linux kernel. |
| /usr/X11R6 | X Window configuration files; generally obsolete. |
| /usr/local | Data and programs specific to the local machine. Subdirectories include bin, sbin, lib, share, include, etc. |
| /usr/bin | This is the primary directory of executable commands on the system. |
Now that you know about the filesystem and its structure, let’s learn how to manage files and directories.
diff is used to compare files and directories. This often-used utiility program has many useful options (see man diff) including:
| diff Option | Usage |
|---|---|
| -c | Provides a listing of differences that include 3 lines of context before and after the lines differing in content |
| -r | Used to recursively compare subdirectories as well as the current directory |
| -i | Ignore the case of letters |
| -w | Ignore differences in spaces and tabs (white space) |
To compare two files, at the command prompt, type diff <filename1> <filename2>
You can compare three files at once using diff3, which uses one file as the reference basis for the other two. For example, suppose you and a co-worker both have made modifications to the same file working at the same time independently. diff3 can show the differences based on the common file you both started with. The syntax for diff3 is as follows:
$ diff3 MY-FILE COMMON-FILE YOUR-FILE
Many modifications to source code and configuration files are distributed utilizing patches, which are applied, not suprisingly, with the patch program. A patch file contains the deltas (changes) required to update an older version of a file to the new one. The patch files are actually produced by running diff with the correct options, as in:
$ diff -Nur originalfile newfile > patchfile
Distributing just the patch is more concise and efficient than distributing the entire file. For example, if only one line needs to change in a file that contains 1,000 lines, the patch file will be just a few lines long.
To apply a patch you can just do either of the two methods below:
$ patch -p1 < patchfile
$ patch originalfile patchfile
The first usage is more common as it is often used to apply changes to an entire directory tree, rather than just one file as in the second example. To understand the use of the -p1 option and many others, see the man page for patch.
The graphic shows a patch file produced by diff.
In Linux, a file's extension often does not categorize it the way it might in other operating systems. One can not assume that a file named file.txt is a text file and not an executable program. In Linux a file name is generally more meaningful to the user of the system than the system itself; in fact most applications directly examine a file's contents to see what kind of object it is rather than relying on an extension. This is very different from the way Windows handles filenames, where a filename ending with .exe, for example, represents an executable binary file.
The real nature of a file can be ascertained by using the file utility. For the file names given as arguments, it examines the contents and certain characteristics to determine whether the files are plain text, shared libraries, executable programs, scripts, or something else.
There are many ways you can back up data or even your entire system. Basic ways to do so include use of simple copying with cp and use of the more robust rsync.
Both can be used to synchronize entire directory trees. However, rsync is more efficient because it checks if the file being copied already exists. If the file exists and there is no change in size or modification time, rsync will avoid an unnecessary copy and save time. Furthermore, because rsync copies only the parts of files that have actually changed, it can be very fast.
cp can only copy files to and from destinations on the local machine (unless you are copying to or from a filesystem mounted using NFS), but rsync can also be used to copy files from one machine to another. Locations are designated in the target:path form where target can be in the form of [user@]host. The user@ part is optional and used if the remote user is different from the local user.
rsync is very efficient when recursively copying one directory tree to another, because only the differences are transmitted over the network. One often synchronizes the destination directory tree with the origin, using the -r option to recursively walk down the directory tree copying all files and directories below the one listed as the source.
rsync is a very powerful utility. For example, a very useful way to back up a project directory might be to use the following command:
$ rsync -r project-X archive-machine:archives/project-X
Note that rsync can be very destructive! Accidental misuse can do a lot of harm to data and programs by inadvertently copying changes to where they are not wanted. Take care to specify the correct options and paths. It is highly recommended that you first test your rsync command using the -dry-run option to ensure that it provides the results that you want.
To use rsync at the command prompt, type rsync sourcefile destinationfile, where either file can be on the local machine or on a networked machine.
The contents of sourcefile are copied to destinationfile.
File data is often compressed to save disk space and reduce the time it takes to transmit files over networks.
Linux uses a number of methods to perform this compression including:
| Command | Usage |
|---|---|
| gzip | The most frequently used Linux compression utility |
| bzip2 | Produces files significantly smaller than those produced by gzip |
| xz | The most space efficient compression utility used in Linux |
| zip | Is often required to examine and decompress archives from other operating systems |
These techniques vary in the efficiency of the compression (how much space is saved) and in how long they take to compress; generally the more efficient techniques take longer. Decompression time doesn't vary as much across different methods.
In addition the tar utility is often used to group files in an archive and then compress the whole archive at once.
gzip is the most oftenly used Linux compression utility. It compresses very well and is very fast. The following table provides some usage examples:
| Command | Usage |
|---|---|
| gzip * | Compresses all files in the current directory; each file is compressed and renamed with a .gz extension. |
| gzip -r projectX | Compresses all files in the projectX directory along with all files in all of the directories under projectX. |
| gunzip foo | De-compresses foo found in the file foo.gz. Under the hood, gunzip command is actually the same as gzip –d. |
bzip2 has syntax that is similar to gzip but it uses a different compression algorithm and produces significantly smaller files, at the price of taking a longer time to do its work. Thus, It is more likely to be used to compress larger files.
Examples of common usage are also similar to gzip:
| Command | Usage |
|---|---|
| bzip2 * | Compress all of the files in the current directory and replaces each file with a file renamed with a .bz2 extension. |
| bunzip2 *.bz2 | Decompress all of the files with an extension of .bz2 in the current directory. Under the hood, bunzip2 is the same as calling bzip2 -d. |
xz is the most space efficient compression utility used in Linux and is now used by www.kernel.org to store archives of the Linux kernel. Once again it trades a slower compression speed for an even higher compression ratio.
Some usage examples:
| Command | Usage |
|---|---|
| $ xz * | Compress all of the files in the current directory and replace each file with one with a .xz extension. |
| xz foo | Compress the file foo into foo.xz using the default compression level (-6), and remove foo if compression succeeds. |
| xz -dk bar.xz | Decompress bar.xz into bar and don't remove bar.xz even if decompression is successful. |
| xz -dcf a.txt b.txt.xz > abcd.txt | Decompress a mix of compressed and uncompressed files to standard output, using a single command. |
| $ xz -d *.xz | Decompress the files compressed using xz. |
Compressed files are stored with a .xz extension.
The zip program is not often used to compress files in Linux, but is often required to examine and decompress archives from other operating systems. It is only used in Linux when you get a zipped file from a Windows user. It is a legacy program.
| Command | Usage |
|---|---|
| zip backup * | Compresses all files in the current directory and places them in the file backup.zip. |
| zip -r backup.zip ~ | Archives your login directory (~) and all files and directories under it in the file backup.zip. |
| unzip backup.zip | Extracts all files in the file backup.zip and places them in the current directory. |
Historically, tar stood for "tape archive" and was used to archive files to a magnetic tape. It allows you to create or extract files from an archive file, often called a tarball. At the same time you can optionally compress while creating the archive, and decompress while extracting its contents.
Here are some examples of the use of tar:
| Command | Usage |
|---|---|
| $ tar xvf mydir.tar | Extract all the files in mydir.tar into the mydir directory |
| $ tar zcvf mydir.tar.gz mydir | Create the archive and compress with gzip |
| $ tar jcvf mydir.tar.bz2 mydir | Create the archive and compress with bz2 |
| $ tar Jcvf mydir.tar.xz mydir | Create the archive and compress with xz |
| $ tar xvf mydir.tar.gz | Extract all the files in mydir.tar.gz into the mydir directory. Note you do not have to tell tar it is in gzip format. |
You can separate out the archiving and compression stages, as in:
$ tar mydir.tar mydir ; gzip mydir.tar
$ gunzip mydir.tar.gz ; tar xvf mydir.tar
but this is slower and wastes space by creating an unneeded intermediary .tar file.
The dd program is very useful for making copies of raw disk space. For example, to back up your Master Boot Record (MBR) (the first 512 byte sector on the disk that contains a table describing the partitions on that disk), you might type:
dd if=/dev/sda of=sda.mbr bs=512 count=1
To use dd to make a copy of one disk onto another, (WARNING!) deleting everything that previously existed on the second disk, type:
dd if=/dev/sda of=/dev/sdb
An exact copy of the first disk device is created on the second disk device.
Do not experiment with this command as written above as it can erase a hard disk!
Exactly what the name dd stands for is an often-argued item. The words data definition is the most popular theory and has roots in early IBM history. Often people joke that it means disk destroyer and other variants such as delete data!
Environment variables are simply named quantities that have specific values and are understood by the command shell, such as bash. Some of these are pre-set (built-in) by the system, and others are set by the user either at the command line or within startup and other scripts. An environment variable is actually no more than a character string that contains information used by one or more applications.
There are a number of ways to view the values of currently set environment variables; one can type set, env, or export. Depending on the state of your system, set may print out many more lines than the other two methods.
$ set
BASH=/bin/bash
BASHOPTS=checkwinsize:cmdhist:expand_aliases:extglob:extquote:force_fignore
BASH_ALIASES=()
...

$ env
SSH_AGENT_PID=1892
GPG_AGENT_INFO=/run/user/me/keyring-Ilf3vt/gpg:0:1
TERM=xterm
SHELL=/bin/bash
...

$ export
declare -x COLORTERM=gnome-terminal
declare -x COMPIZ_BIN_PATH=/usr/bin /
declare -x COMPIZ_CONFIG_PROFILE=ubuntu
...By default, variables created within a script are only available to the current shell; child processes (sub-shells) will not have access to values that have been set or modified. Allowing child processes to see the values, requires use of the export command.
| Task | Command |
|---|---|
| Show the value of a specific variable | echo $SHELL |
| Export a new variable value | export VARIABLE=value (or VARIABLE=value; export VARIABLE) |
| Add a variable permanently | 1. Edit ~/.bashrc and add the line export VARIABLE=value 2. Type source ~/.bashrc or just . ~/.bashrc (dot ~/.bashrc); or just start a new shell by typing bash |
HOME is an environment variable that represents the home (or login) directory of the user. cd without arguments will change the current working directory to the value of HOME. Note the tilde character (~) is often used as an abbreviation for $HOME. Thus cd $HOME and cd ~ are completely equivalent statements.
Command:
$ echo $HOME
/home/me
$ cd /bin
Explanation: Show the value of the HOME environment variable then change directory (cd) to /bin
Command:
$ pwd
/bin
Explanation: Where are we? Use print (or present) working directory (pwd) to find out. As expected /bin
Command: $ cd
Explanation: Change directory without an argument
Command:
$ pwd
/home/me
Explanation: takes us back to HOME
PATH is an ordered list of directories (the path) which is scanned when a command is given to find the appropriate program or script to run. Each directory in the path is separated by colons (:). A null (empty) directory name (or ./) indicates the current directory at any given time.
:path1:path2
path1::path2
In the example :path1:path2, there is null directory before the first colon (:). Similarly, for path1::path2 there is null directory between path1 and path2.
To prefix a private bin directory to your path:
$ export PATH=$HOME/bin:$PATH
$ echo $PATH
/home/me/bin:/usr/local/bin:/usr/bin:/bin/usr
Prompt Statement (PS) is used to customize your prompt string in your terminal windows to display the information you want.
PS1 is the primary prompt variable which controls what your command line prompt looks like. The following special characters can be included in PS1 :
\u - User name
\h - Host name
\w - Current working directory
\! - History number of this command
\d - Date
They must be surrounded in single quotes when they are used as in the following example:
$ echo $PS1
$
$ export PS1='\u@\h:\w$'
me@example.com:~$ # new prompt
me@example.com:~$
To revert the changes:
me@example.com:~$ export PS1='$'
$
Even better practice would be to save the old prompt first and then restore, as in:
$ OLD_PS1=$PS1
change the prompt, and eventually change it back with:
$ PS1=$OLD_PS1
$
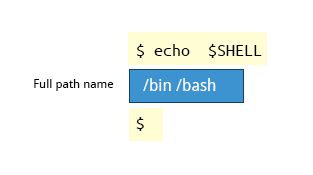
The environment variable SHELL points to the user's default command shell (the program that is handling whatever you type in a command window, usually bash) and contains the full pathname to the shell:
$ echo $SHELL
/bin/bash
$
bash keeps track of previously entered commands and statements in a history buffer; you can recall previously used commands simply by using the Up and Down cursor keys. To view the list of previously executed commands, you can just type history at the command line.
The list of commands is displayed with the most recent command appearing last in the list. This information is stored in ~/.bash_history.
Several associated environment variables can be used to get information about the history file.
HISTFILE stores the location of the history file.
HISTFILESIZE stores the maximum number of lines in the history file.
HISTSIZE stores the maximum number of lines in the history file for the current session.
Specific keys to perform various tasks:
| Key | Usage |
|---|---|
| Up/Down arrow key | Browse through the list of commands previously executed |
| !! (Pronounced as bang-bang) | Execute the previous command |
| CTRL-R | Search previously used commands |
If you want to recall a command in the history list, but do not want to press the arrow key repeatedly, you can press CTRL-R to do a reverse intelligent search.
As you start typing the search goes back in reverse order to the first command that matches the letters you've typed. By typing more successive letters you make the match more and more specific.
The following is an example of how you can use the CTRL-R command to search through the command history:
$ ^R                                                              # This all happens on 1 line
(reverse-i-search)'s': sleep 1000    # Searched for 's'; matched "sleep"
$ sleep 1000                                              # Pressed Enter to execute the searched command
$The table describes the syntax used to execute previously used commands.
| Syntax | Task |
|---|---|
| ! | Start a history substitution |
| !$ | Refer to the last argument in a line |
| !n | Refer to the nth command line |
| ! | string Refer to the most recent command starting with string |
All history substitutions start with !. In the line $ ls -l /bin /etc /var !$ refers to /var, which is the last argument in the line.
Here are more examples:
$ history

echo $SHELL
echo $HOME
echo $PS1
ls -a
ls -l /etc/ passwd
sleep 1000
history
$ !1                             # Execute command #1 above
echo $SHELL
/bin/bash
$ !sl                           # Execute the command beginning with "sl"
sleep 1000
$
You can use keyboard shortcuts to perform different tasks quickly. The table lists some of these keyboard shortcuts and their uses.
| Keyboard Shortcut | Task |
|---|---|
| CTRL-L | Clears the screen |
| CTRL-D | Exits the current shell |
| CTRL-Z | Puts the current process into suspended background |
| CTRL-C | Kills the current process |
| CTRL-H | Works the same as backspace |
| CTRL-A | Goes to the beginning of the line |
| CTRL-W | Deletes the word before the cursor |
| CTRL-U | Deletes from beginning of line to cursor position |
| CTRL-E | Goes to the end of the line |
Tab Auto-completes files, directories, and binaries
You can create customized commands or modify the behavior of already existing ones by creating aliases. Most often these aliases are placed in your ~/.bashrc file so they are available to any command shells you create.
Typing alias with no arguments will list currently defined aliases.
Please note there should not be any spaces on either side of the equal sign and the alias definition needs to be placed within either single or double quotes if it contains any spaces.
In Linux and other UNIX-based operating systems, every file is associated with a user who is the owner. Every file is also associated with a group (a subset of all users) which has an interest in the file and certain rights, or permissions: read, write, and execute.
The following utility programs involve user and group ownership and permission setting.
| Command | Usage |
|---|---|
| chown | Used to change user ownership of a file or directory |
| chgrp | Used to change group ownership |
| chmod | Used to change the permissions on the file which can be done separately for owner, group and the rest of the world (often named as other.) |
Files have three kinds of permissions: read (r), write (w), execute (x). These are generally represented as in rwx. These permissions affect three groups of owners: user/owner (u), group (g), and others (o).
As a result, you have the following three groups of three permissions:
rwx: rwx: rwx
 u:   g:   o
There are a number of different ways to use chmod. For instance, to give the owner and others execute permission and remove the group write permission:
$ ls -l a_file
-rw-rw-r-- 1 coop coop 1601 Mar 9 15:04 a_file
$ chmod uo+x,g-w a_file
$ ls -l a_file
-rwxr--r-x 1 coop coop 1601 Mar 9 15:04 a_file
where u stands for user (owner), o stands for other (world), and g stands for group.
This kind of syntax can be difficult to type and remember, so one often uses a shorthand which lets you set all the permissions in one step. This is done with a simple algorithm, and a single digit suffices to specify all three permission bits for each entity. This digit is the sum of:
- 4 if read permission is desired.
- 2 if write permission is desired.
- 1 if execute permission is desired.
Thus 7 means read/write/execute, 6 means read/write, and 5 means read/execute.
When you apply this to the chmod command you have to give three digits for each degree of freedom, such as in
$ chmod 755 a_file
$ ls -l a_file
-rwxr-xr-x 1 coop coop 1601 Mar 9 15:04 a_file
The first image shows the permissions for owners/groups/all users on 'file1'. The second image shows the change in permissions for the different users on "file1"
$ ls -l
total 4
-rw-rw-r--. 1 bob bob 0 Mar 16 19:04 file-1
-rw-rw-r--. 1 bob bob 0 Mar 16 19:04 file-2
drwxrwxr-x. 2 bob bob 4096 Mar 16 19:04 temp

$ sudo chown root file-1
[sudo] password for bob:

$ ls -l
total 4
-rw-rw-r--. 1 root bob 0 Mar 16 19:04 file-1
-rw-rw-r--. 1 bob bob 0 Mar 16 19:04 file-2
drwxrwxr-x. 2 bob bob 4096 Mar 16 19:04 temp
Now let’s see an example of changing group ownership using chgrp:
The image on LHS shows the group with their permissions on 'file1'.
The image on RHS shows the change in groups and thier permissions on "file1"
$ sudo chgrp bin file-2
$ ls -l
total 4
-rw-rw-r--. 1 root bob 0 Mar 16 19:04 file-1
-rw-rw-r--. 1 bob bin 0 Mar 16 19:04 file-2
drwxrwxr-x. 2 bob bob 4096 Mar 16 19:04 temp
The Linux kernel allows properly authenticated users to access files and applications. While each user is identified by a unique integer (the user id or UID), a separate database associates a username with each UID. Upon account creation, new user information is added to the user database and the user's home directory must be created and populated with some essential files. Command line programs such as useradd and userdel as well as GUI tools are used for creating and removing accounts.
For each user, the following seven fields are maintained in the /etc/passwd file:
| Field Name | Details | Remarks |
|---|---|---|
| Username | User login name | Should be between 1 and 32 characters long |
| Password | User password (or the character x if the password is stored in the /etc/shadow file) in encrypted format | Is never shown in Linux when it is being typed; this stops prying eyes |
| Group ID (GID) The primary Group ID (GID); Group Identification Number stored in the /etc/group file | Will be covered in detail in the chapter on Processes | |
| User Info | This field is optional and allows insertion of extra information about the user such as their name | For example: Rufus T. Firefly |
| Home Directory | The absolute path location of user's home directory | For example: /home/rtfirefly |
| Shell | The absolute location of a user's default shell | For example: /bin/bash |
User ID (UID) -- Every user must have a user id (UID):
- UID 0 is reserved for root user
- UID's ranging from 1-99 are reserved for other predefined accounts
- UID's ranging from 100-999 are reserved for system accounts and groups (except for RHEL, which reserves only up to 499) Normal users have UID's of 1000 or greater, except on RHEL where they start at 500|
By default, Linux distinguishes between several account types in order to isolate processes and workloads. Linux has four types of accounts:
- root
- System
- Normal
- Network
For a safe working environment, it is advised to grant the minimum privileges possible and necessary to accounts, and remove inactive accounts. The last utility, which shows the last time each user logged into the system, can be used to help identify potentially inactive accounts which are candidates for system removal.
Keep in mind that practices you use on multi-user business systems are more strict than practices you can use on personal desktop systems that only affect the casual user. This is especially true with security. We hope to show you practices applicable to enterprise servers that you can use on all systems, but understand that you may choose to relax these rules on your own personal system.
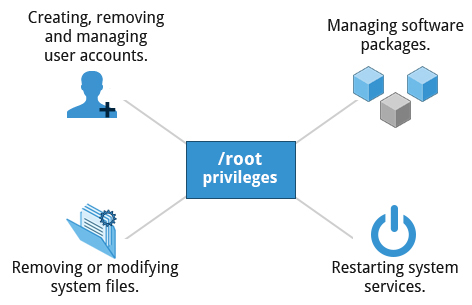
root is the most privileged account on a Linux/UNIX system. This account has the ability to carry out all facets of system administration, including adding accounts, changing user passwords, examining log files, installing software, etc. Utmost care must be taken when using this account. It has no security restrictions imposed upon it.
When you are signed in as, or acting as root, the shell prompt displays '#' (if you are using bash and you haven’t customized the prompt as we discuss elsewhere in this course). This convention is intended to serve as a warning to you of the absolute power of this account.
root privileges are required to perform operations such as:
- Creating, removing and managing user accounts.
- Managing software packages.
- Removing or modifying system files.
- Restarting system services.
Regular account users of Linux distributions may be allowed to install software packages, update some settings, and apply various kinds of changes to the system. However, root privilege is required for performing administration tasks such as restarting services, manually installing packages and managing parts of the filesystem that are outside the normal user’s directories.
To create a new user account:
- At the command prompt, as root type useradd and press the ENTER key.
- To set the initial password, type passwd and press the ENTER key. The New password: prompt is displayed.
- Enter the password and press the ENTER key. To confirm the password, the prompt Retype new password: is displayed. 4 Enter the password again and press the ENTER key. The message passwd: all authentication tokens updated successfully. is displayed.
A regular account user can perform some operations requiring special permissions; however, the system configuration must allow such abilities to be exercised.
SUID (Set owner User ID upon execution—similar to the Windows "run as" feature) is a special kind of file permission given to a file. SUID provides temporary permissions to a user to run a program with the permissions of the file owner (which may be root) instead of the permissions held by the user.
The table provides examples of operations which do not require root privileges:
| Operations that do not require Root privilege | Examples of this operation |
|---|---|
| Running a network client | Sharing a file over the network |
| Using devices such as printers | Printing over the network |
| Operations on files that the user has proper permissions to access | Accessing files that you have access to or sharing data over the network |
| Running SUID-root applications | Executing programs such as passwd. |
In Linux you can use either su or sudo to temporarily grant root access to a normal user; these methods are actually quite different. Listed below are the differences between the two commands.
| su | sudo |
|---|---|
| 1. When elevating privilege, you need to enter the root password. Giving the root password to a normal user should never, ever be done. | When elevating privilege, you need to enter the user’s password and not the root password. |
| 2. Once a user elevates to the root account using su, the user can do anything that the root user can do for as long as the user wants, without being asked again for a password. | Offers more features and is considered more secure and more configurable. Exactly what the user is allowed to do can be precisely controlled and limited. By default the user will either always have to keep giving their password to do further operations with sudo, or can avoid doing so for a configurable time interval. |
| 3. The command has limited logging features. | The command has detailed logging features. |
sudo has the ability to keep track of unsuccessful attempts at gaining root access. Users'authorization for using sudo is based on configuration information stored in the /etc/sudoers file and in the /etc/sudoers.d directory.
A message such as the following would appear in a system log file (usually /var/log/secure) when trying to execute sudo bash without successfully authenticating the user:
authentication failure; logname=op uid=0 euid=0 tty=/dev/pts/6 ruser=op rhost= user=op
conversation failed
auth could not identify password for [op]
op : 1 incorrect password attempt ;
TTY=pts/6 ; PWD=/var/log ; USER=root ; COMMAND=/bin/bash
Whenever sudo is invoked, a trigger will look at /etc/sudoers and the files in /etc/sudoers.d to determine if the user has the right to use sudo and what the scope of their privilege is. Unknown user requests and requests to do operations not allowed to the user even with sudo are reported. You can edit the sudoers file by using visudo, which ensures that only one person is editing the file at a time, has the proper permissions, and refuses to write out the file and exit if there is an error in the changes made.
The basic structure of an entry is:
who where = (as_whom) what
The file has a lot of documentation in it about how to customize. Most Linux distributions now prefer you add a file in the directory /etc/sudoers.d with a name the same as the user. This file contains the individual user's sudo configuration, and one should leave the master configuration file untouched except for changes that affect all users.
By default, sudo commands and any failures are logged in /var/log/auth.log under the Debian distribution family, and in /var/log/messages or /var/log/secure on other systems. This is an important safeguard to allow for tracking and accountability of sudo use. A typical entry of the message contains:
- Calling username
- Terminal info
- Working directory
- User account invoked
- Command with arguments
Running a command such as sudo whoami results in a log file entry such as:
Dec 8 14:20:47 server1 sudo: op : TTY=pts/6 PWD=/var/log USER=root COMMAND=/usr/bin/whoami
Linux is considered to be more secure than many other operating systems because processes are naturally isolated from each other. One process normally cannot access the resources of another process, even when that process is running with the same user privileges. Linux thus makes it difficult (though certainly not impossible) for viruses and security exploits to access and attack random resources on a system.
Additional security mechanisms that have been recently introduced in order to make risks even smaller are:
- Control Groups (cgroups): Allows system administrators to group processes and associate finite resources to each cgroup.
- Linux Containers (LXC): Makes it possible to run multiple isolated Linux systems (containers) on a single system by relying on cgroups.
- Virtualization: Hardware is emulated in such a way that not only processes can be isolated, but entire systems are run simultaneously as isolated and insulated guests (virtual machines) on one physical host.
Linux limits user access to non-networking hardware devices in a manner that is extremely similar to regular file access. Applications interact by engaging the filesystem layer (which is independent of the actual device or hardware the file resides on). This layer will then opens a device special file (often called a device node) under the /dev directory that corresponds to the device being accessed. Each device special file has standard owner, group and world permission fields. Security is naturally enforced just as it is when standard files are accessed.
Hard disks, for example, are represented as /dev/sd*. While a root user can read and write to the disk in a raw fashion (for example, by doing something like:
$ echo hello world > /dev/sda1
the standard permissions as shown in the figure make it impossible for regular users to do so. Writing to a device in this fashion can easily obliterate the filesystem stored on it in a way that cannot be repaired without great effort, if at all. The normal reading and writing of files on the hard disk by applications is done at a higher level through the filesystem, and never through direct access to the device node.
When security problems in either the Linux kernel or applications and libraries are discovered, Linux distributions have a good record of reacting quickly and pushing out fixes to all systems by updating their software repositories and sending notifications to update immediately. The same thing is true with bug fixes and performance improvements that are not security related.
However, it is well known that many systems do not get updated frequently enough and problems which have already been cured are allowed to remain on computers for a long time; this is particularly true with proprietary operating systems where users are either uninformed or distrustful of the vendor's patching policy as sometimes updates can cause new problems and break existing operations. Many of the most successful attack vectors come from exploiting security holes for which fixes are already known but not universally deployed.
So the best practice is to take advantage of your Linux distribution's mechanism for automatic updates and never postpone them. It is extremely rare that such an update will cause new problems.
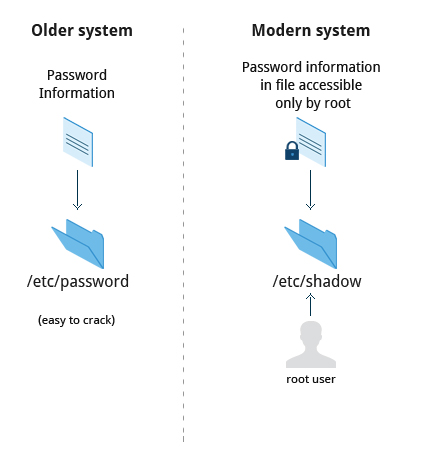
The system verifies authenticity and identity using user credentials. Originally, encrypted passwords were stored in the /etc/passwd file, which was readable by everyone. This made it rather easy for passwords to be cracked. On modern systems, passwords are actually stored in an encrypted format in a secondary file named /etc/shadow. Only those with root access can modify/read this file.
Protecting passwords has become a crucial element of security. Most Linux distributions rely on a modern password encryption algorithm called SHA-512 (Secure Hashing Algorithm 512 bits), developed by the U.S. National Security Agency (NSA) to encrypt passwords.
The SHA-512 algorithm is widely used for security applications and protocols. These security applications and protocols include TLS, SSL, PHP, SSH, S/MIME and IPSec. SHA-512 is one of the most tested hashing algorithms.
For example, if you wish to experiment with SHA-512 encoding, the word “test” can be encoded using the program sha512sum to produce the SHA-512 form (see graphic):
IT professionals follow several good practices for securing the data and the password of every user.
Password aging is a method to ensure that users get prompts that remind them to create a new password after a specific period. This can ensure that passwords, if cracked, will only be usable for a limited amount of time. This feature is implemented using chage, which configures the password expiry information for a user. Another method is to force users to set strong passwords using Pluggable Authentication Modules (PAM). PAM can be configured to automatically verify that a password created or modified using the passwd utility is sufficiently strong. PAM configuration is implemented using a library called pam_cracklib.so, which can also be replaced by pam_passwdqc.so for more options. One can also install password cracking programs, such as Jack The Ripper, to secure the password file and detect weak password entries. It is recommended that written authorization be obtained before installing such tools on any system that you do not own.
You can secure the boot process with a secure password to prevent someone from bypassing the user authentication step. For systems using the GRUB boot loader, for the older GRUB version 1, you can invoke grub-md5-crypt which will prompt you for a password and then encrypt as shown on the adjoining screen.
You then must edit /boot/grub/grub.conf by adding the following line below the timeout entry:
password --md5 $1$Wnvo.1$qz781HRVG4jUnJXmdSCZ30
You can also force passwords for only certain boot choices rather than all.
For the now more common GRUB version 2 things are more complicated, and you have more flexibility and can do things like use user-specific passwords, which can be their normal login password. Also you never edit the configuration file, /boot/grub/grub.cfg, directly, rather you edit system configuration files in /etc/grub.d and then run update-grub. One explanation of this can be found at https://help.ubuntu.com/community/Grub2/Passwords.
When hardware is physically accessible, security can be compromised by:
Key logging: Recording the real time activity of a computer user including the keys they press. The captured data can either be stored locally or transmitted to remote machines Network sniffing: Capturing and viewing the network packet level data on your network Booting with a live or rescue disk Remounting and modifying disk content Your IT security policy should start with requirements on how to properly secure physical access to servers and workstations. Physical access to a system makes it possible for attackers to easily leverage several attack vectors, in a way that makes all operating system level recommendations irrelevant.
The guidelines of security are:
Lock down workstations and servers Protect your network links such that it cannot be accessed by people you do not trust Protect your keyboards where passwords are entered to ensure the keyboards cannot be tampered with Ensure a password protects the BIOS in such a way that the system cannot be booted with a live or rescue DVD or USB key For single user computers and those in a home environment some of the above features (like preventing booting from removable media) can be excessive, and you can avoid implementing them. However, if sensitive information is on your system that requires careful protection, either it shouldn't be there or it should be better protected by following the above guidelines.
A network is a group of computers and computing devices connected together through communication channels, such as cables or wireless media. The computers connected over a network may be located in the same geographical area or spread across the world.
A network is used to:
- Allow the connected devices to communicate with each other.
- Enable multiple users to share devices over the network, such as printers and scanners.
- Share and manage information across computers easily.
Most organizations have both an internal network and an Internet connection for users to communicate with machines and people outside the organization. The Internet is the largest network in the world and is often called "the network of networks".
Devices attached to a network must have at least one unique network address identifier known as the IP (Internet Protocol) address. The address is essential for routing packets of information through the network.
Exchanging information across the network requires using streams of bite-sized packets, each of which contains a piece of the information going from one machine to another. These packets contain data buffers together with headers which contain information about where the packet is going to and coming from, and where it fits in the sequence of packets that constitute the stream. Networking protocols and software are rather complicated due to the diversity of machines and operating systems they must deal with, as well as the fact that even very old standards must be supported.
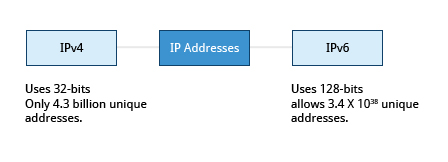
There are two different types of IP addresses available: IPv4 (version 4) and IPv6 (version 6). IPv4 is older and by far the more widely used, while IPv6 is newer and is designed to get past the limitations of the older standard and furnish many more possible addresses.
IPv4 uses 32-bits for addresses; there are only 4.3 billion unique addresses available. Furthermore, many addresses are allotted and reserved but not actually used. IPv4 is becoming inadequate because the number of devices available on the global network has significantly increased over the past years.
IPv6 uses 128-bits for addresses; this allows for 3.4 X 1038 unique addresses. If you have a larger network of computers and want to add more, you may want to move to IPv6, because it provides more unique addresses. However, it is difficult to move to IPv6 as the two protocols do not inter-operate. Due to this, migrating equipment and addresses to IPv6 requires significant effort and hasn't been as fast as was originally intended.
A 32-bit IPv4 address is divided into four 8-bit sections called octets.
Example: IP address → 172 . 16 . 31 . 46 Bit format → 10101100.00010000.00011111.00101110
Network address are divided into five classes: A, B, C, D, and E. Classes A, B, and C are classified into two parts: Network addresses (Net ID) and Host address (Host ID). The Net ID is used to identify the network, while the Host ID is used to identify a host in the network. Class D is used for special multicast applications (information is broadcast to multiple computers simultaneously) and Class E is reserved for future use. In this section you will learn about classes A, B, and C.
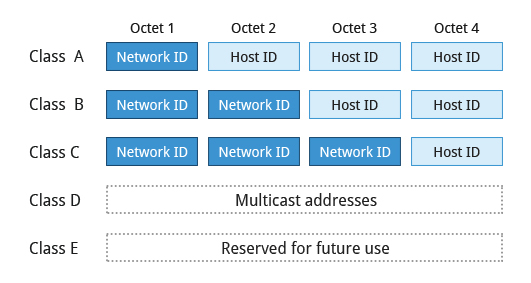
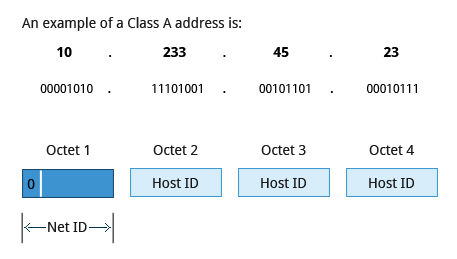
Class A addresses use the first octet of an IP address as their Net ID and use the other three octets as the Host ID. The first bit of the first octet is always set to zero. So you can use only 7-bits for unique network numbers. As a result, there are a maximum of 127 Class A networks available. Not surprisingly, this was only feasible when there were very few unique networks with large numbers of hosts. As the use of the Internet expanded, Classes B and C were added in order to accomodate the growing demand for independent networks.
Each Class A network can have up to 16.7 million unique hosts on its network. The range of host address is from 1.0.0.0 to 127.255.255.255.
Note: The value of an octet, or 8-bits, can range from 0 to 255.
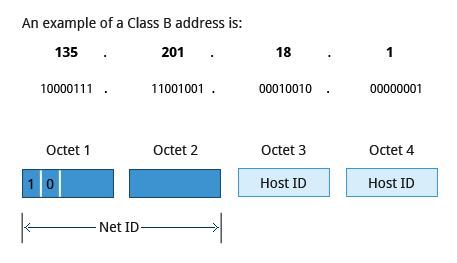
Class B addresses use the first two octets of the IP address as their Net ID and the last two octets as the Host ID. The first two bits of the first octet are always set to binary 10, so there are a maximum of 16,384 (14-bits) Class B networks. The first octet of a Class B address has values from 128 to 191. The introduction of Class B networks expanded the number of networks but it soon became clear that a further level would be needed.
Each Class B network can support a maximum of 65,536 unique hosts on its network. The range of host address is from 128.0.0.0 to 191.255.255.255.
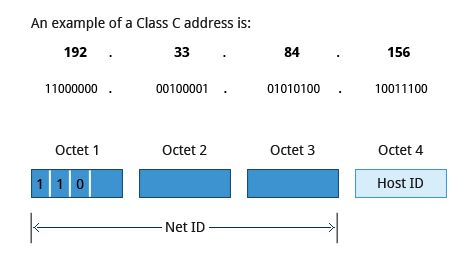
Class C addresses use the first three octets of the IP address as their Net ID and the last octet as their Host ID. The first three bits of the first octet are set to binary 110, so almost 2.1 million (21-bits) Class C networks are available. The first octet of a Class C address has values from 192 to 223. These are most common for smaller networks which don't have many unique hosts.
Each Class C network can support up to 256 (8-bits) unique hosts. The range of host address is from 192.0.0.0 to 223.255.255.255.
Typically, a range of IP addresses are requested from your Internet Service Provider (ISP) by your organization's network administrator. Often your choice of which class of IP address you are given depends on the size of your network and expected growth needs.
You can assign IP addresses to computers over a network manually or dynamically. When you assign IP addresses manually, you add static (never changing) addresses to the network. When you assign IP addresses dynamically (they can change every time you reboot or even more often), the Dynamic Host Configuration Protocol (DHCP) is used to assign IP addresses.
Before an IP address can be allocated manually, one must identify the size of the network by determining the host range; this determines which network class (A, B, or C) can be used. The ipcalc program can be used to ascertain the host range.
Note: The version of ipcalc supplied in the Fedora family of distributions does not behave as described below, it is really a different program.
Assume that you have a Class C network. The first three octets of the IP address are 192.168.0. As it uses 3 octets (i.e. 24 bits) for the network mask, the shorthand for this type of address is 192.168.0.0/24. To determine the host range of the address you can use for this new host, at the command prompt, type: ipcalc 192.168.0.0/24 and press Enter.
From the result, you can check the HostMin and HostMax values to manually assign a static address available from 1 to 254 (192.168.0.1 to 192.168.0.254).
Name Resolution is used to convert numerical IP address values into a human-readable format known as the hostname. For example, 140.211.169.4 is the numerical IP address that refers to the linuxfoundation.org hostname. Hostnames are easier to remember.
Given an IP address, you can obtain its corresponding hostname. Accessing the machine over the network becomes easier when you can type the hostname instead of the IP address.
You can view your system’s hostname simply by typing hostname with no argument.
Note: If you give an argument, the system will try to change its hostname to match it, however, only root users can do that.
The special hostname localhost is associated with the IP address 127.0.0.1, and describes the machine you are currently on (which normally has additional network-related IP addresses).
Network interfaces are a connection channel between a device and a network. Physically, network interfaces can proceed through a network interface card (NIC) or can be more abstractly implemented as software. You can have multiple network interfaces operating at once. Specific interfaces can be brought up (activated) or brought down (de-activated) at any time.
A list of currently active network interfaces is reported by the ifconfig utility which you may have to run as the superuser, or at least, give the full path, i.e., /sbin/ifconfig, on some distributions.
Network configuration files are essential to ensure that interfaces function correctly.
For Debian family configuration, the basic network configuration file is /etc/network/interfaces. You can type /etc/init.d/networking start to start the networking configuration.
For Fedora family system configuration, the routing and host information is contained in /etc/sysconfig/network. The network interface configuration script is located at /etc/sysconfig/network-scripts/ifcfg-eth0.
For SUSE family system configuration, the routing and host information and network interface configuration scripts are contained in the /etc/sysconfig/network directory.
You can type /etc/init.d/network start to start the networking configuration for Fedora and SUSE families.
To view the IP address:
$ /sbin/ip addr show
To view the routing information:
$ /sbin/ip route show
ip is a very powerful program that can do many things. Older (and more specific) utilities such as ifconfig and route are often used to accomplish similar tasks. A look at the relevant man pages can tell you much more about these utilities.
ping is used to check whether or not a machine attached to the network can receive and send data; i.e., it confirms that the remote host is online and is responding.
To check the status of the remote host, at the command prompt, type ping <hostname>.
ping is frequently used for network testing and management; however, its usage can increase network load unacceptably. Hence, you can abort the execution of ping by typing CTRL-C, or by using the -c option, which limits the number of packets that ping will send before it quits. When execution stops, a summary is displayed.
A network requires the connection of many nodes. Data moves from source to destination by passing through a series of routers and potentially across multiple networks. Servers maintain routing tables containing the addresses of each node in the network. The IP Routing protocols enable routers to build up a forwarding table that correlates final destinations with the next hop addresses.
route is used to view or change the IP routing table. You may want to change the IP routing table to add, delete or modify specific (static) routes to specific hosts or networks. The table explains some commands that can be used to manage IP routing.
| Task | Command |
|---|---|
| Show current | routing table $ route –n |
| Add static route | $ route add -net address |
| Delete static route | $ route del -net address |
traceroute is used to inspect the route which the data packet takes to reach the destination host which makes it quite useful for troubleshooting network delays and errors. By using traceroute you can isolate connectivity issues between hops, which helps resolve them faster.
To print the route taken by the packet to reach the network host, at the command prompt, type traceroute <domain>
Now, let’s learn about some additional networking tools. Networking tools are very useful for monitoring and debugging network problems, such as network connectivity and network traffic.
| Networking Tools | Description |
|---|---|
| ethtool | Queries network interfaces and can also set various parameters such as the speed. |
| netstat | Displays all active connections and routing tables. Useful for monitoring performance and troubleshooting. |
| nmap | Scans open ports on a network. Important for security analysis |
| tcpdump | Dumps network traffic for analysis. |
| iptraf | Monitors network traffic in text mode. |
Firefox, Chrome, wget and curl.
When you are connected to a network, you may need to transfer files from one machine to another. File Transfer Protocol (FTP) is a well-known and popular method for transferring files between computers using the Internet. This method is built on a client-server model. FTP can be used within a browser or with standalone client programs.
sftp is a very secure mode of connection, which uses the Secure Shell (ssh) protocol, which we will discuss shortly. sftp encrypts its data and thus sensitive information is transmitted more securely. However, it does not work with so-called anonymous FTP (guest user credentials). Both ncftp and yafc are also powerful FTP clients which work on a wide variety of operating systems including Windows and Linux.
Secure Shell (SSH) is a cryptographic network protocol used for secure data communication. It is also used for remote services and other secure services between two devices on the network and is very useful for administering systems which are not easily available to physically work on but to which you have remote access.
To run my_command on a remote system via SSH, at the command prompt, type, ssh my_command and press Enter. ssh then prompts you for the remote password. You can also configure ssh to securely allow your remote access without typing a password each time.
We can also move files securely using Secure Copy (scp) between two networked hosts. scp uses the SSH protocol for transferring data.
To copy a local file to a remote system, at the command prompt, type scp user@remotesystem:/home/user/ and press Enter.
You will receive a prompt for the remote password. You can also configure scp so that it does not prompt for a password for each transfer.
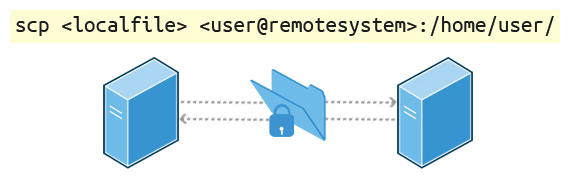
cat, echo, sed, awk,
In managing your files you may need to perform many tasks, such as sorting data and copying data from one location to another. Linux provides several file manipulation utilities that you can use while working with text files. In this section, you will learn about the following file manipulation programs:
sort
uniq
paste
join
split
Regular expressions are text strings used for matching a specific pattern, or to search for a specific location, such as the start or end of a line or a word. Regular expressions can contain both normal characters or so-called metacharacters, such as * and $.
Many text editors and utilities such as vi, sed, awk, find and grep work extensively with regular expressions. Some of the popular computer languages that use regular expressions include Perl, Python and Ruby. It can get rather complicated and there are whole books written about regular expressions; we'll only skim the surface here.
These regular expressions are different from the wildcards (or "metacharacters") used in filename matching in command shells such as bash (which were covered in the earlier Chapter on Command Line Operations). The table lists search patterns and their usage.
| Search Patterns | Usage |
|---|---|
.(dot) |
Match any single character |
| `.a | z` |
.$ |
Match end of string |
.* |
Match preceding item 0 or more times |
For example, Consider the following sentence:
the quick brown fox jumped over the lazy dog
Some of the patterns that can be applied to this sentence are as follows:
| Command | Usage |
|---|---|
| a.. | matches azy |
| b. | j. |
| ..$ | matches og |
| l.* | matches lazy dog |
| l.*y | matches lazy |
| the.* | matches the whole sentence |
grep is extensively used as a primary text searching tool. It scans files for specified patterns and can be used with regular expressions as well as simple strings as shown in the table.
| Command | Usage |
|---|---|
| grep [pattern] | Search for a pattern in a file and print all matching lines |
| grep -v [pattern] | Print all lines that do not match the pattern |
| grep [0-9] | Print the lines that contain the numbers 0 through 9 |
| grep -C 3 [pattern] | Print context of lines (specified number of lines above and below the pattern) for matching the pattern. Here the number of lines is specified as 3. |
tr, tee, wc, cut, paste
[Refer here to see] (https://courses.edx.org/courses/LinuxFoundationX/LFS101x/2T2014/courseware/6117e9680b8444cf99cfbde8767c47cd/d9d8e4a8c8f543afaf335d58db8af1e6/)
Functions in bash
function_name () {
    command...
}
For example, the following function is named display:
display () {
    echo "This is a sample function"
}
Compiled Applications: rm, ls, df, vi, gzip
Builtin bash commands: cd, pwd, echo, read, logout, printf, let, unlimit
Command Substitution
At times, you may need to substitute the result of a command as a portion of another command. It can be done in two ways:
By enclosing the inner command with backticks (\`)
By enclosing the inner command in $()
No matter the method, the innermost command will be executed in a newly launched shell environment, and the standard output of the shell will be inserted where the command substitution was done.
Virtually any command can be executed this way. Both of these methods enable command substitution; however, the $() method allows command nesting. New scripts should always use this more modern method. For example:
$ cd /lib/modules/$(uname -r)/
In the above example, the output of the command "uname –r" becomes the argument for the cd command.
Almost all scripts use variables containing a value, which can be used anywhere in the script. These variables can either be user or system defined. Many applications use such environment variables (covered in the "User Environment" chapter) for supplying inputs, validation, and controlling behaviour.
Some examples of standard environment variables are HOME, PATH, and HOST. When referenced, environment variables must be prefixed with the $ symbol as in $HOME. You can view and set the value of environment variables. For example, the following command displays the value stored in the PATH variable:
$ echo $PATH
However, no prefix is required when setting or modifying the variable value. For example, the following command sets the value of the MYCOLOR variable to blue:
$ MYCOLOR=blue
You can get a list of environment variables with the env, set, or printenv commands.
By default, the variables created within a script are available only to the subsequent steps of that script. Any child processes (sub-shells) do not have automatic access to the values of these variables. To make them available to child processes, they must be promoted to environment variables using the export statement as in:
export VAR=value
or
VAR=value ; export VAR
While child processes are allowed to modify the value of exported variables, the parent will not see any changes; exported variables are not shared, but only copied.
Users often need to pass parameter values to a script, such as a filename, date, etc. Scripts will take different paths or arrive at different values according to the parameters (command arguments) that are passed to them. These values can be text or numbers as in:
$ ./script.sh /tmp $ ./script.sh 100 200
Within a script, the parameter or an argument is represented with a $ and a number. The table lists some of these parameters.
| Parameter | Meaning |
|---|---|
| $0 | Script name |
| $1 | First parameter |
| $2, $3, etc. | Second, third parameter, etc. |
| $* | All parameters |
| $# | Number of arguments |
Using your favorite text editor, create a new script file named script3.sh with the following contents:
#!/bin/bash
echo The name of this program is: $0
echo The first argument passed from the command line is: $1
echo The second argument passed from the command line is: $2
echo The third argument passed from the command line is: $3
echo All of the arguments passed from the command line are : $*
echo
echo All done with $0
Make the script executable with chmod +x. Run the script giving it three arguments as in: script3.sh one two three, and the script is processed as follows:
$0 prints the script name: script3.sh
$1 prints the first parameter: one
$2 prints the second parameter: two
$3 prints the third parameter: three
$* prints all parameters: one two three
The final statement becomes: All done with script3.sh
Most operating systems accept input from the keyboard and display the output on the terminal. However, in shell scripting you can send the output to a file. The process of diverting the output to a file is called output redirection.
The > character is used to write output to a file. For example, the following command sends the output of free to the file /tmp/free.out:
$ free > /tmp/free.out
To check the contents of the /tmp/free.out file, at the command prompt type cat /tmp/free.out.
Two > characters (>>) will append output to a file if it exists, and act just like > if the file does not already exist.
Input redirection example
Just as the output can be redirected to a file, the input of a command can be read from a file. The process of reading input from a file is called input redirection and uses the < character. If you create a file called script8.sh with the following contents:
#!/bin/bash
echo “Line count”
wc -l < /temp/free.out
and then execute it with chmod +x script8.sh ; ./script8.sh, it will count the number of lines from the /temp/free.out file and display the results.
Let’s go deeper and find out how to work with strings in scripts.
A string variable contains a sequence of text characters. It can include letters, numbers, symbols and punctuation marks. Some examples: abcde, 123, abcde 123, abcde-123, &acbde=%123
String operators include those that do comparison, sorting, and finding the length. The following table demonstrates the use of some basic string operators.
| Operator | Meaning |
|---|---|
[string1> string2 ] |
Compares the sorting order of string1 and string2. |
[string1 == string2] |
Compares the characters in string1 with the characters in string2. |
myLen1=${#mystring1} |
Saves the length of string1 in the variable myLen1. |
At times, you may not need to compare or use an entire string. To extract the first character of a string we can specify:
${string:0:1} Here 0 is the offset in the string (i.e., which character to begin from) where the extraction needs to start and 1 is the number of characters to be extracted.
To extract all characters in a string after a dot (.), use the following expression: ${string#*.}
Boolean expressions evaluate to either TRUE or FALSE, and results are obtained using the various Boolean operators listed in the table.
| Operator | Operation | Meaning |
|---|---|---|
&& |
AND | The action will be performed only if both the conditions evaluate to true. |
| ` | ` | |
! |
NOT |
Note that if you have multiple conditions strung together with the && operator processing stops as soon as a condition evaluates to false. For example if you have A && B && C and A is true but B is false, C will never be executed.
Likewise if you are using the || operator, processing stops as soon as anything is true. For example if you have A || B || C and A is false and B is true, you will also never execute C.
Boolean expressions return either TRUE or FALSE. We can use such expressions when working with multiple data types including strings or numbers as well as with files. For example, to check if a file exists, use the following conditional test:
[-e <filename>]
Similarly, to check if the value of number1 is greater than the value of number2, use the following conditional test:
[$number1 -gt $number2]
The operator -gt returns TRUE if number1 is greater than number2.
The case statement is used in scenarios where the actual value of a variable can lead to different execution paths. case statements are often used to handle command-line options.
Below are some of the advantages of using the case statement:
It is easier to read and write.
It is a good alternative to nested, multi-level if-then-else-fi code blocks.
It enables you to compare a variable against several values at once.
It reduces the complexity of a program.
Structure of the case Statement
Here is the basic structure of the case statement:
case expression in
   pattern1) execute commands;;
   pattern2) execute commands;;
   pattern3) execute commands;;
   pattern4) execute commands;;
   * )       execute some default commands or nothing ;;
esac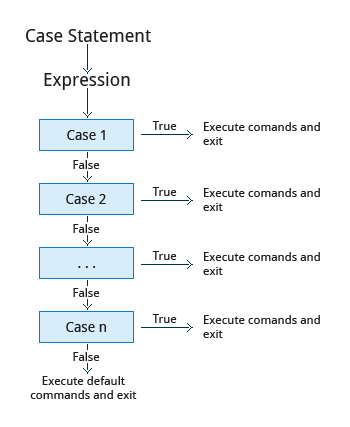
By using looping constructs, you can execute one or more lines of code repetitively. Usually you do this until a conditional test returns either true or false as is required.
Three type of loops are often used in most programming languages:
- for
- while
- until
All these loops are easily used for repeating a set of statements until the exit condition is true.
The 'for' Loop
The for loop operates on each element of a list of items. The syntax for the for loop is:
for variable-name in list
do
    execute one iteration for each item in the
            list until the list is finished
done
In this case, variable-name and list are substituted by you as appropriate (see examples). As with other looping constructs, the statements that are repeated should be enclosed by do and done.
The while loop repeats a set of statements as long as the control command returns true. The syntax is:
while condition is true
do
    Commands for execution
    ----
done
The set of commands that need to be repeated should be enclosed between do and done. You can use any command or operator as the condition. Often it is enclosed within square brackets ([]).
The until loop repeats a set of statements as long as the control command is false. Thus it is essentially the opposite of the while loop. The syntax is:
until condition is false
do
    Commands for execution
    ----
done
Similar to the while loop, the set of commands that need to be repeated should be enclosed between do and done. You can use any command or operator as the condition.
While working with scripts and commands, you may run into errors. These may be due to an error in the script, such as incorrect syntax, or other ingredients such as a missing file or insufficient permission to do an operation. These errors may be reported with a specific error code, but often just yield incorrect or confusing output. So how do you go about identifying and fixing an error?
Debugging helps you troubleshoot and resolve such errors, and is one of the most important tasks a system administrator performs.
More About Script Debugging
Before fixing an error (or bug), it is vital to know its source.
In bash shell scripting, you can run a script in debug mode by doing bash –x ./script_file. Debug mode helps identify the error because:
It traces and prefixes each command with the + character. It displays each command before executing it. It can debug only selected parts of a script (if desired) with:
set -x    # turns on debugging
...
set +x    # turns off debugging
In UNIX/Linux, all programs that run are given three open file streams when they are started as listed in the table:
| File stream | Description | File Descriptor |
|---|---|---|
| stdin | Standard Input, by default the keyboard/terminal for programs run from the command line | 0 |
| stdout | SStandard output, by default the screen for programs run from the command line | 1 |
| stderr | SStandard error, where output error messages are shown or saved | 2 |
Using redirection we can save the stdout and stderr output streams to one file or two separate files for later analysis after a program or command is executed
On the left screen is a buggy shell script. On the right screen the buggy script is executed and the errors are redirected to the file "error.txt". Using "cat" to display the contents of "error.txt" shows the errors of executing the buggy shell script (presumably for further debugging).
Consider a situation where you want to retrieve 100 records from a file with 10,000 records. You will need a place to store the extracted information, perhaps in a temporary file, while you do further processing on it.
Temporary files (and directories) are meant to store data for a short time. Usually one arranges it so that these files disappear when the program using them terminates. While you can also use touch to create a temporary file, this may make it easy for hackers to gain access to your data.
The best practice is to create random and unpredictable filenames for temporary storage. One way to do this is with the mktemp utility as in these examples:
The XXXXXXXX is replaced by the mktemp utility with random characters to ensure the name of the temporary file cannot be easily predicted and is only known within your program.
| Command | Usage |
|---|---|
TEMP=$(mktemp /tmp/tempfile.XXXXXXXX) |
To create a temporary file |
TEMPDIR=$(mktemp -d /tmp/tempdir.XXXXXXXX) |
To create a temporary directory |
First, the danger: If someone creates a symbolic link from a known temporary file used by root to the /etc/passwd file, like this:
$ ln -s /etc/passwd /tmp/tempfile
There could be a big problem if a script run by root has a line in like this:
echo $VAR > /tmp/tempfile
The password file will be overwritten by the temporary file contents.
To prevent such a situation make sure you randomize your temporary filenames by replacing the above line with the following lines:
TEMP=$(mktemp /tmp/tempfile.XXXXXXXX)
echo $VAR > $TEMP
Certain commands like find will produce voluminous amounts of output which can overwhelm the console. To avoid this, we can redirect the large output to a special file (a device node) called /dev/null. This file is also called the bit bucket or black hole.
It discards all data that gets written to it and never returns a failure on write operations. Using the proper redirection operators, it can make the output disappear from commands that would normally generate output to stdout and/or stderr:
$ find / > /dev/null
In the above command, the entire standard output stream is ignored, but any errors will still appear on the console.
It is often useful to generate random numbers and other random data when performing tasks such as:
Performing security-related tasks.
Reinitializing storage devices.
Erasing and/or obscuring existing data.
Generating meaningless data to be used for tests.
Such random numbers can be generated by using the $RANDOM environment variable, which is derived from the Linux kernel’s built-in random number generator, or by the OpenSSL library function, which uses the FIPS140 algorithm to generate random numbers for encryption
To read more about FIPS140, see http://en.wikipedia.org/wiki/FIPS_140-2
The example shows you how to easily use the environmental variable method to generate random numbers.
Some servers have hardware random number generators that take as input different types of noise signals, such as thermal noise and photoelectric effect. A transducer converts this noise into an electric signal, which is again converted into a digital number by an A-D converter. This number is considered random. However, most common computers do not contain such specialized hardware and instead rely on events created during booting to create the raw data needed.
Regardless of which of these two sources is used, the system maintains a so-called entropy pool of these digital numbers/random bits. Random numbers are created from this entropy pool.
The Linux kernel offers the /dev/random and /dev/urandom device nodes which draw on the entropy pool to provide random numbers which are drawn from the estimated number of bits of noise in the entropy pool.
/dev/random is used where very high quality randomness is required, such as one-time pad or key generation, but it is relatively slow to provide vaules. /dev/urandom is faster and suitable (good enough) for most cryptographic purposes.
Furthermore, when the entropy pool is empty, /dev/random is blocked and does not generate any number until additional environmental noise (network traffic, mouse movement, etc.) is gathered whereas /dev/urandom reuses the internal pool to produce more pseudo-random bits.
A process is simply an instance of one or more related tasks (threads) executing on your computer. It is not the same as a program or a command; a single program may actually start several processes simultaneously. Some processes are independent of each other and others are related. A failure of one process may or may not affect the others running on the system.
Processes use many system resources, such as memory, CPU (central processing unit) cycles, and peripheral devices such as printers and displays. The operating system (especially the kernel) is responsible for allocating a proper share of these resources to each process and ensuring overall optimum utilization.
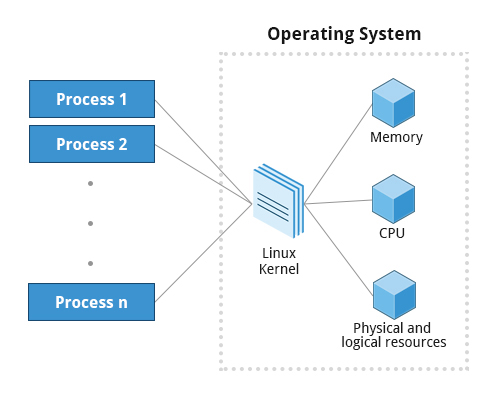
A terminal window (one kind of command shell), is a process that runs as long as needed. It allows users to execute programs and access resources in an interactive environment. You can also run programs in the background, which means they become detached from the shell.
Processes can be of different types according to the task being performed. Here are some different process types along with their descriptions and examples.
| Process Type | Description | Example |
|---|---|---|
| Interactive Processes | Need to be started by a user, either at a command line or through a graphical interface such as an icon or a menu selection. | bash, firefox, top |
| Batch Processes | Automatic processes which are scheduled from and then disconnected from the terminal. These tasks are queued and work on a FIFO (First In, First Out) basis. | updatedb |
| Daemons | Server processes that run continuously. Many are launched during system startup and then wait for a user or system request indicating that their service is required. | httpd, xinetd, sshd |
| Threads | Lightweight processes. These are tasks that run under the umbrella of a main process, sharing memory and other resources, but are scheduled and run by the system on an individual basis. An individual thread can end without terminating the whole process and a process can create new threads at any time. Many non-trivial programs are multi-threaded. | gnome-terminal, firefox |
| Kernel Threads | Kernel tasks that users neither start nor terminate and have little control over. These may perform actions like moving a thread from one CPU to another, or making sure input/output operations to disk are completed. | kswapd0, migration, ksoftirqd |
When a process is in a so-called running state, it means it is either currently executing instructions on a CPU, or is waiting for a share (or time slice) so it can run. A critical kernel routine called the scheduler constantly shifts processes in and out of the CPU, sharing time according to relative priority, how much time is needed and how much has already been granted to a task. All processes in this state reside on what is called a run queue and on a computer with multiple CPUs, or cores, there is a run queue on each.
However, sometimes processes go into what is called a sleep state, generally when they are waiting for something to happen before they can resume, perhaps for the user to type something. In this condition a process is sitting in a wait queue.
There are some other less frequent process states, especially when a process is terminating. Sometimes a child process completes but its parent process has not asked about its state. Amusingly such a process is said to be in a zombie state; it is not really alive but still shows up in the system's list of processes.
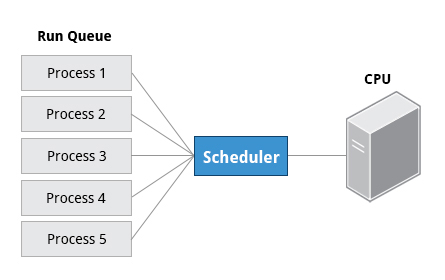
At any given time there are always multiple processes being executed. The operating system keeps track of them by assigning each a unique process ID (PID) number. The PID is used to track process state, cpu usage, memory use, precisely where resources are located in memory, and other characteristics.
New PIDs are usually assigned in ascending order as processes are born. Thus PID 1 denotes the init process (initialization process), and succeeding processes are gradually assigned higher numbers.
The table explains the PID types and their descriptions:
| ID Type | Description |
|---|---|
| Process ID (PID) | Unique Process ID number |
| Parent Process ID (PPID) | Process (Parent) that started this process |
| Thread ID (TID) | Thread ID number. This is the same as the PID for single-threaded processes. For a multi-threaded process, each thread shares the same PID but has a unique TID. |
Many users can access a system simultaneously, and each user can run multiple processes. The operating system identifies the user who starts the process by the Real User ID (RUID) assigned to the user.
The user who determines the access rights for the users is identified by the Effective UID (EUID). The EUID may or may not be the same as the RUID.
Users can be categorized into various groups. Each group is identified by the Real Group ID, or RGID. The access rights of the group are determined by the Effective Group ID, or EGID. Each user can be a member of one or more groups.
Most of the time we ignore these details and just talk about the User ID (UID).
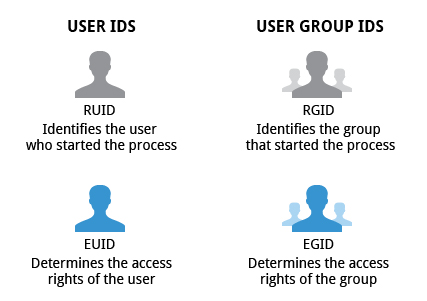
At any given time, many processes are running (i.e., in the run queue) on the system. However, a CPU can actually accommodate only one task at a time, just like a car can have only one driver at a time. Some processes are more important than others so Linux allows you to set and manipulate process priority. Higher priority processes are granted more time on the CPU.
The priority for a process can be set by specifying a nice value, or niceness, for the process. The lower the nice value, the higher the priority. Low values are assigned to important processes, while high values are assigned to processes that can wait longer. A process with a high nice value simply allows other processes to be executed first. In Linux, a nice value of -20 represents the highest priority and 19 represents the lowest. (This does sound kind of backwards, but this convention, the nicer the process, the lower the priority, goes back to the earliest days of UNIX.)
You can also assign a so-called real-time priority to time-sensitive tasks, such as controlling machines through a computer or collecting incoming data. This is just a very high priority and is not to be confused with what is called hard real time which is conceptually different, and has more to do with making sure a job gets completed within a very well-defined time window.
PS: High priority jobs have lower nice value and low priority jobs have higher nice value.