Vuls is an agent-less vulnerability scanner for Linux, FreeBSD, Container, WordPress, Programming language libraries, Network devices.
This tutorial explains how to perform a vulnerability scan using Vulsctl, an easy setup tool for Vuls.
- Scan Host OS (CentOS) vulnerabilities
- Scan Ubuntu via SSH
- Application-dependent library vulnerability scan
- CPE Scanning of Network Device OS
Vuls provides a Docker image on DockerHub. This tutorial is a tutorial on scanning with the official Vuls image; the official Docker Hub repository is here.
Prepare one Linux machine for the Vuls setup. Any major Linux will work.
The following spec is recommended.
- Disk: About 15 GB is enough.
- 4GB or more of memory is recommended.
- Vulnerability DB (NVD) fetch consumes about 2.5 GB of memory.
- If it's not enough, it will be out of memory.
- t3.medium is fine (AWS EC2).
In this tutorial, we will use CentOS 7 as an example.
Install git by connecting to it via SSH.
$ sudo yum install gitNext, install Docker and configure it so that you can run the docker command without root privileges.
- https://docs.docker.com/install/linux/docker-ce/centos/
- https://docs.docker.com/install/linux/linux-postinstall/
Clone vulsio/vulsctl, which is full of useful scripts. You can clone it anywhere, but this time you will clone it to $HOME/vulsctl
$ cd
$ git clone https://github.com/vulsio/vulsctl.git
Cloning into 'vuls-vulsctl'...
remote: Enumerating objects: 14, done.
remote: Counting objects: 100% (14/14), done.
remote: Compressing objects: 100% (12/12), done.
remote: Total 14 (delta 4), reused 12 (delta 2), pack-reused 0
Unpacking objects: 100% (14/14), done.
If you have previously set up vulsctl, update it to the latest version.
$ cd vulsctl
$ git pull
The rest of the operations are done in the vulsctl/docker.
$ cd docker
$ pwd
/home/vuls/vulsctl/dockerTo scan from the Vuls Docker container via SSH to the host OS, you need to configure SSH.
Vuls remote scan mode only supports SSH public key authentication.
Create a key pair and SSH to the server to be scanned beforehand. To register the fingerprint of the server to be scanned in $HOME/.ssh/known_hosts.
This time, create a key with no password. Make sure you can SSH without a password prompt.
If you see the password prompt, you can't scan, so you need to review your SSH settings and configure your SSH to use public key authentication with no password.
$ ssh-keygen -q -f ~/.ssh/id_rsa -N ""
$ cat ~/.ssh/id_rsa.pub >> ~/.ssh/authorized_keys
$ chmod 600 ~/.ssh/*
$ ssh vuls@192.168.56.3
$ exitNext, you need to prepare a configuration file.
Vuls uses the TOML configuration file, config.toml, to configure the server to be scanned, and so on. A template for remote scanning can be found in here.
You can define multiple servers to scan in config.toml. In this case, only one server is defined.
In config.toml, you can set up the information needed to SSH to the server you want to scan.
- IP address
- SSH port number
- User Name
- Private Key for SSH
For details of config.toml, please refer to Manual.
$ pwd
/home/vuls/vulsctl/docker
$ cat config.toml
[servers]
[servers.host]
host = "192.168.56.3"
port = "22"
user = "vuls"
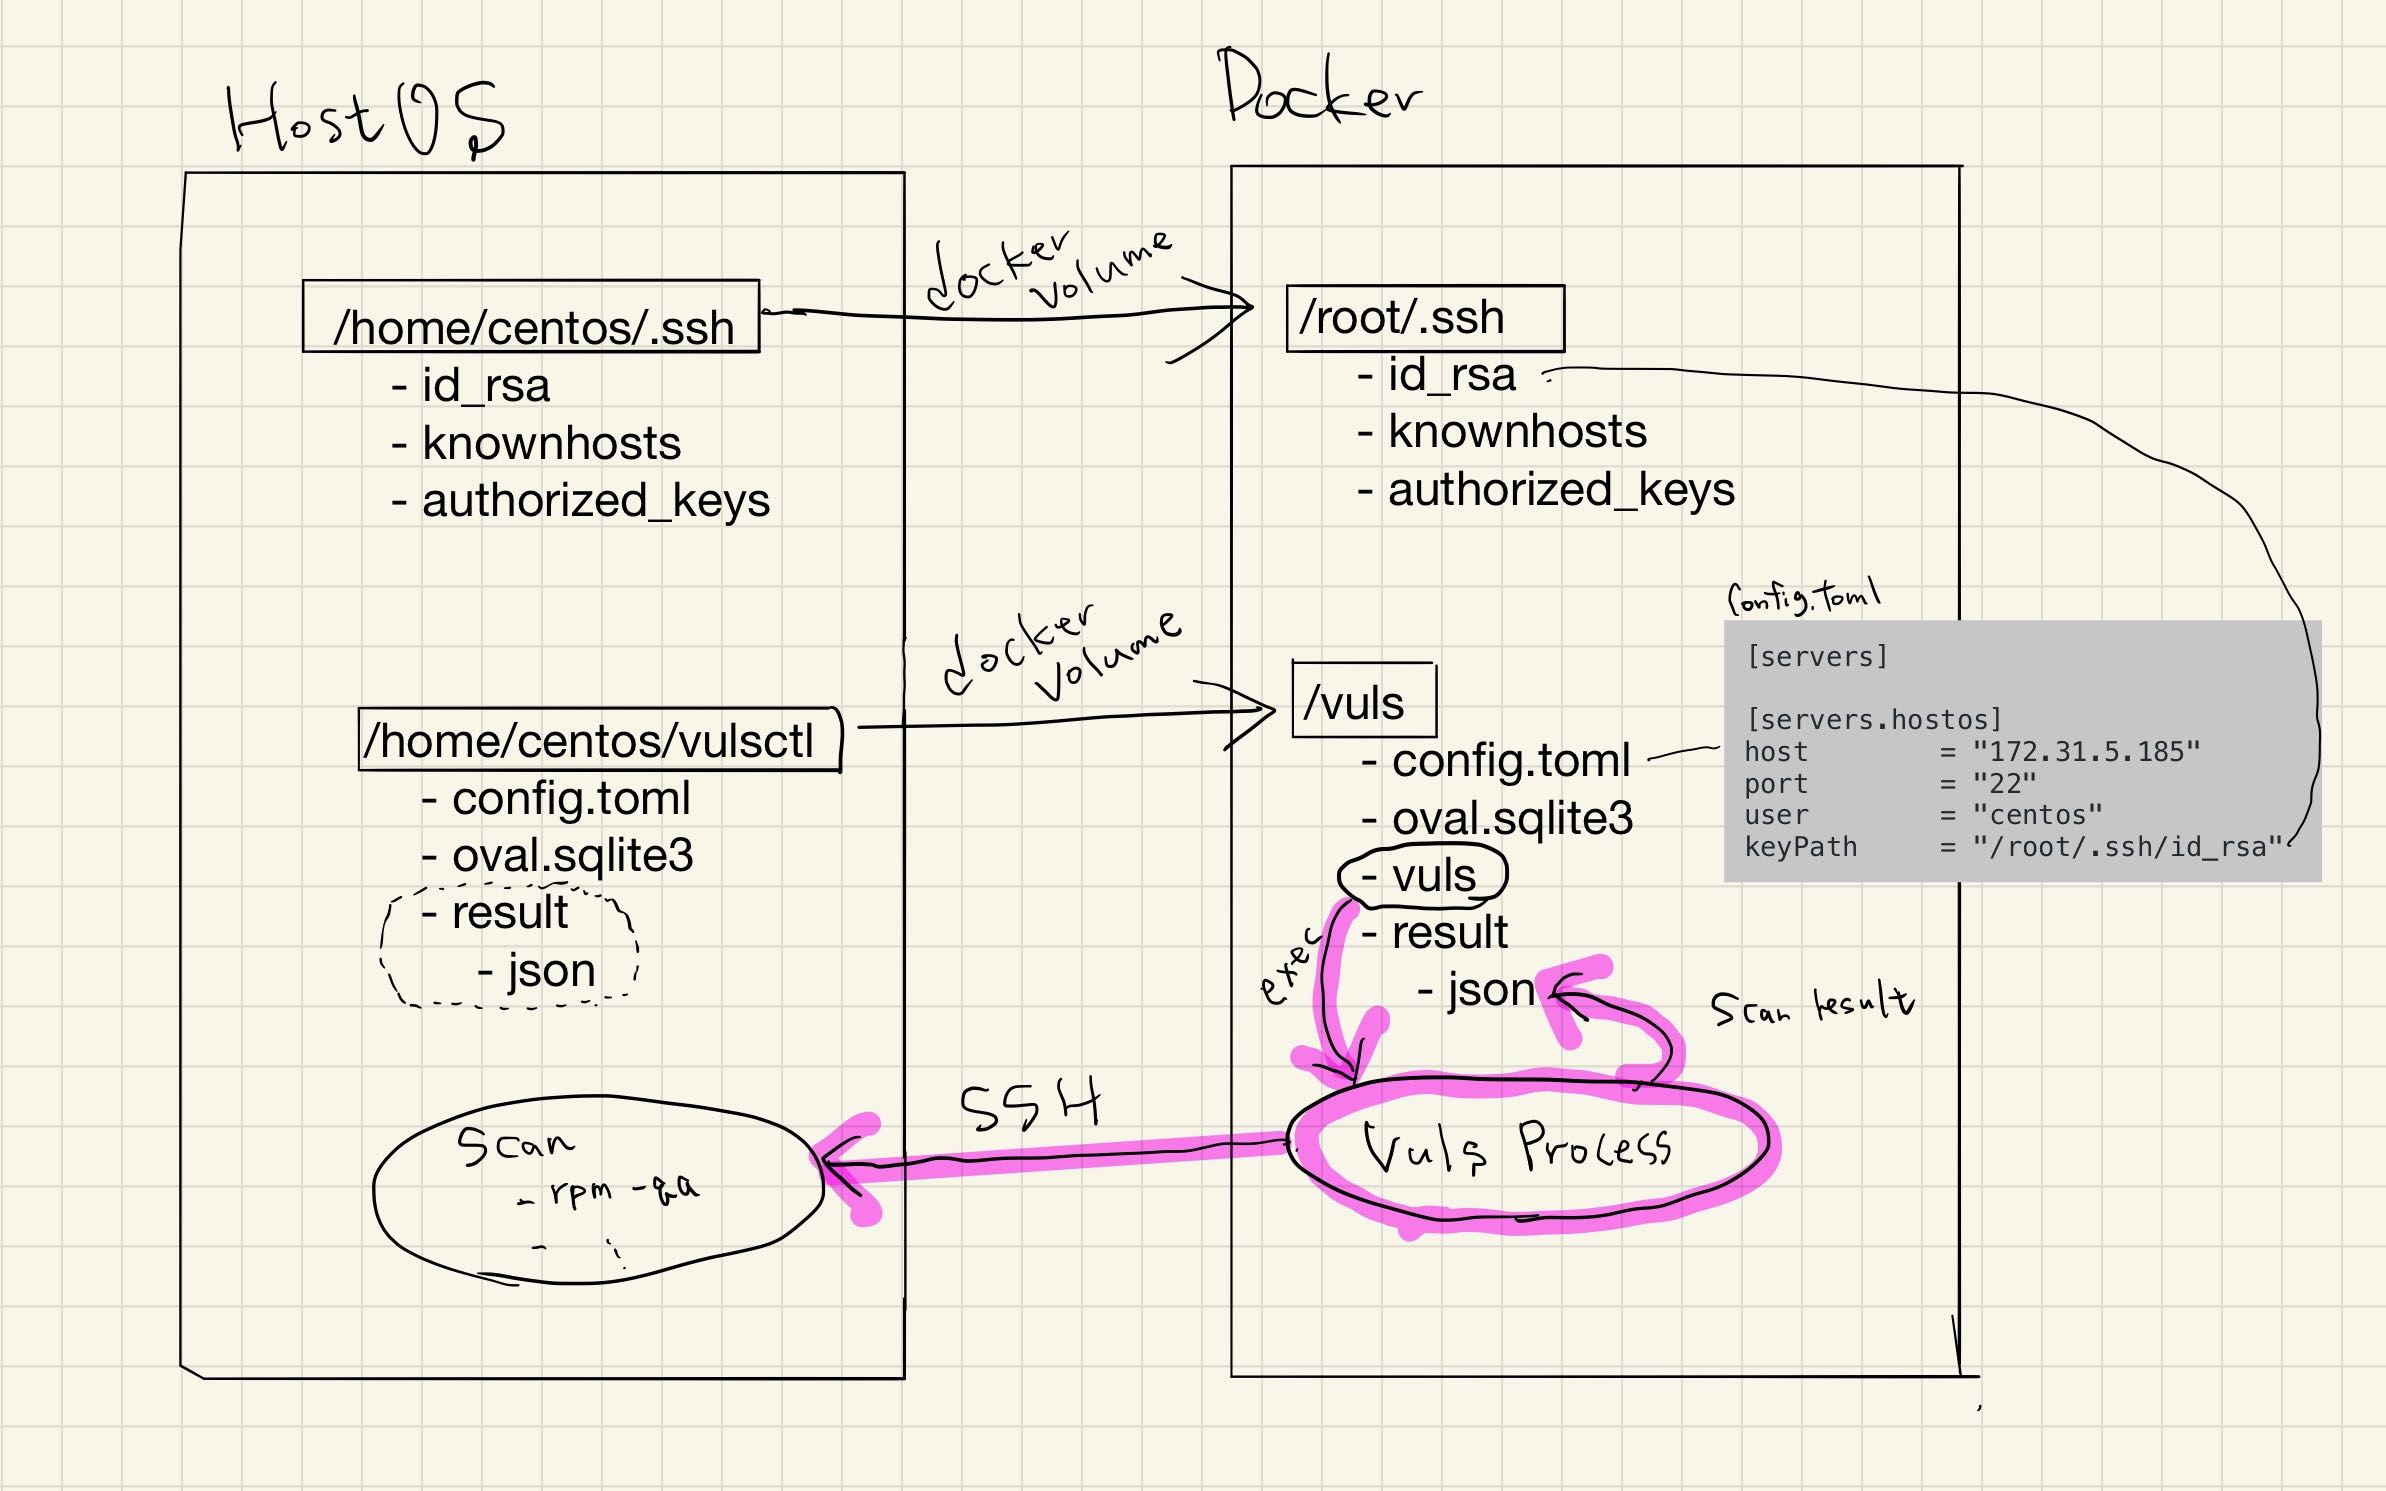
keyPath = "/root/.ssh/id_rsa"Note that this tutorial is a Docker-based setup, so be careful with the keyPath in config.toml.
The keyPath is not the path in Host OS, but the path in the Docker container.
In vulsctl/scan.sh, we have mounted it as -v $HOME/.ssh:/root/.ssh:ro, so the The path in the container, /root/.ssh/ir_rsa.
Now, let's run the scan using the configuration file we prepared earlier.
vulsctl/scan.sh is a script to scan based on the information set in config.toml. The scan results will be stored in JSON format under $PWD/results and will be used when reporting. You can specify the server to be scanned by the command line arguments. Since host is specified as command-line args, the server [servers.host] defined in config.toml will be scanned.
Vuls uses the SSH information defined in config.toml to SSH to the server to be scanned and issue commands on it. There are several scanning modes, but in this case, the default fast scan mode will be used as we haven't specified anything in config.toml.
$ pwd
/home/vuls/vulsctl/docker
$ ./scan.sh host
[Sep 12 07:08:38]  INFO [localhost] Validating config...
[Sep 12 07:08:38]  INFO [localhost] Detecting Server/Container OS...
[Sep 12 07:08:38]  INFO [localhost] Detecting OS of servers...
[Sep 12 07:08:39]  INFO [localhost] (1/1) Detected: hostos: centos 7.6.1810
[Sep 12 07:08:39]  INFO [localhost] Detecting OS of static containers...
[Sep 12 07:08:39]  INFO [localhost] Detecting OS of containers...
[Sep 12 07:08:39]  INFO [localhost] Checking Scan Modes...
[Sep 12 07:08:39]  INFO [localhost] Checking dependencies...
[Sep 12 07:08:39]  INFO [hostos] Dependencies ... Pass
[Sep 12 07:08:39]  INFO [localhost] Checking sudo settings...
[Sep 12 07:08:39]  INFO [hostos] Sudo... Pass
[Sep 12 07:08:39]  INFO [localhost] It can be scanned with fast scan mode even if warn or err messages are displayed due to lack of dependent packages or sudo settings in fast-root or deep scan mode
[Sep 12 07:08:39]  INFO [localhost] Scannable servers are below...
host
[Sep 12 07:08:39]  INFO [localhost] Start scanning
[Sep 12 07:08:39]  INFO [localhost] config: /vuls/config.toml
[Sep 12 07:08:39]  INFO [localhost] Validating config...
[Sep 12 07:08:39]  INFO [localhost] Detecting Server/Container OS...
[Sep 12 07:08:39]  INFO [localhost] Detecting OS of servers...
[Sep 12 07:08:40]  INFO [localhost] (1/1) Detected: host: centos 7.6.1810
[Sep 12 07:08:40]  INFO [localhost] Detecting OS of static containers...
[Sep 12 07:08:40]  INFO [localhost] Detecting OS of containers...
[Sep 12 07:08:40]  INFO [localhost] Checking Scan Modes...
[Sep 12 07:08:40]  INFO [localhost] Detecting Platforms...
[Sep 12 07:08:40]  INFO [localhost] (1/1) host is running on aws
[Sep 12 07:08:40]  INFO [localhost] Detecting IPS identifiers...
[Sep 12 07:08:40]  INFO [localhost] (1/1) host has 0 IPS integration
[Sep 12 07:08:40]  INFO [localhost] Scanning vulnerabilities...
[Sep 12 07:08:40]  INFO [localhost] Scanning vulnerable OS packages...
[Sep 12 07:08:40]  INFO [host] Scanning in fast mode


One Line Summary
================
host centos7.6.1810 359 installed, 63 updatableNext, fetch the vulnerability DB in the OVAL format provided by Linux distributors.
As we have scanned CentOS this time, we will fetch it with --redhat; for other distributions such as Ubuntu, you can fetch it with the corresponding option. For more information about options, please refer to the following page.
$ pwd
/home/vuls/vulsctl/docker
$ ./oval.sh --redhat
INFO[09-12|06:28:12] Fetching...                              URL=https://www.redhat.com/security/data/oval/com.redhat.rhsa-RHEL6.xml.bz2
INFO[09-12|06:28:12] Fetching...                              URL=https://www.redhat.com/security/data/oval/com.redhat.rhsa-RHEL7.xml.bz2
INFO[09-12|06:28:12] Fetching...                              URL=https://www.redhat.com/security/data/oval/com.redhat.rhsa-RHEL8.xml.bz2
INFO[09-12|06:28:13] Fetched...                               URL=https://www.redhat.com/security/data/oval/com.redhat.rhsa-RHEL8.xml.bz2
INFO[09-12|06:28:13] Fetched...                               URL=https://www.redhat.com/security/data/oval/com.redhat.rhsa-RHEL6.xml.bz2
INFO[09-12|06:28:13] Fetched...                               URL=https://www.redhat.com/security/data/oval/com.redhat.rhsa-RHEL7.xml.bz2
INFO[09-12|06:28:13] Finished fetching OVAL definitions
INFO[09-12|06:28:13] Fetched                                  URL=https://www.redhat.com/security/data/oval/com.redhat.rhsa-RHEL8.xml.bz2 OVAL definitions=60
INFO[09-12|06:28:13] Refreshing...                            Family=redhat Version=8
INFO[09-12|06:28:14] Fetched                                  URL=https://www.redhat.com/security/data/oval/com.redhat.rhsa-RHEL6.xml.bz2 OVAL definitions=1130
INFO[09-12|06:28:14] Refreshing...                            Family=redhat Version=6
INFO[09-12|06:28:16] Fetched                                  URL=https://www.redhat.com/security/data/oval/com.redhat.rhsa-RHEL7.xml.bz2 OVAL definitions=887
INFO[09-12|06:28:16] Refreshing...                            Family=redhat Version=7
$ ls oval.sqlite3
oval.sqlite3
$ ls -alh oval.sqlite3
-rw-r--r--. 1 root root 11M Sep 12 06:28 oval.sqlite3Now that the vulnerability DB is ready. Run the report.
Use vulsctl/report.sh to display the results. Identify potential CVE-IDs in the server to be scanned using the information in the JSON created by scan.sh and the OVAL provided by Red Hat, which we fetched earlier. See documentation for details.
$ pwd
/home/vuls/vulsctl/docker
$ ./report.sh
[Sep 12 07:12:10]  INFO [localhost] Validating config...
[Sep 12 07:12:10]  INFO [localhost] Loaded: /vuls/results/2019-09-12T07:08:40Z
[Sep 12 07:12:10]  INFO [localhost] Validating db config...
INFO[0000] -cvedb-type: sqlite3, -cvedb-url: , -cvedb-path: /vuls/cve.sqlite3
INFO[0000] -ovaldb-type: sqlite3, -ovaldb-url: , -ovaldb-path: /vuls/oval.sqlite3
INFO[0000] -gostdb-type: sqlite3, -gostdb-url: , -gostdb-path: /vuls/gost.sqlite3
INFO[0000] -exploitdb-type: sqlite3, -exploitdb-url: , -exploitdb-path: /vuls/go-exploitdb.sqlite3
[Sep 12 07:12:10]  WARN [localhost] --cvedb-path=/vuls/cve.sqlite3 file not found. [CPE-scan](https://vuls.io/docs/en/usage-scan-non-os-packages.html#cpe-scan) needs cve-dictionary. if you specify cpe in config.toml, fetch cve-dictionary before reporting. For details, see `https://github.com/kotakanbe/go-cve-dictionary#deploy-go-cve-dictionary`
[Sep 12 07:12:10]  WARN [localhost] --gostdb-path=/vuls/gost.sqlite3 file not found. Vuls can detect `patch-not-released-CVE-ID` using gost if the scan target server is Debian, RHEL or CentOS, For details, see `https://github.com/knqyf263/gost#fetch- f`
[Sep 12 07:12:10]  WARN [localhost] --exploitdb-path=/vuls/go-exploitdb.sqlite3 file not found. Fetch go-exploit-db before reporting if you want to display exploit codes of detected CVE-IDs. For details, see `https://github.com/mozqnet/go-exploitdb`
[Sep 12 07:12:10]  INFO [localhost] host: 0 CVEs are detected with Library
[Sep 12 07:12:10]  INFO [localhost] OVAL is fresh: redhat 7.6.1810
[Sep 12 07:12:12]  INFO [localhost] host: 111 CVEs are detected with OVAL
[Sep 12 07:12:12]  INFO [localhost] host: 0 CVEs are detected with CPE
[Sep 12 07:12:12]  INFO [localhost] host: 0 CVEs are detected with GitHub Security Alerts
[Sep 12 07:12:12]  INFO [localhost] host: 0 unfixed CVEs are detected with gost
[Sep 12 07:12:12]  INFO [localhost] Fill CVE detailed information with CVE-DB
[Sep 12 07:12:12]  INFO [localhost] Fill exploit information with Exploit-DB
[Sep 12 07:12:12]  INFO [localhost] host: 0 exploits are detected
host (centos7.6.1810)
=======================
Total: 111 (High:57 Medium:39 Low:15 ?:0), 35/111 Fixed, 359 installed, 63 updatable, 0 exploits, en: 0, ja: 0 alerts

+------------------+------+--------+-----+------+---------+---------------------------------------------------+
|      CVE-ID      | CVSS | ATTACK | POC | CERT |  FIXED  |                        NVD                        |
+------------------+------+--------+-----+------+---------+---------------------------------------------------+
| CVE-2019-10160   |  9.8 |  AV:N  |     |      |   fixed | https://nvd.nist.gov/vuln/detail/CVE-2019-10160   |
| CVE-2019-9636    |  9.8 |  AV:N  |     |      |   fixed | https://nvd.nist.gov/vuln/detail/CVE-2019-9636    |
| CVE-2016-10745   |  9.0 |  AV:N  |     |      |   fixed | https://nvd.nist.gov/vuln/detail/CVE-2016-10745   |
| CVE-2019-11085   |  8.8 |  AV:L  |     |      |   fixed | https://nvd.nist.gov/vuln/detail/CVE-2019-11085   |
| CVE-2018-5743    |  8.6 |  AV:N  |     |      |   fixed | https://nvd.nist.gov/vuln/detail/CVE-2018-5743    |
| CVE-2018-1000876 |  7.8 |  AV:L  |     |      | unfixed | https://nvd.nist.gov/vuln/detail/CVE-2018-1000876 |
| CVE-2018-18281   |  7.8 |  AV:L  |     |      | unfixed | https://nvd.nist.gov/vuln/detail/CVE-2018-18281   |
| CVE-2019-11811   |  7.8 |  AV:L  |     |      |   fixed | https://nvd.nist.gov/vuln/detail/CVE-2019-11811   |
| CVE-2019-6974    |  7.8 |  AV:L  |     |      |   fixed | https://nvd.nist.gov/vuln/detail/CVE-2019-6974    |
| CVE-2018-14618   |  7.5 |  AV:N  |     |      |   fixed | https://nvd.nist.gov/vuln/detail/CVE-2018-14618   |
| CVE-2018-16871   |  7.5 |  AV:N  |     |      |   fixed | https://nvd.nist.gov/vuln/detail/CVE-2018-16871   |
| CVE-2019-11477   |  7.5 |  AV:N  |     |      |   fixed | https://nvd.nist.gov/vuln/detail/CVE-2019-11477   |
| CVE-2019-3855    |  7.5 |  AV:N  |     |      |   fixed | https://nvd.nist.gov/vuln/detail/CVE-2019-3855    |
...snipVuls has a terminal-based viewer that allows you to view the results in the terminal. Let's try it out here.
Use vulsctl/tui.sh to view the results in the console. Tab to move the pane, arrow or jk to move it, and Ctrl-C to exit.
See documentation for details.
$ pwd
/home/vuls/vulsctl/docker
$ ./tui.sh --cvss-over=7
Vuls can easily scan for vulnerabilities on any SSH-enabled remote Linux/FreeBSD.
Prepare a Ubuntu server and set up an SSH public key authentication and run SSH once before the scan.
Next, add the SSH information of the Ubuntu server to the configuration file for the scan.
$ pwd
/home/vuls/vulsctl/docker
$ cat config.toml
[servers]
[servers.ubuntu]
host        = "192.168.56.4"
port        = "22"
user        = "vuls"
keyPath     = "/root/.ssh/id_rsa"
Perform a scan.
$ pwd
/home/vuls/vulsctl/docker
$ ./scan.sh ubuntu
The report requires an additional Vulnerability DB for Ubuntu (OVAL).
$ pwd
/home/vuls/vulsctl/docker
$ ./oval.sh --ubuntu
$ ./report.sh
$ ./tui.sh
If you scan other Linux distributions, please prepare a corresponding OVAL in advance as well. Please refer to the documentation for details.
There are a number of vulnerabilities for which CVE-IDs have been issued, but no update package is available(henceforth referred to as not-fixed-yet vulnerability), and Vuls can also detect not-fixed-yet vulnerability.
To detect these vulnerabilities, you need an additional vulnerability database. Use the following command to obtain the vulnerability DB using knqyf263/gost.
gost only supports Red Hat, CentOS, and Debian. For other OS, fetching gost's DB does not affect the detection accuracy. However, it is recommended to fetch gost to add CVSS and Summary information, because Red Hat CVE information is rich and useful.
$ pwd
/home/vuls/vulsctl/docker
$ ./gost.sh --redhat
Using default tag: latest
latest: Pulling from vuls/gost
5d20c808ce19: Already exists
c0f752a1fc26: Pull complete
919f8990415c: Pull complete
Digest: sha256:679a4306d67e0b0992fd43b46c4a2fe4d27a51a1e2d9394e19471c5df02c399c
Status: Downloaded newer image for vuls/gost:latest
docker.io/vuls/gost:latest
INFO[09-12|15:00:33] Initialize Database
2019-09-12T15:00:33.903Z        DEBUG   db path: db/trivy.db
2019-09-12T15:00:33.929Z        DEBUG   remove an existed directory
INFO[09-12|15:02:13] Opening DB.                              db=sqlite3
INFO[09-12|15:02:13] Migrating DB.                            db=sqlite3
INFO[09-12|15:02:13] Insert RedHat into DB                    db=sqlite3
 0 / 20000 [------------------------------------------------------------------------------------------------------------------------------------------------------------------------]   0.00%INFO[09-12|15:02:13] Insert 20000 CVEs
 20000 / 20000 [===============================================================================================================================================================] 100.00% 2m2s
In my environment, it took about 10 minutes.
- report
The number of vulnerability detections has increased.
Vulnerabilities that not-fixed-yet vulnerability is shown as "Unfixed".
Reports can show whether Exploit for detected CVE-IDs is in Metasploit Framework. A CVE with an attack module is considered to be easily attackable by the tool, so the risk is higher than a CVE without an attack module.
Fetch go-msfdb.
$ pwd
/home/vuls/vulsctl/docker
$ ./msfdb.sh
Using default tag: latest
latest: Pulling from vuls/go-msfdb
cbdbe7a5bc2a: Pull complete
936c30013c05: Pull complete
dabcf4a113d0: Pull complete
Digest: sha256:124027eec3f5157447102dafaaae638037d3587936ed5f68055c822e8acc8f02
Status: Downloaded newer image for vuls/go-msfdb:latest
docker.io/vuls/go-msfdb:latest
INFO[08-29|08:03:48] Opening DB                               db=sqlite3
INFO[08-29|08:03:48] Init DB                                  db=sqlite3
INFO[08-29|08:03:48] Migrating DB                             db=sqlite3
INFO[08-29|08:03:48] Fetching vulsio/msfdb-list
INFO[08-29|08:03:48] git clone                                repo=/root/.cache/go-msfdb/msfdb-list
Cloning into '/root/.cache/go-msfdb/msfdb-list'...
remote: Enumerating objects: 1835, done.
remote: Counting objects: 100% (1835/1835), done.
remote: Compressing objects: 100% (1834/1834), done.
remote: Total 1835 (delta 26), reused 128 (delta 0), pack-reused 0
Receiving objects: 100% (1835/1835), 945.52 KiB | 1.17 MiB/s, done.
Resolving deltas: 100% (26/26), done.
INFO[08-29|08:03:51] Updated files                            count=1978
INFO[08-29|08:03:51] Metasploit-Framework modules             count=2216
INFO[08-29|08:03:51] Insert info into go-msfdb.             db=sqlite3
INFO[08-29|08:03:51] Inserting Modules having CVEs...
2216 / 2216 [-----------------------------------------------------------------------------------------------------------------------------] 100.00% 1979 p/s
INFO[08-29|08:03:53] CveID Metasploit Count                   count=2216
It took about 5 seconds in my environment.
Scan again, and the report will show you the information for the Metasploit module.
$ pwd
/home/vuls/vulsctl/docker
$ ./scan.sh
$ ./tui.sh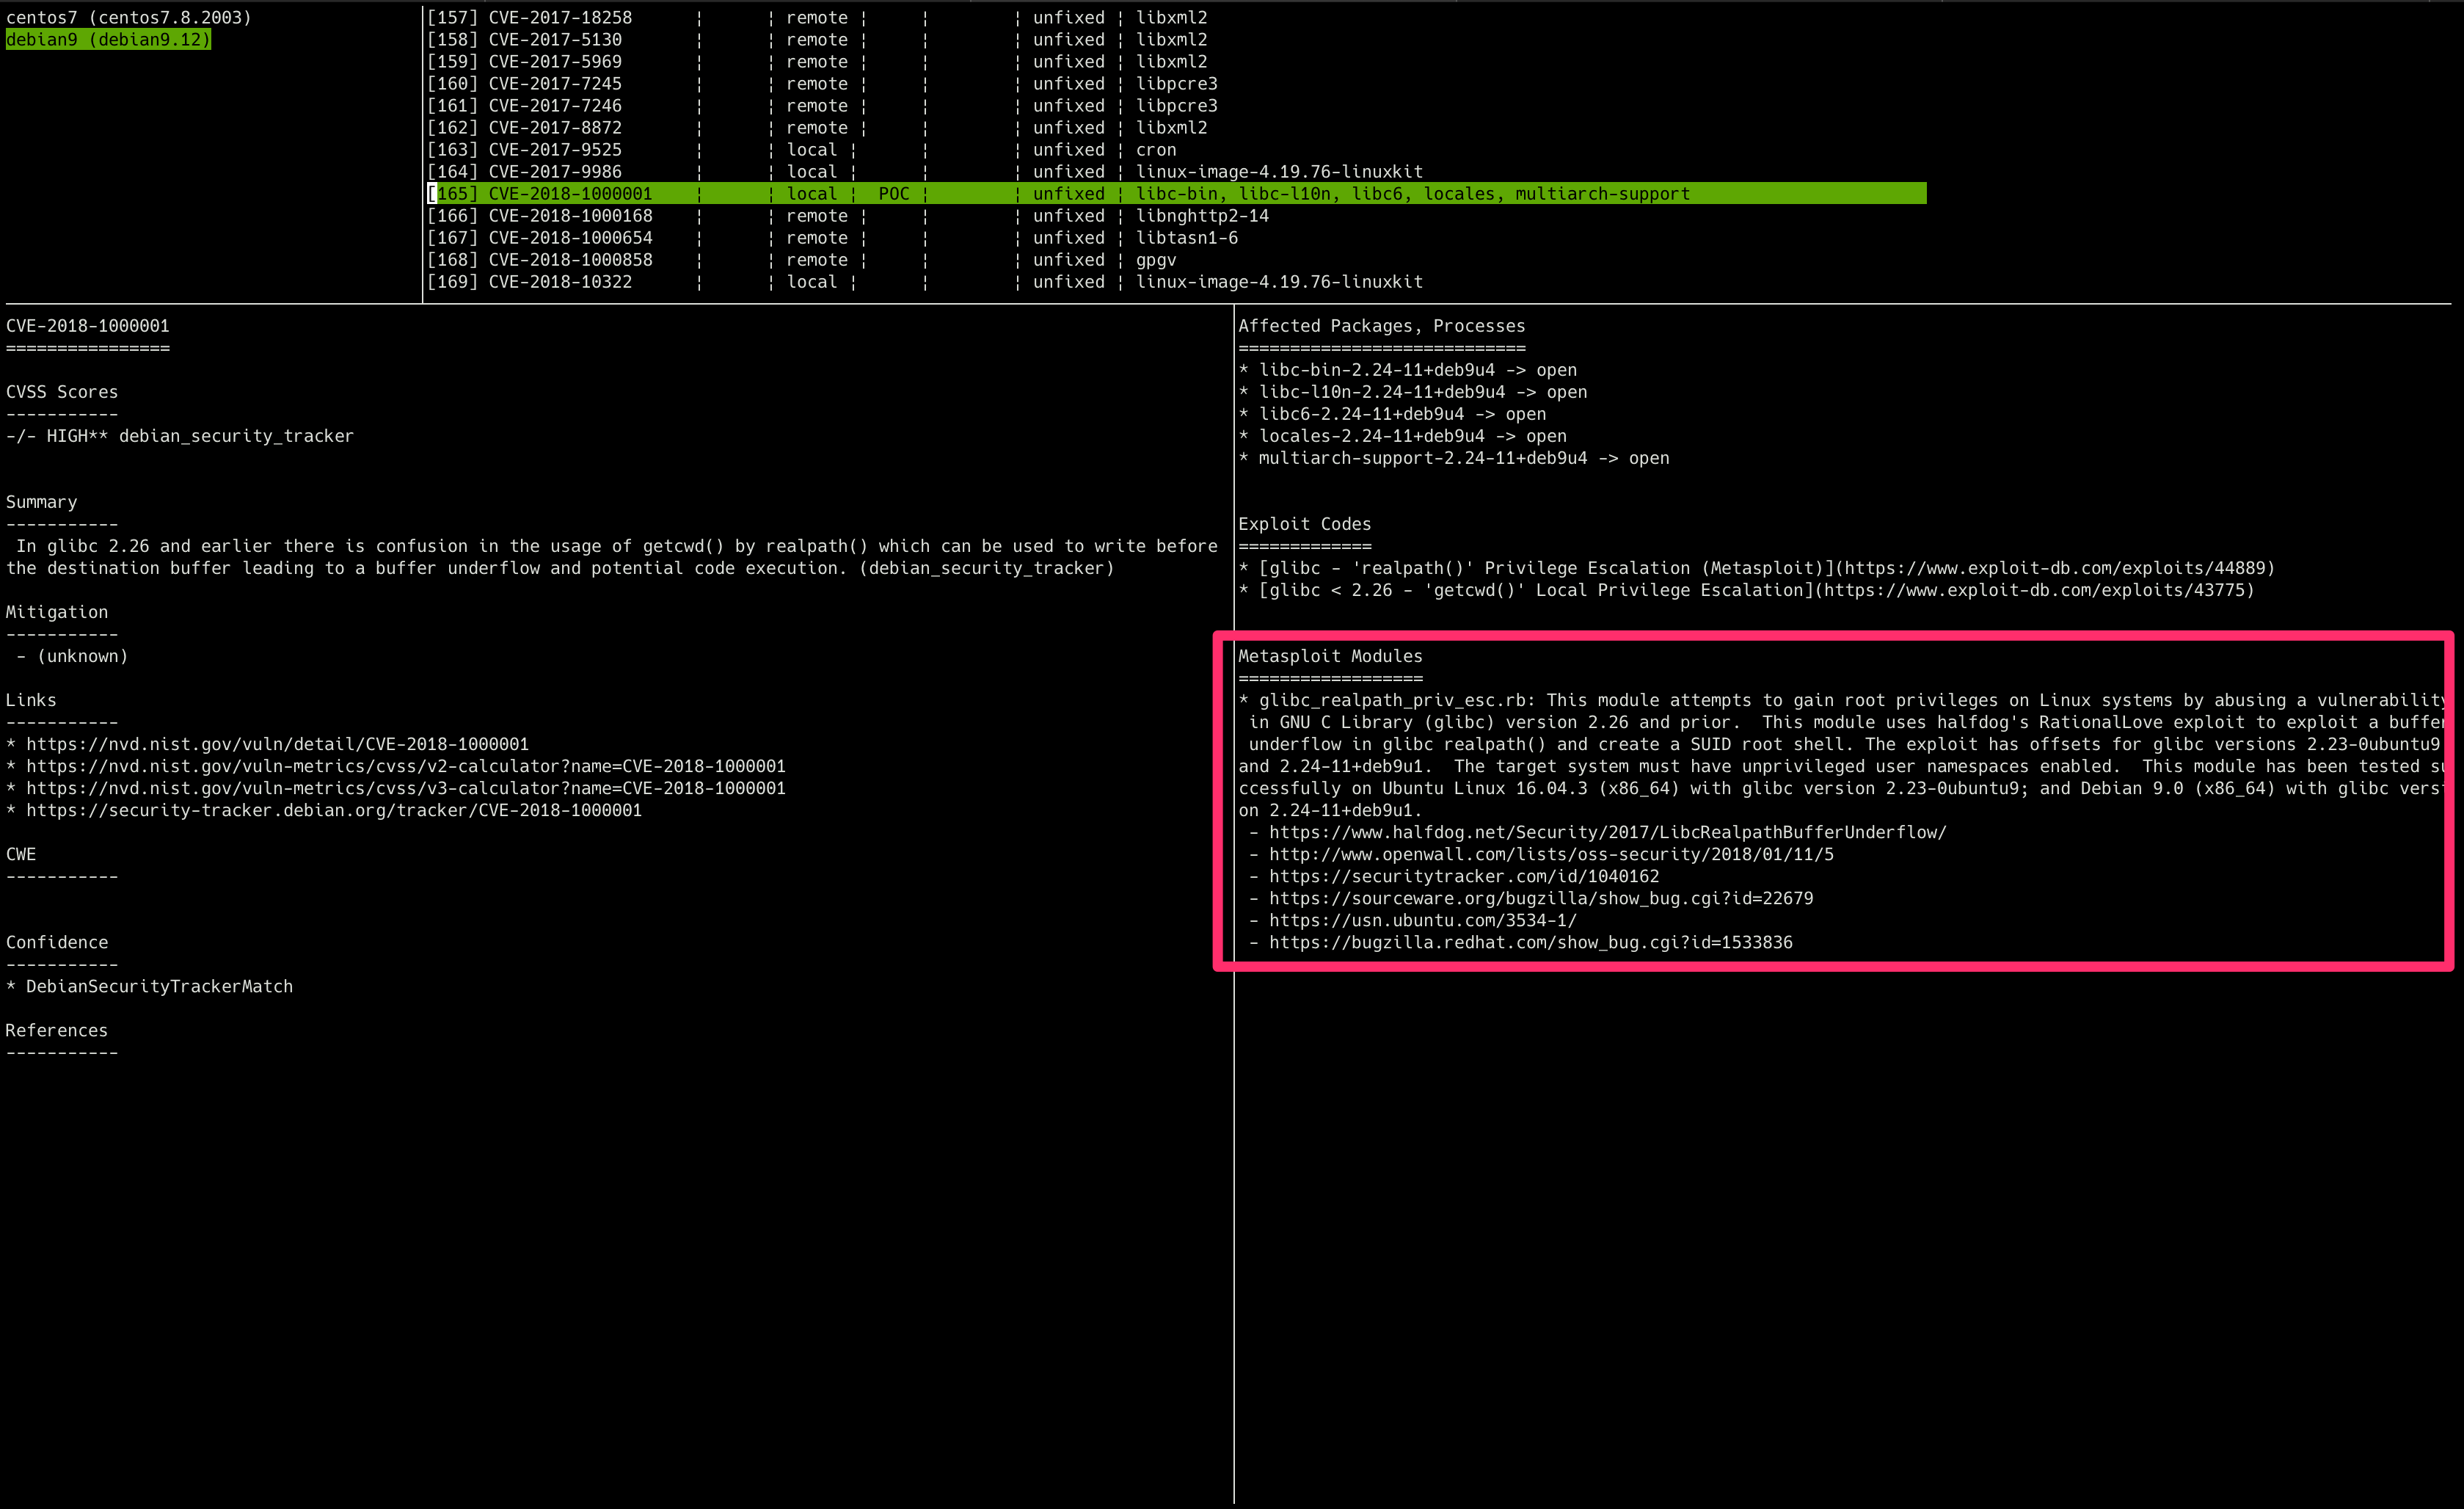
The Exploit Database has collected over 43,000 PoCs.
Vuls can show if a PoC exists for each CVE-ID detected by Vuls, which means that vulnerabilities with a PoC are riskier than those without. However, it is unclear whether the PoC detected is a works fine or not, so it needs to be verified by the user.
Fetch go-exploitdb.
$ pwd
/home/vuls/vulsctl/docker
$ ./exploitdb.sh
Using default tag: latest
latest: Pulling from vuls/go-exploitdb
c87736221ed0: Pull complete
e0d679e82107: Pull complete
7a7a6055cf29: Pull complete
Digest: sha256:1a2721baa6ca5fb533748558c5bf358518c6bd9452be5921db4a2337d0964339
Status: Downloaded newer image for vuls/go-exploitdb:latest
docker.io/vuls/go-exploitdb:latest
INFO[09-12|15:08:46] Opening Database.                        db=sqlite3
INFO[09-12|15:08:46] Migrating DB.                            db=sqlite3
INFO[09-12|15:08:46] Fetching Offensive Security Exploit
INFO[09-12|15:08:46] Fetching                                 URL=https://cve.mitre.org/data/downloads/allitems-cvrf.xml
INFO[09-12|15:09:36] Fetching                                 URL=https://raw.githubusercontent.com/offensive-security/exploitdb/master/files_shellcodes.csv
INFO[09-12|15:09:36] Fetching                                 URL=https://raw.githubusercontent.com/offensive-security/exploitdb/master/files_exploits.csv
INFO[09-12|15:09:37] Offensive Security Exploit               count=44270
INFO[09-12|15:09:37] Insert Exploit into go-exploitdb.        db=sqlite3
INFO[09-12|15:09:37] Inserting 44270 Exploits
44270 / 44270 [------------------------------------------------------------------------------------------------------------------------------------------------------------] 100.00% 4717 p/s
INFO[09-12|15:09:46] No CveID Exploit Count                   count=32084
INFO[09-12|15:09:46] CveID Exploit Count                      count=12186
Scan again and view the report to see the PoC information in the Exploit Database.
$ pwd
/home/vuls/vulsctl/docker
$ ./scan.sh
$ ./tui.sh
It is possible to obtain JPCERT/CC and US-CERT alerts and display whether the detected vulnerability corresponds to the alert information.
The fast-root scan mode issues commands that require root privileges. This allows you to display process information, and network port listen information, and other information useful in making triage decisions.
[vuls@host vulsctl]$ sudo su -
[sudo] vuls password:
[root@host ~]# mkdir .ssh
[root@host ~]# chmod 700 .ssh
[root@host ~]# cat /home/vuls/.ssh/id_rsa.pub >> /root/.ssh/authorized_keys
[root@host ~]# chmod 600 /root/.ssh/*
[root@host ~]# exit
Check if you can connect to SSH as a root user without a password.
[vuls@host vulsctl]$ ssh root@192.168.56.3
Last login: Mon Jan 27 13:15:06 2020
[root@host ~]# exit
The root user can connect to SSH without a password.
Next, add the following to config.toml.
The following is added to config.toml: scanMode = ["fast-root"] to specify the fast-root mode.
[servers]
[servers.hostroot]
host         = "192.168.56.3"
port        = "22"
user        = "root"
keyPath     = "/root/.ssh/id_rsa"
scanMode     = ["fast-root"]
Scan and report.
$ ./scan.sh hostroot
$ ./report.sh
$ ./tui.sh
The TUI now displays process, and network port listen information. You can now see if a process is running from a vulnerable package, including CVE, and if the process is listening to a network port. You can now make a decision to investigate if a process that is vulnerable to a network-based attack is listening to the network.

In fast-root scan mode, additional OS packages may need to be installed in advance. Also, if you use sudo instead of root user, you need to set up /etc/sudoers on the server to be scanned. Please refer to documentation for details.
There is also an offline mode that allows you to scan even if the server you want to scan cannot connect to the Internet. Configure toml as follows.
[servers]
[servers.hostroot]
host         = "192.168.56.3"
port        = "22"
user        = "root"
keyPath     = "/root/.ssh/id_rsa"
scanMode = ["fast", "offline"]Vuls supports scanning for application dependency libraries.
There are several ways to do this, and it's better to try them out as they may not be suitable for your needs.
See Document for details.
The next section explains how to scan with a lock file.
It is possible to parse the lock files of package managers for programming languages such as Gem and pip and detect potential vulnerabilities in the dependent libraries defined in them. (Vuls uses aquasecurity/trivy internally.)
The following lock files are supported for now.
- Gemfile.lock
- Pipfile.lock
- poetry.lock
- composer.lock
- package-lock.json
- yarn.lock
- Cargo.lock
So let's try scanning old Redmine Gemfile.lock on GitHub.
First, we'll use wget to get the old Gemfile.lock on the scan target server.
$ # Execute on the scan target server
$ pwd
/home/vuls/vulsctl/docker
$ wget https://raw.githubusercontent.com/41studio/redmine/master/Gemfile.lock
Specify the path of the lockfiles in config.toml.
[servers]
[servers.host]
host         = "192.168.56.3"
port        = "22"
user        = "vuls"
keyPath     = "/root/.ssh/id_rsa"
lockfiles = [ "/home/vuls/vulsctl/docker/Gemfile.lock" ]
Scan and report.
$ ./scan.sh hostroot
$ ./report.sh
$ ./tui.sh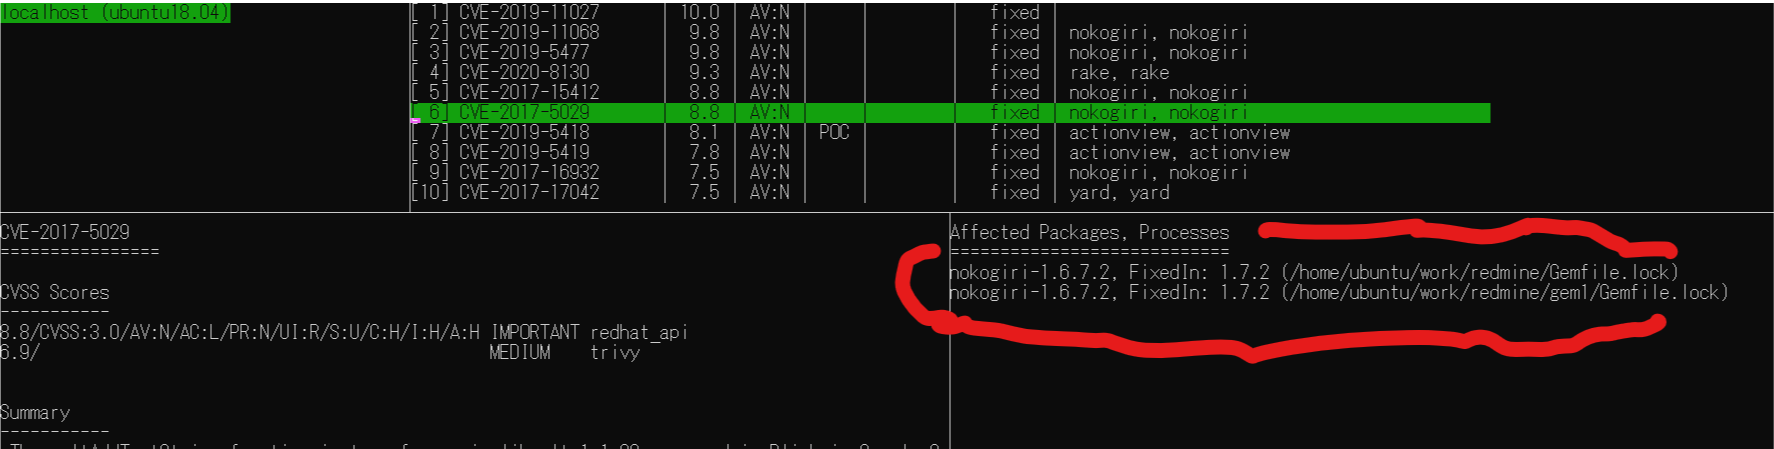
Vuls can detect vulnerabilities in network devices and commercial middleware by defining CPE in config.toml. The OS package scan is done by actually SSH into the server and issuing the command. However, the CPE scan is detected by comparing the versions of the NVD and JVN databases. It does not issue commands on the device and does not access the device via a network.
Here's a sample config.toml: type="pseudo".
If type="pseudo" is specified, you can change the mode to not connect to SSH.
[servers.forti]
type = "pseudo"
cpeNames = [
    "cpe:/o:fortinet:fortios:4.3.0",
]
Vuls need the NVD and JVN data sources for CPE scan, so use cve.sh to get them if they are not already fetched.
$ ./scan.sh forti
$ ./cve.sh
$ ./report.sh
$ ./tui.sh
See documentation for more information.
| Options | Description |
|---|---|
| -debug | Debug flags. The flag to identify the command being issued. |
| -cvss-over | Filter by CVSS score |
| -ignore-unfixed | Hide not-fixed-yet vulnerabilities |
| -diff | Difference from last time only (new detection only) |
Fetch all Vulnerability DB using update-all.sh. This will take some time ...
This will take over an hour in my environment.
$ ./update-all.sh