Vulsは、Linux / FreeBSD, Container, WordPress, アプリケーション依存ライブラリ、Network機器、ミドルウェアの既知の脆弱性を検知するツールです。
このチュートリアルは、Vulsの簡単セットアップツールである、Vulsctlを用いて
- HostOS(CentOS)の脆弱性をリモートスキャン
- SSHでUbuntuをリモートスキャン
- アプリケーション依存ライブラリ脆弱性スキャン
- ネットワーク機器OSのCPEスキャン
を解説します。
VulsはDockerHub上にDockerイメージを提供しており、その公式イメージを使ったチュートリアルとなります。Docker Hub公式レポジトリはこちら。
Vulsセットアップ用のLinuxマシンを一台準備して下さい。 メジャーなLinuxであれば動作します。
以下のスペックを推奨します。
- ディスク ... 15GB程度あれば十分
- メモリ4GB以上を推奨
- 脆弱性DB(NVD)の取得処理で2.5GB程度メモリを消費。
- 足りないとOut of memoryとなる
- AWSならt3.medium程度
今回はCentOS 7を例に説明します。
SSHで接続してgitをインストールします。
$ sudo yum install git次にDockerをインストールしてroot権限なしでdockerコマンドを実行できるように設定してください。
- https://docs.docker.com/install/linux/docker-ce/centos/
- https://docs.docker.com/install/linux/linux-postinstall/
便利スクリプトてんこ盛りなvulsio/vulsctlをクローンします。クローン先はどこでもよいですが、今回は$HOME/vulsctlにクローンすることにします。
$ cd
$ git clone https://github.com/vulsio/vulsctl.git
Cloning into 'vuls-vulsctl'...
remote: Enumerating objects: 14, done.
remote: Counting objects: 100% (14/14), done.
remote: Compressing objects: 100% (12/12), done.
remote: Total 14 (delta 4), reused 12 (delta 2), pack-reused 0
Unpacking objects: 100% (14/14), done.
以前vulsctlをセットアップ済みの環境の場合は最新化して下さい。
$ cd vulsctl
$ git pullこれ以降の操作はvulsctl/dockerディレクトリ内で作業します
$ cd docker
$ pwd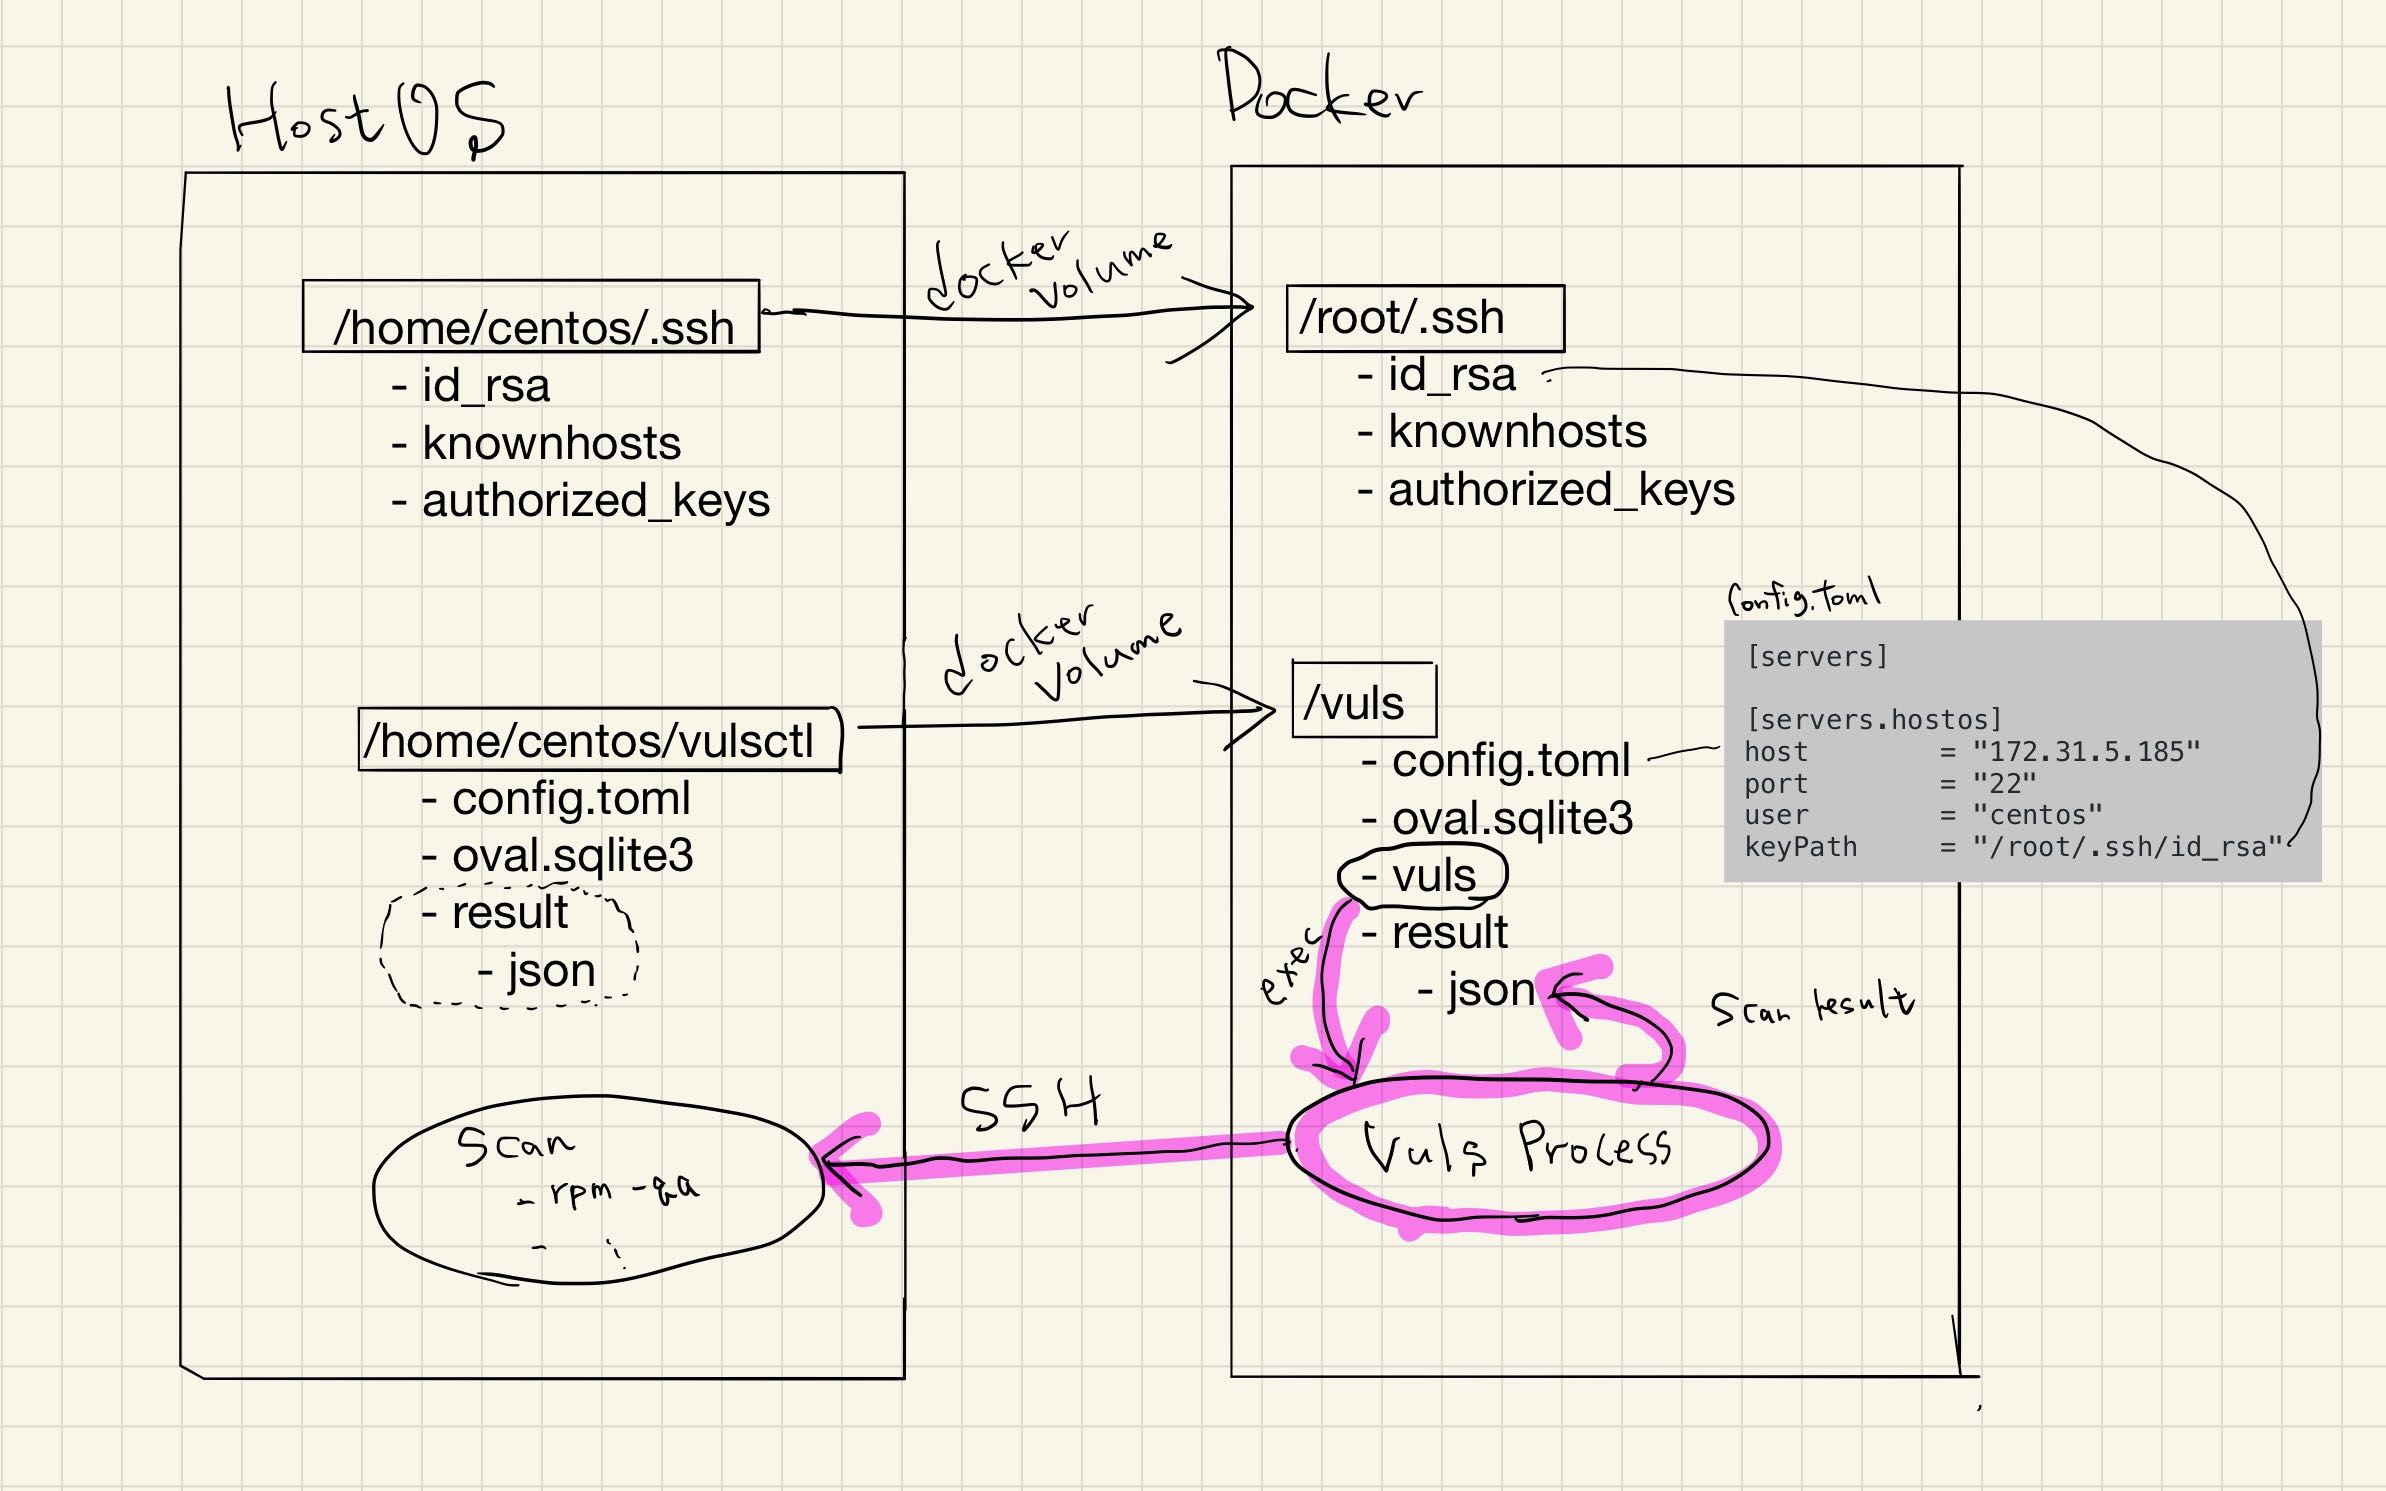
/home/vuls/vulsctl/dockerVuls用のDockerコンテナからホストOSにSSH接続してスキャンするため、SSHの設定を行います。
Vulsのリモートスキャンモードでは、SSH公開鍵認証のみをサポートしています。 鍵ペアを作成して一度、スキャン対象サーバにSSHしてください。$HOME/.ssh/known_hostsにスキャン対象サーバのfingerprintを登録するためです。 今回はパスワードなしの鍵を作成します。パスワードプロンプトが表示されずにSSH可能かを確認してください。 もしパスワードのプロンプトが表示される場合は、このままではスキャン出来ませんので、SSHの設定を見直してパスワードなしの公開鍵認証でSSHできるように設定してください。
$ ssh-keygen -q -f ~/.ssh/id_rsa -N ""
$ cat ~/.ssh/id_rsa.pub >> ~/.ssh/authorized_keys
$ chmod 600 ~/.ssh/*
$ ssh vuls@192.168.56.3
$ exit次に、設定ファイを準備します。
VulsではTOML形式の設定ファイルconfig.tomlでスキャン対象サーバなどを設定します。リモートスキャン用のテンプレートはこちらにあります。
スキャン対象のサーバはconfig.toml内に複数定義可能です。今回は1サーバのみ定義します。
config.tomlにはスキャン対象サーバにSSHするために必要な情報を定義します。
- IPアドレス
- SSHポート番号
- User名
- SSHで使用する秘密鍵
config.tomlの詳細についてはマニュアルを参照して下さい。
$ pwd
/home/vuls/vulsctl/docker
$ cat config.toml
[servers]
[servers.host]
host        = "192.168.56.3"
port        = "22"
user        = "vuls"
keyPath     = "/root/.ssh/id_rsa"
今回はDockerベースでのセットアップのため、keyPathに注意して下さい。
keyPathはHostOS内のパスではなく、Dockerコンテナ内のパスを指定を指定しています。
vulsctl/scan.sh内で-v $HOME/.ssh:/root/.ssh:roとしてマウントしているため、コンテナ内のパスである/root/.ssh/ir_rsaを指定しています。
それでは、先程用意した設定ファイルを用いて実際にスキャンしてみましょう。
vulsctl/scan.shはconfig.tomlで設定された情報を元に実際にスキャンするスクリプトです。 スキャン結果はJSON形式で$PWD/results以下に保存され、report時に利用されます。 スキャン対象サーバはコマンドライン引数で指定可能です。今回はhostを指定しているため、config.tomlに定義された[servers.host]をスキャンします。
Vulsはconfig.tomlに定義されたSSH接続情報を用いて、スキャン対象サーバに実際にSSHで接続し、スキャン対象サーバ上でコマンドを発行します。
スキャンのモードはいくつかありますが、今回はconfig.tomlで何も指定していないためデフォルトのfastスキャンモードでスキャンされます。
$ pwd
/home/vuls/vulsctl/docker
$ ./scan.sh host
[Sep 12 07:08:38]  INFO [localhost] Validating config...
[Sep 12 07:08:38]  INFO [localhost] Detecting Server/Container OS...
[Sep 12 07:08:38]  INFO [localhost] Detecting OS of servers...
[Sep 12 07:08:39]  INFO [localhost] (1/1) Detected: hostos: centos 7.6.1810
[Sep 12 07:08:39]  INFO [localhost] Detecting OS of static containers...
[Sep 12 07:08:39]  INFO [localhost] Detecting OS of containers...
[Sep 12 07:08:39]  INFO [localhost] Checking Scan Modes...
[Sep 12 07:08:39]  INFO [localhost] Checking dependencies...
[Sep 12 07:08:39]  INFO [hostos] Dependencies ... Pass
[Sep 12 07:08:39]  INFO [localhost] Checking sudo settings...
[Sep 12 07:08:39]  INFO [hostos] Sudo... Pass
[Sep 12 07:08:39]  INFO [localhost] It can be scanned with fast scan mode even if warn or err messages are displayed due to lack of dependent packages or sudo settings in fast-root or deep scan mode
[Sep 12 07:08:39]  INFO [localhost] Scannable servers are below...
host
[Sep 12 07:08:39]  INFO [localhost] Start scanning
[Sep 12 07:08:39]  INFO [localhost] config: /vuls/config.toml
[Sep 12 07:08:39]  INFO [localhost] Validating config...
[Sep 12 07:08:39]  INFO [localhost] Detecting Server/Container OS...
[Sep 12 07:08:39]  INFO [localhost] Detecting OS of servers...
[Sep 12 07:08:40]  INFO [localhost] (1/1) Detected: host: centos 7.6.1810
[Sep 12 07:08:40]  INFO [localhost] Detecting OS of static containers...
[Sep 12 07:08:40]  INFO [localhost] Detecting OS of containers...
[Sep 12 07:08:40]  INFO [localhost] Checking Scan Modes...
[Sep 12 07:08:40]  INFO [localhost] Detecting Platforms...
[Sep 12 07:08:40]  INFO [localhost] (1/1) host is running on aws
[Sep 12 07:08:40]  INFO [localhost] Detecting IPS identifiers...
[Sep 12 07:08:40]  INFO [localhost] (1/1) host has 0 IPS integration
[Sep 12 07:08:40]  INFO [localhost] Scanning vulnerabilities...
[Sep 12 07:08:40]  INFO [localhost] Scanning vulnerable OS packages...
[Sep 12 07:08:40]  INFO [host] Scanning in fast mode


One Line Summary
================
host centos7.6.1810 359 installed, 63 updatable次にLinuxのディストリビュータが提供するOVAL形式の脆弱性DBをフェッチします。
今回はCentOSをスキャンしたので--redhatをつけて実行します。Ubuntuなどほかのディストリビューションの場合は対応するオプションを付けてフェッチしてください。オプションの詳細は下記ページを参考にして下さい。
$ pwd
/home/vuls/vulsctl/docker
$ ./oval.sh --redhat
INFO[09-12|06:28:12] Fetching...                              URL=https://www.redhat.com/security/data/oval/com.redhat.rhsa-RHEL6.xml.bz2
INFO[09-12|06:28:12] Fetching...                              URL=https://www.redhat.com/security/data/oval/com.redhat.rhsa-RHEL7.xml.bz2
INFO[09-12|06:28:12] Fetching...                              URL=https://www.redhat.com/security/data/oval/com.redhat.rhsa-RHEL8.xml.bz2
INFO[09-12|06:28:13] Fetched...                               URL=https://www.redhat.com/security/data/oval/com.redhat.rhsa-RHEL8.xml.bz2
INFO[09-12|06:28:13] Fetched...                               URL=https://www.redhat.com/security/data/oval/com.redhat.rhsa-RHEL6.xml.bz2
INFO[09-12|06:28:13] Fetched...                               URL=https://www.redhat.com/security/data/oval/com.redhat.rhsa-RHEL7.xml.bz2
INFO[09-12|06:28:13] Finished fetching OVAL definitions
INFO[09-12|06:28:13] Fetched                                  URL=https://www.redhat.com/security/data/oval/com.redhat.rhsa-RHEL8.xml.bz2 OVAL definitions=60
INFO[09-12|06:28:13] Refreshing...                            Family=redhat Version=8
INFO[09-12|06:28:14] Fetched                                  URL=https://www.redhat.com/security/data/oval/com.redhat.rhsa-RHEL6.xml.bz2 OVAL definitions=1130
INFO[09-12|06:28:14] Refreshing...                            Family=redhat Version=6
INFO[09-12|06:28:16] Fetched                                  URL=https://www.redhat.com/security/data/oval/com.redhat.rhsa-RHEL7.xml.bz2 OVAL definitions=887
INFO[09-12|06:28:16] Refreshing...                            Family=redhat Version=7
$ ls oval.sqlite3
oval.sqlite3
$ ls -alh oval.sqlite3
-rw-r--r--. 1 root root 11M Sep 12 06:28 oval.sqlite3さて脆弱性DBの準備が整いましたので、レポートを実行します。
vulsctl/report.shを使って結果を表示します。 scan.shで作成されたJSONの情報と、先程取得したRed Hatが提供するOVALを用いてスキャン対象サーバに潜在するCVE-IDを特定します。 詳細はドキュメントを参照ください。
$ pwd
/home/vuls/vulsctl/docker
$ ./report.sh
[Sep 12 07:12:10]  INFO [localhost] Validating config...
[Sep 12 07:12:10]  INFO [localhost] Loaded: /vuls/results/2019-09-12T07:08:40Z
[Sep 12 07:12:10]  INFO [localhost] Validating db config...
INFO[0000] -cvedb-type: sqlite3, -cvedb-url: , -cvedb-path: /vuls/cve.sqlite3
INFO[0000] -ovaldb-type: sqlite3, -ovaldb-url: , -ovaldb-path: /vuls/oval.sqlite3
INFO[0000] -gostdb-type: sqlite3, -gostdb-url: , -gostdb-path: /vuls/gost.sqlite3
INFO[0000] -exploitdb-type: sqlite3, -exploitdb-url: , -exploitdb-path: /vuls/go-exploitdb.sqlite3
[Sep 12 07:12:10]  WARN [localhost] --cvedb-path=/vuls/cve.sqlite3 file not found. [CPE-scan](https://vuls.io/docs/en/usage-scan-non-os-packages.html#cpe-scan) needs cve-dictionary. if you specify cpe in config.toml, fetch cve-dictionary before reporting. For details, see `https://github.com/kotakanbe/go-cve-dictionary#deploy-go-cve-dictionary`
[Sep 12 07:12:10]  WARN [localhost] --gostdb-path=/vuls/gost.sqlite3 file not found. Vuls can detect `patch-not-released-CVE-ID` using gost if the scan target server is Debian, RHEL or CentOS, For details, see `https://github.com/knqyf263/gost#fetch- f`
[Sep 12 07:12:10]  WARN [localhost] --exploitdb-path=/vuls/go-exploitdb.sqlite3 file not found. Fetch go-exploit-db before reporting if you want to display exploit codes of detected CVE-IDs. For details, see `https://github.com/mozqnet/go-exploitdb`
[Sep 12 07:12:10]  INFO [localhost] host: 0 CVEs are detected with Library
[Sep 12 07:12:10]  INFO [localhost] OVAL is fresh: redhat 7.6.1810
[Sep 12 07:12:12]  INFO [localhost] host: 111 CVEs are detected with OVAL
[Sep 12 07:12:12]  INFO [localhost] host: 0 CVEs are detected with CPE
[Sep 12 07:12:12]  INFO [localhost] host: 0 CVEs are detected with GitHub Security Alerts
[Sep 12 07:12:12]  INFO [localhost] host: 0 unfixed CVEs are detected with gost
[Sep 12 07:12:12]  INFO [localhost] Fill CVE detailed information with CVE-DB
[Sep 12 07:12:12]  INFO [localhost] Fill exploit information with Exploit-DB
[Sep 12 07:12:12]  INFO [localhost] host: 0 exploits are detected
host (centos7.6.1810)
=======================
Total: 111 (High:57 Medium:39 Low:15 ?:0), 35/111 Fixed, 359 installed, 63 updatable, 0 exploits, en: 0, ja: 0 alerts

+------------------+------+--------+-----+------+---------+---------------------------------------------------+
|      CVE-ID      | CVSS | ATTACK | POC | CERT |  FIXED  |                        NVD                        |
+------------------+------+--------+-----+------+---------+---------------------------------------------------+
| CVE-2019-10160   |  9.8 |  AV:N  |     |      |   fixed | https://nvd.nist.gov/vuln/detail/CVE-2019-10160   |
| CVE-2019-9636    |  9.8 |  AV:N  |     |      |   fixed | https://nvd.nist.gov/vuln/detail/CVE-2019-9636    |
| CVE-2016-10745   |  9.0 |  AV:N  |     |      |   fixed | https://nvd.nist.gov/vuln/detail/CVE-2016-10745   |
| CVE-2019-11085   |  8.8 |  AV:L  |     |      |   fixed | https://nvd.nist.gov/vuln/detail/CVE-2019-11085   |
| CVE-2018-5743    |  8.6 |  AV:N  |     |      |   fixed | https://nvd.nist.gov/vuln/detail/CVE-2018-5743    |
| CVE-2018-1000876 |  7.8 |  AV:L  |     |      | unfixed | https://nvd.nist.gov/vuln/detail/CVE-2018-1000876 |
| CVE-2018-18281   |  7.8 |  AV:L  |     |      | unfixed | https://nvd.nist.gov/vuln/detail/CVE-2018-18281   |
| CVE-2019-11811   |  7.8 |  AV:L  |     |      |   fixed | https://nvd.nist.gov/vuln/detail/CVE-2019-11811   |
| CVE-2019-6974    |  7.8 |  AV:L  |     |      |   fixed | https://nvd.nist.gov/vuln/detail/CVE-2019-6974    |
| CVE-2018-14618   |  7.5 |  AV:N  |     |      |   fixed | https://nvd.nist.gov/vuln/detail/CVE-2018-14618   |
| CVE-2018-16871   |  7.5 |  AV:N  |     |      |   fixed | https://nvd.nist.gov/vuln/detail/CVE-2018-16871   |
| CVE-2019-11477   |  7.5 |  AV:N  |     |      |   fixed | https://nvd.nist.gov/vuln/detail/CVE-2019-11477   |
| CVE-2019-3855    |  7.5 |  AV:N  |     |      |   fixed | https://nvd.nist.gov/vuln/detail/CVE-2019-3855    |
...省略Vulsにはターミナル上で結果を確認可能なTerminalベースのビューアが付属しています。こちらで結果を確認してみましょう。
vulsctl/tui.shを使ってコンソール上で結果を確認します。 Tabでペインを移動し、矢印やjkで移動します。Ctrl-Cで終了します。
詳細はドキュメントを参照ください。
$ pwd
/home/vuls/vulsctl/docker
$ ./tui.sh --cvss-over=7
VulsはSSHで接続可能なLinux/FreeBSDは簡単に脆弱性スキャンが可能です。
適当なUbuntuサーバを準備して、SSH公開鍵認証接続の設定とスキャン前に事前に一度SSHを実行して下さい。
次に、スキャン対象のUbuntuサーバのSSH情報を設定ファイルに追記します。
$ pwd
/home/vuls/vulsctl/docker
$ cat config.toml
[servers]
[servers.ubuntu]
host        = "192.168.56.4"
port        = "22"
user        = "vuls"
keyPath     = "/root/.ssh/id_rsa"
スキャンを実施します。
$ pwd
/home/vuls/vulsctl/docker
$ ./scan.sh ubuntu
レポートにはUbuntu用の脆弱性DB(OVAL)が必要なので追加で取得します。
$ pwd
/home/vuls/vulsctl/docker
$ ./oval.sh --ubuntu
$ ./report.sh
$ ./tui.sh
もし他のLinuxディストリビューションをスキャンする場合は、同じように対応するOVALを事前に準備して下さい。詳細はドキュメントを参考にして下さい。
CVE-IDは発番されているが、まだLinuxディストリビューションのアップデートパッケージが提供されいてない脆弱性も多数存在します。Vulsはパッチがまだ提供されていない脆弱性も検知可能です。
これらのパッチ未提供な脆弱性を検知するためには、追加の脆弱性DBが必要です。 以下のコマンドでknqyf263/gostを利用して脆弱性DBを取得します。
gostはRed Hat, CentOS, Debianのみサポートしています。それ以外のOSはgostの脆弱性DBをフェッチしても検知精度は変わりません。 ただ、Red HatのCVE情報は情報量が豊富なので、CVSSやSummary情報の補強のためにgostをフェッチするのはおすすめです。
$ pwd
/home/vuls/vulsctl/docker
$ ./gost.sh --redhat
Using default tag: latest
latest: Pulling from vuls/gost
5d20c808ce19: Already exists
c0f752a1fc26: Pull complete
919f8990415c: Pull complete
Digest: sha256:679a4306d67e0b0992fd43b46c4a2fe4d27a51a1e2d9394e19471c5df02c399c
Status: Downloaded newer image for vuls/gost:latest
docker.io/vuls/gost:latest
INFO[09-12|15:00:33] Initialize Database
2019-09-12T15:00:33.903Z        DEBUG   db path: db/trivy.db
2019-09-12T15:00:33.929Z        DEBUG   remove an existed directory
INFO[09-12|15:02:13] Opening DB.                              db=sqlite3
INFO[09-12|15:02:13] Migrating DB.                            db=sqlite3
INFO[09-12|15:02:13] Insert RedHat into DB                    db=sqlite3
 0 / 20000 [------------------------------------------------------------------------------------------------------------------------------------------------------------------------]   0.00%INFO[09-12|15:02:13] Insert 20000 CVEs
 20000 / 20000 [===============================================================================================================================================================] 100.00% 2m2s
私の環境だと約10分かかりました。
- report
脆弱性検知数が増えていることが確認できます。 パッチ未提供な脆弱性は「Unfixed」として表示されます。
検知されたCVE-ID用の攻撃コードがMetasploit Frameworkに存在するかをレポートに表示可能です。攻撃用モジュールが存在するCVEは、ツールから簡単に攻撃可能な状態であるとみなせるので、攻撃用モジュールが存在しないCVEよりもリスクは高くなると言えます。
go-msfdbをフェッチします。
$ pwd
/home/vuls/vulsctl/docker
$ ./msfdb.sh
Using default tag: latest
latest: Pulling from vuls/go-msfdb
cbdbe7a5bc2a: Pull complete
936c30013c05: Pull complete
dabcf4a113d0: Pull complete
Digest: sha256:124027eec3f5157447102dafaaae638037d3587936ed5f68055c822e8acc8f02
Status: Downloaded newer image for vuls/go-msfdb:latest
docker.io/vuls/go-msfdb:latest
INFO[08-29|08:03:48] Opening DB                               db=sqlite3
INFO[08-29|08:03:48] Init DB                                  db=sqlite3
INFO[08-29|08:03:48] Migrating DB                             db=sqlite3
INFO[08-29|08:03:48] Fetching vulsio/msfdb-list
INFO[08-29|08:03:48] git clone                                repo=/root/.cache/go-msfdb/msfdb-list
Cloning into '/root/.cache/go-msfdb/msfdb-list'...
remote: Enumerating objects: 1835, done.
remote: Counting objects: 100% (1835/1835), done.
remote: Compressing objects: 100% (1834/1834), done.
remote: Total 1835 (delta 26), reused 128 (delta 0), pack-reused 0
Receiving objects: 100% (1835/1835), 945.52 KiB | 1.17 MiB/s, done.
Resolving deltas: 100% (26/26), done.
INFO[08-29|08:03:51] Updated files                            count=1978
INFO[08-29|08:03:51] Metasploit-Framework modules             count=2216
INFO[08-29|08:03:51] Insert info into go-msfdbdb.             db=sqlite3
INFO[08-29|08:03:51] Inserting Modules having CVEs...
2216 / 2216 [-----------------------------------------------------------------------------------------------------------------------------] 100.00% 1979 p/s
INFO[08-29|08:03:53] CveID Metasploit Count                   count=2216
私の環境だと約5秒かかりました。
再度スキャンして、レポートを表示するとmetasploitモジュールの情報が表示されます。
$ pwd
/home/vuls/vulsctl/docker
$ ./scan.sh
$ ./tui.sh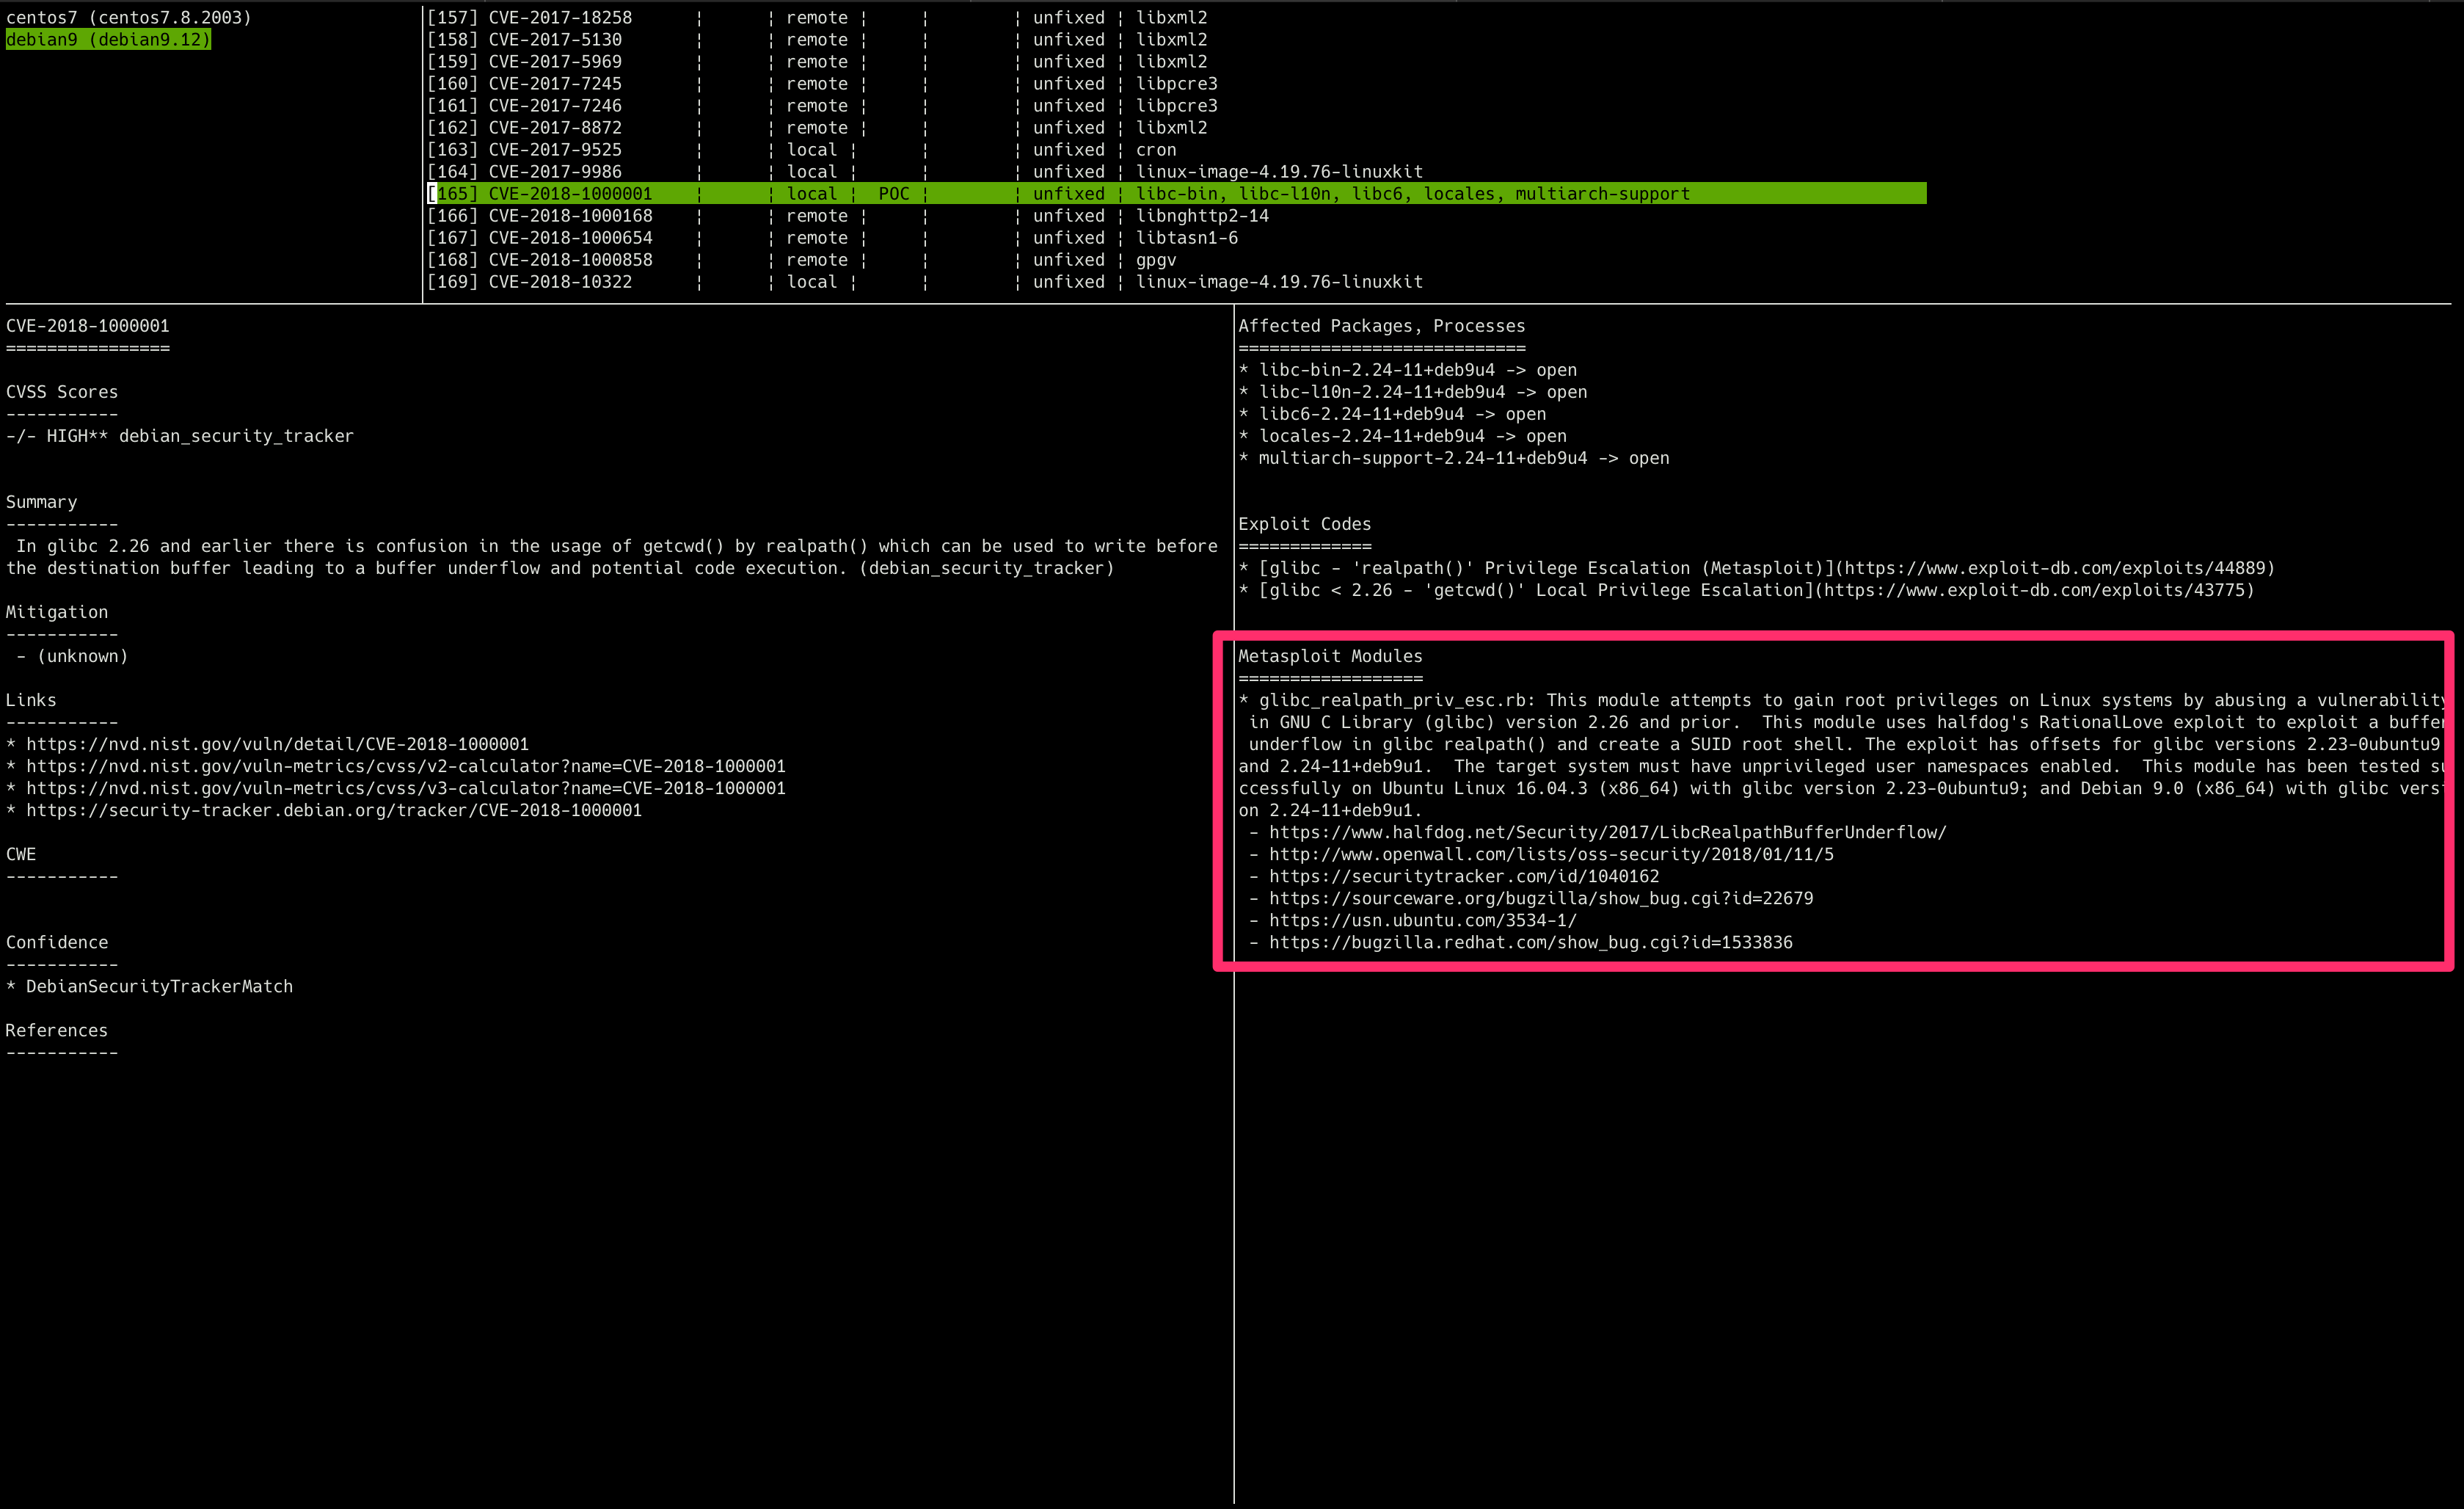
Exploit Databaseには、PoCが43,000件以上集められています。DBを追加することで検知されたCVE-ID用のPoCがExploit Databaseに存在するかをレポートに表示可能です。PoCが存在する脆弱性はそうでないものよりもリスクは高いと言えます。ただ検知されたPoCが実際に動くものかどうかは不明なため検証が必要です。
go-exploitdbをフェッチします。
$ pwd
/home/vuls/vulsctl/docker
$ ./exploitdb.sh
Using default tag: latest
latest: Pulling from vuls/go-exploitdb
c87736221ed0: Pull complete
e0d679e82107: Pull complete
7a7a6055cf29: Pull complete
Digest: sha256:1a2721baa6ca5fb533748558c5bf358518c6bd9452be5921db4a2337d0964339
Status: Downloaded newer image for vuls/go-exploitdb:latest
docker.io/vuls/go-exploitdb:latest
INFO[09-12|15:08:46] Opening Database.                        db=sqlite3
INFO[09-12|15:08:46] Migrating DB.                            db=sqlite3
INFO[09-12|15:08:46] Fetching Offensive Security Exploit
INFO[09-12|15:08:46] Fetching                                 URL=https://cve.mitre.org/data/downloads/allitems-cvrf.xml
INFO[09-12|15:09:36] Fetching                                 URL=https://raw.githubusercontent.com/offensive-security/exploitdb/master/files_shellcodes.csv
INFO[09-12|15:09:36] Fetching                                 URL=https://raw.githubusercontent.com/offensive-security/exploitdb/master/files_exploits.csv
INFO[09-12|15:09:37] Offensive Security Exploit               count=44270
INFO[09-12|15:09:37] Insert Exploit into go-exploitdb.        db=sqlite3
INFO[09-12|15:09:37] Inserting 44270 Exploits
44270 / 44270 [------------------------------------------------------------------------------------------------------------------------------------------------------------] 100.00% 4717 p/s
INFO[09-12|15:09:46] No CveID Exploit Count                   count=32084
INFO[09-12|15:09:46] CveID Exploit Count                      count=12186
再度スキャンして、レポートを表示するとExploit DatabaseにあるPoCの情報が表示されます。
$ pwd
/home/vuls/vulsctl/docker
$ ./scan.sh
$ ./tui.sh
JPCERT/CCとUS-CERTの注意喚起情報を取得して、検知した脆弱性が注意喚起情報に該当するかを表示可能です。
$ pwd
/home/vuls/vulsctl/docker
$ ./cvedb.sh
$ ./scan.sh
$ ./report.sh
$ ./tui.shfast-rootスキャンモードはroot権限が必要なコマンドを発行してプロセス情報やネットワークListen情報などのトリアージの判断に役に立つ情報を表示可能です。
[vuls@host vulsctl]$ sudo su -
[sudo] vuls のパスワード:
最終ログイン: 2020/01/27 (月) 12:58:04 JST日時 pts/2
[root@host ~]# mkdir .ssh
[root@host ~]# chmod 700 .ssh
[root@host ~]# cat /home/vuls/.ssh/id_rsa.pub >> /root/.ssh/authorized_keys
[root@host ~]# chmod 600 /root/.ssh/*
[root@host ~]# exit
ログアウト
rootユーザでパスワードなしでSSH接続できるか確認します。
[vuls@host vulsctl]$ ssh root@192.168.56.3
Last login: Mon Jan 27 13:15:06 2020
[root@host ~]# exit
rootユーザでパスワードなしでSSH接続できるか確認できました。
次にconfig.tomlに以下を追加します。
scanMode = ["fast-root"]でfast-rootモードを指定しています。
[servers]
[servers.hostroot]
host         = "192.168.56.3"
port        = "22"
user        = "root"
keyPath     = "/root/.ssh/id_rsa"
scanMode     = ["fast-root"]
scanしてレポートします。
$ ./scan.sh hostroot
$ ./report.sh
$ ./tui.sh
TUIにプロセス起動情報やネットワークListenの情報が表示さるました。 CVEを含む脆弱なパッケージからプロセスが起動しているかどうか、さらにそのプロセスがネットワークのポートをListenしているかどうかがわかるようになりました。ネットワークから攻撃可能な脆弱性に該当するプロセスがネットワークをListenしている場合は要調査といった判断ができるようになりました。

なお、fast-rootスキャンモードでは、追加のOSパッケージの事前インストールが必要な場合があります。また、rootユーザでSSHログインするのではなく、sudoで実行する場合はスキャン対象サーバ上の/etc/sudoersの設定が必要です。 詳細はドキュメントを参照して下さい。
スキャン対象サーバがインターネットに接続できない状況でもスキャン可能なofflineモードもあります。config.tomlを以下のように設定して下さい。
[servers]
[servers.hostroot]
host         = "192.168.56.3"
port        = "22"
user        = "root"
keyPath     = "/root/.ssh/id_rsa"
scanMode = ["fast", "offline"]Vulsはアプリケーションの依存ライブラリのスキャンに対応しています。
複数の方法があり、それぞれ向き不向きがあるので実際に試してみるのがよいでしょう。
詳細はDocumentを参照してください。
次に、ロックファイルを指定したスキャン方法を説明します。
Gemやpipなどのプログラミング言語のパッケージマネージャのバージョン固定用ロックファイルを解析し、そこに定義されている依存ライブラリに潜在する脆弱性を検知可能です。(内部でaquasecurity/trivyを呼んでいます)
ドキュメントはこちらです。
以下のロックファイルに対応しています。
- Gemfile.lock
- Pipfile.lock
- poetry.lock
- composer.lock
- package-lock.json
- yarn.lock
- Cargo.lock
では試しにGitHubにあった古いRedmineのGemfile.lockをスキャンしてみましょう。
まずスキャン対象サーバ上でwgetで古いGemfile.lockを取得します。
$ #スキャン対象サーバ上で実行します
$ pwd
/home/vuls/vulsctl/docker
$ wget https://raw.githubusercontent.com/41studio/redmine/master/Gemfile.lock
config.tomlにlockfilesのパスを指定します。
[servers]
[servers.host]
host         = "192.168.56.3"
port        = "22"
user        = "vuls"
keyPath     = "/root/.ssh/id_rsa"
lockfiles = [ "/home/vuls/vulsctl/docker/Gemfile.lock" ]
scanします。
$ ./scan.sh hostroot
$ ./report.sh
$ ./tui.sh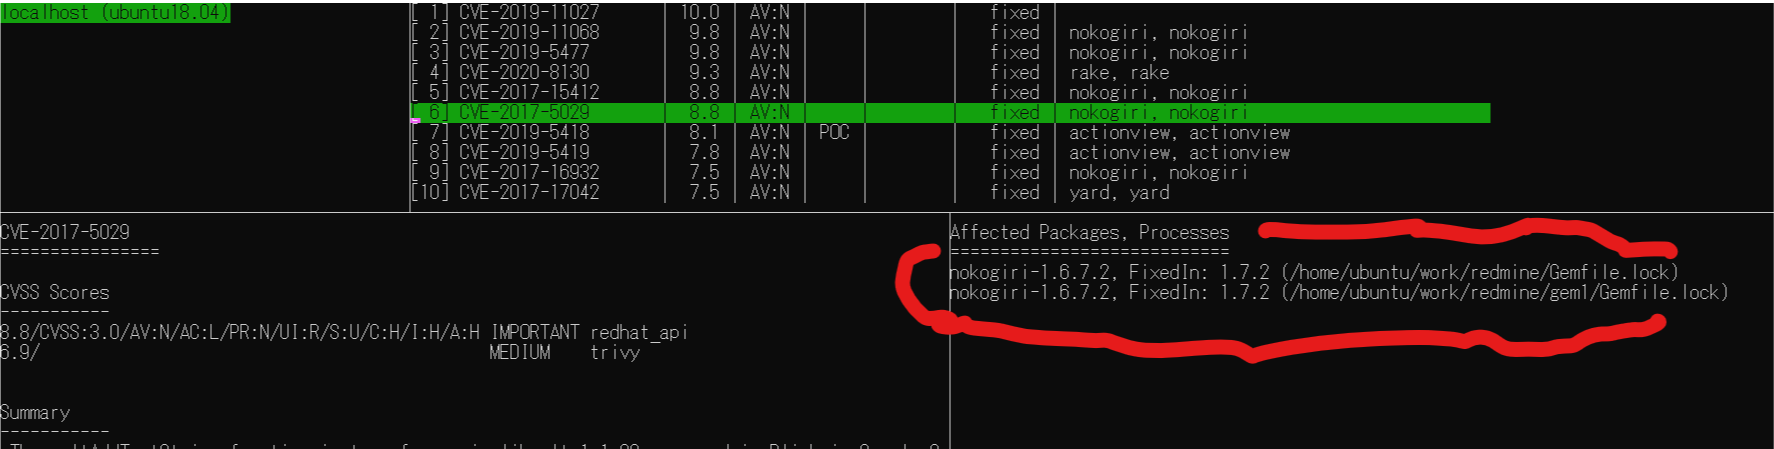
Vulsはconfig.tomlにCPEを定義することでNW機器や商用のミドルウェアの脆弱性を検知することができます。OSパッケージのスキャンはサーバに実際にSSHしてコマンドを発行しましたが、CPEスキャンはNVDとJVNのデータベースのバージョン比較によって検知されます。実機に対してコマンドを発行したりネットワークアクセスはしません。
サンプルのconfig.tomlはこちらです。
type="pseudo"を指定するとSSH接続しないモードとなります。
[servers.forti]
type = "pseudo"
cpeNames = [
    "cpe:/o:fortinet:fortios:4.3.0",
]
スキャンしてレポートします。NVD, JVNのデータソースが必要なのでまだの場合はcve.shで取得します。
$ ./scan.sh forti
$ ./cve.sh
$ ./report.sh
$ ./tui.sh
詳細はドキュメントを参照して下さい。
| オプション | 説明 |
|---|---|
| -debug | デバッグ用フラグ。発行しているコマンドがわかる |
| -cvss-over | CVSSスコアでフィルタ |
| -ignore-unfixed | パッチがまだない脆弱性は非表示 |
| -diff | 前回との差分のみ(新規検知のみ) |
Fetch Vulnerability Databases This will take some time ...
私の環境だと1時間以上かかります。
$ ./update-all.sh