iOS5以前,View Controllers Containersはappleの特権だった。実際、View Controller Programming Guideにはそれらを使うべきではない旨の記述があった。 かつてView ControllerについてのAppleからの一般的はアドバイスは「1つのview controller は1つの画面の内容を管理する。」だった。 これはそれから「1つのView controllerは自分に含まれるユニットの内容を管理する」に変更された。 Why didn’t Apple want us to build our own tab bar controllers and navigation controllers? (なぜアップルは独自のtab bar controllersやnavigation controllersをbuildさせたくなかったのだろうか?) 具体的に、次の問題はなんだろう
[viewControllerA.view addSubView:viewControllerB.view]
UIWindowこれはアプリのroot viewだが、rotationや初期レイアウトメッセージから作られる。 上の図では、root view controller に挿入されたchild view controllerはそれらのeventから除外される。 viewWillAppearのようなevent methodも呼び出されない。
iOS5以前にbuildされたcustom view controllersのコンテナはchild view controllersへの参照を保存し、 手動でparent view controllerでよばれたevent methodをすべて中継していた。ただ、これを正確にやるには非常に難しい。
あなたが砂で遊ぶ子供の頃、両親はもしあなたが小さいシャベルで掘り続ければ中国までたどり着くと教えてくれなかっただろうか。わたしはこの主張を確かめるためにTunnelという小さなでもアプリを作った。 GitHubのRepoをcloneして動作させることで、サンプルコードを簡単に理解できるだろう。
(ネタバレ:Western Denmark landsで掘ると南太平洋のどこかにただろつく)
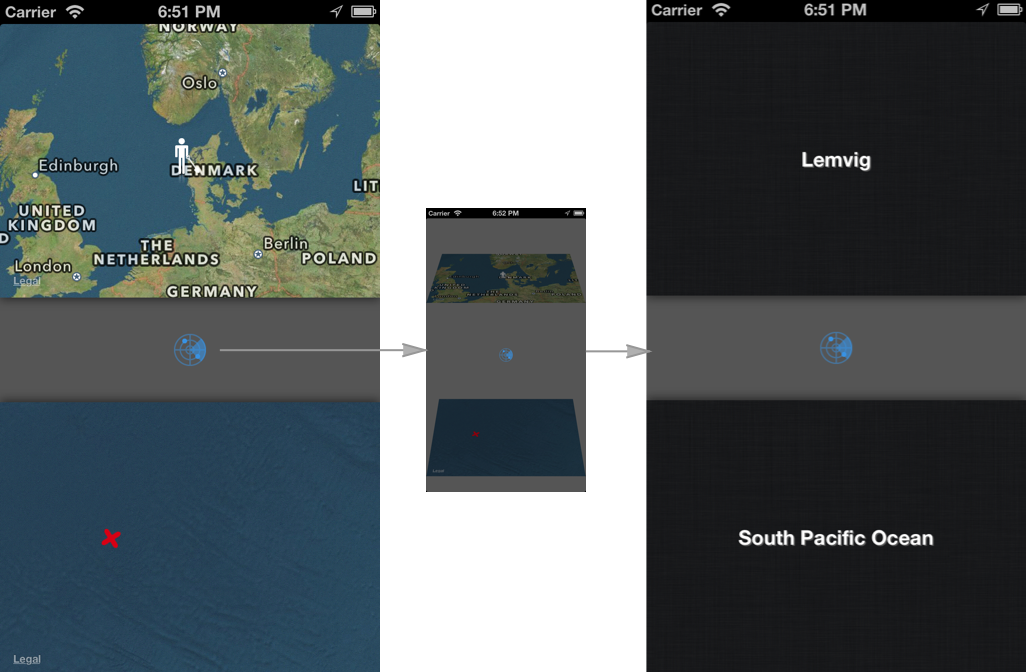
反対の座標を見つけるためには、シャベルをもった小さな男を動かしてほしい。地図は出口がどこかあなたに伝えてくれるだろう。つぎにレーダーボタンをタップしてみよう。そうすれば、地図はflipしてその場所の名前を表示してくれる。
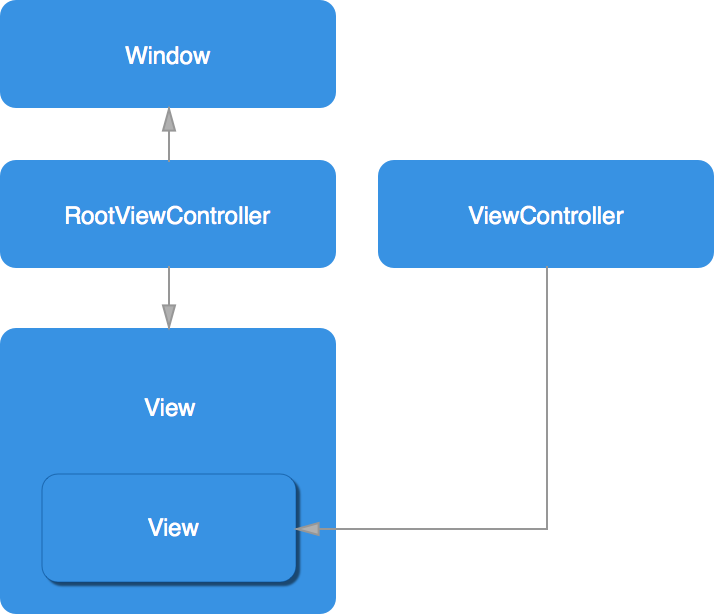
スクリーン上には2つのmap view controllersが存在する。 これらはそれぞれドラッグ、注釈, 地図の更新に対処しなければならない。 これらをFlipすることで反転された座標をもつ2つのview controllersが表示される。 すべてのview controllersはparent view controllersの中に含まれる。それはviewを持ち、レイアウトとローテーションが予想通りに作用することを保証する。
root view controllers は2つのcontainer viewを持っている。 我々が後にで知ったように、これはchildview controllersのviewのレイアウトやアニメーションを簡単にするために追加された。
- (void)viewDidLoad
{
	[super viewDidLoad];

	//Setup controllers
	_startMapViewController = [RGMapViewController new];
	[_startMapViewController setAnnotationImagePath:@"man"];
	[self addChildViewController:_startMapViewController];          //  1
	[topContainer addSubview:_startMapViewController.view];         //  2
	[_startMapViewController didMoveToParentViewController:self];   //  3
	[_startMapViewController addObserver:self
		forKeyPath:@"currentLocation"
		options:NSKeyValueObservingOptionNew
		context:NULL];

	_startGeoViewController = [RGGeoInfoViewController new];        //  4
}
開始位置が表示されたStartMapViewControllerは、インスタンス化され、アノテーション画像が設定される。
- _startMapViewcontrollerは、root view controllersのchildとして追加される。これは自動的にchildのwillMoveToParentViewControllerメソッドを呼び出す。
- child viewはfirst container view のsubviewとして追加される。
- childに今parent view controllersを所持したことが通知されます。
- geocodingを行うchild view controllerがインスタンス化されたが、まだ任意のビューまたはコントローラの階層に挿入されていない。
root view controller は2つのcontainer viewを定義し、これによりchild view controllerのサイズを決定する。 child view controllerは、どのコンテナーに追加されるかを知らない。したがって、サイズは柔軟である必要がある。
- (void) loadView
{
	mapView = [MKMapView new];
	mapView.autoresizingMask = UIViewAutoresizingFlexibleWidth |UIViewAutoresizingFlexibleHeight;
	[mapView setDelegate:self];
	[mapView setMapType:MKMapTypeHybrid];

	self.view = mapView;
}
この場合、それらはsuper view のboundsを利用してレイアウトされるだろう。これはchild view controllerの再利用性を高めている。もし、われわれがnavigation controllerにpushすれば、それは正しくレイアウトされるだろう。
Appleはview controller containment APIをより細かくしてきたため、私たちが考えることができるあらゆるシナリオを構築し、animateすることが可能だ。 Appleはさらにscreen上の2つのview controllerを交換するための、block basedな便利なメソッドを提供している。 ※transitionFromViewController:toViewController(...):はあらゆる点で私たちを助けてくれる。
- (void) flipFromViewController:(UIViewController*) fromController
    	       toViewController:(UIViewController*) toController
            	  withDirection:(UIViewAnimationOptions) direction
{
  toController.view.frame = fromController.view.bounds;                           //  1
  [self addChildViewController:toController];                                     //
  [fromController willMoveToParentViewController:nil];                            //

  [self transitionFromViewController:fromController
                  toViewController:toController
                          duration:0.2
                           options:direction | UIViewAnimationOptionCurveEaseIn
                        animations:nil
                        completion:^(BOOL finished) {

                            [toController didMoveToParentViewController:self];  //  2
                            [fromController removeFromParentViewController];    //  3
                        }];
}
- アニメーションの前にchildとしてtoControllerをaddする。それが削除されるだろうとfromControllerに通知する。fromControllerのviewがcontainers view hierarchyの一部である場合、viewWillDisapear: が呼ばれる。
- toControllerには新しいparentのことが通知される。さらに適切なview event methodが呼ばれる。
- fromControllerが削除されます。
このview controller transitionsのための便利なメソッドは、自動的に古いview controllerのviewと新しいview controllerのviewを入れ替えてくれる。しかしながら、独自のtransitionを実装し、単に一度に一つのviewを表示したければ、古いview上でremoveFromSuperViewをよび、新しいviewをaddSubviewしなければならない Getting the sequence of method calls wrong will most likely result in an UIViewControllerHierarchyInconsistency warning. (methodの呼び出し間違えのシーケンスを得ることは結果としてUIViewControllerHierarchyの矛盾を引き起こします可能性が高い。) たとえば、あなたがviewをaddする前にdidMoveToParentViewController:をcallした場合、これが起きるでしょう。
UIViewAnimationOptionTransitionFlipFromTop アニメーションを使うためには、私たちはchildren viewをroot view controllerのviewではなく私たちのview containersに追加しなければならない。 そうしなければ、アニメーションはroot view全体がflipしてしまう結果になるでしょう
#Communication
view controllersは再利用可能かつ自己完結型のentitiesであるべきだ。 Child view controllerもこの経験則の例外ではない。 これを達成するために、parent view controllerは2つのタスクだけを気にかければよい。child view controllerのroot view をレイアウトすること、そしてその公開されたAPIを介してchild view controllerとやりとりする。 child's view tree や 他の内部状態を修正すべきではない。
child view controllersは、自らのview treeを管理する為に必要なロジックを含んでいる必要がある。 dumb viewsとして扱わないべきだ。 これは結果として関係の分離、良い再利用性をもたらすだろう。
Tunnel example appでは、親ビューコントローラは、マップビューコントローラ上のcurrentLocationというプロパティを監視している。
[_startMapViewController addObserver:self
	forKeyPath:@"currentLocation"
	options:NSKeyValueObservingOptionNew
	context:NULL];
このプロパティに変更があったとき、(地図上のシャベルを持った小さな男をが動いたときに反応する)parent view controllerは別の地図の新しい座標のantipodeと通信する。
[oppositeController updateAnnotationLocation:[newLocation antipode]];
同様に、レーダーボタンをタップするとき、parent view controllerは新しいchild view controller上の反転した座標にlocationを設定します。
[_startGeoViewController setLocation:_startMapViewController.currentLocation];
[_targetGeoViewController setLocation:_targetMapViewController.currentLocation];
child viewからparent view controllerへの通信をするためにあなたが選択した技術(KVO, notifications, delegate)とは無関係に、目標は常に同じままです。child view controllersは独立かつ再利用可能であるべきです。 この例では、ナビゲーションスタック情に1つのchild view controllersをpushすることもできますが、通信は同じAPIを通して動作します。