An in depth overview of how to use Swashbuckle and XML Comments to document your API in an almost effort-less manner
- Single API Version
ASP.NET CoreSetupASP.NET FrameworkSetup (Coming soon)- NuGet
- Configuring
///Documenting
- Multiple API Versions (Coming soon)
For the sake of this tutorial, we will use a project called NetCore.SwaggerDoc.csproj. Whenever you see it referenced, change to your project's name.
The first step is to install Swashbuckle for ASP.NET Core in your .csproj.
Open a PowerShell/Terminal and install Swashbuckle:
$dotnet add package Swashbuckle.AspNetCore
Open VS Package Manager and install Swashbuckle:
PM> Install-Package Swashbuckle.AspNetCore
On your .csproj file, place the following properties:
    ...
    <PropertyGroup Condition="'$(Configuration)|$(Platform)'=='Debug|AnyCPU'">
        <DocumentationFile>bin\Debug\netcoreapp2.0\NetCore.SwaggerDoc.xml</DocumentationFile>
    </PropertyGroup>

    <PropertyGroup Condition="'$(Configuration)|$(Platform)'=='Release|AnyCPU'">
        <DocumentationFile>bin\Release\netcoreapp2.0\NetCore.SwaggerDoc.xml</DocumentationFile>
    </PropertyGroup>
    ...
These lines will ensure your code creates a XML Documentation File upon compiling both on Debug and on Release. Those files will be used by Swagger to enrich the UI.
On your Startup.cs inside the ConfigureServices method, place the following snippet:
    ...
    // Swagger
    services.AddSwaggerGen(c =>
    {
        c.SwaggerDoc("v1", new Info { Title = "NetCore.SwaggerDoc", Version = "v1" });
        var xmlFile = $"{Assembly.GetExecutingAssembly().GetName().Name}.xml";
        var xmlPath = Path.Combine(AppContext.BaseDirectory, xmlFile);
        c.IncludeXmlComments(xmlPath);
    });
    ...
and inside the Configure place the following:
    ...
    // Swagger
    app.UseSwagger();
    app.UseSwaggerUI(c =>
        {
            c.RoutePrefix = "";
            c.SwaggerEndpoint("./swagger/v1/swagger.json", "NetCore.SwaggerDoc V1");
        });
    ...
Those lines will configure the Swagger UI to load at the root of your WebService. You can change the route for it by supplying the c.RoutePrefix on Configurewith a path.
(Coming soon)
While programing using C# (both Framework and Core) you can use triple slashes before anything to document that particular structure in your generated XML (even without Swagger, for the method tooltip). Visual Studio automatically creates a base snippet for you if you type "///" atop of any method or property, like so:
    /// <summary>
    ///
    /// </summary>
    /// <param name="value"></param>
    [HttpPost]
    public void Post([FromBody]string value)
    {
        //
    }
Above is an example of the base triple slash documentation for a request with a single parameter. For more than one parameter you just create more param comments:
    /// <summary>
    ///
    /// </summary>
    /// <param name="id"></param>
    /// <param name="value"></param>
    [HttpPut("{id}")]
    public void Put(int id, [FromBody]string value)
    {
        //
    }
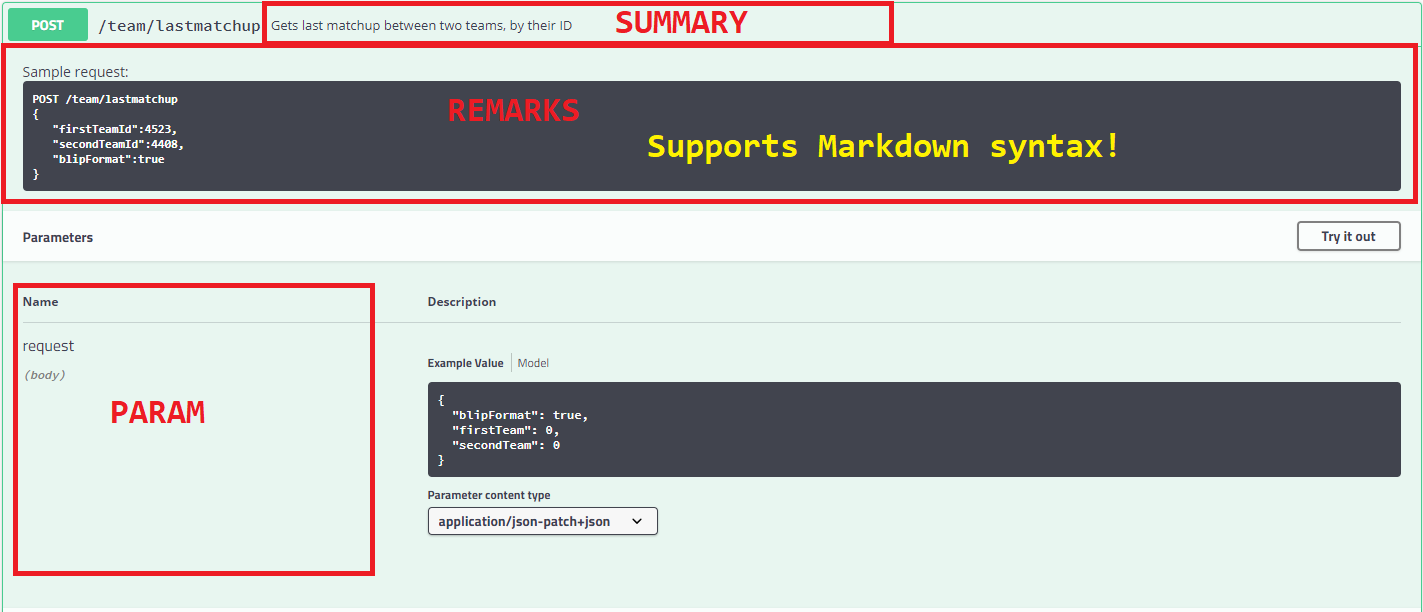
You can enrich the comments and therefore the documentation generated:
    /// <summary>
    /// Gets last matchup between two teams, by their ID
    /// </summary>
    /// <remarks>
    /// Sample request:
    ///
    ///     POST /team/lastmatchup
    ///     {
    ///        "firstTeamId":4523,
    ///        "secondTeamId":4408,
    ///        "blipFormat":true
    ///     }
    /// </remarks>
    /// <param name="request"></param>
    /// <response code="200">Successful call</response>
    /// <response code="202">Successful conversion to carrousel</response>
    /// <response code="400">Invalid Post Body</response>
    /// <response code="500">Internal error</response>
    [HttpPost, Route("lastmatchup"), ProducesResponseType(typeof(ScheduleResponse, 200)]
    public async Task<IActionResult> GetLastMatchup([FromBody] MatchupRequest request)
    {
        try
        {
            if (/**/) return BadRequest(); // 400
            /**/
            if (/**/)
                return Accepted(); // 202
            else
                return Ok(); // 200
        }
        catch (Exception ex)
        {
            return StatusCode(500); // 500
        }
    }
(code snippet from this API)

