You signed in with another tab or window. Reload to refresh your session.You signed out in another tab or window. Reload to refresh your session.You switched accounts on another tab or window. Reload to refresh your session.Dismiss alert
To attach a persistent disk to a virtual machine instance, both resources must be in the same zone
If you want to assign a static IP address to an instance, the instance must be in the same region as the static IP
GCloud CLI
# Help
gcloud -h
gcloud config --help
gcloud help config
# View the list of configurations in your environment
gcloud config list
gcloud config list --all
gcloud components list
# Set the region to us-east1
gcloud config set compute/region us-east1
# To view the project region setting, run the following command
gcloud config get-value compute/region
# Set the zone to us-east1-d
gcloud config set compute/zone us-east1-d
# To view the project zone setting, run the following command
gcloud config get-value compute/zone
# View the project id for your project
gcloud config get-value project
# View details about the project
gcloud compute project-info describe --project $(gcloud config get-value project)# Create an environment variable to store your Project IDexport PROJECT_ID=$(gcloud config get-value project)# Create an environment variable to store your Zoneexport ZONE=$(gcloud config get-value compute/zone)# To verify that your variables were set properly, run the following commandsecho -e "PROJECT ID: $PROJECT_ID\nZONE: $ZONE"# To create your VM, run the following command
gcloud compute instances create --help
gcloud compute instances create gcelab2 --machine-type e2-medium --zone $ZONE
gcloud compute instances list
gcloud compute instances list --filter="name=('gcelab2')"# List the firewall rules in the project
gcloud compute firewall-rules list
# List the firewall rules for the default network
gcloud compute firewall-rules list --filter="network='default'"# List the firewall rules for the default network where the allow rule matches an ICMP rule
gcloud compute firewall-rules list --filter="NETWORK:'default' AND ALLOW:'icmp'"# To connect to your VM with SSH, run the following command
gcloud compute ssh gcelab2 --zone $ZONE# Add a tag to the virtual machine
gcloud compute instances add-tags gcelab2 --tags http-server,https-server
# Update the firewall rule to allow HTTP
gcloud compute firewall-rules create default-allow-http --direction=INGRESS --priority=1000 --network=default --action=ALLOW --rules=tcp:80 --source-ranges=0.0.0.0/0 --target-tags=http-server
gcloud compute firewall-rules list --filter=ALLOW:'80'# View the available logs on the system
gcloud logging logs list
# View the logs that relate to compute resources
gcloud logging logs list --filter="compute"# Read the logs related to the resource type of gce_instance
gcloud logging read"resource.type=gce_instance" --limit 5
# Read the logs for a specific virtual machine
gcloud logging read"resource.type=gce_instance AND labels.instance_name='gcelab2'" --limit 5
GKE
# Create a GKE cluster
gcloud container clusters create --machine-type=e2-medium --zone=us-west1-c lab-cluster

# Authenticate with the cluster (generates kubecofnig entry)
gcloud container clusters get-credentials lab-cluster

# Now, try deploy an app
kubectl create deployment hello-server --image=gcr.io/google-samples/hello-app:1.0
kubectl expose deployment hello-server --type=LoadBalancer --port 8080
kubectl get service

# To delete the cluster, run the following command
gcloud container clusters delete lab-cluster
# Create a virtual machine `www1` in your default zone
gcloud compute instances create www1 \
--zone=us-central1-a \
--tags=network-lb-tag \
--machine-type=e2-small \
--image-family=debian-11 \
--image-project=debian-cloud \
--metadata=startup-script='#!/bin/bash apt-get update apt-get install apache2 -y service apache2 restart echo "<h3>Web Server: www1</h3>" | tee /var/www/html/index.html'# Create a virtual machine `www2` in your default zone
gcloud compute instances create www2 \
--zone=us-central1-a \
--tags=network-lb-tag \
--machine-type=e2-small \
--image-family=debian-11 \
--image-project=debian-cloud \
--metadata=startup-script='#!/bin/bash apt-get update apt-get install apache2 -y service apache2 restart echo "<h3>Web Server: www2</h3>" | tee /var/www/html/index.html'# Create a virtual machine `www3` in your default zone
gcloud compute instances create www3 \
--zone=us-central1-a \
--tags=network-lb-tag \
--machine-type=e2-small \
--image-family=debian-11 \
--image-project=debian-cloud \
--metadata=startup-script='#!/bin/bash apt-get update apt-get install apache2 -y service apache2 restart echo "<h3>Web Server: www3</h3>" | tee /var/www/html/index.html'# Create a firewall rule to allow external traffic to the VM instances
gcloud compute firewall-rules create www-firewall-network-lb --target-tags network-lb-tag --allow tcp:80
# Run the following to list your instances. You'll see their IP addresses in the EXTERNAL_IP column
gcloud compute instances list
# Create a static external IP address for your load balancer
gcloud compute addresses create network-lb-ip-1 --region us-central1
# Add a legacy HTTP health check resource
gcloud compute http-health-checks create basic-check
# Add a target pool in the same region as your instances. Run the following to create the target pool and use the health check, which is required for the service to function
gcloud compute target-pools create www-pool --region us-central1 --http-health-check basic-check
# Add the instances to the pool
gcloud compute target-pools add-instances www-pool --instances www1,www2,www3
# Add a forwarding rule
gcloud compute forwarding-rules create www-rule \
--region us-central1 \
--ports 80 \
--address network-lb-ip-1 \
--target-pool www-pool
# Enter the following command to view the external IP address of the www-rule forwarding rule used by the load balancer
gcloud compute forwarding-rules describe www-rule --region us-central1
# Access the external IP address
IPADDRESS=$(gcloud compute forwarding-rules describe www-rule --region us-central1 --format="json"| jq -r .IPAddress)echo$IPADDRESSwhiletrue;do curl -m1 $IPADDRESS;done
HTTP LB
Managed instance groups (MIGs) let you operate apps on multiple identical VMs. You can make your workloads scalable and highly available by taking advantage of automated MIG services, including: autoscaling, autohealing, regional (multiple zone) deployment, and automatic updating.
URL map is a Google Cloud configuration resource used to route requests to backend services or backend buckets. For example, with an external HTTP(S) load balancer, you can use a single URL map to route requests to different destinations based on the rules configured in the URL map:
Requests for any other host and path combination go to a default backend service.
A forwarding rule and its corresponding IP address represent the frontend configuration of a Google Cloud load balancer.
You need to:
Create an instance template.
Create a target pool.
Create a managed instance group.
Create a firewall rule.
Create a health check.
Create a backend service, and attach the managed instance group with named port.
Create a URL map, and target the HTTP proxy to route requests to your URL map.
Create a forwarding rule.
# First, create the load balancer template
gcloud compute instance-templates create lb-backend-template \
--region=us-central1 \
--network=default \
--subnet=default \
--tags=allow-health-check \
--machine-type=e2-medium \
--image-family=debian-11 \
--image-project=debian-cloud \
--metadata=startup-script='#!/bin/bash apt-get update apt-get install apache2 -y a2ensite default-ssl a2enmod ssl vm_hostname="$(curl -H "Metadata-Flavor:Google" \ http://169.254.169.254/computeMetadata/v1/instance/name)" echo "Page served from: $vm_hostname" | \ tee /var/www/html/index.html systemctl restart apache2'# Create a managed instance group (MIG) based on the template
gcloud compute instance-groups managed create lb-backend-group \
--template=lb-backend-template --size=2 --zone=us-central1-a
# Create the `fw-allow-health-check` firewall rule. The ingress rule allows traffic from the Google Cloud health checking systems (130.211.0.0/22 and 35.191.0.0/16).
gcloud compute firewall-rules create fw-allow-health-check \
--network=default \
--action=allow \
--direction=ingress \
--source-ranges=130.211.0.0/22,35.191.0.0/16 \
--target-tags=allow-health-check \
--rules=tcp:80
# Set up a global static external IP address that your customers use to reach your load balancer
gcloud compute addresses create lb-ipv4-1 \
--ip-version=IPV4 \
--global
# Note the IPv4 address that was reserved
gcloud compute addresses describe lb-ipv4-1 \
--format="get(address)" \
--global
# Create a health check for the load balancer
gcloud compute health-checks create http http-basic-check \
--port 80
# Create a backend service
gcloud compute backend-services create web-backend-service \
--protocol=HTTP \
--port-name=http \
--health-checks=http-basic-check \
--global
# Add your instance group as the backend to the backend service
gcloud compute backend-services add-backend web-backend-service \
--instance-group=lb-backend-group \
--instance-group-zone=us-central1-a \
--global
# Create a URL map to route the incoming requests to the default backend service
gcloud compute url-maps create web-map-http \
--default-service web-backend-service
# Create a target HTTP proxy to route requests to your URL map
gcloud compute target-http-proxies create http-lb-proxy \
--url-map web-map-http
# Create a global forwarding rule to route incoming requests to the proxy
gcloud compute forwarding-rules create http-content-rule \
--address=lb-ipv4-1\
--global \
--target-http-proxy=http-lb-proxy \
--ports=80
Perform Foundational Infrastructure Tasks in Google Cloud
Cloud Storage - Bucket
Enter a unique name for your bucket, every bucket must have a unique name across the entire Cloud Storage namespace. You can use your Project ID as the bucket name because it will always be unique. Object names must be unique only within a given bucket.
Choose where to store - location:
Multi-region, highest availability
Dual-region, across 2 regions
Region, single region
Choose a storage class for your data:
Autoclass - automatically transitions objects to hotter or colder based on activity
Default class - applies to all objects, unless manually modified or via lifecycle rules
Standard - best for short term and frequently accessed data
Nearline - best for backup accessed <1x/mth
Coldline - disaster recovery and data <1x/3mth
Archive - long-term accessed <1x/year
Choose how to control access to objects:
Prevent public access - Restrict data from being publicly accessible via the internet
Access control:
Uniform - bucket level permissions (IAM), becomes permanent after 90 days
Fine-grained - individual objects (ACL+IAM)
Choose how to protect object data:
None
Object versioning (DR)
Retention policy (compliance)
To make object publicly accessible later on:
Permission - Grant Access
Add principals: allUsers
Assign roles: Storage Object Viewer
Allow public access
gsutil ls gs://[YOUR_BUCKET_NAME]
IAM
Four Basic "primitive" roles:
Browser - access to browse GCP resources. Read access to browse the hierarchy for a project, including the folder, organization, and Cloud IAM policy. This role doesn't include permission to view resources in the project.
Editor - View, create, update and delete most GC resources. See the list of included permissions. All viewer permissions, plus permissions for actions that modify state, such as changing existing resources.
Owner - Full access to most GC resources. See the list of included permissions. All editor permissions and permissions for the following actions: Manage roles and permissions for a project and all resources within the project, Set up billing for a project.
Viewer - View most GC resources. See the list of included permissions. Permissions for read-only actions that do not affect state, such as viewing (but not modifying) existing resources or data.
Primitive roles set project-level permissions and unless otherwise specified, they control access and management to all Google Cloud services
It can take up to 80 seconds for permissions to be revoked
Monitoring
provides visibility into the performance, uptime, and overall health of cloud-powered applications.
collects metrics, events, and metadata from Google Cloud, Amazon Web Services, hosted uptime probes, application instrumentation, and a variety of common application components including Cassandra, Nginx, Apache Web Server, Elasticsearch, and many others.
ingests that data and generates insights via dashboards, charts, and alerts.
alerting helps you collaborate by integrating with Slack, PagerDuty, HipChat, Campfire, and more.
project can be monitoring metrics from multiple other projects
Cloud Monitoring agent
Agents collect data and then send or stream info to Cloud Monitoring in the Cloud Console.
Cloud Monitoring agent is a collected-based daemon that gathers system and application metrics from virtual machine instances and sends them to Monitoring.
By default, the Monitoring agent collects disk, CPU, network, and process metrics.
Configuring the Monitoring agent allows third-party applications to get the full list of agent metrics.
It is best practice to run the Cloud Logging agent on all your VM instances.
# Run the Monitoring agent install script command in the SSH terminal of your VM instance to install the Cloud Monitoring agent
curl -sSO https://dl.google.com/cloudagents/add-google-cloud-ops-agent-repo.sh
sudo bash add-google-cloud-ops-agent-repo.sh --also-install
sudo systemctl status google-cloud-ops-agent"*"
Uptime checks configuration:
Target - protocol (HTTP, HTTPS, TCP), Resource type (URL, Internal IP, Kubernetes LB, Cloud Run, App Engine, Instance, Elastic LB), Applies to Single/Group resources, Frequency (1-15 mins)
Select a metric - Show only active resources & metrics
Configure trigger
threshold (e.g. above, below) - Condition triggers if a time series rises above or falls below a value for a specific duration window
metric absence - Condition triggers if any time series in the metric has no data for a specific duration window
forecast - Condition triggers if any timeseries in the metric is projected to cross the threshold in the near future.
notification channel:
Mobile devices via Cloud Mobile App
PagerDuty Services or PagerDuty Sync
Slack
Webhooks
Email
SMS
Pub/Sub
We recommend that you create multiple notification channels for redundancy purposes. Google has no control of many of the delivery systems after we have passed the notification to that system. Additionally, a single Google service supports Cloud Console Mobile App, PagerDuty, Webhooks, and Slack. If you use one of these notification channels, then use email, SMS, or Pub/Sub as the redundant channel.
Cloud Functions
A cloud function is a piece of code that runs in response to an event, such as an HTTP request, a message from a messaging service, or a file upload.
Cloud events are things that happen in your cloud environment. These might be things like changes to data in a database, files added to a storage system, or a new virtual machine instance being created.
Since cloud functions are event-driven, they only run when something happens. This makes them a good choice for tasks that need to be done quickly or that don't need to be running all the time.
For example, you can use a cloud function to:
automatically generate thumbnails for images that are uploaded to Cloud Storage.
send a notification to a user's phone when a new message is received in Cloud Pub/Sub.
process data from a Cloud Firestore database and generate a report.
You can write your code in any language that supports Node.js, and you can deploy your code to the cloud with a few clicks. Once your cloud function is deployed, it will automatically start running in response to events.
Pub/Sub
The Google Cloud Pub/Sub service allows applications to exchange messages reliably, quickly, and asynchronously.
To accomplish this, a data producer publishes messages to a Cloud Pub/Sub topic.
A subscriber client then creates a subscription to that topic and consumes messages from the subscription.
Cloud Pub/Sub persists messages that could not be delivered reliably for up to 7 days.
There are three terms in Pub/Sub that appear often:
topics - shared string that allows applications to connect with one another through a common thread
publishing - push (or publish) a message to a Cloud Pub/Sub topic
subscribing - make a subscription to that thread, where they will either pull messages from the topic or configure webhooks for push subscriptions. Every subscriber must acknowledge each message within a configurable window of time.
In sum, a publisher creates and sends messages to a topic and a subscriber creates a subscription to a topic to receive messages from it.
sudo apt-get install -y virtualenv
python3 -m venv venv
source venv/bin/activate
pip install --upgrade google-cloud-pubsub
git clone https://github.com/googleapis/python-pubsub.git
cd python-pubsub/samples/snippets
echo$GOOGLE_CLOUD_PROJECT# Help for publisher
python publisher.py -h
# Create a topic
python publisher.py $GOOGLE_CLOUD_PROJECT create MyTopic
# Return list of all Pub/Sub topics in a given project
python publisher.py $GOOGLE_CLOUD_PROJECT list
# Help for subscriber
python subscriber.py -h
# Create a Pub/Sub subscription
python subscriber.py $GOOGLE_CLOUD_PROJECT create MyTopic MySub
# Return list of subscribers
python subscriber.py $GOOGLE_CLOUD_PROJECT list-in-project
# Publish the message "Hello" to "MyTopic"
gcloud pubsub topics publish MyTopic --message "Hello"# Use MySub to pull the message from MyTopic
python subscriber.py $GOOGLE_CLOUD_PROJECT receive MySub
Set Up and Configure a Cloud Environment in Google Cloud
BigQuery & Cloud SQL
SQL (Structured Query Language) is a standard language for data operations that allows you to ask questions and get insights from structured datasets. It's commonly used in database management and allows you to perform tasks like transaction record writing into relational databases and petabyte-scale data analysis.
BigQuery is a fully-managed petabyte-scale data warehouse that runs on the Google Cloud. Data analysts and data scientists can quickly query and filter large datasets, aggregate results, and perform complex operations without having to worry about setting up and managing servers. It comes in the form of a command line tool (pre installed in cloudshell) or a web console—both ready for managing and querying data housed in Google Cloud projects.
# Connect to the SQL instance
gcloud sql connect griffin-dev-db --user=root --quiet

# Now run the SQL commands, e.g.
CREATE DATABASE wordpress;
CREATE USER "wp_user"@"%" IDENTIFIED BY "stormwind_rules";
GRANT ALL PRIVILEGES ON wordpress.* TO "wp_user"@"%";
FLUSH PRIVILEGES;
Multiple VPC Networks
Schema/diagram from the Lab:
Each Google Cloud project starts with the default network.
Auto mode networks create subnets in each region automatically, while custom mode networks start with no subnets, giving you full control over subnet creation.
# Create `privatenet` network
gcloud compute networks create privatenet --subnet-mode=custom

# Create the `privatesubnet-us` subnet
gcloud compute networks subnets create privatesubnet-us --network=privatenet --region=us-east1 --range=172.16.0.0/24

# Create the `privatesubnet-eu` subnet
gcloud compute networks subnets create privatesubnet-eu --network=privatenet --region=europe-west1 --range=172.20.0.0/20

# List the available VPC networks & subnets
gcloud compute networks list
gcloud compute networks subnets list --sort-by=NETWORK

# Create the `privatenet-allow-icmp-ssh-rdp` firewall rule
gcloud compute firewall-rules create privatenet-allow-icmp-ssh-rdp --direction=INGRESS --priority=1000 --network=privatenet --action=ALLOW --rules=icmp,tcp:22,tcp:3389 --source-ranges=0.0.0.0/0

# List all the firewall rules, sorted by VPC network
gcloud compute firewall-rules list --sort-by=NETWORK

# Create the privatenet-us-vm instance
gcloud compute instances create privatenet-us-vm --zone="us-east1-b" --machine-type=e2-micro --subnet=privatesubnet-us

# List all the VM instances, sorted by the zone
gcloud compute instances list --sort-by=ZONE
Every instance in a VPC network has a default network interface. You can create additional network interfaces attached to your VMs. Multiple network interfaces enable you to create configurations in which an instance connects directly to several VPC networks (up to 8 interfaces, depending on the instance's type).
VPC networks have an internal DNS service that allows you to address instances by their DNS names rather than their internal IP addresses. When an internal DNS query is made with the instance hostname, it resolves to the primary interface (nic0) of the instance
In a multiple interface instance, every interface gets a route for the subnet that it is in. In addition, the instance gets a single default route that is associated with the primary interface eth0. Unless manually configured otherwise, any traffic leaving an instance for any destination other than a directly connected subnet will leave the instance via the default route on eth0.
Managing Deployments using GKE
Three common scenarios for heterogeneous deployment are:
# Set your working Google Cloud zone by running the following command, substituting the local zone as `us-east5-a`
gcloud config set compute/zone us-east5-a
# Get the sample code for creating and running containers and deployments
gsutil -m cp -r gs://spls/gsp053/orchestrate-with-kubernetes .cd orchestrate-with-kubernetes/kubernetes
# Create a cluster with 3 nodes
gcloud container clusters create bootcamp \
--machine-type e2-small \
--num-nodes 3 \
--scopes "https://www.googleapis.com/auth/projecthosting,storage-rw"# Now, use `kubectl` to learn about deployments
kubectl explain deployment
kubectl explain deployment --recursive
kubectl explain deployment.metadata.name
kubectl create -f deployments/auth.yaml
kubectl get deployments
kubectl get replicasets
kubectl get pods
kubectl create -f services/auth.yaml
kubectl create -f deployments/hello.yaml
kubectl create -f services/hello.yaml
kubectl create secret generic tls-certs --from-file tls/
kubectl create configmap nginx-frontend-conf --from-file=nginx/frontend.conf
kubectl create -f deployments/frontend.yaml
kubectl create -f services/frontend.yaml
kubectl get services frontend
# Scale deployment up
kubectl scale deployment hello --replicas=5
kubectl get pods | grep hello- | wc -l
# Scale deployment down
kubectl scale deployment hello --replicas=3
kubectl get pods | grep hello- | wc -l
Deployments support updating images to a new version through a rolling update mechanism. When a deployment is updated with a new version, it creates a new ReplicaSet and slowly increases the number of replicas in the new ReplicaSet as it decreases the replicas in the old ReplicaSet.
# Change the image version to `2.0.0`
kubectl edit deployment hello
kubectl get replicaset
kubectl rollout history deployment/hello
# Pause a rolling update
kubectl rollout pause deployment/hello
# Get the status of rollout
kubectl rollout status deployment/hello
# See image versions of all pods
kubectl get pods -o jsonpath --template='{range .items[*]}{.metadata.name}{"\t"}{"\t"}{.spec.containers[0].image}{"\n"}{end}'# Resume rolling update
kubectl rollout resume deployment/hello
kubectl rollout status deployment/hello
# Rollback an update
kubectl rollout undo deployment/hello
kubectl rollout history deployment/hello
# Check the old image versions
kubectl get pods -o jsonpath --template='{range .items[*]}{.metadata.name}{"\t"}{"\t"}{.spec.containers[0].image}{"\n"}{end}'
Canary
When you want to test a new deployment in production with a subset of your users, use a canary deployment. Canary deployments allow you to release a change to a small subset of your users to mitigate risk associated with new releases. A canary deployment consists of a separate deployment with your new version and a service that targets both your normal, stable deployment as well as your canary deployment.
apiVersion: apps/v1kind: Deploymentmetadata:
name: hello-canaryspec:
replicas: 1selector:
matchLabels:
app: hellotemplate:
metadata:
labels:
app: hellotrack: canary# Use ver 2.0.0 so it matches version on service selectorversion: 2.0.0spec:
containers:
- name: helloimage: kelseyhightower/hello:2.0.0ports:
- name: httpcontainerPort: 80
- name: healthcontainerPort: 81
...
# Run this several times and you should see that some of the requests are served by hello 1.0.0 and a small subset (1/4 = 25%) are served by 2.0.0.
curl -ks https://`kubectl get svc frontend -o=jsonpath="{.status.loadBalancer.ingress[0].ip}"`/version
Service with session affinity = the same user will always be served from the same version. In the example below the service is the same as before, but a new sessionAffinity field has been added, and set to ClientIP. All clients with the same IP address will have their requests sent to the same version of the hello application.
Blue-green
Rolling updates are ideal because they allow you to deploy an application slowly with minimal overhead, minimal performance impact, and minimal downtime. There are instances where it is beneficial to modify the load balancers to point to that new version only after it has been fully deployed. In this case, blue-green deployments are the way to go.
Kubernetes achieves this by creating two separate deployments; one for the old blue version and one for the new green version. Use your existing hello deployment for the blue version. The deployments will be accessed via a Service which will act as the router. Once the new green version is up and running, you'll switch over to using that version by updating the Service.
A major downside of blue-green deployments is that you will need to have at least 2x the resources in your cluster necessary to host your application. Make sure you have enough resources in your cluster before deploying both versions of the application at once.
# Use the existing hello service, but update it so that it has a selector app:hello, version: 1.0.0
kubectl apply -f services/hello-blue.yaml
kubectl create -f deployments/hello-green.yaml
# Once you have a green deployment and it has started up properly, verify that the current version of 1.0.0 is still being used
curl -ks https://`kubectl get svc frontend -o=jsonpath="{.status.loadBalancer.ingress[0].ip}"`/version
# Update the service to point to the new version
kubectl apply -f services/hello-green.yaml
# When the service is updated, the "green" deployment will be used immediately. You can now verify that the new version is always being used
curl -ks https://`kubectl get svc frontend -o=jsonpath="{.status.loadBalancer.ingress[0].ip}"`/version
# Blue-green rollback# While the "blue" deployment is still running, just update the service back to the old version
kubectl apply -f services/hello-blue.yaml
curl -ks https://`kubectl get svc frontend -o=jsonpath="{.status.loadBalancer.ingress[0].ip}"`/version
Deploy and Manage Cloud Environments with Google Cloud
Google Cloud offers Cloud Identity and Access Management (IAM), which lets you manage access control by defining who (identity) has what access (role) for which resource.
In IAM, permission to access a resource isn't granted directly to the end user. Instead, permissions are grouped into roles, and roles are granted to authenticated principals. (In the past, IAM often referred to principals as members. Some APIs still use this term.)
In Cloud IAM, you grant access to principals. Principals can be of the following types:
Google Account
Service account
Google group
Google Workspace account
Cloud Identity domain
All authenticated users
All users
A role is a collection of permissions. You cannot assign a permission to the user directly; instead you grant them a role. When you grant a role to a user, you grant them all the permissions that the role contains.
Situation:
# Run these on a new Compute Engine instance, not Cloud Shell
gcloud --version
# First, authenticate in gcloud
gcloud auth login
# Create an instance. There are a number of defaults the service uses. Some can be controlled in the gcloud configuration.
gcloud compute instances create lab-1
gcloud config list
# An output example:# [core]# account = student-01-9192eb497f10@qwiklabs.net# disable_usage_reporting = True# project = qwiklabs-gcp-03-ae0df8f21465# Your active configuration is: [default]# List all the zones available to use
gcloud compute zones list
# You can change settings using
gcloud config set<SETTING># Change your current zone for another zone in the same region
gcloud config set compute/zone us-central1-b
gcloud config list
# An output example:# [compute]# zone = us-central1-b# [core]# account = student-01-9192eb497f10@qwiklabs.net# disable_usage_reporting = True# project = qwiklabs-gcp-03-ae0df8f21465# Your active configuration is: [default]# If you want to use a zone other than the default zone when creating an instance, you can use `--zone` switch
gcloud compute instances create lab-1 --zone us-central1-f
# Configuration is stored in
cat ~/.config/gcloud/configurations/config_default
Create a new IAM configuration
[student-01-9192eb497f10@centos-clean ~]$ gcloud init --no-launch-browser
Welcome! This command will take you through the configuration of gcloud.

Settings from your current configuration [default] are:
compute:
  zone: us-central1-b
core:
  account: student-01-9192eb497f10@qwiklabs.net
  disable_usage_reporting: 'True'
  project: qwiklabs-gcp-03-ae0df8f21465

Pick configuration to use:
 [1] Re-initialize this configuration [default] with new settings
 [2] Create a new configuration
Please enter your numeric choice:  2

Enter configuration name. Names start with a lower case letter and contain only lower case letters a-z, digits 0-9, and hyphens '-':  user2
Your current configuration has been set to: [user2]

You can skip diagnostics next time by using the following flag:
  gcloud init --skip-diagnostics

Network diagnostic detects and fixes local network connection issues.
Checking network connection...done.
Reachability Check passed.
Network diagnostic passed (1/1 checks passed).

Choose the account you would like to use to perform operations for this configuration:
 [1] 818598763554-compute@developer.gserviceaccount.com
 [2] student-01-9192eb497f10@qwiklabs.net
 [3] Log in with a new account
Please enter your numeric choice:  3


You are running on a Google Compute Engine virtual machine.
It is recommended that you use service accounts for authentication.

You can run:

  $ gcloud config set account `ACCOUNT`

to switch accounts if necessary.

Your credentials may be visible to others with access to this
virtual machine. Are you sure you want to authenticate with
your personal account?

Do you want to continue (Y/n)?  Y

Go to the following link in your browser:

    https://accounts.google.com/o/oauth2/auth?response_type=code&client_id=32555940559.apps.googleusercontent.com&redirect_uri=https%3A%2F%2Fsdk.cloud.google.com%2Fauthcode.html&scope=openid+https%3A%2F%2Fwww.googleapis.com%2Fauth%2Fuserinfo.email+https%3A%2F%2Fwww.googleapis.com%2Fauth%2Fcloud-platform+https%3A%2F%2Fwww.googleapis.com%2Fauth%2Fappengine.admin+https%3A%2F%2Fwww.googleapis.com%2Fauth%2Fsqlservice.login+https%3A%2F%2Fwww.googleapis.com%2Fauth%2Fcompute+https%3A%2F%2Fwww.googleapis.com%2Fauth%2Faccounts.reauth&state=OUpogbpnh5tdjeD6dfASHIDcgvXZCa&prompt=consent&access_type=offline&code_challenge=uJY_GBcjMjChR72QCT_Ru0MY5tHZ1lhzkb5Iuf3hptQ&code_challenge_method=S256

Enter authorization code: 4/0AbUR2VPW2DzhVBCY_C6j6OTk6VVlm47yCVEKHVl4H25p9z2onrIgDEseYH5ZYE59o6-WXw
You are logged in as: [student-00-ab44b07e5b1e@qwiklabs.net].

Pick cloud project to use:
 [1] qwiklabs-gcp-03-ae0df8f21465
 [2] qwiklabs-resources
 [3] Enter a project ID
 [4] Create a new project
Please enter numeric choice or text value (must exactly match list item):  1

Your current project has been set to: [qwiklabs-gcp-03-ae0df8f21465].

Your project default Compute Engine zone has been set to [us-central1-a].
You can change it by running [gcloud config set compute/zone NAME].

Your project default Compute Engine region has been set to [us-central1].
You can change it by running [gcloud config set compute/region NAME].

Created a default .boto configuration file at [/home/student-01-9192eb497f10/.boto]. See this file and
[https://cloud.google.com/storage/docs/gsutil/commands/config] for more
information about configuring Google Cloud Storage.
Your Google Cloud SDK is configured and ready to use!

* Commands that require authentication will use student-00-ab44b07e5b1e@qwiklabs.net by default
* Commands will reference project `qwiklabs-gcp-03-ae0df8f21465` by default
* Compute Engine commands will use region `us-central1` by default
* Compute Engine commands will use zone `us-central1-a` by default

Run `gcloud help config` to learn how to change individual settings

This gcloud configuration is called [user2]. You can create additional configurations if you work with multiple accounts and/or projects.
Run `gcloud topic configurations` to learn more.

Some things to try next:

* Run `gcloud --help` to see the Cloud Platform services you can interact with. And run `gcloud help COMMAND` to get help on any gcloud command.
* Run `gcloud topic --help` to learn about advanced features of the SDK like arg files and output formatting
* Run `gcloud cheat-sheet` to see a roster of go-to `gcloud` commands.

# Change back to your first user's configuration (default)
gcloud config configurations activate default
Identify and assign correct IAM permissions
You have been provided two user accounts for this project. The first user has complete control of both projects and can be thought of as the admin account. The second user has viewer only access to the two projects. Call the second user a devops user and that user identity represents a typical devops level user.
# To view all the roles (currently there are 1319 of them!)
gcloud iam roles list | grep "name:"# Examine the compute.instanceAdmin predefined role, it has many controls/permissions of Compute Engine instance resources
gcloud iam roles describe roles/compute.instanceAdmin
There are two ways to attach a role:
To the user and an organization
To a user and a project
# Test that the second user doesn't have access to the second project
gcloud config configurations activate user2
# Set PROJECTID2 to the second projectecho"export PROJECTID2=qwiklabs-gcp-00-8807db712bc3">>~/.bashrc
.~/.bashrc
# user2 doesn't have access to the PROJECTID2 project
gcloud config set project $PROJECTID2# Assign the viewer role to the second user in the second project
gcloud config configurations activate default
# Install `jq`
sudo yum -y install epel-release
sudo yum -y install jq
# Set USERID2echo"export USERID2=student-00-ab44b07e5b1e@qwiklabs.net">>~/.bashrc
.~/.bashrc
# Bind the role of viewer to the second user onto the second project
gcloud projects add-iam-policy-binding $PROJECTID2 --member user:$USERID2 --role=roles/viewer
# Test that user2 has access
gcloud config configurations activate user2
gcloud config set project $PROJECTID2
gcloud compute instances list
# This command will fail because user2 only has viewer access to the project
gcloud compute instances create lab-2
# Create a new role with permissions
gcloud config configurations activate default
gcloud iam roles create devops --project $PROJECTID2 --permissions "compute.instances.create,compute.instances.delete,compute.instances.start,compute.instances.stop,compute.instances.update,compute.disks.create,compute.subnetworks.use,compute.subnetworks.useExternalIp,compute.instances.setMetadata,compute.instances.setServiceAccount"# Bind the role of `iam.serviceAccountUser` to the second user onto the second project
gcloud projects add-iam-policy-binding $PROJECTID2 --member user:$USERID2 --role=roles/iam.serviceAccountUser
# Bind the custom role devops to the second user onto the second project
gcloud projects add-iam-policy-binding $PROJECTID2 --member user:$USERID2 --role=projects/$PROJECTID2/roles/devops
# Test the newly assigned permissions
gcloud config configurations activate user2
# This will work now
gcloud compute instances create lab-2
gcloud compute instances list
Now the situation looks like this:
Using a service account
Service accounts can be assigned only the rights necessary for the access required, they allow automated deployments of resources. It prevents a user from directly getting involved in setting up access on the instance.
A service account is a special Google account that belongs to your application or a virtual machine (VM) instead of to an individual end user. Your application uses the service account to call the Google API of a service so that the users aren't directly involved.
Access scopes are the legacy method of specifying permissions for your instance. Access scopes are not a security mechanism. Instead, they define the default OAuth scopes used in requests from the gcloud tool or the client libraries. They have no effect when making requests not authenticated through OAuth, such as gRPC or the SignBlob APIs.
You must set up access scopes when you configure an instance to run as a service account.
A best practice is to set the full cloud-platform access scope on the instance, then securely limit the service account's API access with IAM roles.
Access scopes apply on a per-instance basis. You set access scopes when creating an instance and the access scopes persist only for the life of the instance.
Access scopes have no effect if you have not enabled the related API on the project that the service account belongs to. For example, granting an access scope for Cloud Storage on a virtual machine instance allows the instance to call the Cloud Storage API only if you have enabled the Cloud Storage API on the project.
# Create a service account
gcloud config configurations activate default
gcloud config set project $PROJECTID2
gcloud iam service-accounts create devops --display-name devops
# Get the service account email address (e.g. `devops@qwiklabs-gcp-00-8807db712bc3.iam.gserviceaccount.com`)
gcloud iam service-accounts list --filter "displayName=devops"# Put the email address into a local variable called SA
SA=$(gcloud iam service-accounts list --format="value(email)" --filter "displayName=devops")# Give the service account the role of `iam.serviceAccountUser`
gcloud projects add-iam-policy-binding $PROJECTID2 --member serviceAccount:$SA --role=roles/iam.serviceAccountUser
# Using the service account with a compute instance# Give the service account the role of `compute.instanceAdmin`
gcloud projects add-iam-policy-binding $PROJECTID2 --member serviceAccount:$SA --role=roles/compute.instanceAdmin
# Create an instance with the devops service account attached. You also have to specify an access scope that defines the API calls that the instance can make.
gcloud compute instances create lab-3 --service-account $SA --scopes "https://www.googleapis.com/auth/compute"# Test the service account
gcloud compute ssh lab-3
gcloud config list
gcloud compute instances create lab-4
gcloud compute instances list
Environment now looks like this:
Hosting a Web App on Google Cloud Using Compute Engine
# Set the default zone and project configurationexport ZONE=us-central1-f
gcloud config set compute/zone us-central1-f
# Enable the Compute Engine API
gcloud services enable compute.googleapis.com
# Create a new Cloud Storage bucket
gsutil mb gs://fancy-store-$DEVSHELL_PROJECT_ID# Creating gs://fancy-store-qwiklabs-gcp-01-ec4fcbbb2929/ ...# Now, clone the repo and install dependencies
git clone https://github.com/googlecodelabs/monolith-to-microservices.git
cd~/monolith-to-microservices
./setup.sh
nvm install --lts
cd microservices
npm start
# Frontend microservice listening on port 8080# Orders microservice listening on port 8081# Products microservice listening on port 8082
Create Compute Engine instances
In the following steps you will:
Create a startup script to configure instances.
Clone source code and upload to Cloud Storage.
Deploy a Compute Engine instance to host the backend microservices.
Reconfigure the frontend code to utilize the backend microservices instance.
Deploy a Compute Engine instance to host the frontend microservice.
Configure the network to allow communication.
echo$DEVSHELL_PROJECT_ID# Create a new file
vi monolith-to-microservices/startup-script.sh
#!/bin/bash# Install logging monitor. The monitor will automatically pick up logs sent to# syslog.
curl -s "https://storage.googleapis.com/signals-agents/logging/google-fluentd-install.sh"| bash
service google-fluentd restart &# Install dependencies from apt
apt-get update
apt-get install -yq ca-certificates git build-essential supervisor psmisc
# Install nodejs
mkdir /opt/nodejs
curl https://nodejs.org/dist/v16.14.0/node-v16.14.0-linux-x64.tar.gz | tar xvzf - -C /opt/nodejs --strip-components=1
ln -s /opt/nodejs/bin/node /usr/bin/node
ln -s /opt/nodejs/bin/npm /usr/bin/npm
# Get the application source code from the Google Cloud Storage bucket.
mkdir /fancy-store
gsutil -m cp -r gs://fancy-store-qwiklabs-gcp-01-ec4fcbbb2929/monolith-to-microservices/microservices/* /fancy-store/
# Install app dependencies.cd /fancy-store/
npm install
# Create a nodeapp user. The application will run as this user.
useradd -m -d /home/nodeapp nodeapp
chown -R nodeapp:nodeapp /opt/app
# Configure supervisor to run the node app.
cat >/etc/supervisor/conf.d/node-app.conf <<EOF[program:nodeapp]directory=/fancy-storecommand=npm startautostart=trueautorestart=trueuser=nodeappenvironment=HOME="/home/nodeapp",USER="nodeapp",NODE_ENV="production"stdout_logfile=syslogstderr_logfile=syslogEOF
supervisorctl reread
supervisorctl update
# Make the startup script accessible at https://storage.googleapis.com/[BUCKET_NAME]/startup-script.sh
gsutil cp ~/monolith-to-microservices/startup-script.sh gs://fancy-store-$DEVSHELL_PROJECT_ID# Copy the cloned code into your bucketcd~
rm -rf monolith-to-microservices/*/node_modules
gsutil -m cp -r monolith-to-microservices gs://fancy-store-$DEVSHELL_PROJECT_ID/
Deploy the backend & instances
In a production environment, you may want to separate each microservice into their own instance and instance group to allow them to scale independently. For demonstration purposes, both backend microservices (Orders & Products) will reside on the same instance and instance group.
To allow the application to scale, managed instance groups will be created and will use the frontend and backend instances as Instance Templates.
A managed instance group (MIG) contains identical instances that you can manage as a single entity in a single zone. Managed instance groups maintain high availability of your apps by proactively keeping your instances available, that is, in the RUNNING state. You will be using managed instance groups for your frontend and backend instances to provide autohealing, load balancing, autoscaling, and rolling updates.
# Stop both instances
gcloud compute instances stop frontend
gcloud compute instances stop backend
# Create the instance template from each of the source instances
gcloud compute instance-templates create fancy-fe --source-instance=frontend
gcloud compute instance-templates create fancy-be --source-instance=backend
# Confirm the instance templates were created
gcloud compute instance-templates list
# Delete the backend vm to save resource space
gcloud compute instances delete backend
# Create two managed instance groups, one for the frontend and one for the backend# These managed instance groups will use the instance templates and are configured for two instances each within each group to start# The instances are automatically named based on the base-instance-name specified with random characters appended
gcloud compute instance-groups managed create fancy-fe-mig \
--base-instance-name fancy-fe \
--size 2 \
--template fancy-fe
gcloud compute instance-groups managed create fancy-be-mig \
--base-instance-name fancy-be \
--size 2 \
--template fancy-be
# Since these are non-standard ports, you specify named ports to identify these# Named ports are key:value pair metadata representing the service name and the port that it's running o# Named ports can be assigned to an instance group, which indicates that the service is available on all instances in the group
gcloud compute instance-groups set-named-ports fancy-fe-mig --named-ports frontend:8080
gcloud compute instance-groups set-named-ports fancy-be-mig --named-ports orders:8081,products:8082
# Separate health checks for load balancing and for autohealing will be used.# Create a health check that repairs the instance if it returns "unhealthy" 3 consecutive times for the frontend and backend# Health check for load balancing can and should be MORE AGGRESIVE# Autohealing health check should be MORE CONSERVATIVE# It can take 15 minutes before autohealing begins monitoring instances in the group
gcloud compute health-checks create http fancy-fe-hc \
--port 8080 \
--check-interval 30s \
--healthy-threshold 1 \
--timeout 10s \
--unhealthy-threshold 3
gcloud compute health-checks create http fancy-be-hc \
--port 8081 \
--request-path=/api/orders \
--check-interval 30s \
--healthy-threshold 1 \
--timeout 10s \
--unhealthy-threshold 3
# Create a firewall rule to allow the health check probes to connect to the microservices on ports 8080-8081
gcloud compute firewall-rules create allow-health-check \
--allow tcp:8080-8081 \
--source-ranges 130.211.0.0/22,35.191.0.0/16 \
--network default
gcloud compute instance-groups managed update fancy-fe-mig \
--health-check fancy-fe-hc \
--initial-delay 300
gcloud compute instance-groups managed update fancy-be-mig \
--health-check fancy-be-hc \
--initial-delay 300
Create load balancers
To complement your managed instance groups, use HTTP(S) Load Balancers to serve traffic to the frontend and backend microservices, and use mappings to send traffic to the proper backend services based on pathing rules. This exposes a single load balanced IP for all services.
An HTTP load balancer is structured as follows:
A forwarding rule directs incoming requests to a target HTTP proxy.
The target HTTP proxy checks each request against a URL map to determine the appropriate backend service for the request.
The backend service directs each request to an appropriate backend based on serving capacity, zone, and instance health of its attached backends. The health of each backend instance is verified using an HTTP health check. If the backend service is configured to use an HTTPS or HTTP/2 health check, the request will be encrypted on its way to the backend instance.
Sessions between the load balancer and the instance can use the HTTP, HTTPS, or HTTP/2 protocol. If you use HTTPS or HTTP/2, each instance in the backend services must have an SSL certificate.
# Create health checks that will be used to determine which instances are capable of serving traffic for each service# These health checks are for the load balancer, and only handle directing traffic from the load balancer; they do not cause the managed instance groups to recreate instances.
gcloud compute http-health-checks create fancy-fe-frontend-hc \
--request-path / \
--port 8080
gcloud compute http-health-checks create fancy-be-orders-hc \
--request-path /api/orders \
--port 8081
gcloud compute http-health-checks create fancy-be-products-hc \
--request-path /api/products \
--port 8082
# Create backend services that are the target for load-balanced traffic. The backend services will use the health checks and named ports you created
gcloud compute backend-services create fancy-fe-frontend \
--http-health-checks fancy-fe-frontend-hc \
--port-name frontend \
--global
gcloud compute backend-services create fancy-be-orders \
--http-health-checks fancy-be-orders-hc \
--port-name orders \
--global
gcloud compute backend-services create fancy-be-products \
--http-health-checks fancy-be-products-hc \
--port-name products \
--global
# Add the Load Balancer's backend services
gcloud compute backend-services add-backend fancy-fe-frontend \
--instance-group fancy-fe-mig \
--instance-group-zone us-central1-f \
--global
gcloud compute backend-services add-backend fancy-be-orders \
--instance-group fancy-be-mig \
--instance-group-zone us-central1-f \
--global
gcloud compute backend-services add-backend fancy-be-products \
--instance-group fancy-be-mig \
--instance-group-zone us-central1-f \
--global
# Create a URL map. The URL map defines which URLs are directed to which backend services
gcloud compute url-maps create fancy-map --default-service fancy-fe-frontend
# Create a path matcher to allow the `/api/orders` and `/api/products` paths to route to their respective services
gcloud compute url-maps add-path-matcher fancy-map \
--default-service fancy-fe-frontend \
--path-matcher-name orders \
--path-rules "/api/orders=fancy-be-orders,/api/products=fancy-be-products"# Create the proxy which ties to the URL map
gcloud compute target-http-proxies create fancy-proxy \
--url-map fancy-map
# Create a global forwarding rule that ties a public IP address and port to the proxy
gcloud compute forwarding-rules create fancy-http-rule \
--global \
--target-http-proxy fancy-proxy \
--ports 80
# Update the config againcd~/monolith-to-microservices/react-app/
gcloud compute forwarding-rules list --global
# Output example:# NAME: fancy-http-rule# REGION:# IP_ADDRESS: 34.102.172.184# IP_PROTOCOL: TCP# TARGET: fancy-proxy
vi ~/monolith-to-microservices/react-app/.env
# REACT_APP_ORDERS_URL=http://34.102.172.184:8081/api/orders# REACT_APP_PRODUCTS_URL=http://34.102.172.184:8082/api/productscd~/monolith-to-microservices/react-app
npm install && npm run-script build
cd~
rm -rf monolith-to-microservices/*/node_modules
gsutil -m cp -r monolith-to-microservices gs://fancy-store-$DEVSHELL_PROJECT_ID/
# Now that there is new code and configuration, you want the frontend instances within the managed instance group to pull the new code# In this example of a rolling replace, you specifically state that all machines can be replaced immediately through the `--max-unavailable` parameter.# Without this parameter, the command would keep an instance alive while restarting others to ensure availability. (For testing purposes, you specify to replace all immediately for speed)
gcloud compute instance-groups managed rolling-action replace fancy-fe-mig --max-unavailable 100%
# Test the website
watch -n 2 gcloud compute instance-groups list-instances fancy-fe-mig
# Run the following to confirm the service is listed as HEALTHY
watch -n 2 gcloud compute backend-services get-health fancy-fe-frontend --global
Scaling
So far, you have created two managed instance groups with two instances each. This configuration is fully functional, but a static configuration regardless of load. Next, you create an autoscaling policy based on utilization to automatically scale each managed instance group.
Another feature that can help with scaling is to enable a Content Delivery Network service, to provide caching for the frontend.
When a user requests content from the HTTP(S) load balancer, the request arrives at a Google Front End (GFE) which first looks in the Cloud CDN cache for a response to the user's request. If the GFE finds a cached response, the GFE sends the cached response to the user. This is called a cache hit.
If the GFE can't find a cached response for the request, the GFE makes a request directly to the backend. If the response to this request is cacheable, the GFE stores the response in the Cloud CDN cache so that the cache can be used for subsequent requests.
# Create an autoscaler on the managed instance groups that automatically adds instances when utilization is above 60% utilization, and removes instances when the load balancer is below 60% utilization
gcloud compute instance-groups managed set-autoscaling \
fancy-fe-mig \
--max-num-replicas 2 \
--target-load-balancing-utilization 0.60
gcloud compute instance-groups managed set-autoscaling \
fancy-be-mig \
--max-num-replicas 2 \
--target-load-balancing-utilization 0.60
# Enable CDN
gcloud compute backend-services update fancy-fe-frontend \
--enable-cdn --global
##################### Update the website##################### Since your instances are stateless and all configuration is done through the startup script, you only need to change the instance template if you want to change the template settings# Run the following command to modify the machine type of the frontend instance
gcloud compute instances set-machine-type frontend --machine-type custom-4-3840
# Create the new Instance Template
gcloud compute instance-templates create fancy-fe-new \
--source-instance=frontend \
--source-instance-zone us-central1-f
# Roll out the updated instance template to the Managed Instance Group
gcloud compute instance-groups managed rolling-action start-update fancy-fe-mig \
--version template=fancy-fe-new
# Wait 30 seconds then run the following to monitor the status of the update (STOPPING > DELETING > RUNNING)
watch -n 2 gcloud compute instance-groups managed list-instances fancy-fe-mig
# Add some text to the homepagecd~/monolith-to-microservices/react-app/src/pages/Home
mv index.js.new index.js
cat ~/monolith-to-microservices/react-app/src/pages/Home/index.js
cd~/monolith-to-microservices/react-app
npm install && npm run-script build
cd~
rm -rf monolith-to-microservices/*/node_modules
gsutil -m cp -r monolith-to-microservices gs://fancy-store-$DEVSHELL_PROJECT_ID/
# Force all instances to be replaced to pull the update
gcloud compute instance-groups managed rolling-action replace fancy-fe-mig \
--max-unavailable=100%
watch -n 2 gcloud compute instance-groups list-instances fancy-fe-mig
watch -n 2 gcloud compute backend-services get-health fancy-fe-frontend --global
gcloud compute forwarding-rules list --global
# Simulate failure
gcloud compute instance-groups list-instances fancy-fe-mig
gcloud compute ssh fancy-fe-fkzm
sudo supervisorctl stop nodeapp; sudo killall node
exit
watch -n 2 gcloud compute operations list --filter='operationType~compute.instances.repair.*'# The managed instance group recreated the instance to repair it# NAME: repair-1686113817401-5fd82f7231747-697cb326-660db918# TYPE: compute.instances.repair.recreateInstance# TARGET: us-central1-f/instances/fancy-fe-fkzm# HTTP_STATUS: 200# STATUS: DONE# TIMESTAMP: 2023-06-06T21:56:57.401-07:00
Orchestrating the Cloud with Kubernetes
gcloud config set compute/zone us-central1-b
gcloud container clusters create io
# You are automatically authenticated to your cluster upon creation, if you lose connection to your Cloud Shell for any reason, run
gcloud container clusters get-credentials io
# Copy the source code
gsutil cp -r gs://spls/gsp021/*.cd orchestrate-with-kubernetes/kubernetes
kubectl create deployment nginx --image=nginx:1.10.0
kubectl expose deployment nginx --port 80 --type LoadBalancer
kubectl get services
cat pods/monolith.yaml
kubectl create -f pods/monolith.yaml
kubectl describe pods monolith
# On the second terminal
kubectl port-forward monolith 10080:80
# Back on the first one
curl http://127.0.0.1:10080
curl http://127.0.0.1:10080/secure
TOKEN=$(curl http://127.0.0.1:10080/login -u user|jq -r '.token')
curl -H "Authorization: Bearer $TOKEN" http://127.0.0.1:10080/secure
kubectl logs -f monolith
# On the third terminal
curl http://127.0.0.1:10080
kubectl exec monolith --stdin --tty -c monolith -- /bin/sh
ping -c 3 google.com
exitcd~/orchestrate-with-kubernetes/kubernetes
cat pods/secure-monolith.yaml
kubectl create secret generic tls-certs --from-file tls/
kubectl create configmap nginx-proxy-conf --from-file nginx/proxy.conf
kubectl create -f pods/secure-monolith.yaml
kubectl create -f services/monolith.yaml
# Allow traffic to the monolith service on the exposed NodePort
gcloud compute firewall-rules create allow-monolith-nodeport --allow=tcp:31000
gcloud compute instances list
curl -k https://<EXTERNAL_IP>:31000
kubectl describe services monolith
kubectl label pods secure-monolith 'secure=enabled'
kubectl get pods secure-monolith --show-labels
kubectl describe services monolith | grep Endpoints
cat deployments/auth.yaml
kubectl create -f deployments/auth.yaml
kubectl create -f services/auth.yaml
kubectl create -f deployments/hello.yaml
kubectl create -f services/hello.yaml
kubectl create configmap nginx-frontend-conf --from-file=nginx/frontend.conf
kubectl create -f deployments/frontend.yaml
kubectl create -f services/frontend.yaml
kubectl get services frontend
Networking 101
Resources that live in a zone are referred to as zonal resources. Virtual machine Instances and persistent disks live in a zone. To attach a persistent disk to a virtual machine instance, both resources must be in the same zone. Similarly, if you want to assign a static IP address to an instance, the instance must be in the same region as the static IP.
In Google Cloud Platform, networks provide data connections into and out of your cloud resources (mostly Compute Engine instances). Securing your Networks is critical to securing your data and controlling access to your resources.
Google Cloud Platform supports Projects, Networks, and Subnetworks to provide flexible, logical isolation of unrelated resources.
Projects are the outermost container and are used to group resources that share the same trust boundary. Many developers map Projects to teams since each Project has its own access policy (IAM) and member list. Projects also serve as a collector of billing and quota details reflecting resource consumption. Projects contain Networks which contain Subnetworks, Firewall rules, and Routes (see below architecture diagrams for illustration).
Networks directly connect your resources to each other and to the outside world. Networks, using Firewalls, also house the access policies for incoming and outgoing connections. Networks can be Global (offering horizontal scalability across multiple Regions) or Regional (offering low-latency within a single Region).
Subnetworks allow you to group related resources (Compute Engine instances) into RFC1918 private address spaces. Subnetworks can only be Regional. A subnetwork can be in auto mode or custom mode:
An auto mode network has one subnet per region, each with a predetermined IP range and gateway. These subnets are created automatically when you create the auto mode network, and each subnet has the same name as the overall network.
A custom mode network has no subnets at creation. In order to create an instance in a custom mode network, you must first create a subnetwork in that region and specify its IP range. A custom mode network can have zero, one, or many subnets per region.
When a new project is created, a default network configuration provides each region with an auto subnet network. You can create up to four additional networks in a project. Additional networks can be auto subnet networks, custom subnet networks, or legacy networks. Each instance created within a subnetwork is assigned an IPv4 address from that subnetwork range. Review your network. Click Navigation menu > VPC network.
Firewalls: Each network has a default firewall that blocks all inbound traffic to instances. To allow traffic to come into an instance, you must create "allow" rules for the firewall. Additionally, the default firewall allows traffic from instances unless you configure it to block outbound connections using an "egress" firewall configuration. Therefore, by default you can create "allow" rules for traffic you wish to pass ingress, and "deny" rules for traffic you wish to restrict egress. You may also create a default-deny policy for egress and prohibit external connections entirely. In general, it is recommended to configure the least permissive firewall rule that will support the kind of traffic you are trying to pass. For example, if you need to allow traffic to reach some instances, but restrict traffic from reaching others, create rules that allow traffic to the intended instances only. This more restrictive configuration is more predictable than a large firewall rule that allows traffic to all of the instances. If you want to have "deny" rules to override certain "allow" rules, you can set priority levels on each rule and the rule with the lowest numbered priority will be evaluated first. Creating large and complex sets of override rules can lead to allowing or blocking traffic that is not intended. The default network has automatically created firewall rules, which are shown below. No manually created network of any type has automatically created firewall rules. For all networks except the default network, you must create any firewall rules you need. The ingress firewall rules automatically created for the default network are as follows:
default-allow-internal - Allows network connections of any protocol and port between instances on the network.
default-allow-ssh - Allows SSH connections from any source to any instance on the network over TCP port 22.
default-allow-rdp - Allows RDP connections from any source to any instance on the network over TCP port 3389.
default-allow-icmp - Allows ICMP traffic from any source to any instance on the network.
Network Route: All networks have routes created automatically to the Internet (default route) and to the IP ranges in the network. The route names are automatically generated and will look different for each project. What about those Routes I see in the Network console? Google Cloud Networking uses Routes to direct packets between subnetworks and to the Internet. Whenever a subnetwork is created (or pre-created) in your Network, routes are automatically created in each region to allow packets to route between subnetworks. These cannot be modified. Additional Routes can be created to send traffic to an instance, a VPN gateway, or default internet gateway. These Routes can be modified to tailor the desired network architecture. Routes and Firewalls work together to ensure your traffic gets where it needs to go.
Creating a new network with custom subnet ranges:
When manually assigning subnetwork ranges, you first create a custom subnet network, then create the subnetworks that you want within a region. You do not have to specify subnetworks for all regions right away, or even at all, but you cannot create instances in regions that have no subnetwork defined.
When you create a new subnetwork, its name must be unique in that project for that region, even across networks. The same name can appear twice in a project as long as each one is in a different region. Because this is a subnetwork, there is no network-level IPv4 range or gateway IP, so none will be displayed.
You can either create your custom network with the console or with the cloud shell. We'll show you both, but you have to decide which method to use while taking the lab. For example, you cannot go through a section using the instructions for the console, then go through the same section using gcloud command line.
# Create the custom network:
gcloud compute networks create taw-custom-network --subnet-mode custom
# Create `subnet-us-central` with an IP prefix
gcloud compute networks subnets create subnet-us-central \
--network taw-custom-network \
--region us-central1 \
--range 10.0.0.0/16
# Create `subnet-europe-west` with an IP prefix
gcloud compute networks subnets create subnet-europe-west \
--network taw-custom-network \
--region europe-west1 \
--range 10.1.0.0/16
# Create `subnet-asia-east` with an IP prefix
gcloud compute networks subnets create subnet-asia-east \
--network taw-custom-network \
--region asia-east1 \
--range 10.2.0.0/16
# List your networks
gcloud compute networks subnets list --network taw-custom-network
# Create a firewall rule for HTTP
gcloud compute firewall-rules create nw101-allow-http \
--allow tcp:80 --network taw-custom-network --source-ranges 0.0.0.0/0 \
--target-tags http
# Create a firewall rule for ICMP
gcloud compute firewall-rules create "nw101-allow-icmp" \
--allow icmp --network "taw-custom-network" --target-tags rules
# Create a firewall rule for internal comms
gcloud compute firewall-rules create "nw101-allow-internal" \
--allow tcp:0-65535,udp:0-65535,icmp --network "taw-custom-network" \
--source-ranges "10.0.0.0/16","10.2.0.0/16","10.1.0.0/16"# Create a firewall rule for SSH & RDP
gcloud compute firewall-rules create "nw101-allow-ssh" --allow tcp:22 --network "taw-custom-network" --target-tags "ssh"
gcloud compute firewall-rules create "nw101-allow-rdp" --allow tcp:3389 --network "taw-custom-network"# Create a VM in each zone
gcloud compute instances create us-test-01 \
--subnet subnet-us-central \
--zone us-central1-a \
--tags ssh,http,rules
gcloud compute instances create europe-test-01 \
--subnet subnet-europe-west \
--zone europe-west1-b \
--tags ssh,http,rules
gcloud compute instances create asia-test-01 \
--subnet subnet-asia-east \
--zone asia-east1-a \
--tags ssh,http,rules
Internal DNS: How is DNS provided for VM instances?
Each instance has a metadata server that also acts as a DNS resolver for that instance. DNS lookups are performed for instance names. The metadata server itself stores all DNS information for the local network and queries Google's public DNS servers for any addresses outside of the local network
An internal fully qualified domain name (FQDN) for an instance looks like this: hostName.[ZONE].c.[PROJECT_ID].internal
You can always connect from one instance to another using this FQDN. If you want to connect to an instance using, for example, just hostName, you need information from the internal DNS resolver that is provided as part of Compute Engine
Migrate to Cloud SQL for PostgreSQL using Database Migration Service
Requires Database Migration API and Service Networking API
Prepare the source database for migration:
Installing and configuring the pglogical database extension.
Configuring the stand-alone PostgreSQL database to allow access from Cloud Shell and Cloud SQL.
Adding the pglogical database extension to the postgres, orders and gmemegen_db databases on the stand-alone server.
Creating a migration_admin user (with Replication permissions) for database migration and granting the required permissions to schemata and relations to that user.
# `pglogical` is a logical replication system implemented entirely as a PostgreSQL extension
sudo apt install postgresql-13-pglogical
# Download and apply some additions to the PostgreSQL configuration files
sudo su - postgres -c "gsutil cp gs://cloud-training/gsp918/pg_hba_append.conf ."
sudo su - postgres -c "gsutil cp gs://cloud-training/gsp918/postgresql_append.conf ."
sudo su - postgres -c "cat pg_hba_append.conf >> /etc/postgresql/13/main/pg_hba.conf"
sudo su - postgres -c "cat postgresql_append.conf >> /etc/postgresql/13/main/postgresql.conf"
sudo systemctl restart postgresql@13-main
# In pg_hba.conf these commands added a rule to allow access to all hosts:# host all all 0.0.0.0/0 md5# In postgresql.conf, these commands set the minimal configuration for pglogical to configure it to listen on all addresses:# wal_level = logical # minimal, replica, or logical# max_worker_processes = 10 # one per database needed on provider node# # one per node needed on subscriber node# max_replication_slots = 10 # one per node needed on provider node# max_wal_senders = 10 # one per node needed on provider node# shared_preload_libraries = 'pglogical'# max_wal_size = 1GB# min_wal_size = 80MB# listen_addresses = '*' # what IP address(es) to listen on, '*' is all# Launch psql
sudo su - postgres
psql
# Add the pglogical database extension to the postgres, orders and gmemegen_db databases\c postgres;
CREATE EXTENSION pglogical;\c orders;
CREATE EXTENSION pglogical;\c gmemegen_db;
CREATE EXTENSION pglogical;# List the PostgreSQL databases on the server:\l# In psql, enter the commands below to create a new user with the replication role
CREATE USER migration_admin PASSWORD 'DMS_1s_cool!';
ALTER DATABASE orders OWNER TO migration_admin;
ALTER ROLE migration_admin WITH REPLICATION;# In psql, grant permissions to the pglogical schema and tables for the postgres database\c postgres;
GRANT USAGE ON SCHEMA pglogical TO migration_admin;
GRANT ALL ON SCHEMA pglogical TO migration_admin;
GRANT SELECT ON pglogical.tables TO migration_admin;
GRANT SELECT ON pglogical.depend TO migration_admin;
GRANT SELECT ON pglogical.local_node TO migration_admin;
GRANT SELECT ON pglogical.local_sync_status TO migration_admin;
GRANT SELECT ON pglogical.node TO migration_admin;
GRANT SELECT ON pglogical.node_interface TO migration_admin;
GRANT SELECT ON pglogical.queue TO migration_admin;
GRANT SELECT ON pglogical.replication_set TO migration_admin;
GRANT SELECT ON pglogical.replication_set_seq TO migration_admin;
GRANT SELECT ON pglogical.replication_set_table TO migration_admin;
GRANT SELECT ON pglogical.sequence_state TO migration_admin;
GRANT SELECT ON pglogical.subscription TO migration_admin;# In psql, grant permissions to the pglogical schema and tables for the orders database\c orders;
GRANT USAGE ON SCHEMA pglogical TO migration_admin;
GRANT ALL ON SCHEMA pglogical TO migration_admin;
GRANT SELECT ON pglogical.tables TO migration_admin;
GRANT SELECT ON pglogical.depend TO migration_admin;
GRANT SELECT ON pglogical.local_node TO migration_admin;
GRANT SELECT ON pglogical.local_sync_status TO migration_admin;
GRANT SELECT ON pglogical.node TO migration_admin;
GRANT SELECT ON pglogical.node_interface TO migration_admin;
GRANT SELECT ON pglogical.queue TO migration_admin;
GRANT SELECT ON pglogical.replication_set TO migration_admin;
GRANT SELECT ON pglogical.replication_set_seq TO migration_admin;
GRANT SELECT ON pglogical.replication_set_table TO migration_admin;
GRANT SELECT ON pglogical.sequence_state TO migration_admin;
GRANT SELECT ON pglogical.subscription TO migration_admin;# In psql, grant permissions to the public schema and tables for the orders database
GRANT USAGE ON SCHEMA public TO migration_admin;
GRANT ALL ON SCHEMA public TO migration_admin;
GRANT SELECT ON public.distribution_centers TO migration_admin;
GRANT SELECT ON public.inventory_items TO migration_admin;
GRANT SELECT ON public.order_items TO migration_admin;
GRANT SELECT ON public.products TO migration_admin;
GRANT SELECT ON public.users TO migration_admin;# In psql, grant permissions to the pglogical schema and tables for the gmemegen_db database\c gmemegen_db;
GRANT USAGE ON SCHEMA pglogical TO migration_admin;
GRANT ALL ON SCHEMA pglogical TO migration_admin;
GRANT SELECT ON pglogical.tables TO migration_admin;
GRANT SELECT ON pglogical.depend TO migration_admin;
GRANT SELECT ON pglogical.local_node TO migration_admin;
GRANT SELECT ON pglogical.local_sync_status TO migration_admin;
GRANT SELECT ON pglogical.node TO migration_admin;
GRANT SELECT ON pglogical.node_interface TO migration_admin;
GRANT SELECT ON pglogical.queue TO migration_admin;
GRANT SELECT ON pglogical.replication_set TO migration_admin;
GRANT SELECT ON pglogical.replication_set_seq TO migration_admin;
GRANT SELECT ON pglogical.replication_set_table TO migration_admin;
GRANT SELECT ON pglogical.sequence_state TO migration_admin;
GRANT SELECT ON pglogical.subscription TO migration_admin;# In psql, grant permissions to the public schema and tables for the gmemegen_db database
GRANT USAGE ON SCHEMA public TO migration_admin;
GRANT ALL ON SCHEMA public TO migration_admin;
GRANT SELECT ON public.meme TO migration_admin;# Make the migration_admin user the owner of the tables in the orders database, so that you can edit the source data later, when you test the migration\c orders;\dt
ALTER TABLE public.distribution_centers OWNER TO migration_admin;
ALTER TABLE public.inventory_items OWNER TO migration_admin;
ALTER TABLE public.order_items OWNER TO migration_admin;
ALTER TABLE public.products OWNER TO migration_admin;
ALTER TABLE public.users OWNER TO migration_admin;\dt
\qexit
Create a Database Migration Service connection profile for a stand-alone PostgreSQL database
A connection profile stores information about the source database instance (e.g., stand-alone PosgreSQL) and is used by the Database Migration Service to migrate data from the source to your destination Cloud SQL database instance. After you create a connection profile, it can be reused across migration jobs.
Create and start a continuous migration job
When you create a new migration job, you first define the source database instance using a previously created connection profile. Then you create a new destination database instance and configure connectivity between the source and destination instances.
Define the connectivity method
Allow access to the posgresql-vm instance from automatically allocated IP range
Update stand-alone source data to test continuous migration
Promote Cloud SQL to be a stand-alone instance for reading and writing data
In the case of continuous migrations, the promotion process can be initiated once it's time to move reads and writes to the destination. In a one-time migration, the Cloud SQL instance is ready as soon as dump/load is complete, and user-invoked promotion is not required. Behind the scenes, promotion means that the destination Cloud SQL instance is disconnected from the source, and is promoted from replica to standalone primary.
metrics server (deployment itself) can expose the metrics API:
resize delay of the metrics-server via --scale-down-delay=24h
monitoring the metrics server should be top priority
config changes are reviewed before deployed via automated Anthos policy controller (or via KPT)
recommendation hub show specific suggestions based on your usage patterns
general tips & best practices:
multitenant clusters (namespaces, policies) - use exclusion rules to filter out the logs you don't need
for smaller/nonprod clusters, disable features that you don't need:
cloud logging / monitoring
disable horizontal pod autoscaling
disable kube-dns / limit kube-dns scaling
pod disruption budget - think about minAvailable and overprovisioning
visibility to all moving pieces is critical in prod
underlying VMs - choose and customize the underlying infra:
N-series are the default
E2-series, updated general purpose are a bit cheaper, optimised for cost
C & M are high-frequency & large memory for intensive workloads
if apps have specific requirements, use the right VMs
binpacking = making sure you find the most efficient way to run apps on your machines and minimise waste
"two to the power of N" rule
node autoprovisioning
preemtible VMs = cost a lot less, but any instance can drop down (ungraceful termination) any moment so the app needs to be fault tolerant
commited use discounts if you sign up for 1-3 year commitment (is your usage spiky? - ise commited VMs for static demand = baseline and on other days = flexible demand)
pick a cheaper region (but data transfers between regions cost $)
autoscaling:
horizontal pod autoscaler = more pods based on e.g. target cpu utilization. Choose the right buffer size. Minimize startup/shutdown time. Accurate ready and live states. Monitor the metrics server.
vertical pod autoscaler = different pod size on e.g. memory usage. Modes: off, initial and auto. Create recommendations when keeping this off. Apps can actually utilize more resources. Set limits, avoid large jumps. Monitor the metrics server. Use PodDisruptionBudget to limit disruptions for all your apps.
cluster autoscaler = horizontally add/remove nodes based on the pod scheduling and requests. Use with HPA or VPA. It is build to prefer lower cost (it first creates cheaper type VMs). Pods that can't be restarted may block node removals. For system pods, you can setup PodDisruptionBudget, for pods with local storage you can enable annotation cluster-autoscaler.kubernetes.io/safe-to-evict: "true". Read the autoscaler logs. Try to use preemtible VMs. Make sure you have a backup pool. Figure out minimum nodes needed.
node auto-provisioning = adds new node pools sized to meet the demand. Measure twice, config once. New pools may take longer than autoscaling. Set resource limits and quotas.
overprovision slightly using the formula: 1-15% buffer and 1-30% traffic growth over 2-3 minutes ~ 65%, which means 35% overprovisioned in order to be ready for upcoming spike.
pause-pods = low priority, removed when high priority pods need to be run
app optimizations:
it is important to know your apps inside out, start out with single replica and test it under load without autoscaling. Use this information/knowledge to configure requests (define how much your app needs to run), limits (maximum allowed). Then test large rapid spikes with autoscaling. Good practice is set memory limits equal to your memory request and to set your CPU limit higher than your CPU request (or leave it unbounded).
single threaded apps cannot run concurrent processes
building containers to minimise spin up time:
minimize image size
minimize base image size
minimize time between startup and ready
shutting down containers gracefully:
finish active/new requests on SIGTERM
update readiness probe, clean up
use preStop hook for graceful shutdown
configure terminationGracePeriodSeconds (by default 30s) before forcibly terminated
liveness probe = is the pod still alive and working?
readiness probe = is the pod ready to handle the traffic? Always define for all containers (e.g. HTTP 200). Keep it simple and quick.
Retrying the request should add exponential delays to avoid overloading the destination
configure GKE to work with your app:
batch apps (monthly calculations):
use dedicated node pools (taints, tolerations, labels)
try profile optimize-utilization in cluster autoscaler, scales down a lot quicker
distinct apps when node auto-provisioning
PVMs save money when fault-tolerant and much less time sensitive
serving apps (retail website):
scale rapidly based on demand
for long provisioning time pods = makes sense to over-provision and have resources at-ready before the spike
pause-pods to scale ahead to keep the apps lean
consider using node local DNS caching (lowers the lookups, kube-dns load and scaling delays)
use container native loadbalancing = allows requests to go directly to pods via network endpoint group (NEG)
# Download these files from a Cloud Storage bucket
gsutil -m cp -r gs://spls/gsp766/gke-qwiklab ~# Change your current working directory to gke-qwiklabcd~/gke-qwiklab
# Run the following to set a default compute zone and authenticate the provided cluster multi-tenant-cluster
gcloud config set compute/zone us-central1-a && gcloud container clusters get-credentials multi-tenant-cluster
# By default, Kubernetes clusters have 4 system namespaces (default, kube-node-lease, kube-public, kube-system)
kubectl get namespace
# For a complete list of namespaced resources
kubectl api-resources --namespaced=true
# The namespace can also be specified with any `kubectl get` subcommand to display a namespace's resources
kubectl get services --namespace=kube-system
# Create 2 namespaces for `team-a` and `team-b`
kubectl create namespace team-a && \
kubectl create namespace team-b
# Run the following to deploy a pod in the team-a namespace and in the team-b namespace using the same name
kubectl run app-server --image=centos --namespace=team-a -- sleep infinity && \
kubectl run app-server --image=centos --namespace=team-b -- sleep infinity
kubectl get pods -A
kubectl describe pod app-server --namespace=team-a
# To work exclusively with resources in one namespace, you can set it once in the `kubectl context` instead of using the --namespace flag for every command
kubectl config set-context --current --namespace=team-a
kubectl describe pod app-server
Provisioning access to namespaced resources in a cluster is accomplished by granting a combination of IAM roles and Kubernetes' built-in role-based access control (RBAC). An IAM role will give an account initial access to the project while the RBAC permissions will grant granular access to a cluster's namespaced resources (pods, deployments, services, etc).
To grant IAM roles in a project, you'll need the Project IAM Admin role assigned.
When managing access control for Kubernetes, Identity and Access Management (IAM) is used to manage access and permissions on a higher organization and project levels.
There are several roles that can be assigned to users and service accounts in IAM that govern their level of access with GKE. RBAC's granular permissions build on the access already provided by IAM and cannot restrict access granted by it. As a result, for multi-tenant namespaced clusters, the assigned IAM role should grant minimal access.
Common GKE IAM roles you can assign:
Kubernetes Engine Admin - Provides access to full management of clusters and their Kubernetes API objects. A user with this role will be able to create, edit and delete any resource in any cluster and subsequent namespaces.
Kubernetes Engine Developer - Provides access to Kubernetes API objects inside clusters. A user with this role will be able to create, edit, and delete resources in any cluster and subsequent namespaces.
Kubernetes Engine Cluster Admin - Provides access to management of clusters. A user with this role will not have access to create or edit resources within any cluster or subsequent namespaces directly, but will be able to create, modify, and delete any cluster.
Kubernetes Engine Viewer - Provides read-only access to GKE resources. A user with this role will have read-only access to namespaces and their resources.
Kubernetes Engine Cluster Viewer - Get and list access to GKE Clusters. This is the minimal role required for anyone who needs to access resources within a cluster's namespaces.
# Grant the account the Kubernetes Engine Cluster Viewer role by running the following
gcloud projects add-iam-policy-binding ${GOOGLE_CLOUD_PROJECT} \
--member=serviceAccount:team-a-dev@${GOOGLE_CLOUD_PROJECT}.iam.gserviceaccount.com  \
--role=roles/container.clusterViewer
Within a cluster, access to any resource type (pods, services, deployments, etc) is defined by either a role or a cluster role (RBAC). Only roles are allowed to be scoped to a namespace. While a role will indicate the resources and the action allowed for each resource, a role binding will indicate to what user accounts or groups to assign that access to.
# Roles with single rules can be created with kubectl create
kubectl create role pod-reader \
--resource=pods --verb=watch --verb=get --verb=list
# Create a new developer role
kubectl apply -f - <<EOFapiVersion: rbac.authorization.k8s.io/v1kind: Rolemetadata: namespace: team-a name: developerrules:- apiGroups: [""] resources: ["pods", "services", "serviceaccounts"] verbs: ["update", "create", "delete", "get", "watch", "list"]- apiGroups:["apps"] resources: ["deployments"] verbs: ["update", "create", "delete", "get", "watch", "list"]EOF# Create a role binding between the `team-a-developers` serviceaccount and the `developer-role`
kubectl create rolebinding team-a-developers \
--role=developer --user=team-a-dev@${GOOGLE_CLOUD_PROJECT}.iam.gserviceaccount.com
# Download the service account keys used to impersonate the service account
gcloud iam service-accounts keys create /tmp/key.json --iam-account team-a-dev@${GOOGLE_CLOUD_PROJECT}.iam.gserviceaccount.com
# Here, run the following to activate the service account. This will allow you to run the commands as the account
gcloud auth activate-service-account --key-file=/tmp/key.json
# Get the credentials for your cluster, as the service account
gcloud container clusters get-credentials multi-tenant-cluster --zone us-central1-a --project ${GOOGLE_CLOUD_PROJECT}# Working:
kubectl get pods --namespace=team-a
# Not working:
kubectl get pods --namespace=team-b
# Renew the cluster credentials and reset your context to the `team-a` namespace
gcloud container clusters get-credentials multi-tenant-cluster --zone us-central1-a --project ${GOOGLE_CLOUD_PROJECT}
When a cluster is shared in a multi-tenant set up, it's important to make sure that users are not able to use more than their fair share of the cluster resources. A resource quota object (ResourceQuota) will define constraints that will limit resource consumption in a namespace. A resource quota can specify a limit to object counts (pods, services, stateful sets, etc), total sum of storage resources (persistent volume claims, ephemeral storage, storage classes ), or total sum of compute resources. (cpu and memory).
When a resource quota for CPU or memory exists in a namespace, every container that is created in that namespace thereafter must have its own CPU and memory limit defined on creation or by having a default value assigned in the namespace as a LimitRange.
# The following will set a limit to the number of pods allowed in the namespace `team-a` to 2, and the number of loadbalancers to 1:
kubectl create quota test-quota --hard=count/pods=2,count/services.loadbalancers=1 --namespace=team-a
# Create a second pod in the namespace `team-a`
kubectl run app-server-2 --image=centos --namespace=team-a -- sleep infinity
# Now try to create a third pod
kubectl run app-server-3 --image=centos --namespace=team-a -- sleep infinity
kubectl describe quota test-quota --namespace=team-a
# Update to 6export KUBE_EDITOR="nano"
kubectl edit quota test-quota --namespace=team-a
kubectl describe quota test-quota --namespace=team-a
# When setting quotas for CPU and memory, you can indicate a quota for the sum of requests (a value that a container is guaranteed to get) or the sum of limits (a value that a container will never be allowed to pass).
kubectl apply -f - <<EOFapiVersion: v1kind: ResourceQuotametadata: name: cpu-mem-quota namespace: team-aspec: hard: limits.cpu: "4" limits.memory: "12Gi" requests.cpu: "2" requests.memory: "8Gi"EOF# To demonstrate the CPU and memory quota
kubectl apply -f - <<EOFapiVersion: v1kind: Podmetadata: name: cpu-mem-demo namespace: team-aspec: containers: - name: cpu-mem-demo-ctr image: nginx resources: requests: cpu: "100m" memory: "128Mi" limits: cpu: "400m" memory: "512Mi"EOF
kubectl describe quota cpu-mem-quota --namespace=team-a
For most multi-tenant clusters, it's likely that the workloads and resource requirements of each of the tenants will change and resource quotas might need to be adjusted. By using Monitoring you can get a general view of the resources each namespace is using.
With GKE usage metering, you're able to get a more granular view of that resource usage and subsequently a better idea of costs associated with each tenant.
GKE usage metering allows you to export your GKE cluster resource utilization and consumption to a BigQuery dataset where you can visualize it using Looker Studio. It allows for a more granular view of resource usage. By using usage metering, you are able to make more informed decisions on resource quotas and efficient cluster configuration. It can take several hours for GKE metric data to populate BigQuery.
# Run the following to enable GKE usage metering on the cluster and specify the dataset `cluster_dataset`
gcloud container clusters \
update multi-tenant-cluster --zone us-central1-a \
--resource-usage-bigquery-dataset cluster_dataset
# Create the GKE cost breakdown table - set the path of the provided billing table, the provided usage metering dataset, and a name for the new cost breakdown table...export GCP_BILLING_EXPORT_TABLE_FULL_PATH=${GOOGLE_CLOUD_PROJECT}.billing_dataset.gcp_billing_export_v1_xxxx
export USAGE_METERING_DATASET_ID=cluster_dataset
export COST_BREAKDOWN_TABLE_ID=usage_metering_cost_breakdown
export USAGE_METERING_QUERY_TEMPLATE=~/gke-qwiklab/usage_metering_query_template.sql
export USAGE_METERING_QUERY=cost_breakdown_query.sql
export USAGE_METERING_START_DATE=2020-10-26
# Now, using these environment variables and the query template, generate the usage metering query
sed \
-e "s/\${fullGCPBillingExportTableID}/$GCP_BILLING_EXPORT_TABLE_FULL_PATH/" \
-e "s/\${projectID}/$GOOGLE_CLOUD_PROJECT/" \
-e "s/\${datasetID}/$USAGE_METERING_DATASET_ID/" \
-e "s/\${startDate}/$USAGE_METERING_START_DATE/" \
"$USAGE_METERING_QUERY_TEMPLATE" \
>"$USAGE_METERING_QUERY"# Run the following command to set up your cost breakdown table using the query you rendered in the previous step
bq query \
--project_id=$GOOGLE_CLOUD_PROJECT \
--use_legacy_sql=false \
--destination_table=$USAGE_METERING_DATASET_ID.$COST_BREAKDOWN_TABLE_ID \
--schedule='every 24 hours' \
--display_name="GKE Usage Metering Cost Breakdown Scheduled Query" \
--replace=true \
"$(cat $USAGE_METERING_QUERY)"
SELECT * FROM `qwiklabs-gcp-02-be13d9d2ce47.cluster_dataset.usage_metering_cost_breakdown`
Exploring Cost-optimization for GKE Virtual Machines
A machine type is a set of virtualized hardware resources available to a virtual machine (VM) instance, including the system memory size, virtual CPU (vCPU) count, and persistent disk limits. Machine types are grouped and curated by families for different workloads.
When choosing a machine type for your node pool, the general purpose machine type family typically offers the best price-performance ratio for a variety of workloads. The general purpose machine types consist of the N-series and E2-series
The differences between the machine types might help your app and they might not. In general, E2s have similar performance to N1s but are optimized for cost. Usually, utilizing the E2 machine type alone can help save on costs. However, with a cluster, it's most important that the resources utilized are optimized based on your application’s needs. For bigger applications or deployments that need to scale heavily, it can be cheaper to stack your workloads on a few optimized machines rather than spreading them across many general purpose ones.
Understanding the details of your app is important for this decision making progress. If your app has specific requirements, you can make sure the machine type is shaped to fit the app.
If the workload for this app were completely static, you could create a machine type with a custom fitted shape that has the exact amount of cpu and memory needed. By doing this, you would consequently save costs on your overall cluster infrastructure. However, GKE clusters often run multiple workloads and those workloads will typically need to be scaled up and down.
# Access your cluster's credentials
gcloud container clusters get-credentials hello-demo-cluster --zone us-central1-a

# Scale up your Hello-Server
kubectl scale deployment hello-server --replicas=2

# Increase your node pool to handle your new request
gcloud container clusters resize hello-demo-cluster --node-pool node \
  --num-nodes 3 --zone us-central1-a
A binpacking problem is one in which you must fit items of various volumes/shapes into a finite number of regularly shaped bins or containers. Essentially, the challenge is to fit the items into the fewest number of bins, packing them as efficiently as possible.
The cost of 3 e2-medium machines would be about $0.1 an hour while 1 e2-standard-2 is listed at about $0.067 an hour.
# Create a new node pool with a larger machine type, 1 node only
gcloud container node-pools create larger-pool \
--cluster=hello-demo-cluster \
--machine-type=e2-standard-2 \
--num-nodes=1 \
--zone=us-central1-a
# Cordon the original node pool of 3 nodesfornodein$(kubectl get nodes -l cloud.google.com/gke-nodepool=node -o=name);do
kubectl cordon "$node";done# Drain the poolfornodein$(kubectl get nodes -l cloud.google.com/gke-nodepool=node -o=name);do
kubectl drain --force --ignore-daemonsets --delete-local-data --grace-period=10 "$node";done# You should see that your pods are running on the new, larger-pool
kubectl get pods -o=wide
# With the pods migrated, it's safe to delete the old node pool
gcloud container node-pools delete node --cluster hello-demo-cluster --zone us-central1-a
Selecting the appropriate location for a cluster
Handling failures - If your resources for your app are only distributed in one zone and that zone becomes unavailable, your app will also become unavailable. For larger scale, high demand apps it's often best practice to distribute resources across multiple zones or regions in order to handle failures.
Decreased network latency - To decrease network latency, you might want to choose a region or zone that is close to your point of service. For example, if you mostly have customers on the East Coast of the US, then you might want to choose a primary region and zone that is close to that area.
Costs vary between regions based on a variety of factors. For example, resources in the us-west2 region tend to be more expensive than those in us-central1.
When selecting a region or zone for your cluster, examine what your app is doing. For a latency-sensitive production environment, placing your app in a region/zone with decreased network latency and increased efficiency would likely give you the best performance-to-cost ratio. However, a non-latency-sensitive dev environment could be placed in a less expensive region to reduce costs.
At face value, a single-zone cluster will be the least expensive option. For HA of your applications, it is best to distribute your cluster’s infrastructure resources across zones
A multi-zonal cluster has at least one additional zone defined, but only has a single replica of the control plane running in a single zone. Workloads can still run during an outage of the control plane's zone, but no configurations can be made to the cluster until the control plane is available.
A regional cluster has multiple replicas of the control plane, running in multiple zones within a given region. Nodes also run in each zone where a replica of the control plane runs. Regional clusters consume the most resources, but offer the best HA.
# Create a new regional cluster (this command will take a few minutes to complete)
gcloud container clusters create regional-demo --region=us-central1 --num-nodes=1
# In order to demonstrate traffic between your pods and nodes, you will create two pods on separate nodes in your regional cluster. We will use ping to generate traffic from one pod to the other to generate traffic which we can then monitor.# 1st
cat <<EOF > pod-1.yamlapiVersion: v1kind: Podmetadata: name: pod-1 labels: security: demospec: containers: - name: container-1 image: wbitt/network-multitoolEOF
kubectl apply -f pod-1.yaml
# 2nd
cat <<EOF > pod-2.yamlapiVersion: v1kind: Podmetadata: name: pod-2spec:# This enables you to ensure that the pod is not scheduled on the same node as pod-1. This is done by matching an expression based on pod-1 "security: demo" label. Pod Affinity is used to ensure pods are scheduled on the same node, while Pod Anti Affinity is used to ensure pods are NOT scheduled on the same node. affinity: podAntiAffinity: requiredDuringSchedulingIgnoredDuringExecution: - labelSelector: matchExpressions: - key: security operator: In values: - demo topologyKey: "kubernetes.io/hostname" containers: - name: container-2 image: gcr.io/google-samples/node-hello:1.0EOF
kubectl apply -f pod-2.yaml
kubectl get pod pod-1 pod-2 --output wide
kubectl exec -it pod-1 -- sh
ping -c 50 10.60.0.4
exit
SELECT jsonPayload.src_instance.zone AS src_zone, jsonPayload.src_instance.vm_name AS src_vm, jsonPayload.dest_instance.zone AS dest_zone, jsonPayload.dest_instance.vm_name FROM `qwiklabs-gcp-02-c1daa2359a0d.us_central_flow_logs.compute_googleapis_com_vpc_flows_20230605` LIMIT 1000
# Change your Pod Anti-Affinity rule into a Pod Affinity rule while still using the same logic. Now pod-2 will be scheduled on the same node as pod-1.
sed -i 's/podAntiAffinity/podAffinity/g' pod-2.yaml
kubectl delete pod pod-2
kubectl create -f pod-2.yaml
When the pods were pinging each other from different zones, it was costing $0.01 per GB. While that may seem small, it could add up very quickly in a large scale cluster with multiple services making frequent calls between zones.
When you moved the pods into the same zone, the pinging became free of charge.
Understanding and Combining GKE Autoscaling Strategies
gcloud config set compute/zone us-central1-a
gcloud container clusters create scaling-demo --num-nodes=3 --enable-vertical-pod-autoscaling
# Create a manifest for the `php-apache` deployment
cat <<EOF > php-apache.yamlapiVersion: apps/v1kind: Deploymentmetadata: name: php-apachespec: selector: matchLabels: run: php-apache replicas: 3 template: metadata: labels: run: php-apache spec: containers: - name: php-apache image: k8s.gcr.io/hpa-example ports: - containerPort: 80 resources: limits: cpu: 500m requests: cpu: 200m---apiVersion: v1kind: Servicemetadata: name: php-apache labels: run: php-apachespec: ports: - port: 80 selector: run: php-apacheEOF
kubectl apply -f php-apache.yaml
# Apply horizontal autoscaling to the php-apache deployment# 1. 50% as the target average CPU utilization of requested CPU over all the pods# 2. Maintain between 1 and 10 replicas
kubectl autoscale deployment php-apache --cpu-percent=50 --min=1 --max=10
# Wait for 15 minutes
kubectl get hpa
# The HPA takes advantage of the fact that the app is inactive right now and removes all the unused resources. Furthermore, if more demand were placed on the php-apache app, it would scale back up to account for the load.# If availability of your application is a main concern, it's considered best practice to leave a slightly higher buffer as the minimum pod number for your Horizontal Pod Autoscaler to account for the time it takes to scale.# Verify Vertical Pod Autoscaler is enabled
gcloud container clusters update scaling-demo --enable-vertical-pod-autoscaling
gcloud container clusters describe scaling-demo | grep ^verticalPodAutoscaling -A 1
# Apply the hello-server deployment to your cluster
kubectl create deployment hello-server --image=gcr.io/google-samples/hello-app:1.0
kubectl get deployment hello-server
# Assign a CPU resource request of 450m to the deployment
kubectl set resources deployment hello-server --requests=cpu=450m
kubectl describe pod hello-server | sed -n "/Containers:$/,/Conditions:/p"# Create a manifest for VPA# Update policies:# 1. Off: this policy means VPA will generate recommendations based on historical data which you can manually apply.# 2. Initial: VPA recommendations will be used to create new pods once and then won't change the pod size after.# 3. Auto: pods will regularly be deleted and recreated to match the size of the recommendations.
cat <<EOF > hello-vpa.yamlapiVersion: autoscaling.k8s.io/v1kind: VerticalPodAutoscalermetadata: name: hello-server-vpaspec: targetRef: apiVersion: "apps/v1" kind: Deployment name: hello-server updatePolicy: updateMode: "Off"EOF
kubectl apply -f hello-vpa.yaml
kubectl describe vpa hello-server-vpa
Locate the "Container Recommendations" at the end of the VPA output. If you don't see it, wait a little longer and try the previous command again. When it appears, you'll see several different recommendation types, each with values for CPU and memory:
Lower Bound: this is the lower bound number VPA looks at for triggering a resize. If your pod utilization goes below this, VPA will delete the pod and scale it down.
Target: this is the value VPA will use when resizing the pod.
Uncapped Target: if no minimum or maximum capacity is assigned to the VPA, this will be the target utilization for VPA.
Upper Bound: this is the upper bound number VPA looks at for triggering a resize. If your pod utilization goes above this, VPA will delete the pod and scale it up.
VPA bases its recommendations on historical data from the container. In practice, it's recommended to wait at least 24 hours to collect recommendation data before applying any changes.
# Update the manifest to set the policy to Auto and apply the configuration
sed -i 's/Off/Auto/g' hello-vpa.yaml
kubectl apply -f hello-vpa.yaml
# In order to resize a pod, VPA will need to delete that pod and recreate it with the new size. By default & to avoid downtime, VPA will not delete and resize the last active pod. Because of this, you will need at least 2 replicas to see VPA make any changes.
kubectl scale deployment hello-server --replicas=2
kubectl get pods -w
# Your Vertical Pod Autoscaler recreated the pods with their target utilizations.
A well-tuned autoscaler means that you are maintaining high availability of your application while only paying for the resources that are required to maintain that availability, regardless of the demand.
VPA becomes an excellent tool for optimizing resource utilization and, in effect, saving on costs.
With the Auto update policy, your VPA would continue to delete and resize the pods of the hello-server deployment throughout its lifetime. It could scale pods up with larger requests to handle heavy traffic and then scale back down during a downtime. This can be great for accounting for steady increases of demand for your application, but it does risk losing availability during heavy spikes.
Depending on your application, it's generally safest to use VPA with the Off update policy and take the recommendations as needed in order to both optimize resource usage and maximize your cluster's availability.
# The Cluster Autoscaler is designed to add or remove nodes based on demand# Enable autoscaling for your cluster
gcloud beta container clusters update scaling-demo --enable-autoscaling --min-nodes 1 --max-nodes 5
# You can specify which autoscaling profile# 1. Balanced: The default profile.# 2. Optimize-utilization: Prioritize optimizing utilization over keeping spare resources in the cluster. When selected, the cluster autoscaler scales down the cluster more aggressively. It can remove more nodes, and remove nodes faster. This profile has been optimized for use with batch workloads that are not sensitive to start-up latency.# Switch to `optimize-utilization` autoscaling profile
gcloud beta container clusters update scaling-demo --autoscaling-profile optimize-utilization
# By default, most of the system pods from these deployments will prevent cluster autoscaler from taking them completely offline to reschedule them
kubectl get deployment -n kube-system
# Pod Disruption Budgets (PDB) define how Kubernetes should handle disruptions like upgrades, pod removals, running out of resources, etc.
kubectl create poddisruptionbudget kube-dns-pdb --namespace=kube-system --selector k8s-app=kube-dns --max-unavailable 1
kubectl create poddisruptionbudget prometheus-pdb --namespace=kube-system --selector k8s-app=prometheus-to-sd --max-unavailable 1
kubectl create poddisruptionbudget kube-proxy-pdb --namespace=kube-system --selector component=kube-proxy --max-unavailable 1
kubectl create poddisruptionbudget metrics-agent-pdb --namespace=kube-system --selector k8s-app=gke-metrics-agent --max-unavailable 1
kubectl create poddisruptionbudget metrics-server-pdb --namespace=kube-system --selector k8s-app=metrics-server --max-unavailable 1
kubectl create poddisruptionbudget fluentd-pdb --namespace=kube-system --selector k8s-app=fluentd-gke --max-unavailable 1
kubectl create poddisruptionbudget backend-pdb --namespace=kube-system --selector k8s-app=glbc --max-unavailable 1
kubectl create poddisruptionbudget kube-dns-autoscaler-pdb --namespace=kube-system --selector k8s-app=kube-dns-autoscaler --max-unavailable 1
kubectl create poddisruptionbudget stackdriver-pdb --namespace=kube-system --selector app=stackdriver-metadata-agent --max-unavailable 1
kubectl create poddisruptionbudget event-pdb --namespace=kube-system --selector k8s-app=event-exporter --max-unavailable 1
# We set up automation that scaled cluster down from 3 nodes to 2 nodes
It's important to note that, while Cluster Autoscaler removed an unnecessary node, Vertical Pod Autoscaling (VPA) and Horizontal Pod Autoscaling (HPA) helped reduce enough CPU demand so that the node was no longer needed. Combining these tools is a great way to optimize your overall costs and resource usage.
Node Auto Provisioning (NAP) actually adds new node pools that are sized to meet demand. Without node auto provisioning, the cluster autoscaler will only be creating new nodes in the node pools you've specified, meaning the new nodes will be the same machine type as the other nodes in that pool. This is perfect for helping optimize resource usage for batch workloads and other apps that don't need extreme scaling, since creating a node pool that is specifically optimized for your use case might take more time than just adding more nodes to an existing pool.
## Enable Node Auto Provisioning
gcloud container clusters update scaling-demo \
--enable-autoprovisioning \
--min-cpu 1 \
--min-memory 2 \
--max-cpu 45 \
--max-memory 160
# Test the larger demand
kubectl run -i --tty load-generator --rm --image=busybox --restart=Never -- /bin/sh -c "while sleep 0.01; do wget -q -O- http://php-apache; done"
kubectl get hpa
kubectl get deployment php-apache
Pause Pods are low priority deployments which are able to be removed and replaced by high priority deployments. This means you can create low priority pods which don't actually do anything except reserve buffer space. When the higher-priority pod needs room, the pause pods will be removed and rescheduled to another node, or a new node, and the higher-priority pod has the room it needs to be scheduled quickly.
In order to take advantage of container-native load balancing, the VPC-native setting must be enabled on the cluster. This was indicated when you created the cluster and included the --enable-ip-alias flag.
gcloud config set compute/zone us-central1-a
gcloud container clusters create test-cluster --num-nodes=3 --enable-ip-alias
cat <<EOF > gb_frontend_pod.yamlapiVersion: v1kind: Podmetadata: labels: app: gb-frontend name: gb-frontendspec: containers: - name: gb-frontend image: gcr.io/google-samples/gb-frontend:v5 resources: requests: cpu: 100m memory: 256Mi ports: - containerPort: 80EOF
kubectl apply -f gb_frontend_pod.yaml
cat <<EOF > gb_frontend_cluster_ip.yamlapiVersion: v1kind: Servicemetadata: name: gb-frontend-svc annotations: cloud.google.com/neg: '{"ingress": true}'spec: type: ClusterIP selector: app: gb-frontend ports: - port: 80 protocol: TCP targetPort: 80EOF
cat <<EOF > gb_frontend_cluster_ip.yamlapiVersion: v1kind: Servicemetadata: name: gb-frontend-svc annotations: cloud.google.com/neg: '{"ingress": true}'spec: type: ClusterIP selector: app: gb-frontend ports: - port: 80 protocol: TCP targetPort: 80EOF
kubectl apply -f gb_frontend_cluster_ip.yaml
cat <<EOF > gb_frontend_ingress.yamlapiVersion: networking.k8s.io/v1kind: Ingressmetadata: name: gb-frontend-ingressspec: defaultBackend: service: name: gb-frontend-svc port: number: 80EOF
kubectl apply -f gb_frontend_ingress.yaml
# When the ingress is created, an HTTP(S) load balancer is created along with an NEG (Network Endpoint Group) in each zone in which the cluster runs. After a few minutes, the ingress will be assigned an external IP.# The load balancer it created has a backend service running in your project that defines how Cloud Load Balancing distributes traffic. This backend service has a health status associated with it.
BACKEND_SERVICE=$(gcloud compute backend-services list | grep NAME | cut -d '' -f2)echo$BACKEND_SERVICE
gcloud compute backend-services get-health $BACKEND_SERVICE --global
kubectl get ingress gb-frontend-ingress
These health checks are part of the Google Cloud load balancer and are distinct from the liveness and readiness probes provided by the Kubernetes API which can be used to determine the health of individual pods. The Google Cloud load balancer health checks use special routes outside of your project’s VPC to perform health checks and determine the success or failure of a backend.
# To load test your pod, use Locust, an open source load-testing framework
gsutil -m cp -r gs://spls/gsp769/locust-image .# Build the Docker image for Locust and store it in your project's container registry
gcloud builds submit \
--tag gcr.io/${GOOGLE_CLOUD_PROJECT}/locust-tasks:latest locust-image
gcloud container images list
gsutil cp gs://spls/gsp769/locust_deploy_v2.yaml .
sed 's/${GOOGLE_CLOUD_PROJECT}/'$GOOGLE_CLOUD_PROJECT'/g' locust_deploy_v2.yaml | kubectl apply -f -
kubectl get service locust-main
If configured in the Kubernetes pod or deployment spec, a liveness probe will continuously run to detect whether a container requires a restart and trigger that restart. They are helpful for automatically restarting deadlocked applications that may still be in a running state. For example, a kubernetes-managed load balancer (such as a service) would only send traffic to a pod backend if all of its containers pass a readiness probe.
The initialDelaySeconds value represents how long before the first probe should be performed after the container starts up. The periodSeconds value indicates how often the probe will be performed.
Pods can also be configured to include a startupProbe which indicates whether the application within the container is started. If a startupProbe is present, no other probes will perform until it returns a Success state. This is recommended for applications that may have variable start-up times in order to avoid interruptions from a liveness probe.
The example in this lab uses a command probe for its livenessProbe that depends on the exit code of a specified command. In addition to a command probe, a livenessProbe could be configured as an HTTP probe that will depend on HTTP response, or a TCP probe that will depend on whether a TCP connection can be made on a specific port.
Although a pod could successfully start and be considered healthy by a liveness probe, it's likely that it may not be ready to receive traffic right away. This is common for deployments that serve as a backend to a service such as a load balancer. A readiness probe is used to determine when a pod and its containers are ready to begin receiving traffic.
Part of ensuring reliability and uptime for your GKE application relies on leveraging pod disruption budgets (pdp). PodDisruptionBudget is a Kubernetes resource that limits the number of pods of a replicated application that can be down simultaneously due to voluntary disruptions.
Voluntary disruptions include administrative actions like deleting a deployment, updating a deployment's pod template and performing a rolling update, draining nodes that an application's pods reside on, or moving pods to different nodes.
kubectl delete pod gb-frontend
cat <<EOF > gb_frontend_deployment.yamlapiVersion: apps/v1kind: Deploymentmetadata: name: gb-frontend labels: run: gb-frontendspec: replicas: 5 selector: matchLabels: run: gb-frontend template: metadata: labels: run: gb-frontend spec: containers: - name: gb-frontend image: gcr.io/google-samples/gb-frontend:v5 resources: requests: cpu: 100m memory: 128Mi ports: - containerPort: 80 protocol: TCPEOF
kubectl apply -f gb_frontend_deployment.yaml
# Evict pods from the specified node and cordon the node so that no new pods can be created on it. If the available resources allow, pods are redeployed on a different node.fornodein$(kubectl get nodes -l cloud.google.com/gke-nodepool=default-pool -o=name);do
kubectl drain --force --ignore-daemonsets --grace-period=10 "$node";done# Check in on your gb-frontend deployment's replica count
kubectl describe deployment gb-frontend | grep ^Replicas
# After draining a node, your deployment could have as little as 0 replicas available, as indicated by the output above. Without any pods available, your application is effectively down. Let's try draining the nodes again, except this time with a pod disruption budget in place for your application. Bring the drained nodes back by uncordoning them. The command below allows pods to be scheduled on the node again:fornodein$(kubectl get nodes -l cloud.google.com/gke-nodepool=default-pool -o=name);do
kubectl uncordon "$node";done# Check in on the status of your deployment
kubectl describe deployment gb-frontend | grep ^Replicas
# Create a pod disruption budget that will declare the minimum number of available pods to be 4
kubectl create poddisruptionbudget gb-pdb --selector run=gb-frontend --min-available 4
# drain one of your cluster's nodes and observe the outputfornodein$(kubectl get nodes -l cloud.google.com/gke-nodepool=default-pool -o=name);do
kubectl drain --timeout=30s --ignore-daemonsets --grace-period=10 "$node";done# Until Kubernetes is able to deploy a 5th pod on a different node in order to evict the next one, the remaining pods will remain available in order to adhere to the PDB. In this example, the pod disruption budget was configured to indicate min-available but a PDB can also be configured to define a max-unavailable. Either value can be expressed as an integer representing a pod count, or a percentage of total pods.
kubectl describe deployment gb-frontend | grep ^Replicas
Automating Infrastructure on Google Cloud with Terraform
Terraform is a tool for building, changing, and versioning infrastructure safely and efficiently. Terraform can manage existing, popular service providers and custom in-house solutions.
Configuration files describe to Terraform the components needed to run a single application or your entire data center. Terraform generates an execution plan describing what it will do to reach the desired state, and then executes it to build the described infrastructure. As the configuration changes, Terraform can determine what changed and create incremental execution plans that can be applied.
The infrastructure Terraform can manage includes both low-level components such as compute instances, storage, and networking, and high-level components such as DNS entries and SaaS features.
Key features:
Infrastructure as code
Execution plans
Resource graph
Change automation
Terraform comes pre-installed in Cloud Shell.
Terraform recognizes files ending in .tf or .tf.json as configuration files and will load them when it runs.
A destructive change is a change that requires the provider to replace the existing resource rather than updating it. This usually happens because the cloud provider doesn't support updating the resource in the way described by your configuration.
Terraform uses implicit dependency information to determine the correct order in which to create and update different resources.
Sometimes there are dependencies between resources that are not visible to Terraform. The depends_on argument can be added to any resource and accepts a list of resources to create explicit dependencies for.
Just like with terraform apply, Terraform determines the order in which things must be destroyed.
# The "resource" block in the instance.tf file defines a resource that exists within the infrastructure
cat <<EOF > instance.tfresource "google_compute_instance" "terraform" { project = "qwiklabs-gcp-00-11e2bd4a53d4" name = "terraform" machine_type = "n1-standard-1" zone = "us-west1-c" boot_disk { initialize_params { image = "debian-cloud/debian-11" } } network_interface { network = "default" access_config { } }}EOF# Initialize Terraform
terraform init
# Create an execution plan
terraform plan
# In the same directory as the instance.tf file you created, run this command
terraform apply
# Inspect the current state
terraform show
# The terraform {} block is required so Terraform knows which provider to download from the Terraform Registry.
cat <<EOF > main.tfterraform { required_providers { google = { source = "hashicorp/google" } }}provider "google" { version = "3.5.0" project = "qwiklabs-gcp-02-12656959b010" region = "us-central1" zone = "us-central1-c"}resource "google_compute_network" "vpc_network" { name = "terraform-network"}EOF# Initialize, apply & verify
terraform init
terraform apply
terraform show
# Add more resourcesecho'resource "google_compute_instance" "vm_instance" { name = "terraform-instance" machine_type = "f1-micro" tags = ["web", "dev"] boot_disk { initialize_params { image = "debian-cloud/debian-11" } } network_interface { network = google_compute_network.vpc_network.name access_config { } }}'>> main.tf
# Apply again
terraform apply
# Detroy the infrastructure
terraform destroy
# Add static IPecho'resource "google_compute_address" "vm_static_ip" { name = "terraform-static-ip"}'>> main.tf
# Update network interface to use static IP# network_interface {# network = google_compute_network.vpc_network.self_link# access_config {# nat_ip = google_compute_address.vm_static_ip.address# }# }# Save plan to a file
terraform plan -out static_ip
# Apply the plan
terraform apply "static_ip"# Terraform is able to infer a dependency, and knows it must create the static IP before updating the instance# Add more resources, like Storage bucketecho'# New resource for the storage bucket our application will use.resource "google_storage_bucket" "example_bucket" { name = "qwiklabs-gcp-02-12656959b010" location = "US" website { main_page_suffix = "index.html" not_found_page = "404.html" }}# Create a new instance that uses the bucketresource "google_compute_instance" "another_instance" { # Tells Terraform that this VM instance must be created only after the # storage bucket has been created. depends_on = [google_storage_bucket.example_bucket] name = "terraform-instance-2" machine_type = "f1-micro" boot_disk { initialize_params { image = "cos-cloud/cos-stable" } } network_interface { network = google_compute_network.vpc_network.self_link access_config { } }}'>> main.tf
# To define a provisioner, modify the resource block defining the first vm_instance in your configuration to look like the following
resource "google_compute_instance""vm_instance" {
name = "terraform-instance"
machine_type = "f1-micro"
tags = ["web", "dev"]
provisioner "local-exec" {
command = "echo ${google_compute_instance.vm_instance.name}: ${google_compute_instance.vm_instance.network_interface[0].access_config[0].nat_ip} >> ip_address.txt"
}
# ...
}
terraform apply
# Use terraform taint to tell Terraform to recreate the instance:
terraform taint google_compute_instance.vm_instance
terraform apply
If a resource is successfully created but fails a provisioning step, Terraform will error and mark the resource as tainted. A resource that is tainted still exists, but shouldn't be considered safe to use, since provisioning failed.
When you generate your next execution plan, Terraform will remove any tainted resources and create new resources, attempting to provision them again after creation.
Provisioners can also be defined that run only during a destroy operation. These are useful for performing system cleanup, extracting data, etc.
For many resources, using built-in cleanup mechanisms is recommended if possible (such as init scripts), but provisioners can be used if necessary.
Terraform Modules
A Terraform module is a set of Terraform configuration files in a single directory.
As you manage your infrastructure with Terraform, increasingly complex configurations will be created. There is no intrinsic limit to the complexity of a single Terraform configuration file or directory, so it is possible to continue writing and updating your configuration files in a single directory. However, if you do, you may encounter one or more of the following problems:
Understanding and navigating the configuration files will become increasingly difficult.
Updating the configuration will become more risky, because an update to one block may cause unintended consequences to other blocks of your configuration.
Duplication of similar blocks of configuration may increase, for example, when you configure separate dev/staging/production environments, which will cause an increasing burden when updating those parts of your configuration.
If you want to share parts of your configuration between projects and teams, cutting and pasting blocks of configuration between projects could be error-prone and hard to maintain.
What are modules for?
Organize configuration
Encapsulate configuration
Re-use configuration
Provide consistency and ensure best practices
Modules can be loaded from either the local filesystem or a remote source.
It is recommended that every Terraform practitioner use modules by following these best practices:
Start writing your configuration with a plan for modules. Even for slightly complex Terraform configurations managed by a single person, the benefits of using modules outweigh the time it takes to use them properly.
Use local modules to organize and encapsulate your code. Even if you aren't using or publishing remote modules, organizing your configuration in terms of modules from the beginning will significantly reduce the burden of maintaining and updating your configuration as your infrastructure grows in complexity.
Use the public Terraform Registry to find useful modules. This way you can quickly and confidently implement your configuration by relying on the work of others.
Publish and share modules with your team. Most infrastructure is managed by a team of people, and modules are an important tool that teams can use to create and maintain infrastructure. As mentioned earlier, you can publish modules either publicly or privately.
When using a new module for the first time, you must run either terraform init or terraform get to install the module. When either of these commands is run, Terraform will install any new modules in the .terraform/modules directory within your configuration's working directory. For local modules, Terraform will create a symlink to the module's directory. Because of this, any changes to local modules will be effective immediately, without your having to re-run terraform get.
git clone https://github.com/terraform-google-modules/terraform-google-network
cd terraform-google-network
git checkout tags/v6.0.1 -b v6.0.1
echo'module "test-vpc-module" { source = "terraform-google-modules/network/google" version = "~> 6.0" project_id = var.project_id # Replace this with your project ID network_name = "my-custom-mode-network" mtu = 1460 subnets = [ { subnet_name = "subnet-01" subnet_ip = "10.10.10.0/24" subnet_region = "us-west1" }, { subnet_name = "subnet-02" subnet_ip = "10.10.20.0/24" subnet_region = "us-west1" subnet_private_access = "true" subnet_flow_logs = "true" }, { subnet_name = "subnet-03" subnet_ip = "10.10.30.0/24" subnet_region = "us-west1" subnet_flow_logs = "true" subnet_flow_logs_interval = "INTERVAL_10_MIN" subnet_flow_logs_sampling = 0.7 subnet_flow_logs_metadata = "INCLUDE_ALL_METADATA" subnet_flow_logs_filter = "false" } ] project_id = var.project_id network_name = var.network_name}'> main.tf
gcloud config list --format 'value(core.project)'echo'variable "project_id" { description = "The project ID to host the network in" default = "qwiklabs-gcp-03-58c084b52f45"}variable "network_name" { description = "The name of the VPC network being created" default = "example-vpc"}'> variables.tf
echo'output "network_name" { value = module.test-vpc-module.network_name description = "The name of the VPC being created"}output "network_self_link" { value = module.test-vpc-module.network_self_link description = "The URI of the VPC being created"}output "project_id" { value = module.test-vpc-module.project_id description = "VPC project id"}output "subnets_names" { value = module.test-vpc-module.subnets_names description = "The names of the subnets being created"}output "subnets_ips" { value = module.test-vpc-module.subnets_ips description = "The IP and cidrs of the subnets being created"}output "subnets_regions" { value = module.test-vpc-module.subnets_regions description = "The region where subnets will be created"}output "subnets_private_access" { value = module.test-vpc-module.subnets_private_access description = "Whether the subnets will have access to Google APIs without a public IP"}output "subnets_flow_logs" { value = module.test-vpc-module.subnets_flow_logs description = "Whether the subnets will have VPC flow logs enabled"}output "subnets_secondary_ranges" { value = module.test-vpc-module.subnets_secondary_ranges description = "The secondary ranges associated with these subnets"}output "route_names" { value = module.test-vpc-module.route_names description = "The routes associated with this VPC"}'> outputs.tf
cd~/terraform-google-network/examples/simple_project
terraform init
terraform apply
terraform destroy
rm -rd terraform-google-network -f
Each of these files serves a purpose:
LICENSE contains the license under which your module will be distributed. When you share your module, the LICENSE file will let people using it know the terms under which it has been made available. Terraform itself does not use this file.
README.md contains documentation in markdown format that describes how to use your module. Terraform does not use this file, but services like the Terraform Registry and GitHub will display the contents of this file to visitors to your module's Terraform Registry or GitHub page.
main.tf contains the main set of configurations for your module. You can also create other configuration files and organize them in a way that makes sense for your project.
variables.tf contains the variable definitions for your module. When your module is used by others, the variables will be configured as arguments in the module block. Because all Terraform values must be defined, any variables that don't have a default value will become required arguments. A variable with a default value can also be provided as a module argument, thus overriding the default value.
outputs.tf contains the output definitions for your module. Module outputs are made available to the configuration using the module, so they are often used to pass information about the parts of your infrastructure defined by the module to other parts of your configuration.
# Create modulecd~
touch main.tf
mkdir -p modules/gcs-static-website-bucket
cd modules/gcs-static-website-bucket
touch website.tf variables.tf outputs.tf
tee -a README.md <<EOF# GCS static website bucketThis module provisions Cloud Storage buckets configured for static website hosting.EOF
tee -a LICENSE <<EOFLicensed under the Apache License, Version 2.0 (the "License");you may not use this file except in compliance with the License.You may obtain a copy of the License at http://www.apache.org/licenses/LICENSE-2.0Unless required by applicable law or agreed to in writing, softwaredistributed under the License is distributed on an "AS IS" BASIS,WITHOUT WARRANTIES OR CONDITIONS OF ANY KIND, either express or implied.See the License for the specific language governing permissions andlimitations under the License.EOFecho'resource "google_storage_bucket" "bucket" { name = var.name project = var.project_id location = var.location storage_class = var.storage_class labels = var.labels force_destroy = var.force_destroy uniform_bucket_level_access = true versioning { enabled = var.versioning } dynamic "retention_policy" { for_each = var.retention_policy == null ? [] : [var.retention_policy] content { is_locked = var.retention_policy.is_locked retention_period = var.retention_policy.retention_period } } dynamic "encryption" { for_each = var.encryption == null ? [] : [var.encryption] content { default_kms_key_name = var.encryption.default_kms_key_name } } dynamic "lifecycle_rule" { for_each = var.lifecycle_rules content { action { type = lifecycle_rule.value.action.type storage_class = lookup(lifecycle_rule.value.action, "storage_class", null) } condition { age = lookup(lifecycle_rule.value.condition, "age", null) created_before = lookup(lifecycle_rule.value.condition, "created_before", null) with_state = lookup(lifecycle_rule.value.condition, "with_state", null) matches_storage_class = lookup(lifecycle_rule.value.condition, "matches_storage_class", null) num_newer_versions = lookup(lifecycle_rule.value.condition, "num_newer_versions", null) } } }}'> website.tf
echo'variable "name" { description = "The name of the bucket." type = string}variable "project_id" { description = "The ID of the project to create the bucket in." type = string}variable "location" { description = "The location of the bucket." type = string}variable "storage_class" { description = "The Storage Class of the new bucket." type = string default = null}variable "labels" { description = "A set of key/value label pairs to assign to the bucket." type = map(string) default = null}variable "bucket_policy_only" { description = "Enables Bucket Policy Only access to a bucket." type = bool default = true}variable "versioning" { description = "While set to true, versioning is fully enabled for this bucket." type = bool default = true}variable "force_destroy" { description = "When deleting a bucket, this boolean option will delete all contained objects. If false, Terraform will fail to delete buckets which contain objects." type = bool default = true}variable "iam_members" { description = "The list of IAM members to grant permissions on the bucket." type = list(object({ role = string member = string })) default = []}variable "retention_policy" { description = "Configuration of the buckets data retention policy for how long objects in the bucket should be retained." type = object({ is_locked = bool retention_period = number }) default = null}variable "encryption" { description = "A Cloud KMS key that will be used to encrypt objects inserted into this bucket" type = object({ default_kms_key_name = string }) default = null}variable "lifecycle_rules" { description = "The buckets Lifecycle Rules configuration." type = list(object({ # Object with keys: # - type - The type of the action of this Lifecycle Rule. Supported values: Delete and SetStorageClass. # - storage_class - (Required if action type is SetStorageClass) The target Storage Class of objects affected by this Lifecycle Rule. action = any # Object with keys: # - age - (Optional) Minimum age of an object in days to satisfy this condition. # - created_before - (Optional) Creation date of an object in RFC 3339 (e.g. 2017-06-13) to satisfy this condition. # - with_state - (Optional) Match to live and/or archived objects. Supported values include: "LIVE", "ARCHIVED", "ANY". # - matches_storage_class - (Optional) Storage Class of objects to satisfy this condition. Supported values include: MULTI_REGIONAL, REGIONAL, NEARLINE, COLDLINE, STANDARD, DURABLE_REDUCED_AVAILABILITY. # - num_newer_versions - (Optional) Relevant only for versioned objects. The number of newer versions of an object to satisfy this condition. condition = any })) default = []}'> variables.tf
echo'output "bucket" { description = "The created storage bucket" value = google_storage_bucket.bucket}'> outputs.tf
cd ../..
echo'module "gcs-static-website-bucket" { source = "./modules/gcs-static-website-bucket" name = var.name project_id = var.project_id location = "us-east1" lifecycle_rules = [{ action = { type = "Delete" } condition = { age = 365 with_state = "ANY" } }]}'> main.tf
echo'output "bucket-name" { description = "Bucket names." value = "module.gcs-static-website-bucket.bucket"}'> outputs.tf
echo'variable "project_id" { description = "The ID of the project in which to provision resources." type = string default = "qwiklabs-gcp-03-58c084b52f45"}variable "name" { description = "Name of the buckets to create." type = string default = "qwiklabs-gcp-03-58c084b52f45"}'> variables.tf
terraform init
terraform apply
# Upload files to a bucketcd~
curl https://raw.githubusercontent.com/hashicorp/learn-terraform-modules/master/modules/aws-s3-static-website-bucket/www/index.html > index.html
curl https://raw.githubusercontent.com/hashicorp/learn-terraform-modules/blob/master/modules/aws-s3-static-website-bucket/www/error.html > error.html
gsutil cp *.html gs://qwiklabs-gcp-03-58c084b52f45
terraform destroy
Terraform state
State is a necessary requirement for Terraform to function. People sometimes ask whether Terraform can work without state or not use state and just inspect cloud resources on every run. In the scenarios where Terraform may be able to get away without state, doing so would require shifting massive amounts of complexity from one place (state) to another place (the replacement concept).
Terraform requires some sort of database to map Terraform config to the real world.
In addition to tracking the mappings between resources and remote objects, Terraform must also track metadata such as resource dependencies.
To ensure correct operation, Terraform retains a copy of the most recent set of dependencies within the state.
In addition to basic mapping, Terraform stores a cache of the attribute values for all resources in the state. This is an optional feature of Terraform state and is used only as a performance improvement.
In the default configuration, Terraform stores the state in a file in the current working directory where Terraform was run.
Remote state is the recommended solution.
State locking = If supported by your backend, Terraform will lock your state for all operations that could write state. This prevents others from acquiring the lock and potentially corrupting your state. State locking happens automatically on all operations that could write state.
Workspace = The persistent data stored in the backend belongs to a workspace. Initially the backend has only one workspace, called default, and thus only one Terraform state is associated with that configuration. Certain backends support multiple named workspaces, which allows multiple states to be associated with a single configuration. The configuration still has only one backend, but multiple distinct instances of that configuration can be deployed without configuring a new backend or changing authentication credentials
A backend in Terraform determines how state is loaded and how an operation such as apply is executed. This abstraction enables non-local file state storage, remote execution, etc.
Here are some of the benefits of backends:
Working in a team
Keeping sensitive information off disk
Remote operations
# Add a local backend
touch main.tf
gcloud config list --format 'value(core.project)'echo'provider "google" { project = "qwiklabs-gcp-03-c3e63b049a3b" region = "us-central-1"}resource "google_storage_bucket" "test-bucket-for-state" { name = "qwiklabs-gcp-03-c3e63b049a3b" location = "US" uniform_bucket_level_access = true}'> main.tf
echo'terraform { backend "local" { path = "terraform/state/terraform.tfstate" }}'>> main.tf
terraform init
terraform apply
terraform show
# Add a Cloud Storage backendecho'provider "google" { project = "qwiklabs-gcp-03-c3e63b049a3b" region = "us-central-1"}resource "google_storage_bucket" "test-bucket-for-state" { name = "qwiklabs-gcp-03-c3e63b049a3b" location = "US" uniform_bucket_level_access = true}terraform { backend "gcs" { bucket = "qwiklabs-gcp-03-c3e63b049a3b" prefix = "terraform/state" }}'> main.tf
terraform init -migrate-state
# Change the key/value labels of the above bucket
terraform refresh
# Clean up your workspaceecho'provider "google" { project = "qwiklabs-gcp-03-c3e63b049a3b" region = "us-central-1"}resource "google_storage_bucket" "test-bucket-for-state" { name = "qwiklabs-gcp-03-c3e63b049a3b" location = "US" uniform_bucket_level_access = true}terraform { backend "local" { path = "terraform/state/terraform.tfstate" }}'> main.tf
terraform init -migrate-state
echo'provider "google" { project = "qwiklabs-gcp-03-c3e63b049a3b" region = "us-central-1"}resource "google_storage_bucket" "test-bucket-for-state" { name = "qwiklabs-gcp-03-c3e63b049a3b" location = "US" uniform_bucket_level_access = true force_destroy = true}terraform { backend "local" { path = "terraform/state/terraform.tfstate" }}'> main.tf
terraform apply
terraform destroy
Import Terraform configuration
Bringing existing infrastructure under Terraform’s control involves five main steps:
Identify the existing infrastructure to be imported.
Import the infrastructure into your Terraform state.
Write a Terraform configuration that matches that infrastructure.
Review the Terraform plan to ensure that the configuration matches the expected state and infrastructure.
Apply the configuration to update your Terraform state.
docker run --name hashicorp-learn --detach --publish 8080:80 nginx:latest
docker ps
git clone https://github.com/hashicorp/learn-terraform-import.git
cd learn-terraform-import
terraform init
echo'resource "docker_container" "web" {}'> learn-terraform-import/docker.tf
terraform import docker_container.web $(docker inspect -f {{.ID}} hashicorp-learn)
terraform show
terraform plan
terraform show -no-color > docker.tf
terraform plan
echo'resource "docker_container" "web" { image = "sha256:87a94228f133e2da99cb16d653cd1373c5b4e8689956386c1c12b60a20421a02" name = "hashicorp-learn" ports { external = 8080 internal = 80 ip = "0.0.0.0" protocol = "tcp" }}'> docker.tf
terraform plan
terraform apply
Google Cloud Directory Sync (GCDS) to mirror users from AD to Google Cloud Identity
Module 1
CloudRun (CR) vs GKE: CR is seamless serverless environment, but it has limitations (e.g. needs stateless WL)
AppEngine is one of the oldes services in GCP, we should favour CR instead
Firestore is NoSQL
Streaming videos, unstructured data = Google Cloud Storage (GCS)
Instead of monolith, consider microservices = Strangler Fig pattern
Apigee API Management is preferred if monetization/commercialization is needed (to expose some API)
Managed Instance Group (MIG) is always better even if you are deploying just 1 VM = autohealing based on instance template
GCP colocation facilities are third-party data centers where Google has presence and Points of Presence (POPs) are Google owned infrastructure
Disk:
Single Zone
Regional - Create a failover replica in the same region for HA storage and data replication is provided between both zones
Examples of global GCP resources? VPC, some LBs
Examples of regional GCP resources? Regional disk, Regional MIGs, IP addresses, VPC Subnet
What is alias IP range for? It is used in Google Kubernetes Engine (GKE)
Google Compute Engine (GCE) instance can have max 8 NICs (e.g. hub & spoke scenario)
VMs don't need service accounts (SA), but there is compute engine default service account = it is too open and it's recommended to configure access scopes
Organization policies = constraints to e.g. skip default network creation, hand-in-hand with IAM
Instance schedule can turn on/off VMs
Machine type contains amount of vCPUs in the name (e.g. e2-standard-8 has 8 vCPUs)
Module 2
What choices does architect need to find before you even start? IAM, networking, Org hierarchy, regions/zones constraints etc.
Organization policies in the project(s) inherit parent's policy, but can be customized/make exceptions for each underlying Org
Network admin role is usually not enough for some security related aspects of networking (e.g. FW rules, SSL certs) and you will also need security admin role
IAM BigQuery roles:
Job user - from project A querying project B
Data viewer - in the project B (where data resides)
IAM Shared VPCs:
Host project privileges (e.g. network user role)
Service project privileges
BigQuery is both storage and query engine, but data does not need to be residing in it
KMS protection levels:
Software
HSM
External (Fortanix, Futurex, Thales, Virtru)
Quotas can limit usage (e.g. on top of billing alerts)
Storage transfer service jobs are for moving data
Google Cloud Transfer Appliance when constrained with bandwidth, but takes weeks to order
When you create a retention policy on the bucket and lock it, it is permanent and cannot be cancelled
You can only enable object versioning or retention policy - not both
Dataproc = Hadoop
which ML tool to use? 4 main services:
complex models, create your own model = VertexAI
standard usecases, but unusual data = AutoML
own model = BigQuery ML
simple challenge, something off the shelf = ML APIs
Module 3
Why not accept vendor supplied defaults? It is not suitable/secure, only for quick operations
Assured workloads = compliance controls that will ensure subset of GCP is properly configured for compliance
How to hide PII? Use Dataflow template data masking/tokenization.
Data Loss Prevention (DLP API) scans the data and finds different types. Once detected, you can mask it.
Cloud security command centre = Detect & respond to security vulnerabilities.
Cloud Audit logs = Admin Activity audit logs contain log entries for API calls or other actions that modify the configuration or metadata of resources.
How to migrate app, that uses websockets to GCP? Nothing special, HTTP(S) LB natively supports websocket proxying.
GKE Autopilot is probably not covered in the exam, you are expected to know standard clusters (exam content is behind)
GKE Workload Identity = eliminates need to use service account keys, best practice for GKE to access GCP APIs
Workload Identity Federation is a different thing!
Module 4
SCM from Google = Cloud Storage Repositories
Cloud Build = has triggers (e.g. watching events in the repo)
Artifact Registry = newer version of container registry
Serverless (e.g. Cloud Functions, AppEngine) environments do not deploy into a VPC
HA based on Google's definition is zonal protection (e.g. AZ1 failing, not the entire region), <RTO, <RPO, fully automated
CloudSQL read replica is not automatic and is more DR than HA
For CloudSQL HA, change your existing instances into a regional instance
Managed product that can automatically scale to zero? CloudFunctions or AppEngine Standard (not AppEngine Flexible!)
Firewall (FW) Policy is like FW rule, can be used higher in the hierarchy e.g. in the Org where you can allow/deny for the entire Org
FW Policy has "Go to next" option, if you don't want to decide on it's own level (e.g. top Org) and leave the decision on the Project level
VPC Service Controls are for data exfiltration. You use it as oppose VPC FW in cases when you don't have control of your IP space (managed services don't have IPs so you cannot use FW)
Private service connectivity - 4 types:
Private Google Access - enabled/disabled on the subnet level (VMs without external IP still can't access internet, but can reach Google APIs)
Private service access - fancy name for 2-way VPC peering between your onprem and interconnected VPC and Google's own managed service VPC (hidden VPCs that are running Google services)
Serverless VPC access - for serverless managed services (that do not run in a VPC and which can't access your VPC). You need to create regional Connector (kind of appliance/VM)
Private service connect - removes challenges of the previous service connectivity types
Quizzes
Operations suite tool = Trace
Serial console connectivity is supported
Customer might not be able to recover data from a cloud provider = vendor lockout
How many NICs does GCE have? One, unless it's deployed in multiple VPCs
With TCP forwarding, Identity-Aware Proxy (IAP) can protect SSH and RDP access to your VMs hosted on GCP. Your VM instances don't even need public IP addresses.
~30% cost reduction of a VM over a month = sustained use discount
~80% cost reduction of a VM = preemtible discount
You can create GCE instances directly from snapshots
Each additional core increases the machine's network cap (Best network performance for a VM = increase vCPUs)
CloudSQL automatically creates a VPC peering so any attempts to login from another peered VPC will not work
IAM child policies cannot override access granted at the parent level
Dataflow uses Apache Beam API to provide Extract, transform, and load (ETL) services
GCP alternative to Apache Kafka = Cloud Pub/Sub
Alternative to Apache Spark = Dataproc
1GBps connection = Partner Interconnect
VPC FW rules are applied to traffic, that is entering a VM regardless of origin
Blue/Green deployment is not ideal for long-running transactions (any long-running transactions that were in progress on the old version of the application will be interrupted)
All queries on BigQuery need to be billed on a single project = add all users to a group, grant the group the roles of BigQuery jobUser on the billing project and BigQuery dataViewer on the projects that contain the data
Always use instance groups!
gcloud datastore indexes create = create new datastore indexes based on your local index configuration
BigQuery has time-partitioned table(s), with partition expiration
Aggregated sinks combine and route log entries from the GCP resources contained by an organization or folder
Firestore is the next generation of Datastore (highly scalable NoSQL database)
To ensure your app will handle the load even if an entire zone fails, overprovision:
at least by 100% for 2 AZs
at least by 50% for 3 AZs
Dataflow is also good for analysing data streams (e.g. mix of batch/stream processing)
Enlarge ext4 disk without downtime? In the GCP console, increase the size of the PD and use resize2fs
Cost optimisation best practices? Utilize free tier and sustained use discounts
shifted & lifted mobile platform to GCP VMs; each new game = GCP project nested below a folder (perms/netpol reason); all legacy games = single GCP project; separate envs for dev/test
BR (Business Requirements)
GKE for new multiplayer/multiplatform/multiregion game; global LB; multi-region DB for leaderboard; < latency; < $; managed services; fast development; rapid iterations
TR (Technical Requirements)
dynamic scaling; real-time global leaderboard; structured logs -> analysis; GPU processing/render graphics server-side; support legacy games
high SLA, HA, DR; Spanner due to multiple regions
multiple GKEs, maybe Anthos; Migrate to containers tool - helps you modernize Linux & Win WL from running on VMs to a set of artifacts (e.g. Dockerfile, Docker image, Deployment spec) which can run as containers
store game activity logs in GCS and query using BigQuery
to manage = IoT Core (but it is deprecated now! still can be in the exam)
streamed telemetry data = Cloud Pub/Sub
transform data = Dataflow
store & query = Bigtable/BigQuery
Currently
collect telemetry data from sensors (small critical data in real-time, rest compressed and uploaded daily from the base); sensor data sent to private cloud; interconnects with GCP already; Front end runs on GCP and provides stock mgmt & analytics
BR (Business Requirements)
minimise vehicle downtime by predicting/detecting malfunction; > autonomous operations; < OP $; > speed/reliability of dev workflow; data security for remote devs; flexible/scalable platform; custom API for partners (for fleet mgmt, access to our data)
TR (Technical Requirements)
abstraction APIs for legacy systems; modernize CI/CD; containers; experimentation without compromising security/governance; self-service portal for new projects (data analytics, central mgmt of API access, cloud native keys/secrets mgmt); identity based access; standardised monitoring
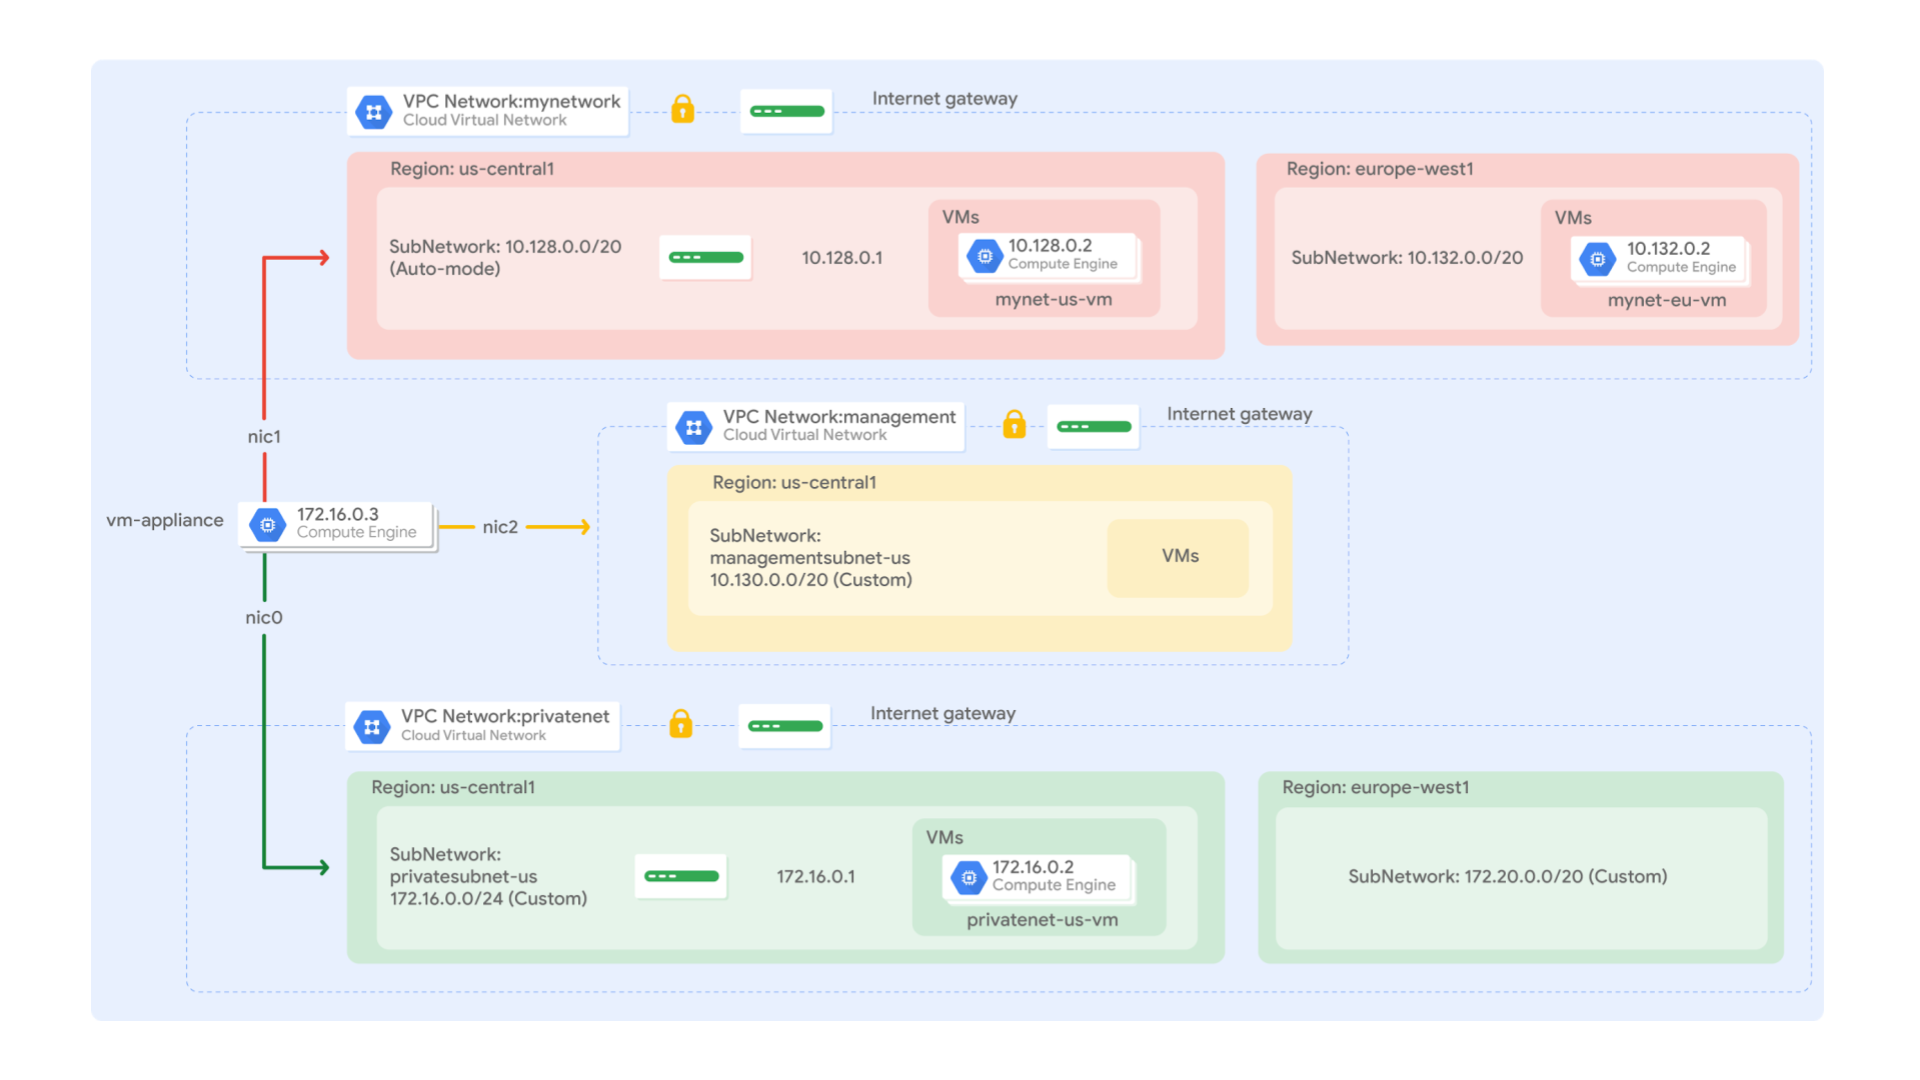
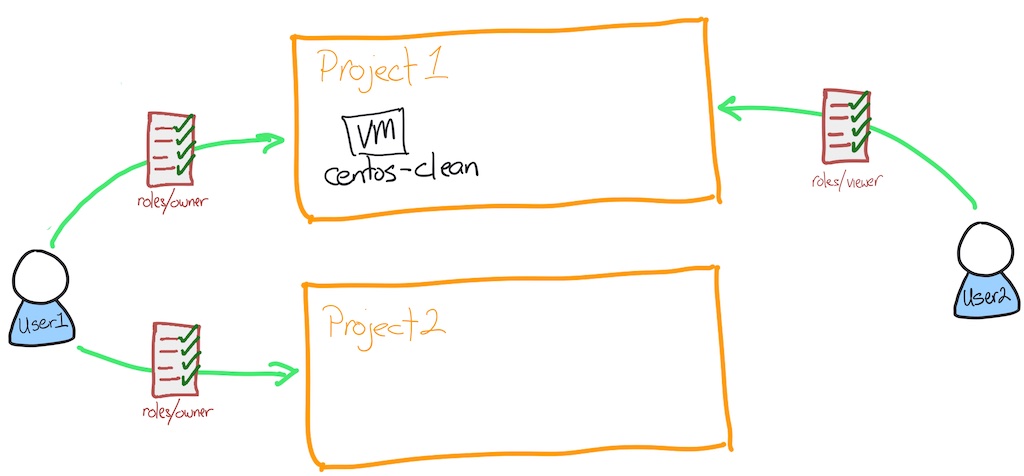
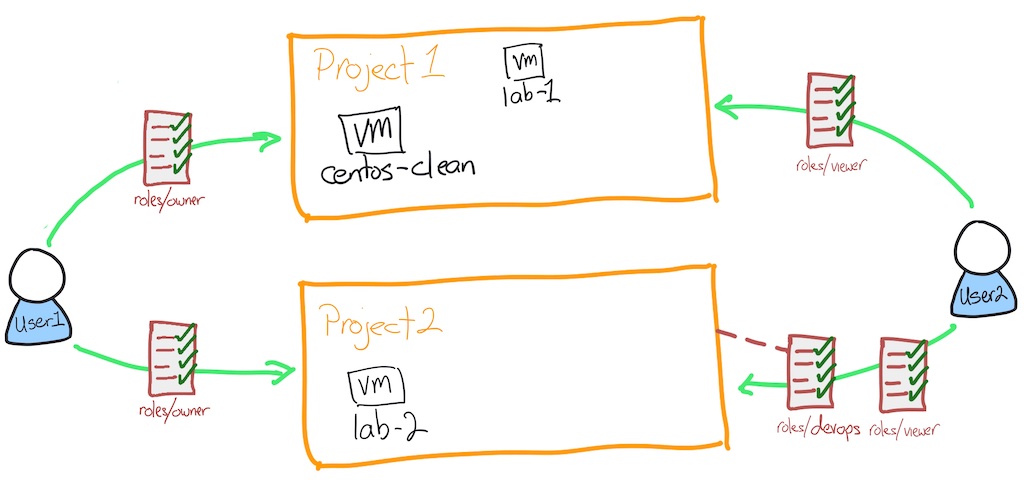
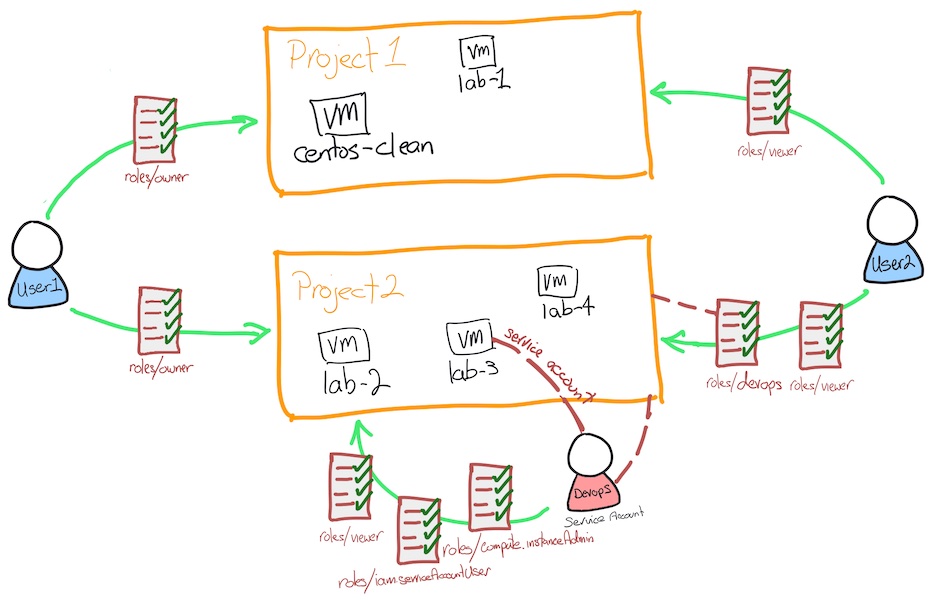
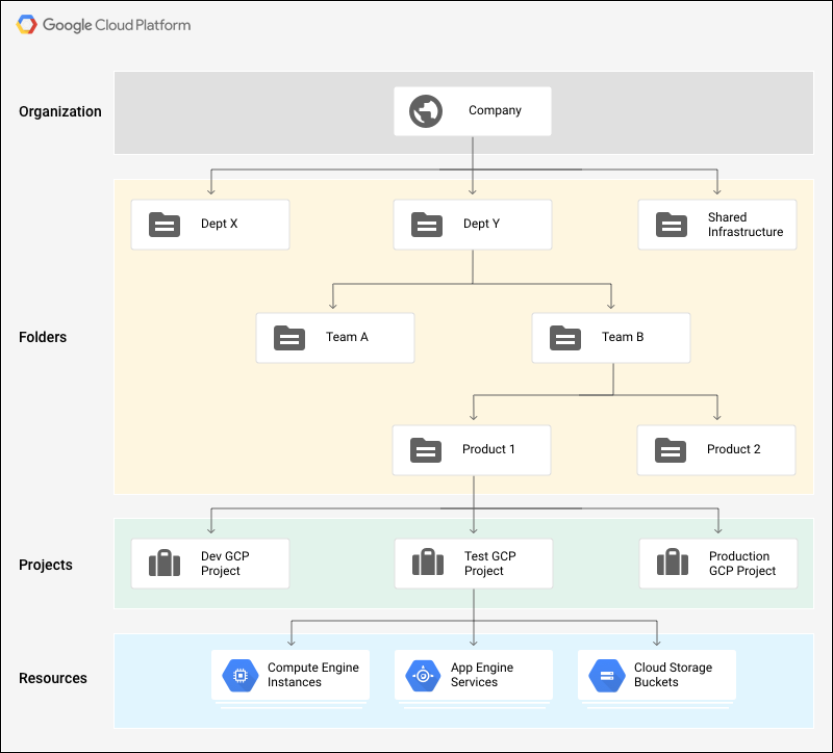
Thanks so much, this is impressive