The following are steps to set up Azure AD as an Identity Provider for an on-prem Kubernetes cluster.
- Azure Subscription
- On-prem Kubernetes cluster (in my case RKE2 v1.27.12+rke2r1)
I want to connect from my Workstation (Windows/Linux/Mac) to an on-prem Kubernetes cluster and authenticate to is using Azure AD.
I could not find many useful resources for this scenario except the dbi blog, so i decided to expand on it a little.
- Create an App Registration in Azure
- Use kubelogin to authenticate to Azure AD through the App Registration and aquire a token
- Use that token to authenticate to Kubernetes API Server
This is the basic flow from the kubelogin repo:

- Create an App Registration and set its Redirect URI to http://localhost:8000 (Azure will only accept localhost with http, every other URI has to be https)

- The App registration needs to have User.Read permissions to be able to sign users in and read their info.

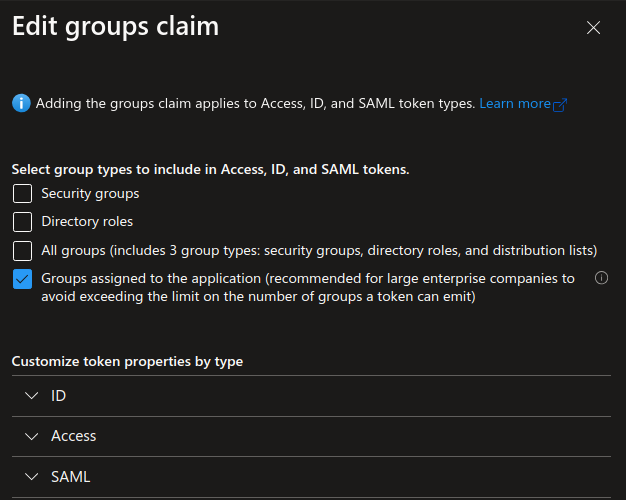
- Add a group claim for the tokens so that you can use group membership for Kubernetes RBAC. Keep in mind that there are limits to the number of group memberships a single token can hold, more on that: MSFT Docs.

NOTE: If you have a large AD with many groups you can assign specific groups to the App Registration so that only those groups are emitted in the token. MSFT Docs. In that case you should only select the 4th option:
- Create a client secret to use when requesting tokens.

- Add the following arguments to your Kubernetes API server.
  --oidc-client-id=<azure-app-registration-application-id>
  --oidc-issuer-url=https://sts.windows.net/<azure-tenant-id>/
  --oidc-username-claim=upn
  --oidc-username-prefix=oidc:
  --oidc-groups-claim=groups
  --oidc-groups-prefix=oidc:
These arguments are very well explained in the K8S Docs, i will just explain shortly what they mean to us practically in this example.
--oidc-username-claim - points the Kubernetes API to the fields in the JWT to use for the username. If you use upn you will be using the user principal name of the user for K8S role assignment. Other fields from the JWT can be used, for example oid - object id of the user.
--oidc-username-prefix - prefix prepended to the user claim. This is an arbitrary string.
--oidc-groups-claim - points the Kubernetes API to the fields in the JWT to use for the users group membership.
--oidc-groups-prefix - prefix prepended to group claims. This is also an arbitrary string.
- Install kubelogin link
# Krew (macOS, Linux, Windows and ARM)
kubectl krew install oidc-login
- Add user to your kubeconfig file, for example:
using kubectl:
```
kubectl config set-credentials <user_name> \
--exec-api-version=client.authentication.k8s.io/v1beta1 \
--exec-command=kubectl \
--exec-arg=oidc-login \
--exec-arg=get-token \
--exec-arg=--oidc-issuer-url=https://sts.windows.net/<azure-tenant-id>/ \
--exec-arg=--oidc-client-id=<azure-app-registration-application-id> \
--exec-arg=--oidc-client-secret=<azure-app-registration-client-secret> \
--kubeconfig <path-to-kubeconfig>
```

resulting in something like:
```
users:
- name: <user_name>
  user:
    exec:
      apiVersion: client.authentication.k8s.io/v1beta1
      args:
      - oidc-login
      - get-token
      - --oidc-issuer-url=https://sts.windows.net/<azure-tenant-id>/
      - --oidc-client-id=<azure-app-registration-application-id>
      - --oidc-client-secret=<azure-app-registration-client-secret>
      command: kubectl
      env: null
      interactiveMode: IfAvailable
      provideClusterInfo: false

```
NOTE: Don't forget to set the appropriate context (in the kubeconfig file) using the newly added user.
- When connecting to the Kubernetes cluster (for example using kubectl) a browser will open for you to authenticate to Azure AD. After successful authentication a token will be aquired and cached and used to communicate further with the Kubernetes API Server. You can examine the cached token if necessary for troubleshooting (~/.kube/cache/oidc-login).
Now that the authentication is done, we need to assign RBAC roles to our user.
- Define an example role:
apiVersion: rbac.authorization.k8s.io/v1
kind: ClusterRole
metadata:
  name: test-clusterrole
rules:
- apiGroups: [""]
  resources: ["nodes", "pods"]
  verbs: ["get", "watch", "list"]
- Assigning role to a user:
apiVersion: rbac.authorization.k8s.io/v1
kind: ClusterRoleBinding
metadata:
  name: test-clusterrolebinding
roleRef:
  apiGroup: rbac.authorization.k8s.io
  kind: ClusterRole
  name: test-clusterrole
subjects:
- apiGroup: rbac.authorization.k8s.io
  kind: User
  name: "oidc:<user_principal_name>" # here our --oidc-username-prefix argument value comes into play
- Assigning role to a group:
apiVersion: rbac.authorization.k8s.io/v1
kind: ClusterRoleBinding
metadata:
  name: test-clusterrolebinding-group
roleRef:
  apiGroup: rbac.authorization.k8s.io
  kind: ClusterRole
  name: test-clusterrole
subjects:
  - apiGroup: rbac.authorization.k8s.io
    kind: Group
    name: "oidc:<group_object_id>" # here our --oidc-groups-prefix argument value comes into play
@lukapetrovic-git , Thank you for sharing this article. It will be helpful for anyone looking to implement this in their environment. I am planning to implement this solution on my on-premise cluster. This document will be beneficial for my setup.