Contained here are the instructions for getting your laptop set up for databases skills share as well as my presentation.
Last active
March 18, 2019 19:29
-
-
Save majorgreys/515355c2a07d6c80fd41 to your computer and use it in GitHub Desktop.
ITF Spring 2015 Databases Skills Share
For our purposes, databases are structured collections of data commonly on a computer. Applications which read and write these collections of data on computers, such as MySQL, are database management systems (DBMS). Additionally we can distinguish databases by how they organize their data. The case of MySQL we will be focusing on here is that of a relational database where relations between entities (such as people and places) are stored.
In a moment of desperation last night, I found The Manga Guide to Databases which actually has a helpful illustration of why managing data in an uncoordinated fashion can be lead to crises. The basic reasoning we want to highlight at this point is that it relational databases allow us to structure our data in a such way that we reduce duplicating the same information by managing common attributes in a coordinated fashion. This reasoning will become less opaque once we work with the Wordpress database.
Finally, we communicate with relational databases by using a Structured Query Language (SQL). There are multiple standards for SQL (the most common being ANSI SQL) and oftentimes databases like MySQL will add to these standards. Certainly SQL clients, like Sequel Pro and phpMyAdmin, provide us graphical interfaces to accomplish much of what we might need to do with our databases but at their core they are still communicating with the DBMS by way of a query language.
We regularly want to know what the names of tables are in our database. We can also accomplish this through using one of the many SHOW statements, in this case the SHOW TABLES.
mysql> show tables;
+-----------------------+
| Tables_in_itfdb       |
+-----------------------+
| wp_commentmeta        |
| wp_comments           |
| wp_links              |
| wp_options            |
| wp_postmeta           |
| wp_posts              |
| wp_term_relationships |
| wp_term_taxonomy      |
| wp_terms              |
| wp_usermeta           |
| wp_users              |
+-----------------------+
11 rows in set (0.00 sec)
Notice this query returns a table with 11 rows and a single column.
One of the benefits of using a query rather than the graphical tool like phpMyAdmin or Sequel Pro is that we can more easily find the tables we are more interested in, which can be a bigger concern when we have many tables. This is accomplished by using a filter on the query we just used to list the tables. For instance, the filter like '%posts%' only returns rows from the above 11 that contain the substring "posts".
mysql> show tables like '%post%';
+----------------------------+
| Tables_in_itfdb (wp_post%) |
+----------------------------+
| wp_postmeta                |
| wp_posts                   |
+----------------------------+
2 rows in set (0.00 sec)
We might want to request the data stored within the wp_posts but need to first familiarize ourselves with the names of its fields (columns). This is accomplished by using the EXPLAIN statement.
mysql> explain wp_posts;
+-----------------------+---------------------+------+-----+---------------------+----------------+
| Field                 | Type                | Null | Key | Default             | Extra          |
+-----------------------+---------------------+------+-----+---------------------+----------------+
| ID                    | bigint(20) unsigned | NO   | PRI | NULL                | auto_increment |
| post_author           | bigint(20) unsigned | NO   | MUL | 0                   |                |
| post_date             | datetime            | NO   |     | 0000-00-00 00:00:00 |                |
| post_date_gmt         | datetime            | NO   |     | 0000-00-00 00:00:00 |                |
| post_content          | longtext            | NO   |     | NULL                |                |
| post_title            | text                | NO   |     | NULL                |                |
| post_excerpt          | text                | NO   |     | NULL                |                |
| post_status           | varchar(20)         | NO   |     | publish             |                |
| comment_status        | varchar(20)         | NO   |     | open                |                |
| ping_status           | varchar(20)         | NO   |     | open                |                |
| post_password         | varchar(20)         | NO   |     |                     |                |
| post_name             | varchar(200)        | NO   | MUL |                     |                |
| to_ping               | text                | NO   |     | NULL                |                |
| pinged                | text                | NO   |     | NULL                |                |
| post_modified         | datetime            | NO   |     | 0000-00-00 00:00:00 |                |
| post_modified_gmt     | datetime            | NO   |     | 0000-00-00 00:00:00 |                |
| post_content_filtered | longtext            | NO   |     | NULL                |                |
| post_parent           | bigint(20) unsigned | NO   | MUL | 0                   |                |
| guid                  | varchar(255)        | NO   |     |                     |                |
| menu_order            | int(11)             | NO   |     | 0                   |                |
| post_type             | varchar(20)         | NO   | MUL | post                |                |
| post_mime_type        | varchar(100)        | NO   |     |                     |                |
| comment_count         | bigint(20)          | NO   |     | 0                   |                |
+-----------------------+---------------------+------+-----+---------------------+----------------+
23 rows in set (0.00 sec)
The output of this statement includes the name of the field ('Field'), its data type ('Type'), if the field is allowed to be empty or not ('Null'), if the field serves as a key to the table ('Key'), and what the default value of the field is if none is provided at the time a new record is added to the table ('Default'). We will look more closely at what the 'Key' field is all about later but for now let's make sure we understand the Type, Null, and Default.
In the Type field, we see a few basic data types repeating:
intbigint(20) [unsigned]varchar({20, 200, 255})datetimelongtexttext
The naming of the last three data types should make it clear what sort of data is contained in those fields. The first and second data type are both integers but the second one allows from much bigger numbers to be stored in the field. Finally the third data type is used for variable-length strings where the number within the parenthesis is the maximum length of the string. Storing strings in this way has the beneficial consequence that any string that is less than the maximum length afforded can be stored more efficiently. Given that databases management systems handle the storage of collections of data, efficiency is a major concern. For the purposes of this presentation, we will have to set aside how our data is being stored.
Databases would be useless if we couldn't add and modify the structured data we are storing. We can create a table with the CREATE TABLE statement and we can also remove a table (which deletes all the rows contained with in it) by using the DROP TABLE statement. Once we have a table, we can add rows using the INSERT, modify existing rows with the UPDATE statement, and remove rows with the DELETE statement.
The following example of creating and modifying a table explains what the Null field means ("NULL" is how our database refers to an empty field):
mysql> create table test_nulls (a int not null, b int null);
Query OK, 0 rows affected (0.01 sec)

mysql> explain test_nulls;
+-------+---------+------+-----+---------+-------+
| Field | Type    | Null | Key | Default | Extra |
+-------+---------+------+-----+---------+-------+
| a     | int(11) | NO   |     | NULL    |       |
| b     | int(11) | YES  |     | NULL    |       |
+-------+---------+------+-----+---------+-------+
2 rows in set (0.00 sec)

mysql> insert into test_nulls (a, b) values(1, 2);
Query OK, 1 row affected (0.00 sec)

mysql> insert into test_nulls (a, b) values(1, NULL);
Query OK, 1 row affected (0.00 sec)

mysql> insert into test_nulls (a, b) values(NULL, 1);
ERROR 1048 (23000): Column 'a' cannot be null
As we see here, the not null and null modifiers to in the create table statement structure our data such that rows can only be inserted where fields meet the criteria for empty and non-empty fields.
Before moving onto an example for defaults, let's drop the table we created so as not to clutter our database:
mysql> drop table test_nulls;
Query OK, 0 rows affected (0.00 sec)
Now we can create a table where we establish default values for a field:
mysql> create table test_defaults (a int not null, b int not null default -1);
Query OK, 0 rows affected (0.02 sec)

mysql> insert into test_defaults (a, b) values(1, 11);
Query OK, 1 row affected (0.01 sec)

mysql> insert into test_defaults (a) values(2);
Query OK, 1 row affected (0.00 sec)

mysql> select * from test_defaults;
+---+----+
| a | b  |
+---+----+
| 1 | 11 |
| 2 | -1 |
+---+----+
2 rows in set (0.00 sec)

mysql> drop table test_defaults;
Query OK, 0 rows affected (0.01 sec)
In this example, we do not include a "b" value for the second row we insert, so the database sets its value to the default which we provided in the create table statement.
We now know that wp_posts has 23 fields. But how many rows does it contain? We can now begin to explore how to use the SELECT statement. Here we use COUNT(*) to count rows:
mysql> select count(*) from wp_posts;
+----------+
| count(*) |
+----------+
|        3 |
+----------+
1 row in set (0.00 sec)
So in my nearly fresh Wordpress database I found 3 rows in wp_posts. What could these be? We can select just the fields from wp_posts we think will tell us what these posts are:
mysql> select post_title, post_date from wp_posts;
+--------------+---------------------+
| post_title   | post_date           |
+--------------+---------------------+
| Hello world! | 2015-04-10 21:15:50 |
| Sample Page  | 2015-04-10 21:15:50 |
| Auto Draft   | 2015-04-11 04:54:31 |
+--------------+---------------------+
3 rows in set (0.00 sec)
We can filter the rows of a table by using the WHERE clause. For instance, we can select just the row for the row with a specific title:
mysql> select post_title, post_date from wp_posts where post_title = 'Sample Page';
+-------------+---------------------+
| post_title  | post_date           |
+-------------+---------------------+
| Sample Page | 2015-04-10 21:15:50 |
+-------------+---------------------+
1 row in set (0.00 sec)
Or we can query for all the rows posted before a specific date, making use of the date function to convert a string so that it can be compared to the datetime field:
mysql> select post_title, post_date from wp_posts where post_date < date('2015-04-11');
+--------------+---------------------+
| post_title   | post_date           |
+--------------+---------------------+
| Hello world! | 2015-04-10 21:15:50 |
| Sample Page  | 2015-04-10 21:15:50 |
+--------------+---------------------+
2 rows in set (0.00 sec)
Multiple conditions can be combined in the where clause by using the and or or predicates:
select post_title, post_date from wp_posts where post_date > date('2015-04-09') and post_date < date('2015-04-11');
In order to do more complex queries, such as ones that combine data across multiple tables, we will first need to add more substantial data to our database.
To populate your database with some sample data, download wp-sample-db.sql. Open this file in Sequel Pro and click "Run All Queries". For those interested, this file was generated by dumping an existing MySQL database using a command line tool provided by the database software:
vagrant@vvv:~$ mysqldump -uroot -proot itfdb > /vagrant/wp-sample-db.sql
You can also load data easily from such dumps:
vagrant@vvv:~$ mysql -uroot -proot itfdb < /vagrant/wp-sample-db.sql
Once you have populated your itfdb database with this sample data, you can re-examine wp_posts:
mysql> select count(*) from wp_posts;
+----------+
| count(*) |
+----------+
|      109 |
+----------+
1 row in set (0.00 sec)
We now have more than 100 posts to run queries against.
More on this process is available in Backing Up Your Database.
We will now look at how data is organized across multiple tables, which is the essence of why we use relational databases like MySQL.
The tables and relationships contained in a basic Wordpress database are described in the following diagram:
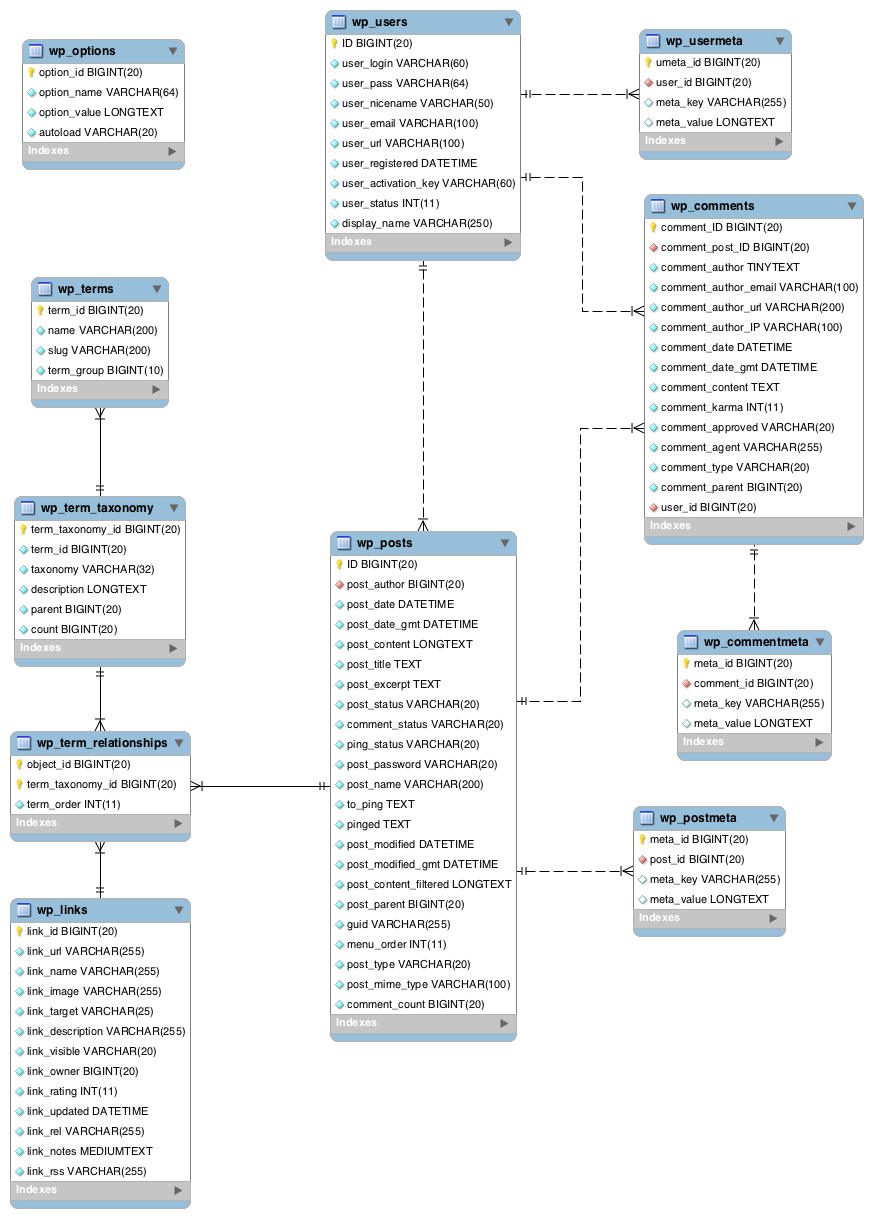
The key to understanding the relationships in this diagram is a table's primary key. Tables can have one primary key which uniquely identifies a row in the table. We say "can" because not all tables require such a key to be established. In the case of the Wordpress database you will see that many of the tables have a primary key. For instance, the wp_users table declaring the ID field as the primary key:
CREATE TABLE `wp_users` (
  `ID` bigint(20) unsigned NOT NULL AUTO_INCREMENT,
  `user_login` varchar(60) NOT NULL DEFAULT '',
  `user_pass` varchar(64) NOT NULL DEFAULT '',
  `user_nicename` varchar(50) NOT NULL DEFAULT '',
  `user_email` varchar(100) NOT NULL DEFAULT '',
  `user_url` varchar(100) NOT NULL DEFAULT '',
  `user_registered` datetime NOT NULL DEFAULT '0000-00-00 00:00:00',
  `user_activation_key` varchar(60) NOT NULL DEFAULT '',
  `user_status` int(11) NOT NULL DEFAULT '0',
  `display_name` varchar(250) NOT NULL DEFAULT '',
  PRIMARY KEY (`ID`),
  KEY `user_login_key` (`user_login`),
  KEY `user_nicename` (`user_nicename`)
) ENGINE=InnoDB AUTO_INCREMENT=26 DEFAULT CHARSET=utf8;
One of the implications of declaring a primary key is in insert/update statement. If we attempt to insert a row into a table where the primary key for the new row matches one that exists already in the table, the primary key constraint is violated and the statement fails. A similar failure would occur if we were to modify an existing row using an update statement
In Wordpress the relationships between tables are maintained by adding a field to a table that contains the value of the primary key in another table. Let's look at wp_comments to see how comments are tied to users:
CREATE TABLE `wp_comments` (
  `comment_ID` bigint(20) unsigned NOT NULL AUTO_INCREMENT,
  `comment_post_ID` bigint(20) unsigned NOT NULL DEFAULT '0',
  `comment_author` tinytext NOT NULL,
  `comment_author_email` varchar(100) NOT NULL DEFAULT '',
  `comment_author_url` varchar(200) NOT NULL DEFAULT '',
  `comment_author_IP` varchar(100) NOT NULL DEFAULT '',
  `comment_date` datetime NOT NULL DEFAULT '0000-00-00 00:00:00',
  `comment_date_gmt` datetime NOT NULL DEFAULT '0000-00-00 00:00:00',
  `comment_content` text NOT NULL,
  `comment_karma` int(11) NOT NULL DEFAULT '0',
  `comment_approved` varchar(20) NOT NULL DEFAULT '1',
  `comment_agent` varchar(255) NOT NULL DEFAULT '',
  `comment_type` varchar(20) NOT NULL DEFAULT '',
  `comment_parent` bigint(20) unsigned NOT NULL DEFAULT '0',
  `user_id` bigint(20) unsigned NOT NULL DEFAULT '0',
  PRIMARY KEY (`comment_ID`),
  KEY `comment_post_ID` (`comment_post_ID`),
  KEY `comment_approved_date_gmt` (`comment_approved`,`comment_date_gmt`),
  KEY `comment_date_gmt` (`comment_date_gmt`),
  KEY `comment_parent` (`comment_parent`),
  KEY `comment_author_email` (`comment_author_email`(10))
) ENGINE=InnoDB AUTO_INCREMENT=125 DEFAULT CHARSET=utf8;
Notice that the user_id field is declared as not being empty, which means all comment rows require a user to be specified. We can examine how the contents of the user_id field in wp_comments are similar to the contents of the ID field in wp_users by using the DISTINCT statement in the select query.
mysql> select distinct user_id from wp_comments;
+---------+
| user_id |
+---------+
|       0 |
|       4 |
|       3 |
|      21 |
|       8 |
|      16 |
|      18 |
|      10 |
|      15 |
|      12 |
|       7 |
|      23 |
|       5 |
|      19 |
|      22 |
|      14 |
|      17 |
|      20 |
|       9 |
|       6 |
|      13 |
|      24 |
|      11 |
|       2 |
+---------+
24 rows in set (0.00 sec)
mysql> select distinct ID from wp_users;
+----+
| ID |
+----+
|  1 |
|  2 |
|  3 |
|  4 |
|  5 |
|  6 |
|  7 |
|  8 |
|  9 |
| 10 |
| 11 |
| 12 |
| 13 |
| 14 |
| 15 |
| 16 |
| 17 |
| 18 |
| 19 |
| 20 |
| 21 |
| 22 |
| 23 |
| 24 |
| 25 |
+----+
25 rows in set (0.00 sec)
Notice that there are comments with a user_id of '0' but no such user exists in wp_users. That means that those posts won't resolve to a user, which will have to be handled by the Wordpress application.
We are now ready to combine the data of these two tables. Let's combine the two tables so we can find out when each user posted a comment:
mysql> select u.ID, u.user_login, c.comment_date from wp_users u join wp_comments c on u.ID = c.user_id limit 10;
+----+------------+---------------------+
| ID | user_login | comment_date        |
+----+------------+---------------------+
|  4 | user3      | 2015-01-31 15:00:03 |
|  4 | user3      | 2015-01-31 15:01:31 |
|  4 | user3      | 2015-02-01 19:31:05 |
|  3 | user2      | 2015-02-05 01:21:44 |
| 21 | user20     | 2015-01-31 17:40:10 |
|  4 | user3      | 2015-02-01 19:23:49 |
|  3 | user2      | 2015-02-03 01:11:08 |
|  4 | user3      | 2015-02-03 05:44:26 |
|  8 | user7      | 2015-02-02 21:21:17 |
|  3 | user2      | 2015-02-08 01:23:52 |
+----+------------+---------------------+
10 rows in set (0.00 sec)
We combine wp_users (aliased as u) and wp_comments (aliased as c) using the JOIN statement. The above query specifies that the joining of the two tables accomplished by matching the c.user_id (using the alias to refer to the table followed by a period and then the name of the field) with u.ID. Further, we limit the results of the table join by using the LIMIT statement with the number of rows we want.
The default and most common sort of join performed with a relational database is what is referred to as the inner join. In this most common case, any row in wp_comments that has a user_id which is not found in the wp_users table will not be in the result. The order of the join also matters because it will also be true that rows in wp_users not referenced wp_comments will also not be in the result. Remember that we found that comments referred to a '0' user which did not actually exist. Therefore, we won't find any of these rows returned from wp_comments in an inner join with wp_users.
mysql> select u.ID, u.user_login, c.comment_date from wp_users u join wp_comments c on u.ID = c.user_id where c.user_id = 0 or c.user_id = 2;
+----+------------+---------------------+
| ID | user_login | comment_date        |
+----+------------+---------------------+
|  2 | user1      | 2015-03-25 16:47:20 |
+----+------------+---------------------+
1 row in set (0.00 sec)
Another join which will come in handy is the outer join, in this case we use a right outer join using the right join clause.
mysql> select u.ID, c.user_id, c.comment_date from wp_users u right join wp_comments c on u.ID = c.user_id where c.user_id = 0 or c.user_id = 2;
+------+---------+---------------------+
| ID   | user_id | comment_date        |
+------+---------+---------------------+
| NULL |       0 | 2015-04-10 21:15:50 |
| NULL |       0 | 2015-01-28 18:23:35 |
|    2 |       2 | 2015-03-25 16:47:20 |
+------+---------+---------------------+
3 rows in set (0.01 sec)
This query includes the two comments with c.user_id = 0 but the values for the ID field we are selecting from the wp_users table are NULL. The row with c.user_id = 2 is still returned as it was in the inner join case.
Now that we can query rows in one or more tables, we can move onto summarizing the results. We already did a simple aggregation of a table when we counted the number of rows in the table. Other simple aggregations include MIN (minimum value), MAX (maximum value), AVG (average value), SUM (sum of all values) functions:
mysql> select min(comment_date), max(comment_date), avg(user_id), sum(user_id) from wp_comments;
+---------------------+---------------------+--------------+--------------+
| min(comment_date)   | max(comment_date)   | avg(user_id) | sum(user_id) |
+---------------------+---------------------+--------------+--------------+
| 2015-01-28 18:23:35 | 2015-04-15 14:37:45 |       9.7661 |         1211 |
+---------------------+---------------------+--------------+--------------+
1 row in set (0.00 sec)
These aggregations cannot be used for all fields but certainly we can use them for numbers and dates as we have done above.
More complex aggregations can be performed by grouping rows based on one or more fields. Let's count how many comments each user has made and order the result by the count in descending order:
mysql> select u.user_login, count(*) from wp_users u right join wp_comments c on u.ID = c.user_id group by u.user_login order by count(*) desc;
+------------+----------+
| user_login | count(*) |
+------------+----------+
| user2      |       40 |
| user3      |       14 |
| user17     |        9 |
| user7      |        8 |
| user20     |        7 |
| user14     |        6 |
| user18     |        3 |
| user10     |        3 |
| user22     |        3 |
| user16     |        3 |
| user15     |        3 |
| user13     |        3 |
| user11     |        3 |
| user21     |        3 |
| user9      |        2 |
| user19     |        2 |
| NULL       |        2 |
| user23     |        2 |
| user6      |        2 |
| user12     |        2 |
| user8      |        1 |
| user1      |        1 |
| user4      |        1 |
| user5      |        1 |
+------------+----------+
24 rows in set (0.00 sec)
Before we can dive into databases, we need to have a living, breathing one to work with. There are two paths I will outline below for bringing database life into your world. Whichever you choose, you will have a MySQL database loaded with the default database objects created by Wordpress. We will use the Wordpress database as a way to introduce the basic concepts of databases.
The first step in getting set up is to get yourself a database to work with. Most people will feel comfortable setting up MAMP route for this workshop. If you feel up to it, I would encourage you to instead consider the Vagrant route. If you have any questions about either, don't hesitate to ask me before the workshop. These two routes are described below.
Both routes will provide you with the web administration tool phpMyAdmin, which you can follow along with the presentation. For this presentation though I will be asking everyone to install the desktop SQL client Sequal Pro.
When you have completed the MAMP or Vagrant route and installed Sequal Pro, you will want to test that you can connect to the database, which is described below.
Fortunately for us, the folks over at Wordpress have described Installing WordPress Locally on Your Mac With MAMP.
For our purposes in this workshop, it is important to note that the default MAMP ports are 8888 for Apache and 8889 for MySQL.
Before running MAMP, you will need to download the current release of Wordpress and unzip that to a directory on your machine (e.g., /Users/tbutt/Sites/wordpress-itfdb). This will be the directory path you enter into the MAMP Web Server tab as your document root.
Start MAMP. This will load up Apache (the web server application) and MySQL (the database server application) on your laptop. Connecting to these two server applications is accomplished by using the domain localhost, which the operating system knows points to your machine, rather than some server online. When MAMP is started, it will open up http://localhost:8888/MAMP/index.php in your web browser. From here you will be able to access phpMyAdmin where you will create the database for your new Wordpress installation.
When you create a new database using phpMyAdmin (clicking the "New" link in the left sidebar), set the database name to "itfdb" and keep the dropdown at "Collation". Once you click "Create" you will have an empty database that you can access with the default user name root and default password root. We will be using these credentials later when connecting to the database with a SQL client.
Once you have created the itfdb database through phpMyAdmin, you will start the Wordpress install by opening http://localhost:8888/ in your web browser. This will present to you a web page to enter in your database configuration, which are:
- Database Name: itfdb
- User Name: root
- Password: root
- Database Host: localhost
- Table Prefix: wp_
Once you submit this information, the Wordpress install will confirm the database connection can be established and the database with that name can be accessed from that user. If all goes well, you will have a new Wordpress application deployed to MAMP. Whenever you want to stop using it, simply click "Stop Servers" in MAMP. When you want to load your new Wordpress application, simply start MAMP and click "Start Servers".
The way MAMP works is that it comes packaged with an Apache web server application and a MySQL database server application. You can think of it as one application (MAMP) running two other applications (Apache and MySQL). These server applications (also referred to as services) are then active until you stop running them from MAMP. The way we interact with server applications is by communicating with the port the application was configured with (i.e., 8888 for Apache, so we enter http://localhost:8888 into our web browser to request a webpage from Apache).
While MAMP's main advantage is the ease with which you can create a development environment on your own machine, this is also a limitation. For instance, we are limited to the configuration options of Apache and MySQL that are exposed by the MAMP application.
The second approach, the Vagrant route, is meant to address such limitations. Vagrant is actually a tool makes it easier to create and manage virtual machines. Virtualization software emulates a machine that can execute programs like a physical machine. For instance, here we will be using virtualization software (Oracle's free and open source Virtual Box) on our Mac laptops to run Linux as if it was running on an actual physical computer. We use Vagrant to fetch a fresh image of a virtual machine (VM) and then start/stop the VM.
Going the Vagrant route does depend on already have some familiarity with the Terminal and Git.
I'm assuming here you have created a project directory for this workshop (e.g., /Users/tbutt/itfdb/).
- Install VirtualBox and Vagrant
- Open Terminal.app
- Install the vagrant-hostsupdater to help map domains hosts locally:
vagrant plugin install vagrant-hostsupdater - Clone the Varying Vagrant Vagrants repository:
git clone https://github.com/Varying-Vagrant-Vagrants/VVV.git ~/itfdb/vagrant-local - Clone the vvv-site-wizard repository:
git clone https://github.com/aliso/vvv-site-wizard.git ~/itfdb/vvv/ - Run the vvv script:
cd ~/itfdb/vvv/; ./vvv -a create -n itfdb -p ~/itfdb/vagrant-local/. Note: When you are asked to enter in your password, you need to enter in the password for your user on the laptop. - You are almost done! Setting up a Vagrant virtual machine takes some time ⌛ (less than an hour) so grab a cup of coffee ☕ and contemplate how many donuts you would eat in a post-capitalist society 😂.
- Navigate to the vagrant-local directory and start vagrant:
cd ~/itfdb/vagrant-local/; vagrant up(enter in your user password when prompted)
Regardless of which route you took above, you will use the following credential information in Sequal Pro for connecting to your newly birthed database.
With both routes, you will also use the following settings:
- name: "itfdb"
- MySQL Host: 127.0.0.1
- database: "itfdb"
- user: "root"
- password: "root"
If you went the MAMP route, the remaining settings will be:
- port: 8889
If you went the Vagrant route, you will use the SSH connection method (select this from the top tab when entering a new connection) and use these remaining settings:
- port: 3306
- SSH Host: 192.168.50.4
- SSH User: vagrant
- SSH Password: vagrant
Once you have entered in this information, you can click the Test connection button at the bottom to confirm that Sequel Pro is able to establish a connection. If it succeeds, click "Add to Favorites" so that you don't need to add the information next time you need to connect.
If all goes well, you will be ready for the skill share. But don't worry if you don't get it on your first attempt.
If you went the MAMP route and cannot connect to the database, check to see if what you've entered into Sequel Pro matches what you entered into phpMyAdmin when you created the itfdb database.
If you went the Vagrant route and cannot connect to the database, find me before our meeting and I'll see what I can do.
Regardless, I'll go around the room before I begin my presentation to make sure everyone has a database connection working.
When you are done with your database experimenting phase, you need to turn off the applications we had loaded to run our Wordpress web server and database.
If you are using MAMP, simply click "Stop Servers".
If you are using Vagrant, you will need to enter the following into the command line prompt: cd ~/vagrant-local; vagrant halt. Because Vagrant downloads Linux images to run the server (~ 2 GBs), you might also want to delete them. You can do that very easily by putting the vagrant created folder in ~/VirtualBox VMs/ into the trash which will delete all your virtual machines.

Sign up for free
to join this conversation on GitHub.
Already have an account?
Sign in to comment