-
-
Save makinuk/b28ef26a55d9735ee470ee07e8bf93c2 to your computer and use it in GitHub Desktop.
With Annotations, we can attach arbitrary non-identifying metadata to any objects, in a key-value format:
"annotations": {
  "key1" : "value1",
  "key2" : "value2"
}
Unlike Labels, annotations are not used to identify and select objects. Annotations can be used to:
- Store build/release IDs, PR numbers, git branch, etc.
- Phone/pager numbers of people responsible, or directory entries specifying where such information can be found
- Pointers to logging, monitoring, analytics, audit repositories, debugging tools, etc.
- Etc.
For example, while creating a Deployment, we can add a description as seen below:
apiVersion: extensions/v1beta1
kind: Deployment
metadata:
  name: webserver
  annotations:
    description: Deployment based PoC dates 2nd May'2019
....
Annotations are displayed while describing an object:
$ kubectl describe deployment webserver
Name:                webserver
Namespace:           default
CreationTimestamp:   Fri, 03 May 2019 05:10:38 +0530
Labels:              app=webserver
Annotations:         deployment.kubernetes.io/revision=1
                     description=Deployment based PoC dates 2nd May'2019
...A Job creates one or more Pods to perform a given task. The Job object takes the responsibility of Pod failures. It makes sure that the given task is completed successfully. Once the task is complete, all the Pods have terminated automatically. Job configuration options include:
- parallelism - to set the number of pods allowed to run in parallel;
- completions - to set the number of expected completions;
- activeDeadlineSeconds - to set the duration of the Job;
- backoffLimit - to set the number of retries before Job is marked as failed;
- ttlSecondsAfterFinished - to delay the clean up of the finished Jobs.
Starting with the Kubernetes 1.4 release, we can also perform Jobs at scheduled times/dates with CronJobs, where a new Job object is created about once per each execution cycle. The CronJob configuration options include:
- startingDeadlineSeconds - to set the deadline to start a Job if scheduled time was missed;
- concurrencyPolicy - to allow or forbid concurrent Jobs or to replace old Jobs with new ones.
When there are many users sharing a given Kubernetes cluster, there is always a concern for fair usage. A user should not take undue advantage. To address this concern, administrators can use the ResourceQuota API resource, which provides constraints that limit aggregate resource consumption per Namespace.
We can set the following types of quotas per Namespace:
- Compute Resource Quota We can limit the total sum of compute resources (CPU, memory, etc.) that can be requested in a given Namespace.
- Storage Resource Quota We can limit the total sum of storage resources (PersistentVolumeClaims, requests.storage, etc.) that can be requested.
- Object Count Quota We can restrict the number of objects of a given type (pods, ConfigMaps, PersistentVolumeClaims, ReplicationControllers, Services, Secrets, etc.).
While it is fairly easy to manually scale a few Kubernetes objects, this may not be a practical solution for a production-ready cluster where hundreds or thousands of objects are deployed. We need a dynamic scaling solution which adds or removes objects from the cluster based on resource utilization, availability, and requirements.
Autoscaling can be implemented in a Kubernetes cluster via controllers which periodically adjust the number of running objects based on single, multiple, or custom metrics. There are various types of autoscalers available in Kubernetes which can be implemented individually or combined for a more robust autoscaling solution:
- Horizontal Pod Autoscaler (HPA) HPA is an algorithm based controller API resource which automatically adjusts the number of replicas in a ReplicaSet, Deployment or Replication Controller based on CPU utilization.
- Vertical Pod Autoscaler (VPA) VPA automatically sets Container resource requirements (CPU and memory) in a Pod and dynamically adjusts them in runtime, based on historical utilization data, current resource availability and real-time events.
- Cluster Autoscaler Cluster Autoscaler automatically re-sizes the Kubernetes cluster when there are insufficient resources available for new Pods expecting to be scheduled or when there are underutilized nodes in the cluster.
In cases when we need to collect monitoring data from all nodes, or to run a storage daemon on all nodes, then we need a specific type of Pod running on all nodes at all times. A DaemonSet is the object that allows us to do just that. It is a critical controller API resource for multi-node Kubernetes clusters. The kube-proxy agent running as a Pod on every single node in the cluster is managed by a DaemonSet.
Whenever a node is added to the cluster, a Pod from a given DaemonSet is automatically created on it. Although it ensures an automated process, the DaemonSet's Pods are placed on nodes by the cluster's default Scheduler. When the node dies or it is removed from the cluster, the respective Pods are garbage collected. If a DaemonSet is deleted, all Pods it created are deleted as well.
A newer feature of the DaemonSet resource allows for its Pods to be scheduled only on specific nodes by configuring nodeSelectors and node affinity rules. Similar to Deployment resources, DaemonSets support rolling updates and rollbacks.
The StatefulSet controller is used for stateful applications which require a unique identity, such as name, network identifications, strict ordering, etc. For example, MySQL cluster, etcd cluster.
The StatefulSet controller provides identity and guaranteed ordering of deployment and scaling to Pods. Similar to Deployments, StatefulSets use ReplicaSets as intermediary Pod controllers and support rolling updates and rollbacks.
With Kubernetes Cluster Federation we can manage multiple Kubernetes clusters from a single control plane. We can sync resources across the federated clusters and have cross-cluster discovery. This allows us to perform Deployments across regions, access them using a global DNS record, and achieve High Availability.
Although still an Alpha feature, the Federation is very useful when we want to build a hybrid solution, in which we can have one cluster running inside our private datacenter and another one in the public cloud, allowing us to avoid provider lock-in. We can also assign weights for each cluster in the Federation, to distribute the load based on custom rules.
In Kubernetes, a resource is an API endpoint which stores a collection of API objects. For example, a Pod resource contains all the Pod objects.
Although in most cases existing Kubernetes resources are sufficient to fulfill our requirements, we can also create new resources using custom resources. With custom resources, we don't have to modify the Kubernetes source.
Custom resources are dynamic in nature, and they can appear and disappear in an already running cluster at any time.
To make a resource declarative, we must create and install a custom controller, which can interpret the resource structure and perform the required actions. Custom controllers can be deployed and managed in an already running cluster.
There are two ways to add custom resources:
- Custom Resource Definitions (CRDs) This is the easiest way to add custom resources and it does not require any programming knowledge. However, building the custom controller would require some programming.
- API Aggregation For more fine-grained control, we can write API Aggregators. They are subordinate API servers which sit behind the primary API server. The primary API server acts as a proxy for all incoming API requests - it handles the ones based on its capabilities and proxies over the other requests meant for the subordinate API servers.
To deploy an application, we use different Kubernetes manifests, such as Deployments, Services, Volume Claims, Ingress, etc. Sometimes, it can be tiresome to deploy them one by one. We can bundle all those manifests after templatizing them into a well-defined format, along with other metadata. Such a bundle is referred to as Chart. These Charts can then be served via repositories, such as those that we have for rpm and deb packages.
Helm is a package manager (analogous to yum and apt for Linux) for Kubernetes, which can install/update/delete those Charts in the Kubernetes cluster.
Helm has two components:
- A client called helm, which runs on your user's workstation
- A server called tiller, which runs inside your Kubernetes cluster.
The client helm connects to the server tiller to manage Charts. Charts submitted for Kubernetes are available here.
At times we need to define specific privileges and access control settings for Pods and Containers. Security Contexts allow us to set Discretionary Access Control for object access permissions, privileged running, capabilities, security labels, etc. However, their effect is limited to the individual Pods and Containers where such context configuration settings are incorporated in the spec section.
In order to apply security settings to multiple Pods and Containers cluster-wide, we can define Pod Security Policies. They allow more fine-grained security settings to control the usage of the host namespace, host networking and ports, file system groups, usage of volume types, enforce Container user and group ID, root privilege escalation, etc.
Kubernetes was designed to allow all Pods to communicate freely, without restrictions, with all other Pods in cluster Namespaces. In time it became clear that it was not an ideal design, and mechanisms needed to be put in place in order to restrict communication between certain Pods and applications in the cluster Namespace. Network Policies are sets of rules which define how Pods are allowed to talk to other Pods and resources inside and outside the cluster. Pods not covered by any Network Policy will continue to receive unrestricted traffic from any endpoint.
Network Policies are very similar to typical Firewalls. They are designed to protect mostly assets located inside the Firewall but can restrict outgoing traffic as well based on sets of rules and policies.
The Network Policy API resource specifies podSelectors, Ingress and/or Egress policyTypes, and rules based on source and destination ipBlocks and ports. Very simplistic default allow or default deny policies can be defined as well. As a good practice, it is recommended to define a default deny policy to block all traffic to and from the Namespace, and then define sets of rules for specific traffic to be allowed in and out of the Namespace.
Let's keep in mind that not all the networking solutions available for Kubernetes support Network Policies. Review the Pod-to-Pod Communication section from the Kubernetes Architecture chapter if needed. By default, Network Policies are namespaced API resources, but certain network plugins provide additional features so that Network Policies can be applied cluster-wide.
In Kubernetes, we have to collect resource usage data by Pods, Services, nodes, etc., to understand the overall resource consumption and to make decisions for scaling a given application. Two popular Kubernetes monitoring solutions are the Kubernetes Metrics Server and Prometheus.
- Metrics Server Metrics Server is a cluster-wide aggregator of resource usage data - a relatively new feature in Kubernetes.
- Prometheus Prometheus, now part of CNCF (Cloud Native Computing Foundation), can also be used to scrape the resource usage from different Kubernetes components and objects. Using its client libraries, we can also instrument the code of our application.
Another important aspect for troubleshooting and debugging is Logging, in which we collect the logs from different components of a given system. In Kubernetes, we can collect logs from different cluster components, objects, nodes, etc. Unfortunately, however, Kubernetes does not provide cluster-wide logging by default, therefore third party tools are required to centralize and aggregate cluster logs. The most common way to collect the logs is using Elasticsearch, which uses fluentd with custom configuration as an agent on the nodes. fluentd is an open source data collector, which is also part of CNCF.
ConfigMaps allow us to decouple the configuration details from the container image. Using ConfigMaps, we pass configuration data as key-value pairs, which are consumed by Pods or any other system components and controllers, in the form of environment variables, sets of commands and arguments, or volumes. We can create ConfigMaps from literal values, from configuration files, from one or more files or directories.
A ConfigMap can be created with the kubectl create command, and we can display its details using the kubectl get command.
Create the ConfigMap
$ kubectl create configmap my-config --from-literal=key1=value1 --from-literal=key2=value2
configmap/my-config created
Display the ConfigMap Details for my-config
$ kubectl get configmaps my-config -o yaml
apiVersion: v1
data:
  key1: value1
  key2: value2
kind: ConfigMap
metadata:
  creationTimestamp: 2019-05-31T07:21:55Z
  name: my-config
  namespace: default
  resourceVersion: "241345"
  selfLink: /api/v1/namespaces/default/configmaps/my-config
  uid: d35f0a3d-45d1-11e7-9e62-080027a46057
With the -o yaml option, we are requesting the kubectl command to spit the output in the YAML format. As we can see, the object has the ConfigMap kind, and it has the key-value pairs inside the data field. The name of ConfigMap and other details are part of the metadata field.
First, we need to create a configuration file with the following content:
apiVersion: v1
kind: ConfigMap
metadata:
  name: customer1
data:
  TEXT1: Customer1_Company
  TEXT2: Welcomes You
  COMPANY: Customer1 Company Technology Pct. Ltd.
where we specify the kind, metadata, and data fields, targeting the v1 endpoint of the API server.
If we name the file with the configuration above as customer1-configmap.yaml, we can then create the ConfigMap with the following command:
$ kubectl create -f customer1-configmap.yaml
configmap/customer1 createdFirst, we need to create a file permission-reset.properties with the following configuration data:
permission=read-only
allowed="true"
resetCount=3
We can then create the ConfigMap with the following command:
$ kubectl create configmap permission-config --from-file=<path/to/>permission-reset.properties
configmap/permission-config creatednside a Container, we can retrieve the key-value data of an entire ConfigMap or the values of specific ConfigMap keys as environment variables.
In the following example all the myapp-full-container Container's environment variables receive the values of the full-config-map ConfigMap keys:
...
  containers:
  - name: myapp-full-container
    image: myapp
    envFrom:
    - configMapRef:
      name: full-config-map
...
In the following example the myapp-specific-container Container's environment variables receive their values from specific key-value pairs from separate ConfigMaps:
...
  containers:
  - name: myapp-specific-container
    image: myapp
    env:
    - name: SPECIFIC_ENV_VAR1
      valueFrom:
        configMapKeyRef:
          name: config-map-1
          key: SPECIFIC_DATA
    - name: SPECIFIC_ENV_VAR2
      valueFrom:
        configMapKeyRef:
          name: config-map-2
          key: SPECIFIC_INFO
...
With the above, we will get the SPECIFIC_ENV_VAR1 environment variable set to the value of SPECIFIC_DATA key from config-map-1 ConfigMap, and SPECIFIC_ENV_VAR2 environment variable set to the value of SPECIFIC_INFO key from config-map-2 ConfigMap.
As Volumes
We can mount a vol-config-map ConfigMap as a Volume inside a Pod. For each key in the ConfigMap, a file gets created in the mount path (where the file is named with the key name) and the content of that file becomes the respective key's value:
...
  containers:
  - name: myapp-vol-container
    image: myapp
    volumeMounts:
    - name: config-volume
      mountPath: /etc/config
  volumes:
  - name: config-volume
    configMap:
      name: vol-config-map
...
For more details, please study the Kubernetes documentation.
et's assume that we have a Wordpress blog application, in which our wordpress frontend connects to the MySQL database backend using a password. While creating the Deployment for wordpress, we can include the MySQL password in the Deployment's YAML file, but the password would not be protected. The password would be available to anyone who has access to the configuration file.
In this scenario, the Secret object can help by allowing us to encode the sensitive information before sharing it. With Secrets, we can share sensitive information like passwords, tokens, or keys in the form of key-value pairs, similar to ConfigMaps; thus, we can control how the information in a Secret is used, reducing the risk for accidental exposures. In Deployments or other resources, the Secret object is referenced, without exposing its content.
It is important to keep in mind that the Secret data is stored as plain text inside etcd, therefore administrators must limit access to the API server and etcd. A newer feature allows for Secret data to be encrypted at rest while it is stored in etcd; a feature which needs to be enabled at the API server level.
To create a Secret, we can use the kubectl create secret command:
$ kubectl create secret generic my-password --from-literal=password=mysqlpasswordThe above command would create a secret called my-password, which has the value of the password key set to mysqlpassword.
After successfully creating a secret we can analyze it with the get and describe commands. They do not reveal the content of the Secret. The type is listed as Opaque.
$ kubectl get secret my-password
NAME          TYPE     DATA   AGE
my-password   Opaque   1      8m

$ kubectl describe secret my-password
Name:          my-password
Namespace:     default
Labels:        <none>
Annotations:   <none>

Type  Opaque

Data
====
password: 13 bytesWe can create a Secret manually from a YAML configuration file. The example file below is named mypass.yaml. There are two types of maps for sensitive information inside a Secret: data and stringData.
With data maps, each value of a sensitive information field must be encoded using base64. If we want to have a configuration file for our Secret, we must first create the base64 encoding for our password:
$ echo mysqlpassword | base64
bXlzcWxwYXNzd29yZAo=
and then use it in the configuration file:
apiVersion: v1
kind: Secret
metadata:
  name: my-password
type: Opaque
data:
  password: bXlzcWxwYXNzd29yZAo=
Please note that base64 encoding does not mean encryption, and anyone can easily decode our encoded data:
$ echo "bXlzcWxwYXNzd29yZAo=" | base64 --decode
mysqlpassword
Therefore, make sure you do not commit a Secret's configuration file in the source code.
With stringData maps, there is no need to encode the value of each sensitive information field. The value of the sensitive field will be encoded when the my-password Secret is created:
apiVersion: v1
kind: Secret
metadata:
  name: my-password
type: Opaque
stringData:
  password: mysqlpassword
Using the mypass.yaml configuration file we can now create a secret with kubectl create command:
$ kubectl create -f mypass.yaml
secret/my-password createdTo create a Secret from a File, we can use the kubectl create secret command.
First, we encode the sensitive data and then we write the encoded data to a text file:
$ echo mysqlpassword | base64
 bXlzcWxwYXNzd29yZAo=

$ echo -n 'bXlzcWxwYXNzd29yZAo=' > password.txt
Now we can create the Secret from the password.txt file:
$ kubectl create secret generic my-file-password --from-file=password.txt
  secret/my-file-password created
After successfully creating a secret we can analyze it with the get and describe commands. They do not reveal the content of the Secret. The type is listed as Opaque.
$ kubectl get secret my-file-password
NAME               TYPE     DATA   AGE
my-file-password   Opaque   1      8m

$ kubectl describe secret my-file-password
Name:          my-file-password
Namespace:     default
Labels:        <none>
Annotations:   <none>

Type  Opaque

Data
====
password.txt: 13 bytesSecrets are consumed by Containers in Pods as mounted data volumes, or as environment variables, and are referenced in their entirety or specific key-values.
Below we reference only the password key of the my-password Secret and assign its value to the WORDPRESS_DB_PASSWORD environment variable:
....
spec:
  containers:
  - image: wordpress:4.7.3-apache
    name: wordpress
    env:
    - name: WORDPRESS_DB_PASSWORD
      valueFrom:
        secretKeyRef:
          name: my-password
          key: password
....
#### Using Secrets as Files from a Pod We can also mount a Secret as a Volume inside a Pod. The following example creates a file for each my-password Secret key (where the files are named after the names of the keys), the files containing the values of the Secret:
....
spec:
  containers:
  - image: wordpress:4.7.3-apache
    name: wordpress
    volumeMounts:
    - name: secret-volume
      mountPath: "/etc/secret-data"
      readOnly: true
  volumes:
  - name: secret-volume
    secret:
      secretName: my-password
....
For more details, you can study the Kubernetes documentation.
Create a YAML configuration file with Deployment details Let's create the webserver.yaml file with the following content:
apiVersion: apps/v1
kind: Deployment
metadata:
  name: webserver
  labels:
    app: nginx
spec:
  replicas: 3
  selector:
    matchLabels:
      app: nginx
  template:
    metadata:
      labels:
        app: nginx
    spec:
      containers:
      - name: nginx
        image: nginx:alpine
        ports:
        - containerPort: 80
Using kubectl, we will create the Deployment from the YAML configuration file. Using the -f option with the kubectl create command, we can pass a YAML file as an object's specification, or a URL to a configuration file from the web. In the following example, we are creating a webserver Deployment:
$ kubectl create -f webserver.yaml
deployment.apps/webserver created
This will also create a ReplicaSet and Pods, as defined in the YAML configuration file.
$  kubectl get replicasets
NAME                  DESIRED   CURRENT   READY     AGE
webserver-b477df957   3         3         3         45s

$ kubectl get pods
NAME                        READY     STATUS    RESTARTS   AGE
webserver-b477df957-7lnw6   1/1       Running   0          2m
webserver-b477df957-j69q2   1/1       Running   0          2m
webserver-b477df957-xvdkf 1/1 Running 0 2mWith ServiceTypes we can define the access method for a Service. For a NodePort ServiceType, Kubernetes opens up a static port on all the worker nodes. If we connect to that port from any node, we are proxied to the ClusterIP of the Service. Next, let's use the NodePort ServiceType while creating a Service.
reate a webserver-svc.yaml file with the following content:
apiVersion: v1
kind: Service
metadata:
  name: web-service
  labels:
    run: web-service
spec:
  type: NodePort
  ports:
  - port: 80
    protocol: TCP
  selector:
    app: nginx
Using kubectl, create the Service:
$ kubectl create -f webserver-svc.yaml
service/web-service created
A more direct method of creating a Service is by exposing the previously created Deployment (this method requires an existing Deployment).
Expose a Deployment with the kubectl expose command:
$ kubectl expose deployment webserver --name=web-service --type=NodePort
service/web-service exposed
List the Services:
$ kubectl get services
NAME          TYPE        CLUSTER-IP     EXTERNAL-IP   PORT(S)        AGE
kubernetes    ClusterIP   10.96.0.1      <none>        443/TCP        1d
web-service   NodePort    10.110.47.84   <none>        80:31074/TCP   22s
Our web-service is now created and its ClusterIP is 10.110.47.84. In the PORT(S)section, we see a mapping of 80:31074, which means that we have reserved a static port 31074 on the node. If we connect to the node on that port, our requests will be proxied to the ClusterIP on port 80.
It is not necessary to create the Deployment first, and the Service after. They can be created in any order. A Service will find and connect Pods based on the Selector.
To get more details about the Service, we can use the kubectl describe command, as in the following example:
$ kubectl describe service web-service
Name:                     web-service
Namespace:                default
Labels:                   run=web-service
Annotations:              <none>
Selector:                 app=nginx
Type:                     NodePort
IP:                       10.110.47.84
Port:                     <unset>  80/TCP
TargetPort:               80/TCP
NodePort:                 <unset>  31074/TCP
Endpoints:                172.17.0.4:80,172.17.0.5:80,172.17.0.6:80
Session Affinity:         None
External Traffic Policy:  Cluster
Events:                   <none>
web-service uses app=nginx as a Selector to logically group our three Pods, which are listed as endpoints. When a request reaches our Service, it will be served by one of the Pods listed in the Endpoints section.
**Now, open the browser and access the application on CLUSTERIP at port 31074.
on minukube use
minikube ipfor getting CLUSTERIP
## Liveness and Readiness Probes While containerized applications are scheduled to run in pods on nodes across our cluster, at times the applications may become unresponsive or may be delayed during startup. Implementing Liveness and Readiness Probes allows the kubelet to control the health of the application running inside a Pod's container and force a container restart of an unresponsive application. When defining both Readiness and Liveness Probes, it is recommended to allow enough time for the Readiness Probe to possibly fail a few times before a pass, and only then check the Liveness Probe. If Readiness and Liveness Probes overlap there may be a risk that the container never reaches ready state.
f a container in the Pod is running, but the application running inside this container is not responding to our requests, then that container is of no use to us. This kind of situation can occur, for example, due to application deadlock or memory pressure. In such a case, it is recommended to restart the container to make the application available.
Rather than restarting it manually, we can use a Liveness Probe. Liveness probe checks on an application's health, and if the health check fails, kubelet restarts the affected container automatically.
Liveness Probes can be set by defining:
- Liveness command
- Liveness HTTP request
- TCP Liveness Probe.
In the following example, we are checking the existence of a file /tmp/healthy:
apiVersion: v1
kind: Pod
metadata:
  labels:
    test: liveness
  name: liveness-exec
spec:
  containers:
  - name: liveness
    image: k8s.gcr.io/busybox
    args:
    - /bin/sh
    - -c
    - touch /tmp/healthy; sleep 30; rm -rf /tmp/healthy; sleep 600
    livenessProbe:
      exec:
        command:
        - cat
        - /tmp/healthy
      initialDelaySeconds: 5
      periodSeconds: 5
The existence of the /tmp/healthy file is configured to be checked every 5 seconds using the periodSeconds parameter. The initialDelaySeconds parameter requests the kubelet to wait for 5 seconds before the first probe. When running the command line argument to the container, we will first create the /tmp/healthy file, and then we will remove it after 30 seconds. The deletion of the file would trigger a health failure, and our Pod would get restarted.
In the following example, the kubelet sends the HTTP GET request to the /healthz endpoint of the application, on port 8080. If that returns a failure, then the kubelet will restart the affected container; otherwise, it would consider the application to be alive.
livenessProbe:
      httpGet:
        path: /healthz
        port: 8080
        httpHeaders:
        - name: X-Custom-Header
          value: Awesome
      initialDelaySeconds: 3
periodSeconds: 3With TCP Liveness Probe, the kubelet attempts to open the TCP Socket to the container which is running the application. If it succeeds, the application is considered healthy, otherwise the kubelet would mark it as unhealthy and restart the affected container.
livenessProbe:
      tcpSocket:
        port: 8080
      initialDelaySeconds: 15
periodSeconds: 20Sometimes, applications have to meet certain conditions before they can serve traffic. These conditions include ensuring that the depending service is ready, or acknowledging that a large dataset needs to be loaded, etc. In such cases, we use Readiness Probes and wait for a certain condition to occur. Only then, the application can serve traffic.
A Pod with containers that do not report ready status will not receive traffic from Kubernetes Services.
readinessProbe:
  exec:
    command:
    - cat
    - /tmp/healthy
  initialDelaySeconds: 5
  periodSeconds: 5
eadiness Probes are configured similarly to Liveness Probes. Their configuration also remains the same.
Please review the Kubernetes documentation for more details.
we saw how we can access our deployed containerized application from the external world via Services. Among the ServiceTypes the NodePort and LoadBalancer are the most often used. For the LoadBalancer ServiceType, we need to have support from the underlying infrastructure. Even after having the support, we may not want to use it for every Service, as LoadBalancer resources are limited and they can increase costs significantly. Managing the NodePort ServiceType can also be tricky at times, as we need to keep updating our proxy settings and keep track of the assigned ports. In this chapter, we will explore the Ingress API resource, which represents another layer of abstraction, deployed in front of the Service API resources, offering a unified method of managing access to our applications from the external world.
With Services, routing rules are associated with a given Service. They exist for as long as the Service exists, and there are many rules because there are many Services in the cluster. If we can somehow decouple the routing rules from the application and centralize the rules management, we can then update our application without worrying about its external access. This can be done using the Ingress resource.
According to kubernetes.io, "An Ingress is a collection of rules that allow inbound connections to reach the cluster Services."
To allow the inbound connection to reach the cluster Services, Ingress configures a Layer 7 HTTP/HTTPS load balancer for Services and provides the following:
- TLS (Transport Layer Security)
- Name-based virtual hosting
- Fanout routing
- Loadbalancing
- Custom rules.
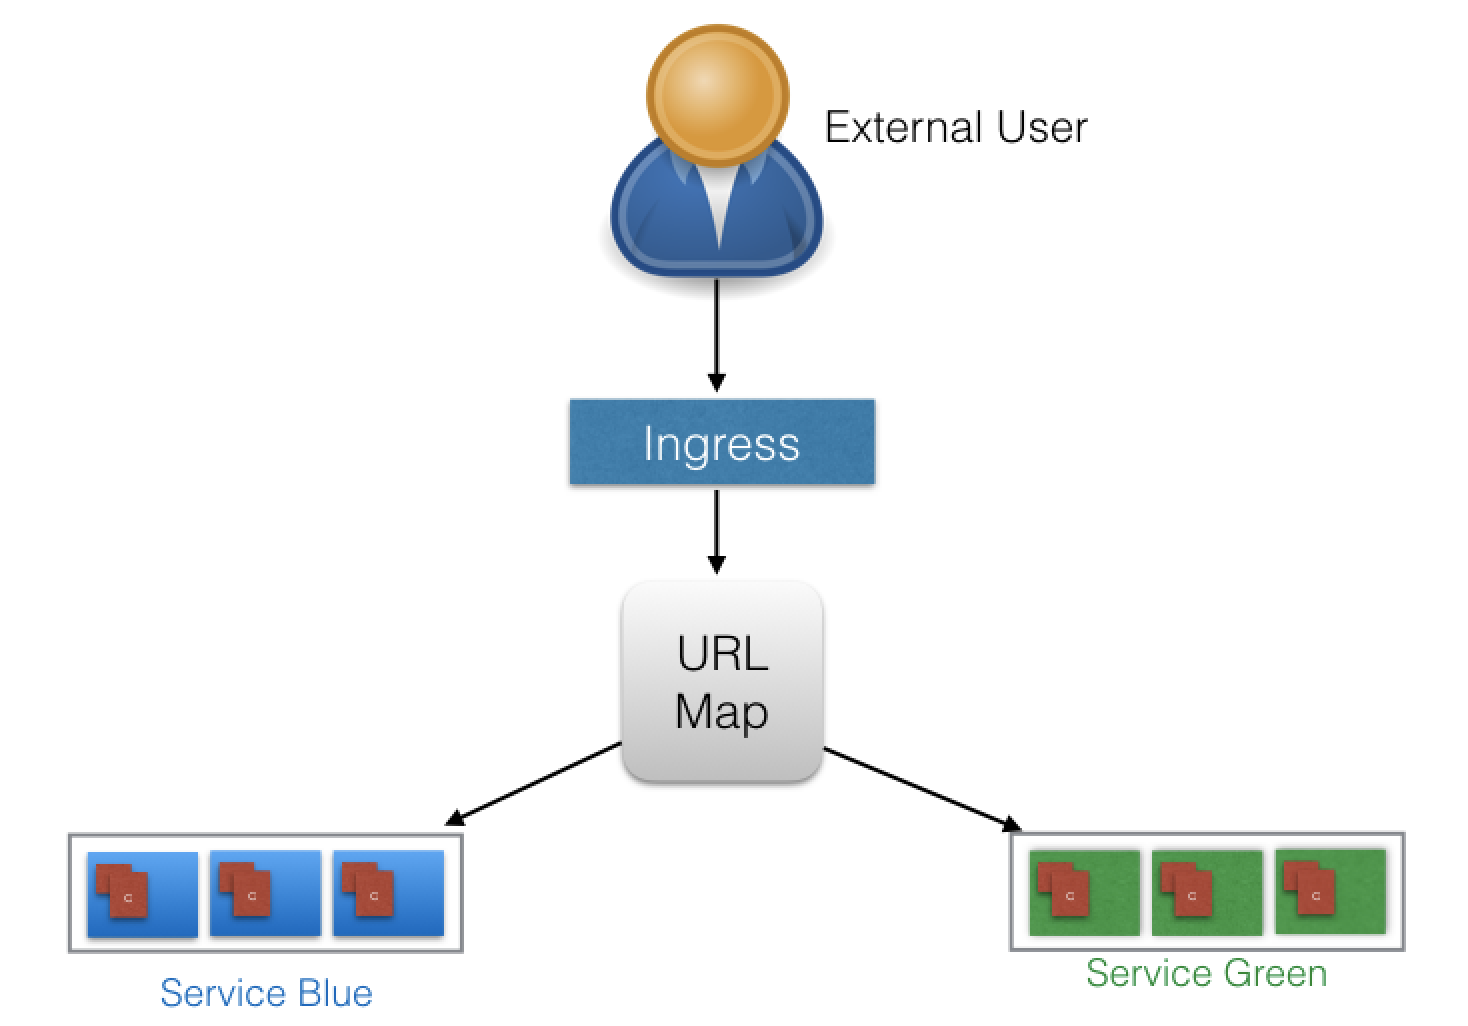
With Ingress, users do not connect directly to a Service. Users reach the Ingress endpoint, and, from there, the request is forwarded to the desired Service. You can see an example of a sample Ingress definition below:
apiVersion: networking.k8s.io/v1beta1
kind: Ingress
metadata:
  name: virtual-host-ingress
  namespace: default
spec:
  rules:
  - host: blue.example.com
    http:
      paths:
      - backend:
          serviceName: webserver-blue-svc
          servicePort: 80
  - host: green.example.com
    http:
      paths:
      - backend:
          serviceName: webserver-green-svc
          servicePort: 80
In the example above, user requests to both blue.example.com and green.example.com would go to the same Ingress endpoint, and, from there, they would be forwarded to webserver-blue-svc, and webserver-green-svc, respectively. This is an example of a Name-Based Virtual Hosting Ingress rule.
We can also have Fanout Ingress rules, when requests to example.com/blue and example.com/green would be forwarded to webserver-blue-svc and webserver-green-svc, respectively:
apiVersion: networking.k8s.io/v1beta1
kind: Ingress
metadata:
  name: fan-out-ingress
  namespace: default
spec:
  rules:
  - host: example.com
    http:
      paths:
      - path: /blue
        backend:
          serviceName: webserver-blue-svc
          servicePort: 80
      - path: /green
        backend:
          serviceName: webserver-green-svc
          servicePort: 80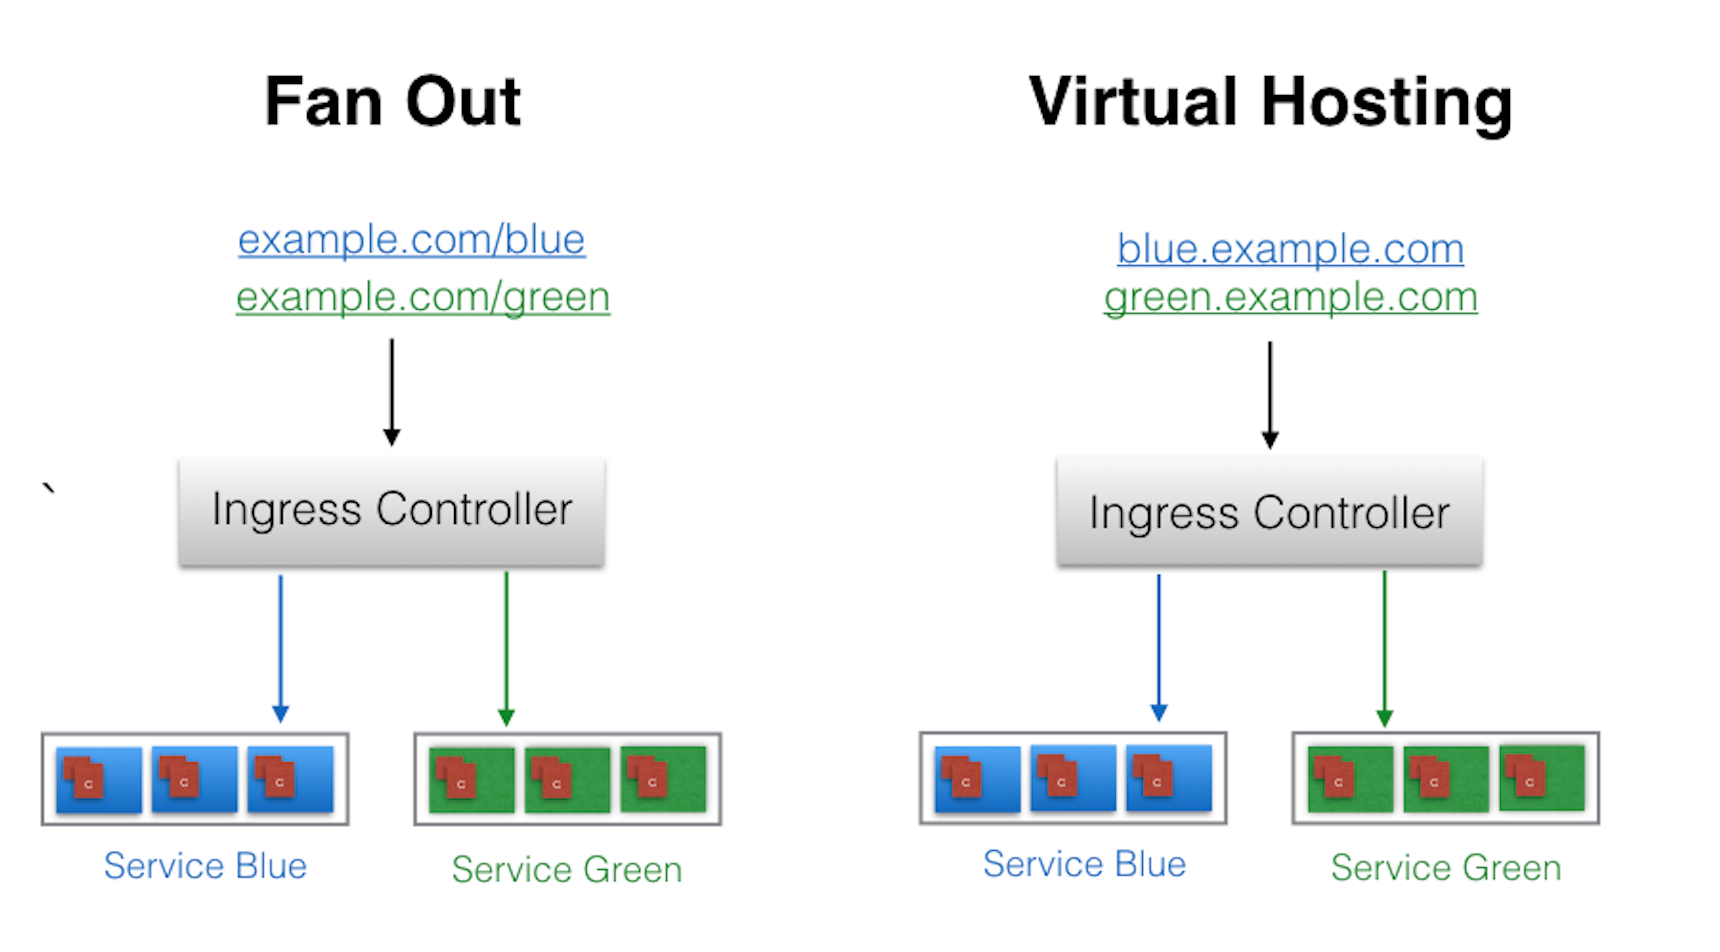
The Ingress resource does not do any request forwarding by itself, it merely accepts the definitions of traffic routing rules. The ingress is fulfilled by an Ingress Controller, which we will discuss next.
An Ingress Controller is an application watching the Master Node's API server for changes in the Ingress resources and updates the Layer 7 Load Balancer accordingly. Kubernetes supports different Ingress Controllers, and, if needed, we can also build our own. GCE L7 Load Balancer Controller and Nginx Ingress Controller are commonly used Ingress Controllers. Other controllers are Istio, Kong, Traefik, etc.
**Start the Ingress Controller with Minikube--
Minikube ships with the Nginx Ingress Controller setup as an addon, disabled by default. It can be easily enabled by running the following command:
$ minikube addons enable ingressOnce the Ingress Controller is deployed, we can create an Ingress resource using the kubectl create command. For example, if we create a virtual-host-ingress.yaml file with the Name-Based Virtual Hosting Ingress rule definition that we saw in the Ingress II section, then we use the following command to create an Ingress resource:
kubectl create -f virtual-host-ingress.yamlWith the Ingress resource we just created, we should now be able to access the webserver-blue-svc or webserver-green-svc services using the blue.example.com and green.example.com URLs. As our current setup is on Minikube, we will need to update the host configuration file (/etc/hosts on Mac and Linux) on our workstation to the Minikube IP for those URLs. After the update, the file should look similar to:
$ cat /etc/hosts
127.0.0.1        localhost
::1              localhost
192.168.99.100   blue.example.com green.example.com
Now we can open blue.example.com and green.example.com on the browser and access each application.
Kubernetes can be installed using different configurations. The four major installation types are briefly presented below:
- All-in-One Single-Node Installation In this setup, all the master and worker components are installed and running on a single-node. While it is useful for learning, development, and testing, it should not be used in production. Minikube is one such example, and we are going to explore it in future chapters.
- Single-Node etcd, Single-Master and Multi-Worker Installation In this setup, we have a single-master node, which also runs a single-node etcd instance. Multiple worker nodes are connected to the master node.
- Single-Node etcd, Multi-Master and Multi-Worker Installation in this setup, we have multiple-master nodes configured in HA mode, but we have a single-node etcd instance. Multiple worker nodes are connected to the master nodes.
- Multi-Node etcd, Multi-Master and Multi-Worker Installation In this mode, etcd is configured in clustered HA mode, the master nodes are all configured in HA mode, connecting to multiple worker nodes. This is the most advanced and recommended production setup.
kubectl is the Kubernetes Command Line Interface (CLI) client to manage cluster resources and applications. It can be used standalone, or part of scripts and automation tools. Once all required credentials and cluster access points have been configured for kubectl it can be used remotely from anywhere to access a cluster.
The Kubernetes Dashboard provides a Web-Based User Interface (Web UI) to interact with a Kubernetes cluster to manage resources and containerized applications. In one of the later chapters, we will be using it to deploy a containerized application.
As we know, Kubernetes has the API server, and operators/users connect to it from the external world to interact with the cluster. Using both CLI and Web UI, we can connect to the API server running on the master node to perform different operations. We can directly connect to the API server using its API endpoints and send commands to it, as long as we can access the master node and have the right credentials.
HTTP API space of Kubernetes can be divided into three independent groups:
- Core Group (/api/v1) This group includes objects such as Pods, Services, nodes, namespaces, configmaps, secrets, etc.
- Named Group This group includes objects in /apis/$NAME/$VERSION format. These different API versions imply different levels of stability and support: Alpha level - it may be dropped at any point in time, without notice. For example, /apis/batch/v2alpha1. Beta level - it is well-tested, but the semantics of objects may change in incompatible ways in a subsequent beta or stable release. For example, /apis/certificates.k8s.io/v1beta1. Stable level - appears in released software for many subsequent versions. For example, /apis/networking.k8s.io/v1.
- System-wide This group consists of system-wide API endpoints, like /healthz, /logs, /metrics, /ui, etc.
When not using the kubectl proxy, we need to authenticate to the API server when sending API requests. We can authenticate by providing a Bearer Token when issuing a curl, or by providing a set of keys and certificates.
A Bearer Token is an access token which is generated by the authentication server (the API server on the master node) and given back to the client. Using that token, the client can connect back to the Kubernetes API server without providing further authentication details, and then, access resources.
TOKEN=$(kubectl describe secret -n kube-system $(kubectl get secrets -n kube-system | grep default | cut -f1 -d ' ') | grep -E '^token' | cut -f2 -d':' | tr -d '\t' | tr -d " ")APISERVER=$(kubectl config view | grep https | cut -f 2- -d ":" | tr -d " ")Confirm that the APISERVER stored the same IP as the Kubernetes master IP by issuing the following 2 commands and comparing their outputs:
echo $APISERVER
kubectl cluster-infocurl $APISERVER --header "Authorization: Bearer $TOKEN" --insecurenstead of the access token, we can extract the client certificate, client key, and certificate authority data from the .kube/config file. Once extracted, they are encoded and then passed with a curl command for authentication. The new curl command looks similar to:
curl $APISERVER --cert encoded-cert --key encoded-key --cacert encoded-ca
All the administrative tasks are coordinated by the kube-apiserver, a central control plane component running on the master node. The API server intercepts RESTful calls from users, operators and external agents, then validates and processes them. During processing the API server reads the Kubernetes cluster's current state from the etcd, and after a call's execution, the resulting state of the Kubernetes cluster is saved in the distributed key-value data store for persistence. The API server is the only master plane component to talk to the etcd data store, both to read and to save Kubernetes cluster state information from/to it - acting as a middle-man interface for any other control plane agent requiring to access the cluster's data store.
The API server is highly configurable and customizable. It also supports the addition of custom API servers, when the primary API server becomes a proxy to all secondary custom API servers and routes all incoming RESTful calls to them based on custom defined rules.
The role of the kube-scheduler is to assign new objects, such as pods, to nodes. During the scheduling process, decisions are made based on current Kubernetes cluster state and new object's requirements. The scheduler obtains from etcd, via the API server, resource usage data for each worker node in the cluster. The scheduler also receives from the API server the new object's requirements which are part of its configuration data. Requirements may include constraints that users and operators set, such as scheduling work on a node labeled with disk==ssd key/value pair. The scheduler also takes into account Quality of Service (QoS) requirements, data locality, affinity, anti-affinity, taints, toleration, etc.
## Controller Managers The controller managers are control plane components on the master node running controllers to regulate the state of the Kubernetes cluster. Controllers are watch-loops continuously running and comparing the cluster's desired state (provided by objects' configuration data) with its current state (obtained from etcd data store via the API server). In case of a mismatch corrective action is taken in the cluster until its current state matches the desired state.
The kube-controller-manager runs controllers responsible to act when nodes become unavailable, to ensure pod counts are as expected, to create endpoints, service accounts, and API access tokens.
The cloud-controller-manager runs controllers responsible to interact with the underlying infrastructure of a cloud provider when nodes become unavailable, to manage storage volumes when provided by a cloud service, and to manage load balancing and routing.
etcd is a distributed key-value data store used to persist a Kubernetes cluster's state. New data is written to the data store only by appending to it, data is never replaced in the data store. Obsolete data is compacted periodically to minimize the size of the data store.
Out of all the control plane components, only the API server is able to communicate with the etcd data store.
etcd's CLI management tool provides backup, snapshot, and restore capabilities which come in handy especially for a single etcd instance Kubernetes cluster - common in Development and learning environments. However, in Stage and Production environments, it is extremely important to replicate the data stores in HA mode, for cluster configuration data resiliency.
Some Kubernetes cluster bootstrapping tools, by default, provision stacked etcd master nodes, where the data store runs alongside and shares resources with the other control plane components on the same master node. For data store isolation from the control plane components, the bootstrapping process can be configured for an external etcd, where the data store is provisioned on a dedicated separate host, thus reducing the chances of an etcd failure. Both stacked and external etcd configurations support HA configurations. etcd is based on the Raft Consensus Algorithm which allows a collection of machines to work as a coherent group that can survive the failures of some of its members. At any given time, one of the nodes in the group will be the master, and the rest of them will be the followers. Any node can be treated as a master.
etcd is written in the Go programming language. In Kubernetes, besides storing the cluster state, etcd is also used to store configuration details such as subnets, ConfigMaps, Secrets, etc.
Decoupled microservices based applications rely heavily on networking in order to mimic the tight-coupling once available in the monolithic era. Networking, in general, is not the easiest to understand and implement. Kubernetes is no exception - as a containerized microservices orchestrator is needs to address 4 distinct networking challenges:
- Container-to-container communication inside Pods
- Pod-to-Pod communication on the same node and across cluster nodes
- Pod-to-Service communication within the same namespace and across cluster namespaces
- External-to-Service communication for clients to access applications in a cluster.
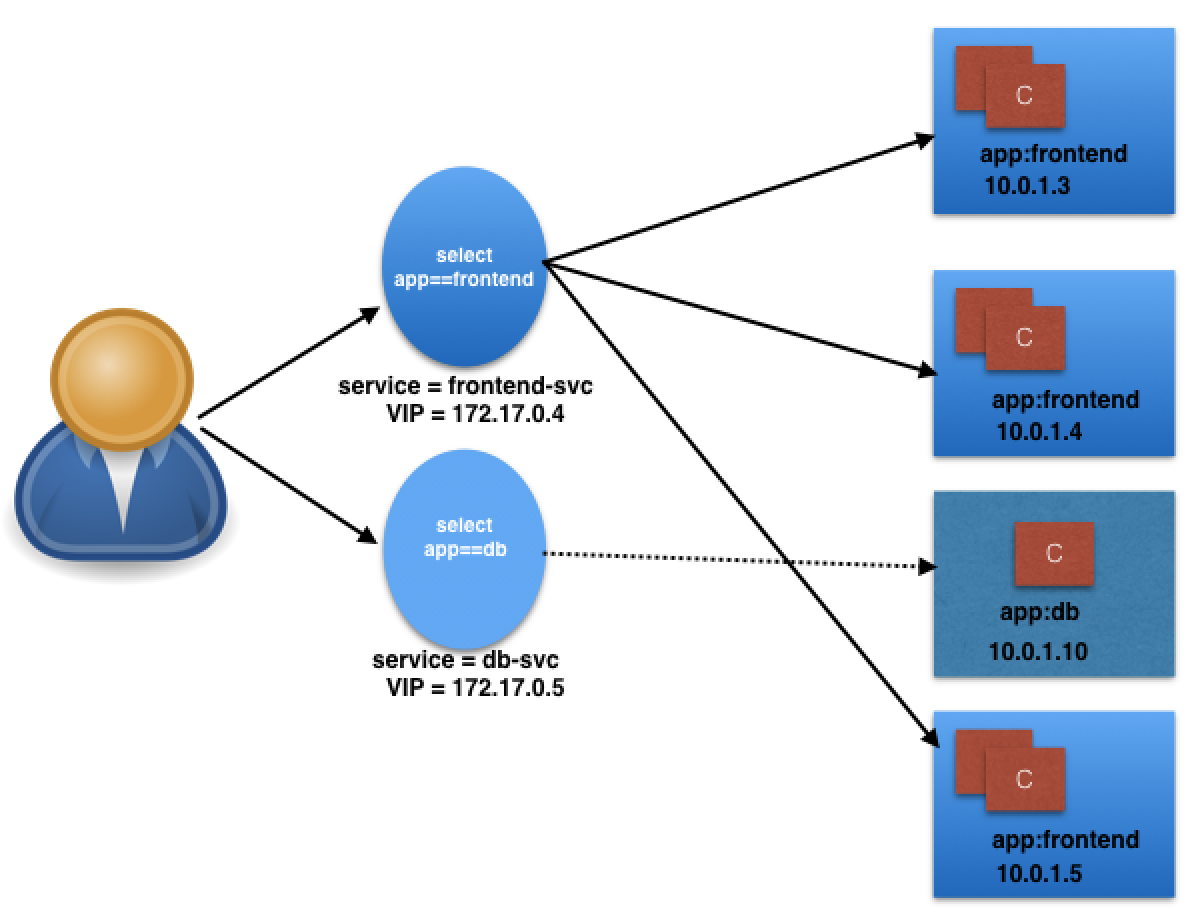
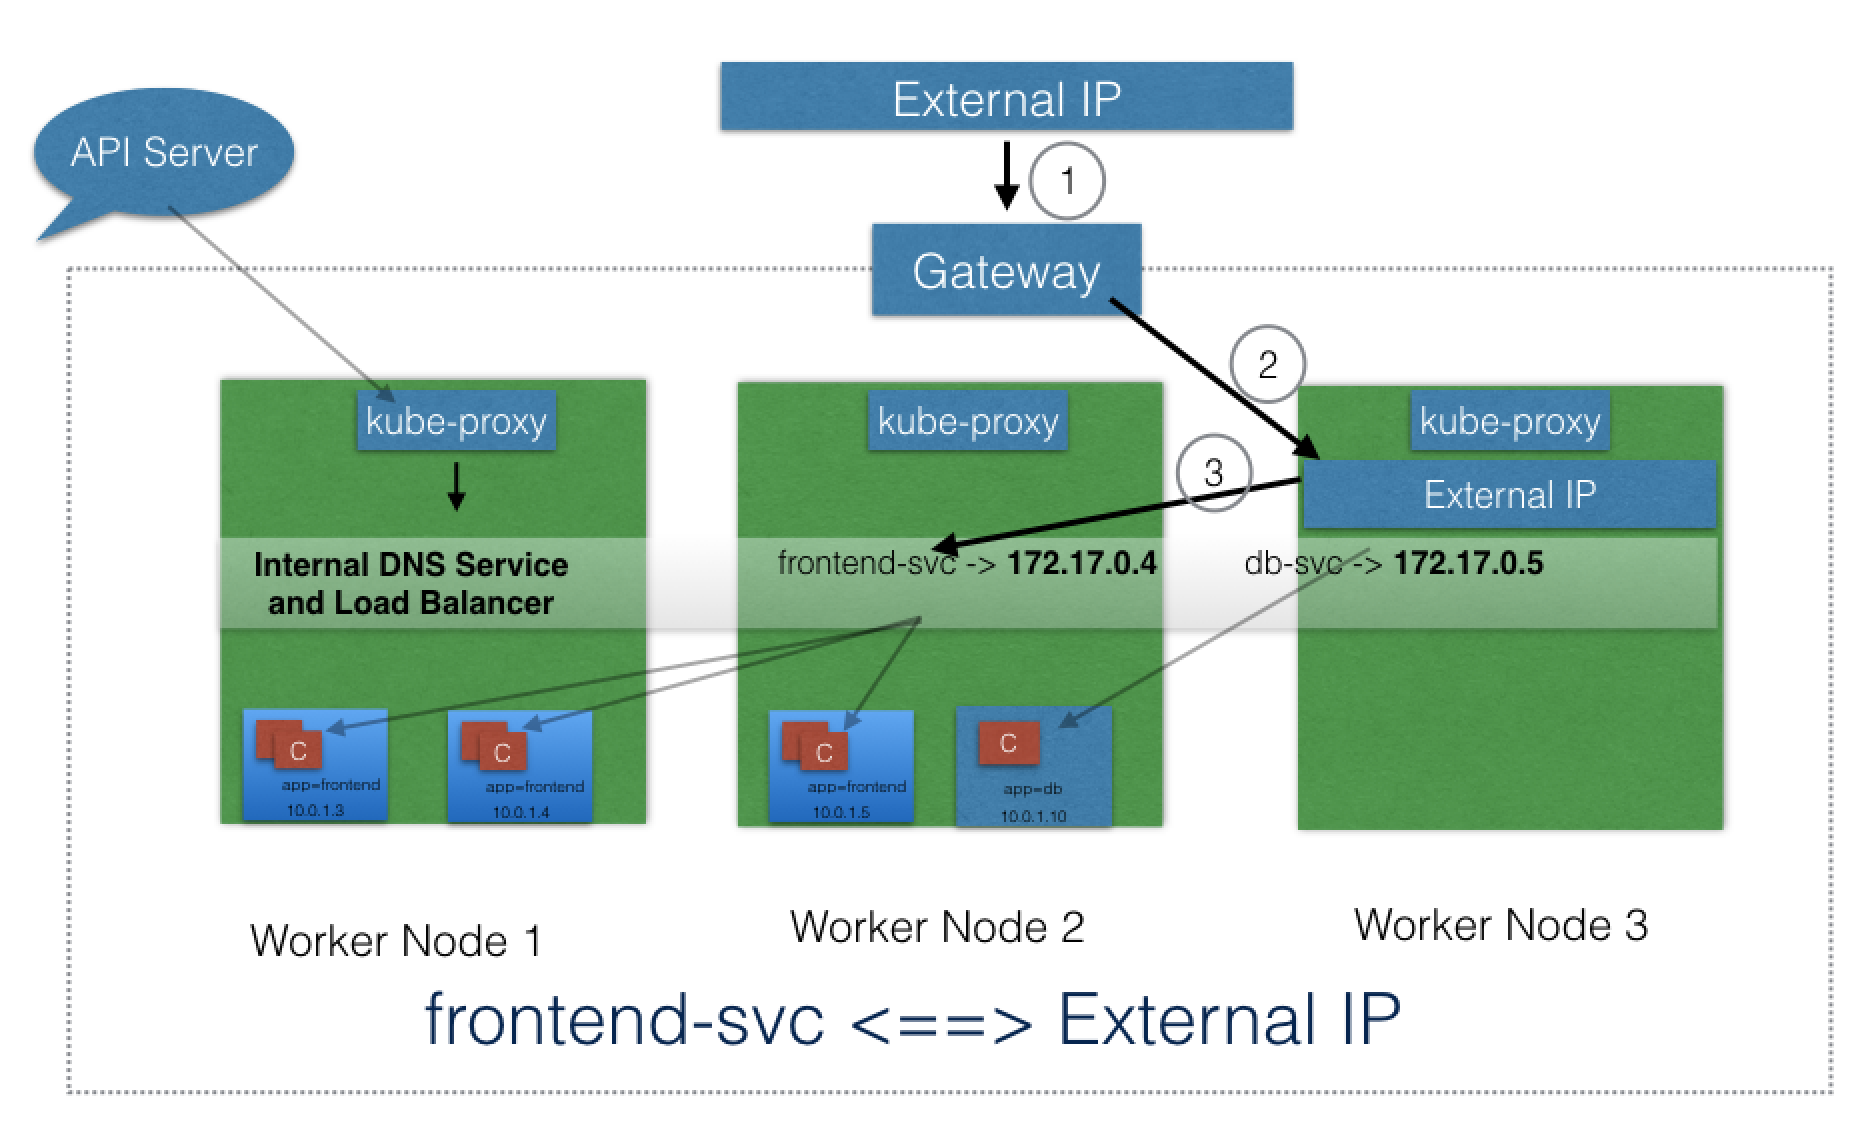
In the following graphical representation, app is the Label key, frontend and db are Label values for different Pods.
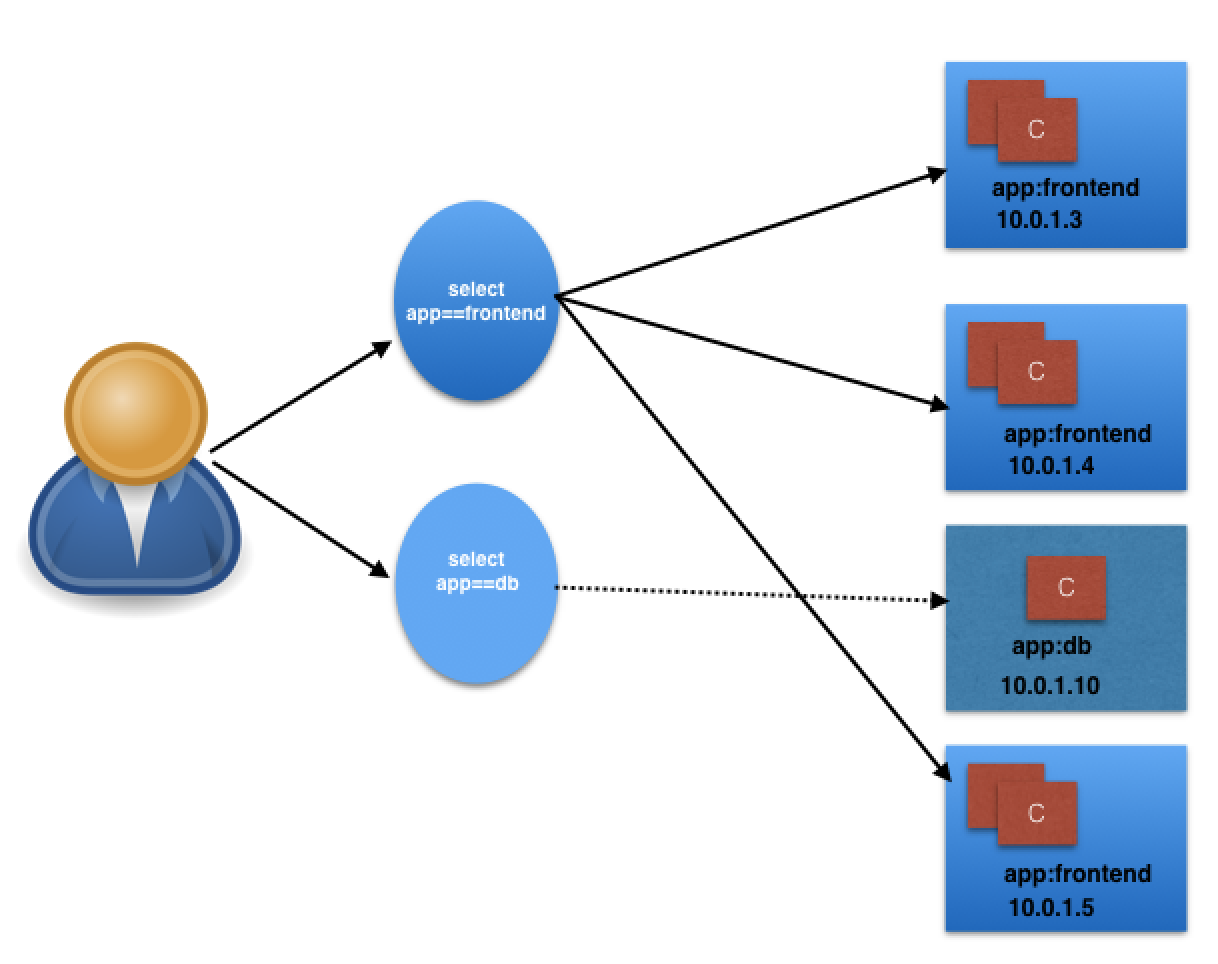
Using the selectors app==frontend and app==db, we group Pods into two logical sets: one with 3 Pods, and one with a single Pod.
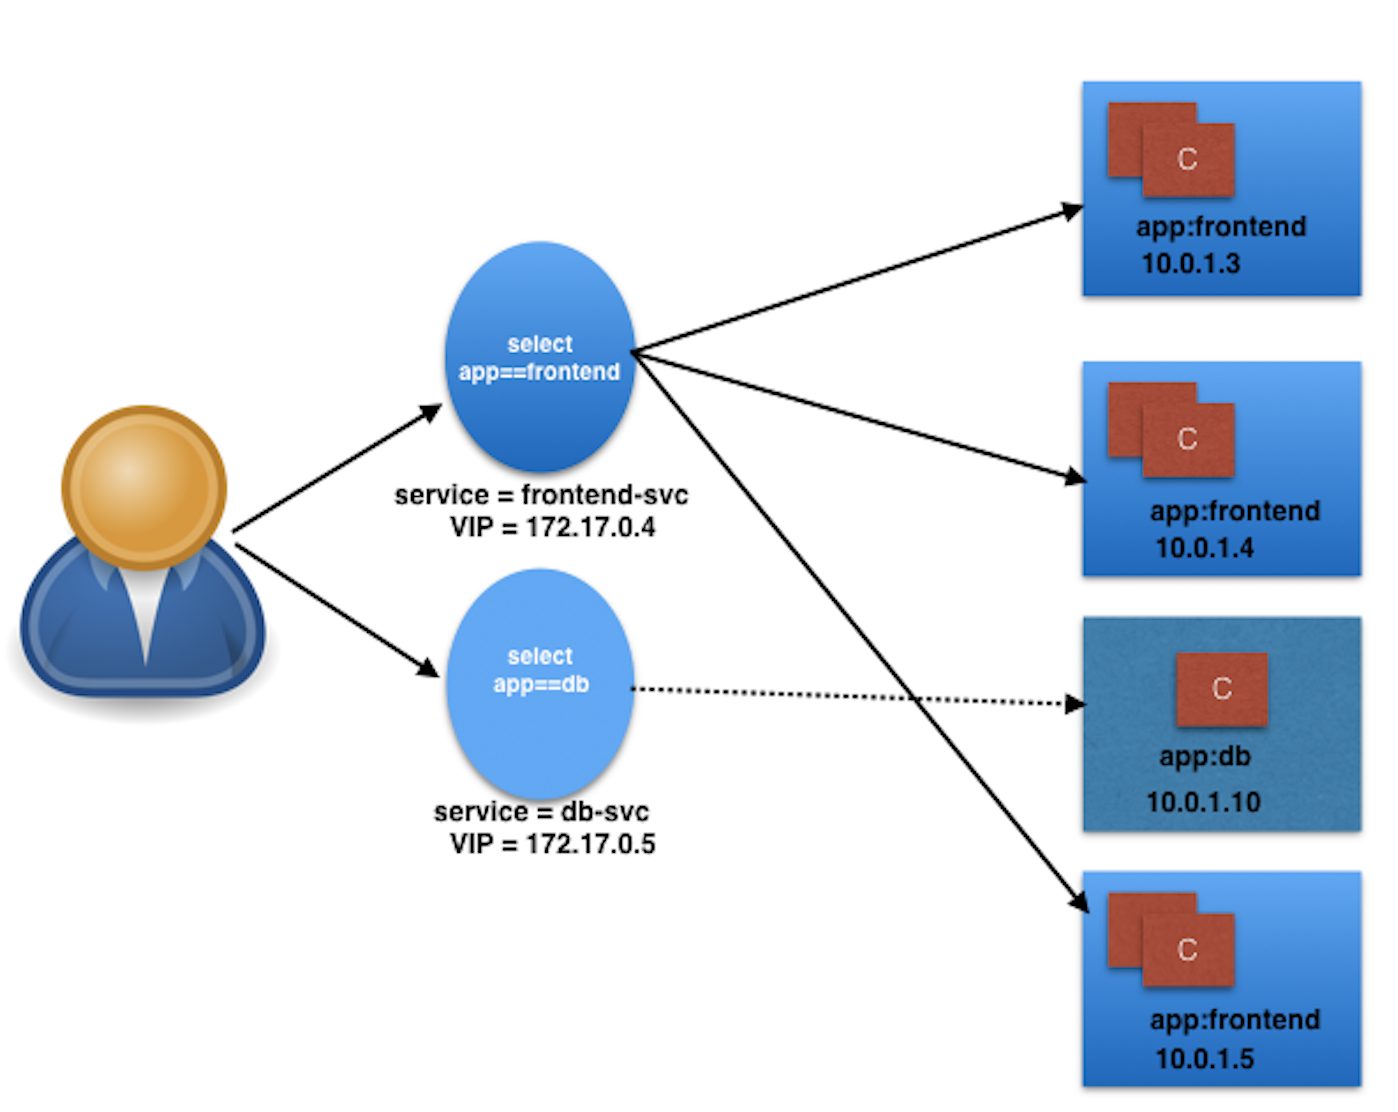
We assign a name to the logical grouping, referred to as a Service. In our example, we create two Services, frontend-svc, and db-svc, and they have the app==frontend and the app==db Selectors, respectively.
Services can expose single Pods, ReplicaSets, Deployments, DaemonSets, and StatefulSets.
The following is an example of a Service object definition:
kind: Service
apiVersion: v1
metadata:
  name: frontend-svc
spec:
  selector:
    app: frontend
  ports:
  - protocol: TCP
    port: 80
    targetPort: 5000
In this example, we are creating a frontend-svc Service by selecting all the Pods that have the Label key=app set to value=frontend. By default, each Service receives an IP address routable only inside the cluster, known as ClusterIP. In our example, we have 172.17.0.4 and 172.17.0.5 as ClusterIPs assigned to our frontend-svc and db-svc Services, respectively.
The user/client now connects to a Service via its ClusterIP, which forwards traffic to one of the Pods attached to it. A Service provides load balancing by default while selecting the Pods for traffic forwarding.
While the Service forwards traffic to Pods, we can select the targetPort on the Pod which receives the traffic. In our example, the frontend-svc Service receives requests from the user/client on port 80 and then forwards these requests to one of the attached Pods on the targetPort 5000. If the targetPort is not defined explicitly, then traffic will be forwarded to Pods on the port on which the Service receives traffic.
A logical set of a Pod's IP address, along with the targetPort is referred to as a Service endpoint. In our example, the frontend-svc Service has 3 endpoints: 10.0.1.3:5000, 10.0.1.4:5000, and 10.0.1.5:5000. Endpoints are created and managed automatically by the Service, not by the Kubernetes cluster administrator.
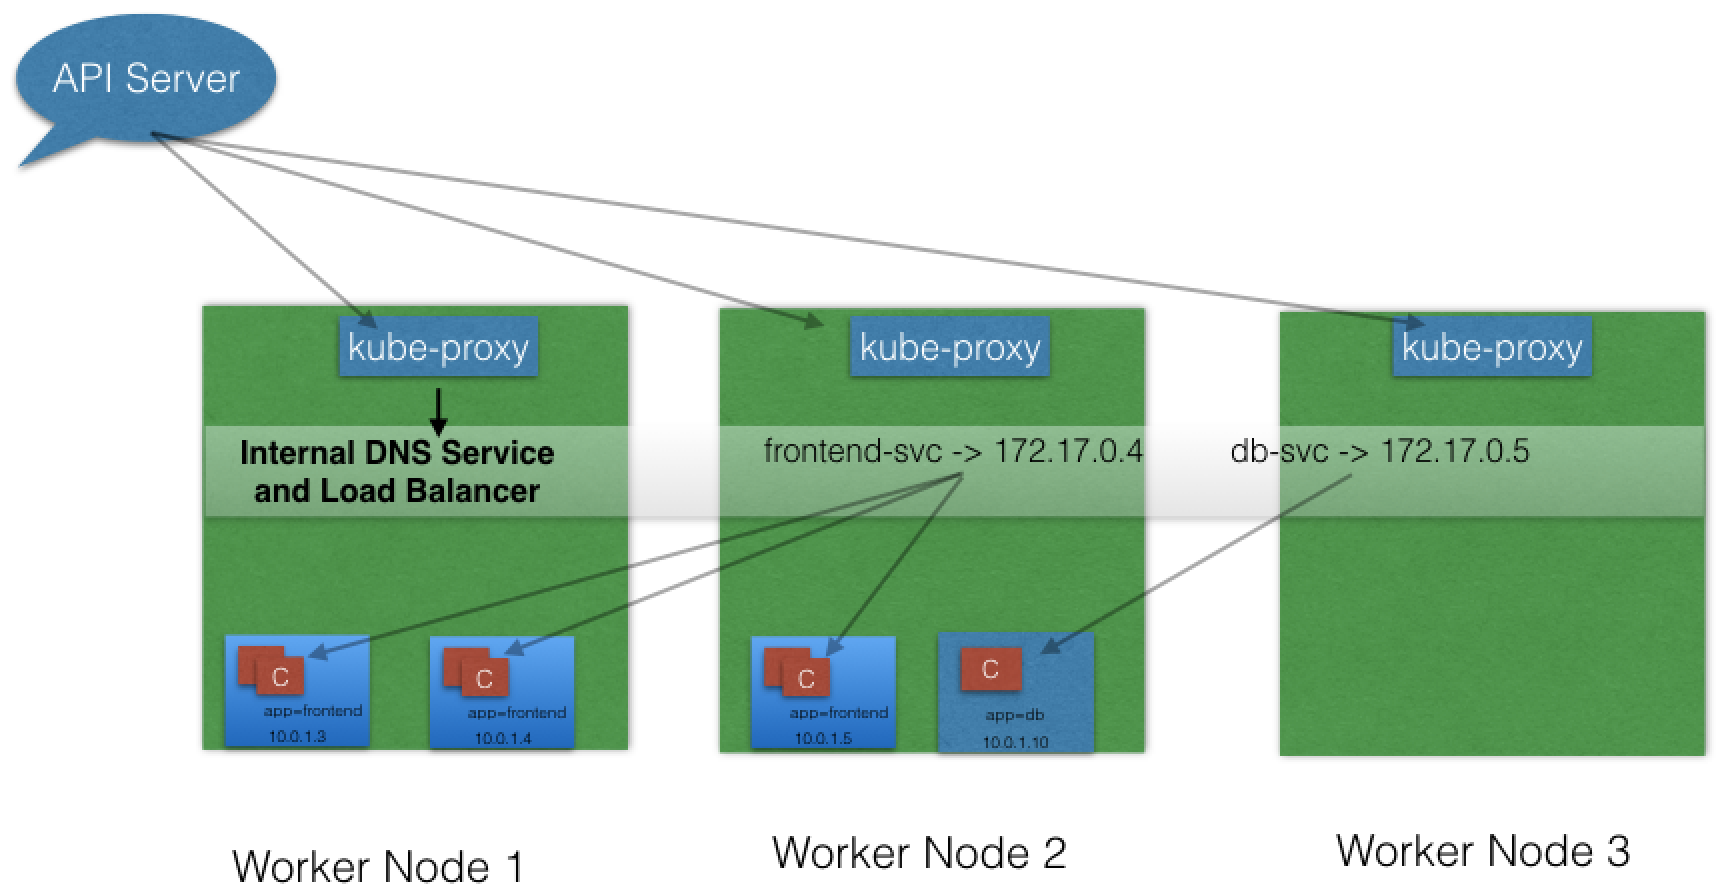
All worker nodes run a daemon called kube-proxy, which watches the API server on the master node for the addition and removal of Services and endpoints. In the example below, for each new Service, on each node, kube-proxy configures iptables rules to capture the traffic for its ClusterIP and forwards it to one of the Service's endpoints. Therefore any node can receive the external traffic and then route it internally in the cluster based on the iptables rules. When the Service is removed, kube-proxy removes the corresponding iptables rules on all nodes as well.
As Services are the primary mode of communication in Kubernetes, we need a way to discover them at runtime. Kubernetes supports two methods for discovering Services:
- Environment Variables As soon as the Pod starts on any worker node, the kubelet daemon running on that node adds a set of environment variables in thePod for all active Services. For example, if we have an active Service called redis-master, which exposes port 6379, and its ClusterIP is 172.17.0.6, then, on a newly created Pod, we can see the following environment variables:
REDIS_MASTER_SERVICE_HOST=172.17.0.6
REDIS_MASTER_SERVICE_PORT=6379
REDIS_MASTER_PORT=tcp://172.17.0.6:6379
REDIS_MASTER_PORT_6379_TCP=tcp://172.17.0.6:6379
REDIS_MASTER_PORT_6379_TCP_PROTO=tcp
REDIS_MASTER_PORT_6379_TCP_PORT=6379
REDIS_MASTER_PORT_6379_TCP_ADDR=172.17.0.6
With this solution, we need to be careful while ordering our Services, as the Pods will not have the environment variables set for Services which are created after the Pods are created.
- DNS Kubernetes has an add-on for DNS, which creates a DNS record for each Service and its format is my-svc.my-namespace.svc.cluster.local. Services within the same Namespace find other Services just by their name. If we add a Service redis-master in my-ns Namespace, all Pods in the same Namespace lookup the Service just by its name, redis-master. Pods from other Namespaces lookup the same Service by adding the respective Namespace as a suffix, such as redis-master.my-ns.
This is the most common and highly recommended solution. For example, in the previous section's image, we have seen that an internal DNS is configured, which maps our Services frontend-svc and db-svc to 172.17.0.4 and 172.17.0.5, respectively.
While defining a Service, we can also choose its access scope. We can decide whether the Service:
- Is only accessible within the cluster
- Is accessible from within the cluster and the external world
- Maps to an entity which resides either inside or outside the cluster.
Access scope is decided by ServiceType, which can be configured when creating the Service.
ClusterIP is the default ServiceType. A Service receives a Virtual IP address, known as its ClusterIP. This Virtual IP address is used for communicating with the Service and is accessible only within the cluster.
With the NodePort ServiceType, in addition to a ClusterIP, a high-port, dynamically picked from the default range 30000-32767, is mapped to the respective Service, from all the worker nodes. For example, if the mapped NodePort is 32233 for the service frontend-svc, then, if we connect to any worker node on port 32233, the node would redirect all the traffic to the assigned ClusterIP - 172.17.0.4. If we prefer a specific high-port number instead, then we can assign that high-port number to the NodePort from the default range.
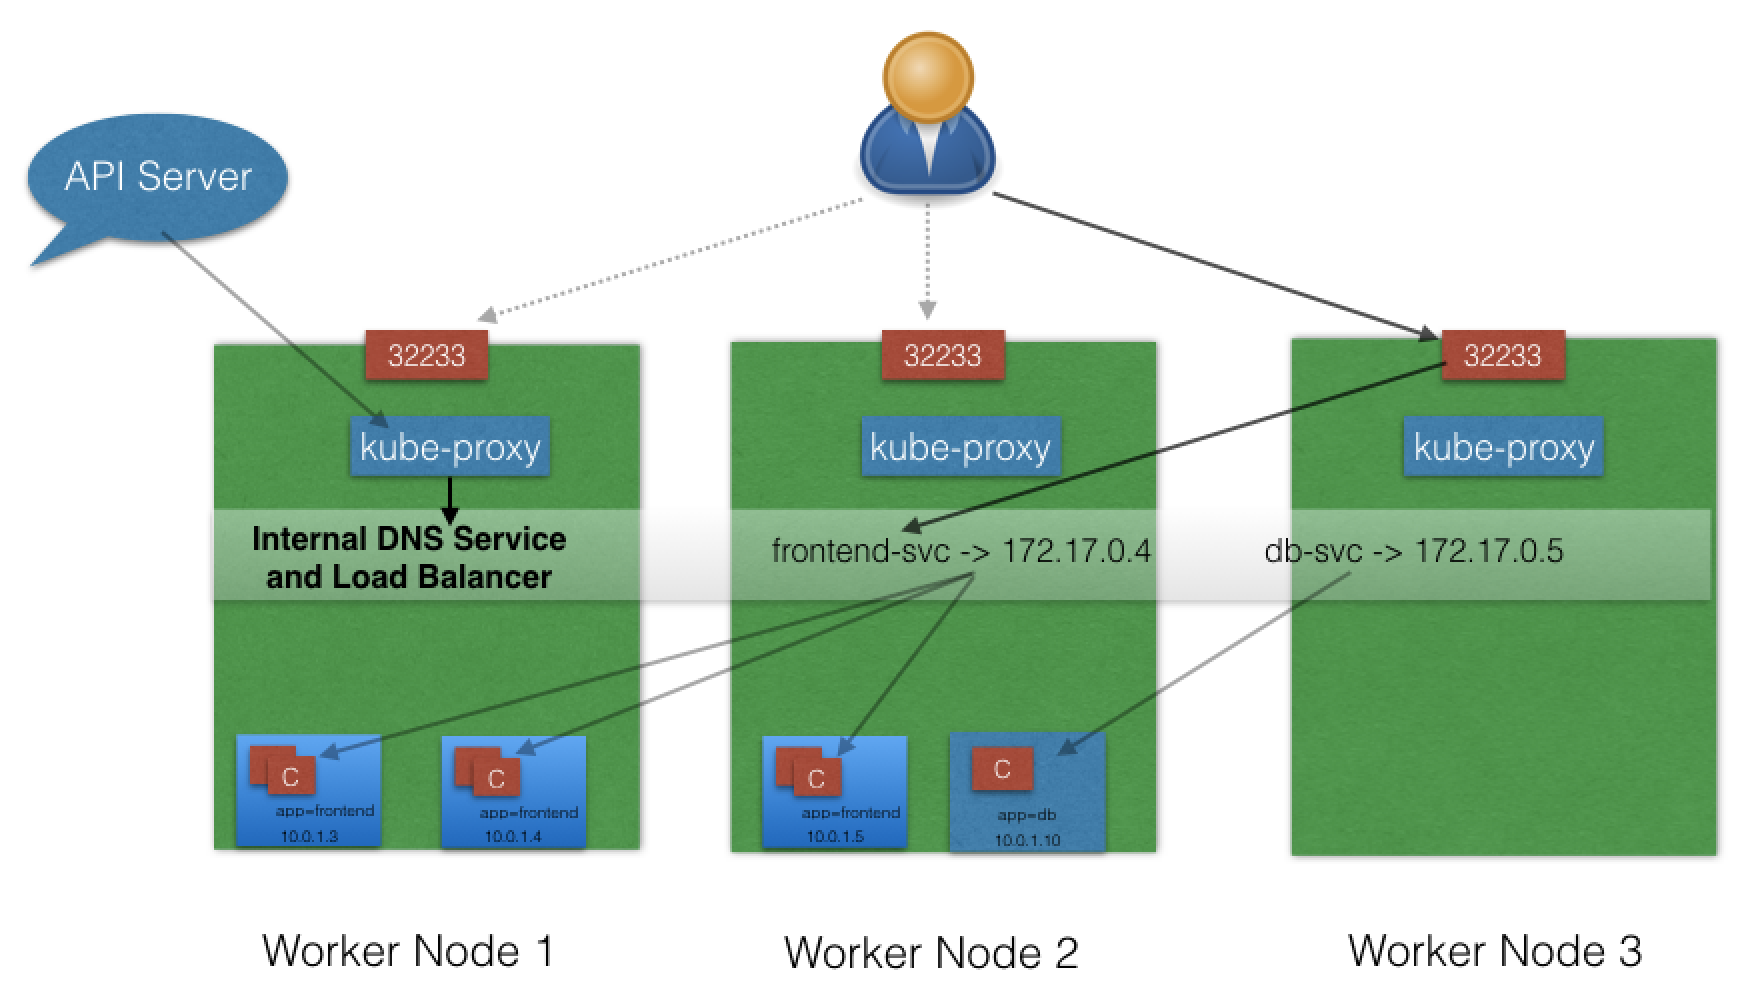
The NodePort ServiceType is useful when we want to make our Services accessible from the external world. The end-user connects to any worker node on the specified high-port, which proxies the request internally to the ClusterIP of the Service, then the request is forwarded to the applications running inside the cluster. To access multiple applications from the external world, administrators can configure a reverse proxy - an ingress, and define rules that target Services within the cluster.
With the LoadBalancer ServiceType:
- NodePort and ClusterIP are automatically created, and the external load balancer will route to them
- The Service is exposed at a static port on each worker node
- The Service is exposed externally using the underlying cloud provider's load balancer feature.
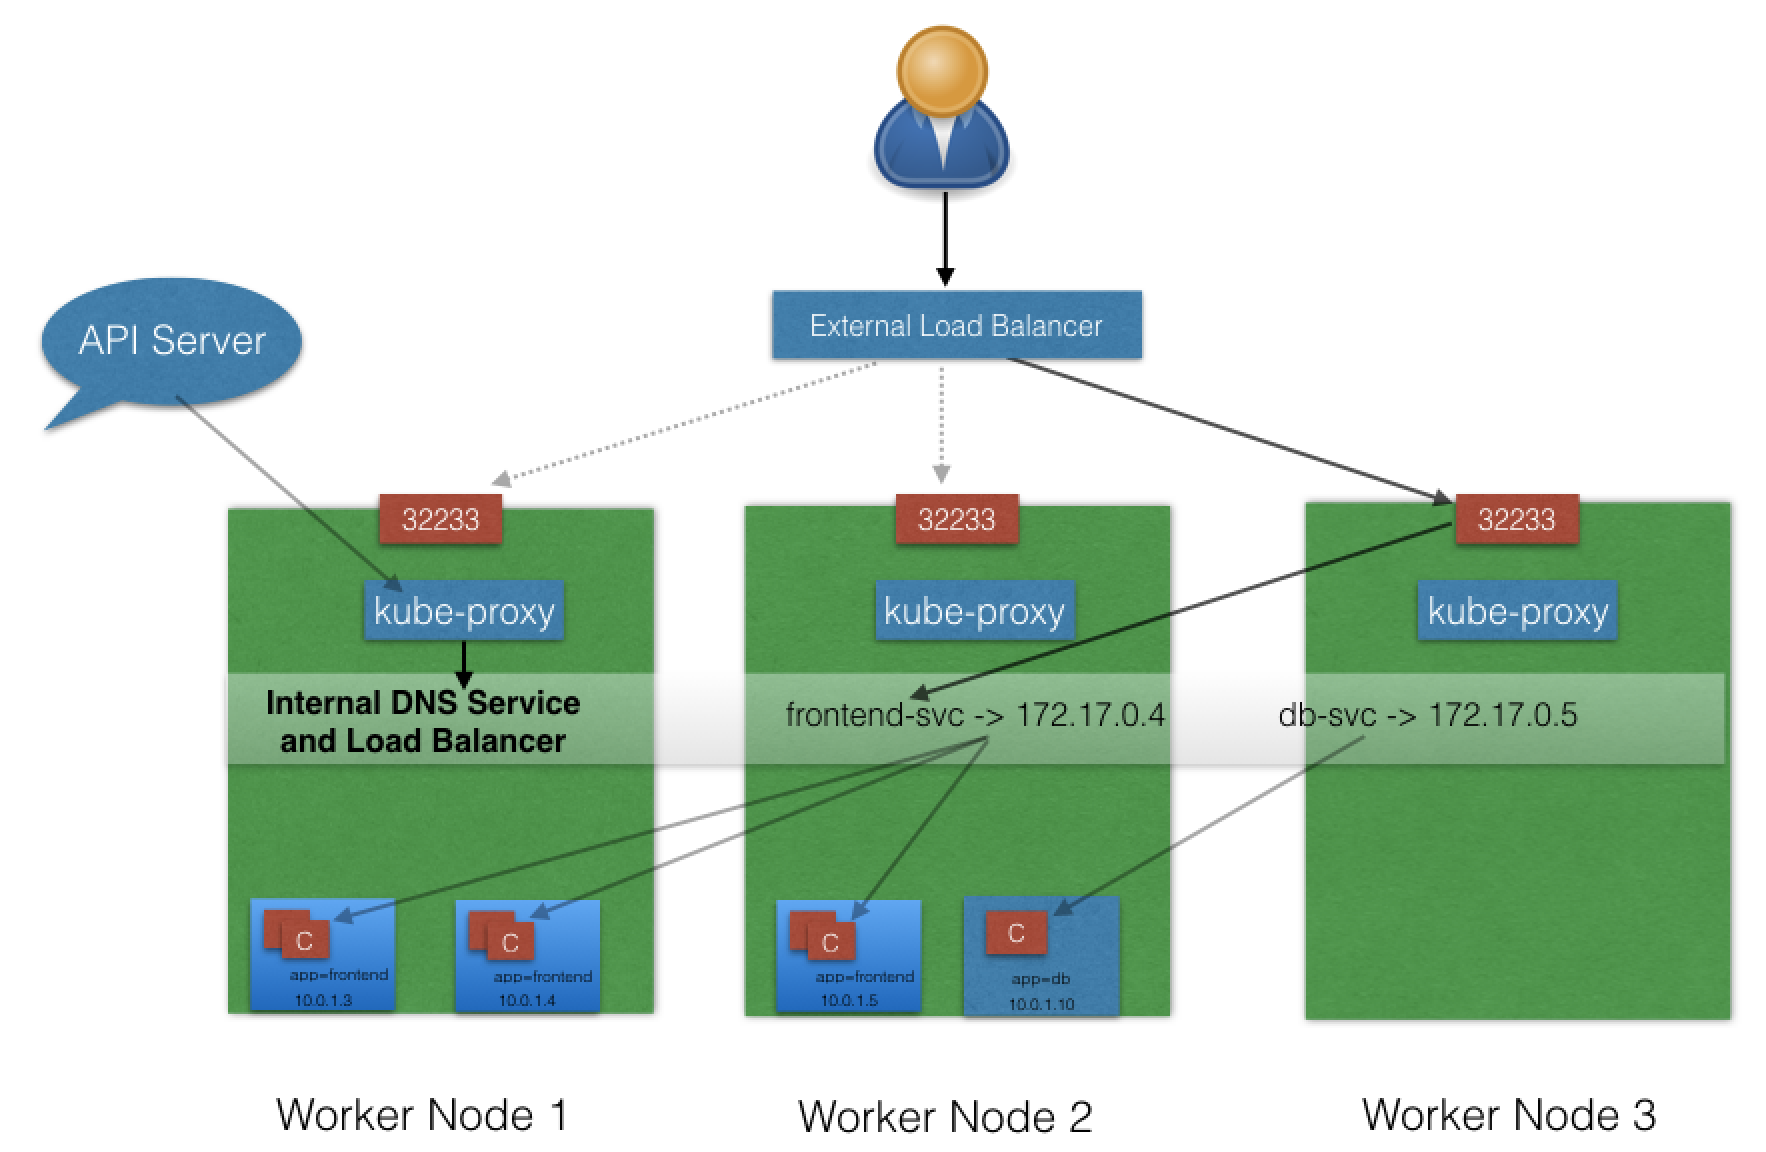
he LoadBalancer ServiceType will only work if the underlying infrastructure supports the automatic creation of Load Balancers and have the respective support in Kubernetes, as is the case with the Google Cloud Platform and AWS. If no such feature is configured, the LoadBalancer IP address field is not populated, and the Service will work the same way as a NodePort type Service.
A Service can be mapped to an ExternalIP address if it can route to one or more of the worker nodes. Traffic that is ingressed into the cluster with the ExternalIP (as destination IP) on the Service port, gets routed to one of the Service endpoints. This type of service requires an external cloud provider such as Google Cloud Platform or AWS.
xternalName is a special ServiceType, that has no Selectors and does not define any endpoints. When accessed within the cluster, it returns a CNAME record of an externally configured Service.
The primary use case of this ServiceType is to make externally configured Services like my-database.example.com available to applications inside the cluster. If the externally defined Service resides within the same Namespace, using just the name my-database would make it available to other applications and Services within that same Namespace.
As we know, containers running in Pods are ephemeral in nature. All data stored inside a container is deleted if the container crashes. However, the kubelet will restart it with a clean slate, which means that it will not have any of the old data.
To overcome this problem, Kubernetes uses Volumes. A Volume is essentially a directory backed by a storage medium. The storage medium, content and access mode are determined by the Volume Type.

In Kubernetes, a Volume is attached to a Pod and can be shared among the containers of that Pod. The Volume has the same life span as the Pod, and it outlives the containers of the Pod - this allows data to be preserved across container restarts.
A directory which is mounted inside a Pod is backed by the underlying Volume Type. A Volume Type decides the properties of the directory, like size, content, default access modes, etc. Some examples of Volume Types are:
- emptyDir An empty Volume is created for the Pod as soon as it is scheduled on the worker node. The Volume's life is tightly coupled with the Pod. If the Pod is terminated, the content of emptyDir is deleted forever.
- hostPath With the hostPath Volume Type, we can share a directory from the host to the Pod. If the Pod is terminated, the content of the Volume is still available on the host.
- gcePersistentDisk With the gcePersistentDisk Volume Type, we can mount a Google Compute Engine (GCE) persistent disk into a Pod.
- awsElasticBlockStore With the awsElasticBlockStore Volume Type, we can mount an AWS EBS Volume into a Pod.
- azureDisk With azureDisk we can mount a Microsoft Azure Data Disk into a Pod.
- azureFile With azureFile we can mount a Microsoft Azure File Volume into a Pod.
- cephfs With cephfs, an existing CephFS volume can be mounted into a Pod. When a Pod terminates, the volume is unmounted and the contents of the volume are preserved.
- nfs With nfs, we can mount an NFS share into a Pod.
- iscsi With iscsi, we can mount an iSCSI share into a Pod.
- secret With the secret Volume Type, we can pass sensitive information, such as passwords, to Pods.
- configMap With configMap objects, we can provide configuration data, or shell commands and arguments into a Pod.
- persistentVolumeClaim We can attach a PersistentVolume to a Pod using a persistentVolumeClaim. We will cover this in our next section.
You can learn more details about Volume Types in the Kubernetes documentation.
In a typical IT environment, storage is managed by the storage/system administrators. The end user will just receive instructions to use the storage but is not involved with the underlying storage management.
In the containerized world, we would like to follow similar rules, but it becomes challenging, given the many Volume Types we have seen earlier. Kubernetes resolves this problem with the PersistentVolume (PV) subsystem, which provides APIs for users and administrators to manage and consume persistent storage. To manage the Volume, it uses the PersistentVolume API resource type, and to consume it, it uses the PersistentVolumeClaim API resource type.
A Persistent Volume is a network-attached storage in the cluster, which is provisioned by the administrator.
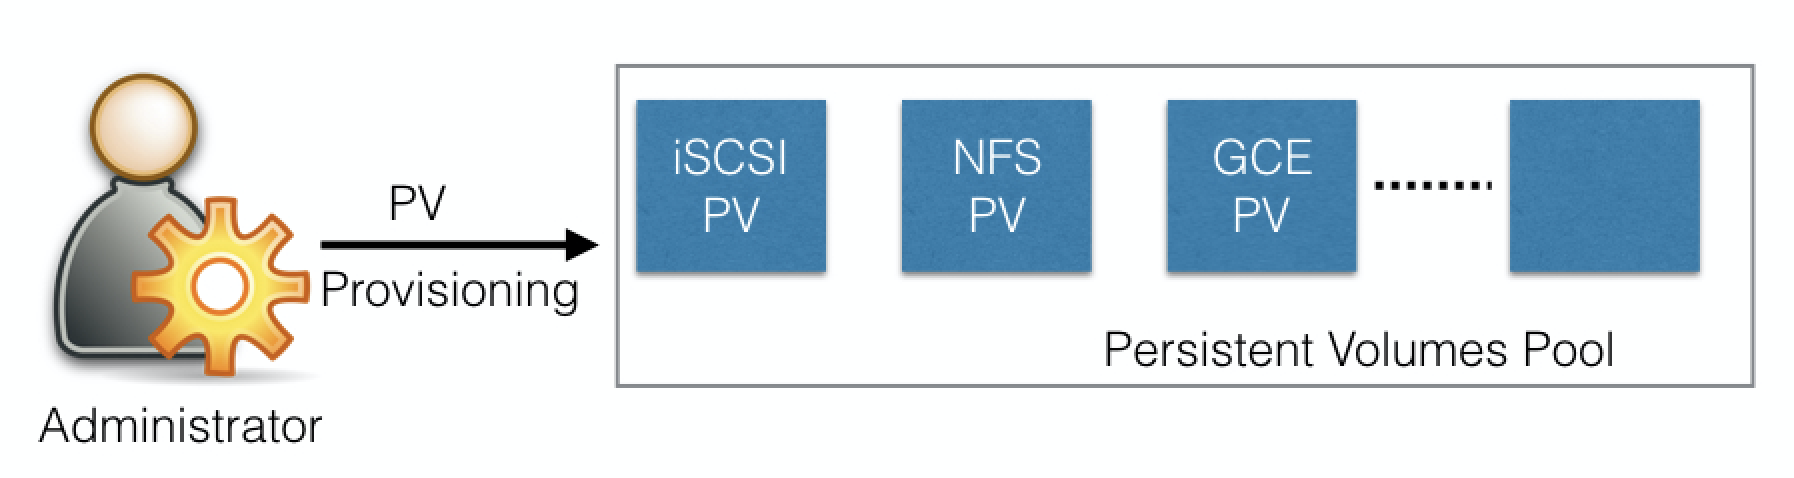
PersistentVolumes can be dynamically provisioned based on the StorageClass resource. A StorageClass contains pre-defined provisioners and parameters to create a PersistentVolume. Using PersistentVolumeClaims, a user sends the request for dynamic PV creation, which gets wired to the StorageClass resource.
Some of the Volume Types that support managing storage using PersistentVolumes are:
- GCEPersistentDisk
- AWSElasticBlockStore
- AzureFile
- AzureDisk
- CephFS
- NFS
- iSCSI.
For a complete list, as well as more details, you can check out the Kubernetes documentation.
A PersistentVolumeClaim (PVC) is a request for storage by a user. Users request for PersistentVolume resources based on type, access mode, and size. There are three access modes: ReadWriteOnce (read-write by a single node), ReadOnlyMany (read-only by many nodes), and ReadWriteMany (read-write by many nodes). Once a suitable PersistentVolume is found, it is bound to a PersistentVolumeClaim.
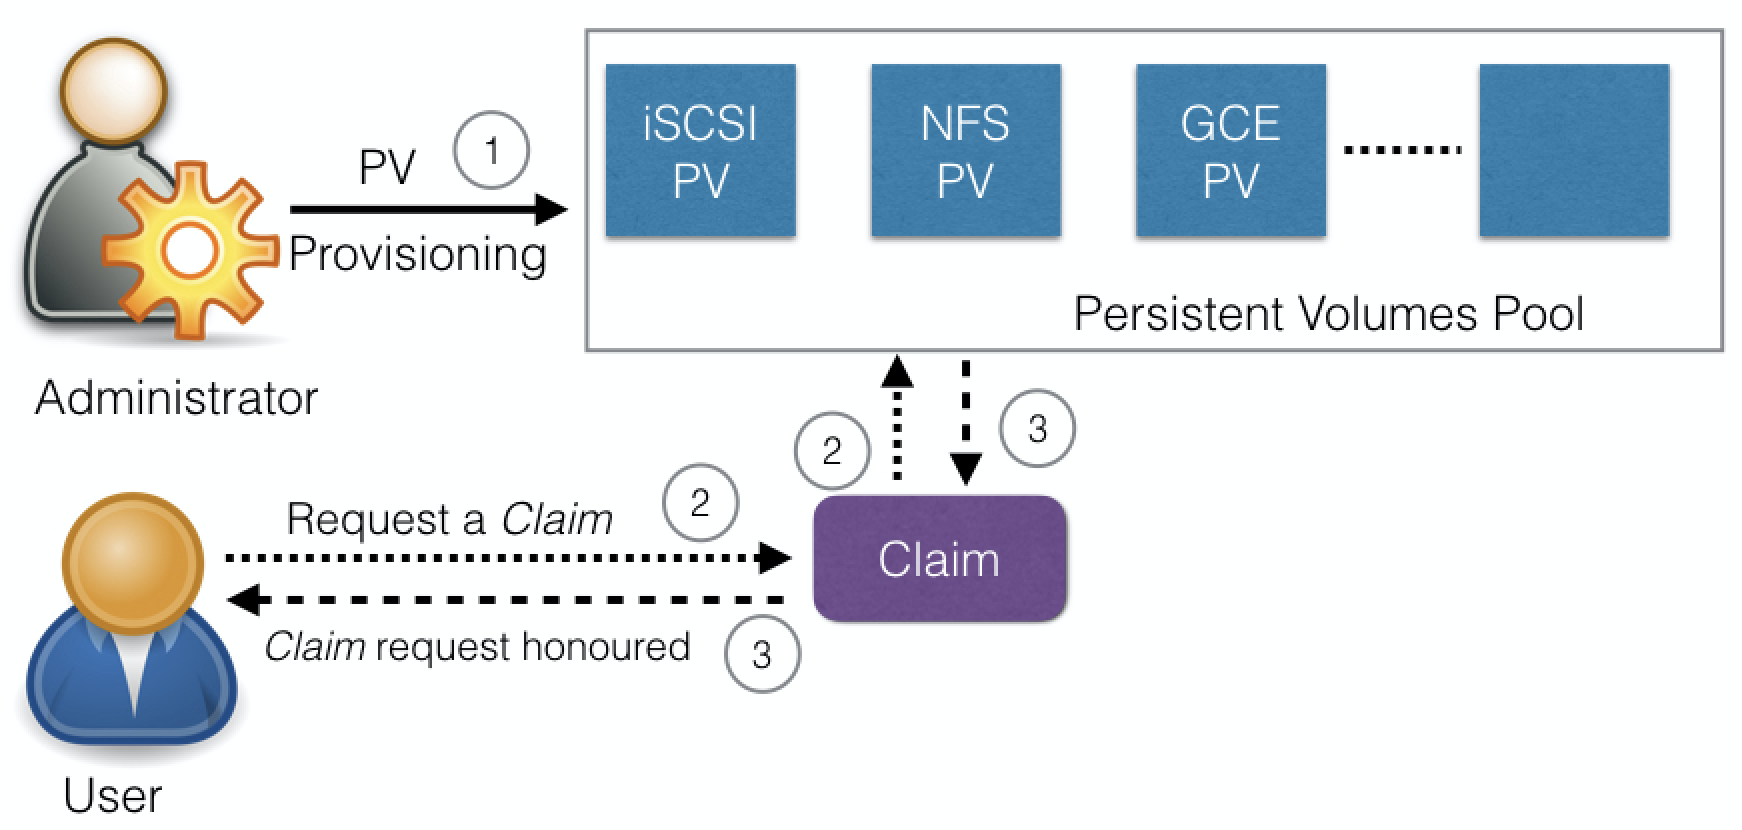
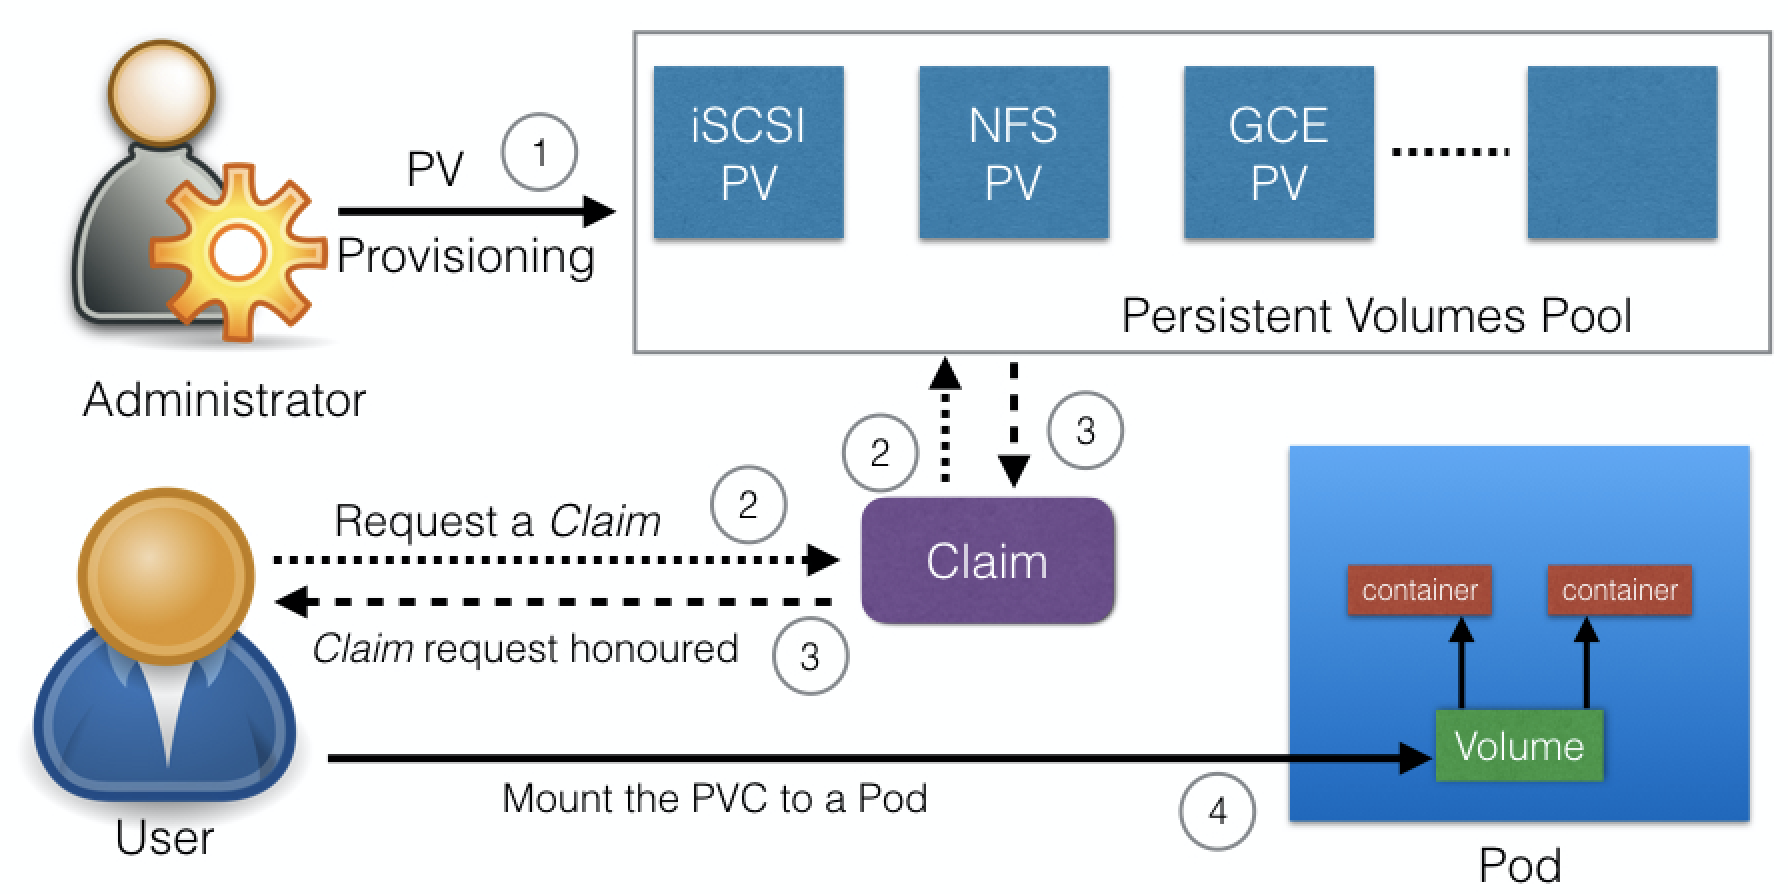
After a successful bound, the PersistentVolumeClaim resource can be used in a Pod.
Once a user finishes its work, the attached PersistentVolumes can be released. The underlying PersistentVolumes can then be reclaimed (for an admin to verify and/or aggregate data), deleted (both data and volume are deleted), or recycled for future usage (only data is deleted).
To learn more, you can check out the Kubernetes documentation.
Container orchestrators like Kubernetes, Mesos, Docker or Cloud Foundry used to have their own methods of managing external storage using Volumes. For storage vendors, it was challenging to manage different Volume plugins for different orchestrators. Storage vendors and community members from different orchestrators started working together to standardize the Volume interface; a volume plugin built using a standardized CSI designed to work on different container orchestrators. You can find CSI specifications here.
Between Kubernetes releases v1.9 and v1.13 CSI matured from alpha to stable support, which makes installing new CSI-compliant Volume plugins very easy. With CSI, third-party storage providers can develop solutions without the need to add them into the core Kubernetes codebase.
Although Kubernetes is described as a "container orchestration engine", it does not have the capability to directly handle containers. In order to run and manage a container's lifecycle, Kubernetes requires a container runtime on the node where a Pod and its containers are to be scheduled. Kubernetes supports many container runtimes:
- Docker - although a container platform which uses containerd as a container runtime, it is the most widely used container runtime with Kubernetes
- CRI-O - a lightweight container runtime for Kubernetes, it also supports Docker image registries
- containerd - a simple and portable container runtime providing robustness
- rkt - a pod-native container engine, it also runs Docker images
- rktlet - a Kubernetes Container Runtime Interface (CRI) implementation using rkt.
## kubelet The kubelet is an agent running on each node and communicates with the control plane components from the master node. It receives Pod definitions, primarily from the API server, and interacts with the container runtime on the node to run containers associated with the Pod. It also monitors the health of the Pod's running containers.
The kube-proxy is the network agent which runs on each node responsible for dynamic updates and maintenance of all networking rules on the node. It abstracts the details of Pods networking and forwards connection requests to Pods.
Addons are cluster features and functionality not yet available in Kubernetes, therefore implemented through 3rd-party pods and services.
- DNS - cluster DNS is a DNS server required to assign DNS records to Kubernetes objects and resources
- Dashboard - a general purposed web-based user interface for cluster management
- Monitoring - collects cluster-level container metrics and saves them to a central data store
- Logging - collects cluster-level container logs and saves them to a central log store for analysis.