There's self-hosted product analytics, and then there's self-hosted product analytics - in your basement.
A few months ago we moved house. The new place came with a big, moldless basement, which was in a perfect central location for all the routers, switches, IoT hubs and other necessities of a modern household.
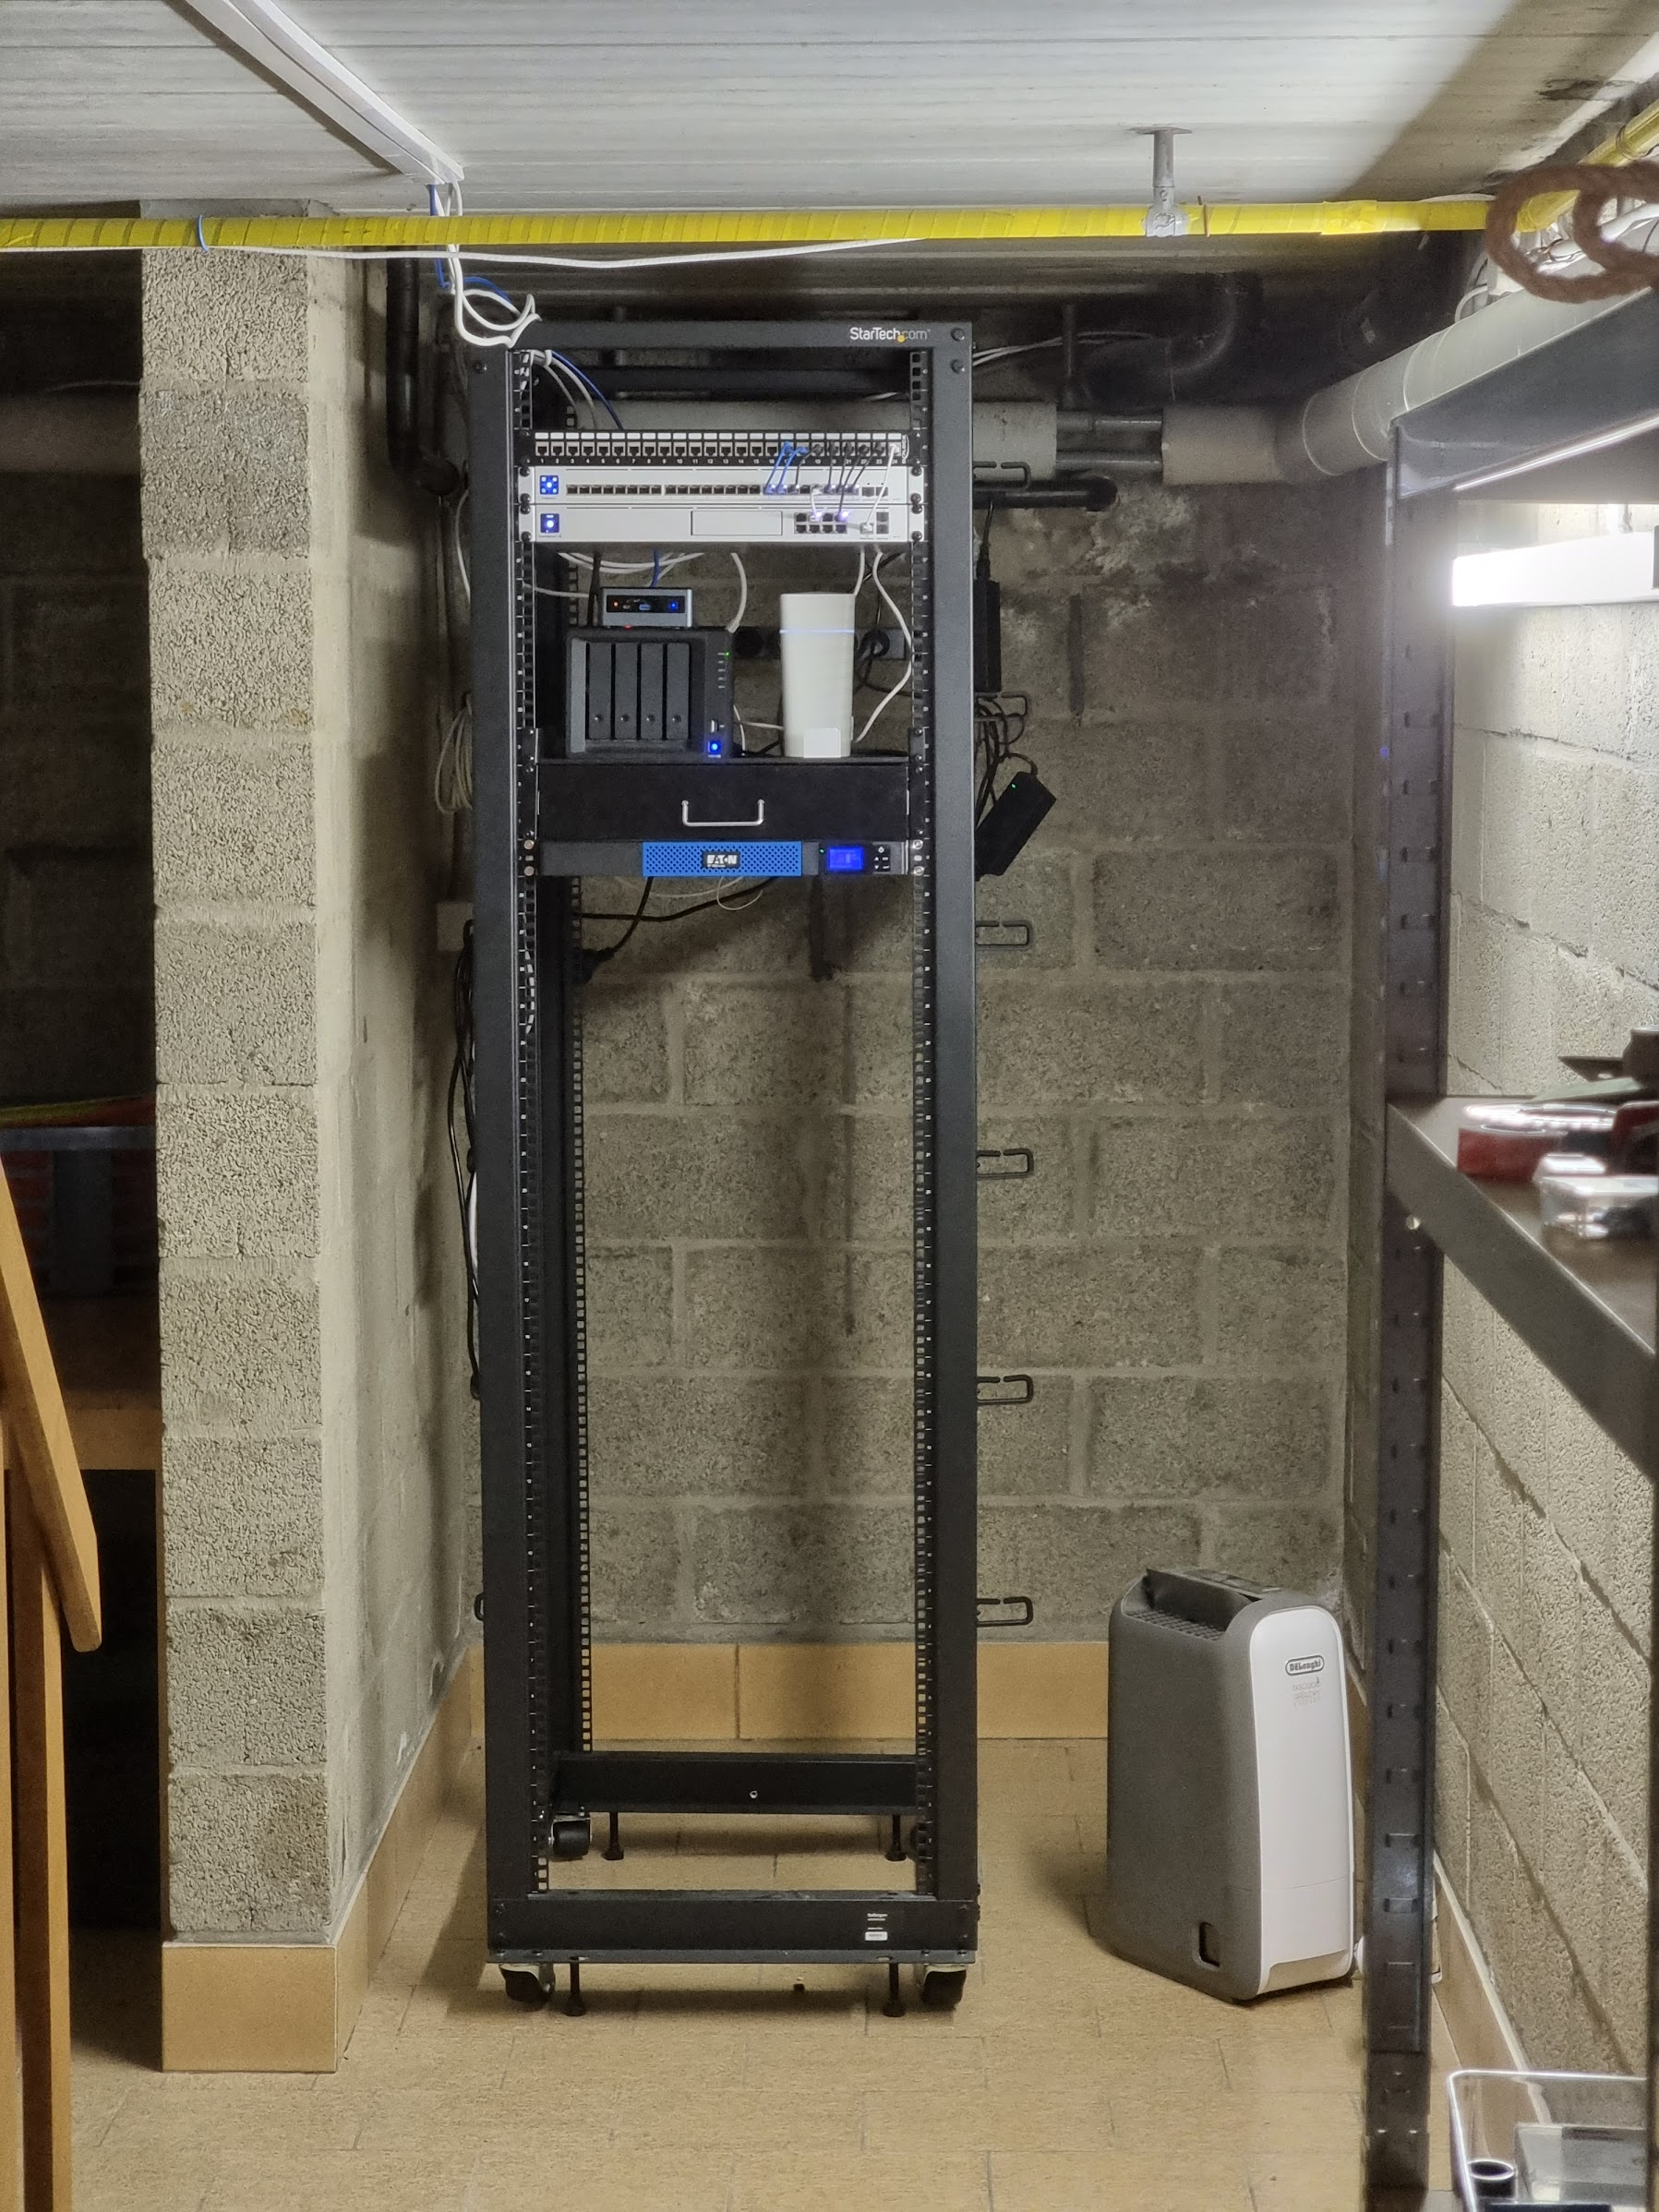
Naturally, I bought a full width matt black 42U server rack to go with the decor.
It now hosts a modem, a router, a switch, a Synology NAS, and a NUC. Plus a shelf, a drawer, a patch panel, and a lithium UPS.
Oh, and it's also running a copy of PostHog, which is exposed to the world through a Cloudflare tunnel.
Before we begin, heed this warning: Follow along if your goal is to Learn about infrastracture, and to tinker in your homelab. Turn back now if you're thinking of using this for any business critical workloads.
This ain't your granddad's LAMP stack. Setting up and maintaining a Kubernetes cluster with something as complex as PostHog can be ridiculously time consuming, with a likely chance of data loss, if you just YOLO it. To truly understand a system like this, you need to spend hours pondering "why is this LoadBalancer not exposing an IP", "why doesn't Kafka boot up" or "I wiped Zookeeper's volume, was that a bad idea?". If that sounds like fun to you, then jump right in!
If you're like most people, and prefer things that just work, give PostHog Cloud (or Cloud EU) a try. Your data is yours, and you can always move it out.
With that out of the way, lets talk about hardware!
The NUC10i7FNH is the star of the show. With a 6-core Intel Core i7-10710U @ 1.10GHz, boostable up to 4.7 GHz, you theoretically get half the compute of a 10-core M1 Pro in this little package.
I maxxed it out with 64GB of RAM (why not), added a terabyte of NVMe SSD, and said sweet goodbyes to a well earned kiloeur (1000€).
For the same price, you could get 4-6 months of comparable DigialOcean droplets, a year of Hetzner cloud, or a kick in the butt from AWS.
It's inevitable that used M1 Mac Minis with Asahi Linux will be the default choice for efficient homelabs, but we're not there yet. Other efficient ARM based systems usually lack NVMe storage, come with just a few GB of RAM, and are generally really slow. That means, an Intel NUC is still the best option for an efficient little home server. For now.
In the past, I would have used a bootable USB stick, installed my favourite Debian deriviate, and apt-get'ed my way to a running copy of XMB2 under /var/www.
You know, system administration.
Those days are gone. Now to be employable, you must alias ssh to sl, and deploy your infrastructure as code.
It all starts with choosing a hypervisor. It's technically just a dodgy Linux distro with an app on top... but admit it, "let me restart the hypervisor" just sounds cool to say.
A hypervisor, also known as a virtual machine monitor or VMM, is software that creates and runs virtual machines (VMs).
At first, I thought commercial software is better, and installed the Free Vmware ESXi. But it's not. I learned of all the ways they've crippled their free tier (limits on CPU cores per VM, limits on incremental backups, etc). The paid plan at $500/year was ridiculous, so Proxmox it had to be.
Installing Proxmox was quite straightforward. Hook your NUC up to a screen and a keyboard, google for the latest installation instructions and do as you're told.
Don't forget to set a static IP, either within Proxmox, or in your router. Protip: tell your router to use a 10.[$rnd](https://www.random.org/integers/?num=1&min=1&max=99&col=5&base=10&format=html&rnd=new).0.0/16 address range (note the /16 subnet) for maximum lazyness.
To test things out, I set up a few VMs, including a pi-hole... and all looked good.
However that's still system administration, and not DevOps, so let's try that again.
Since everyone at work uses terraform, and they can't all be wrong, I decided to give it a go.
Terraform is an open-source infrastructure as code software tool that enables you to safely and predictably create, change, and improve infrastructure.
You set up a few *.cf files, run terraform apply, and watch it build, destory and/or reconfigure any VM in its path.
Getting it working with Proxmox takes a few extra steps.
Here's another pro tip: create a new private Github repository, call it homelab, and use it to store all the scripts from below.
In this repo, also create a docs folder. This is where you'll store all the commands you run, in code blocks within markdown files.
Do yourself a favour and keep a record of all of this. Sometimes, you run into a situation where you need to start again from scratch, even if a year from now. You'll thank yourself if you kept notes.
First we need a Proxmox VM template with cloud-init. Log in to Proxmox, click "datacenter" -> "pve" -> "shell", and run the following:
# Inspierd by https://austinsnerdythings.com/2021/08/30/how-to-create-a-proxmox-ubuntu-cloud-init-image/

# download the ubuntu cloud image
wget https://cloud-images.ubuntu.com/jammy/current/jammy-server-cloudimg-amd64.img

# install qemu-guest-agent inside this ".img" file
apt install libguestfs-tools -y
virt-customize -a jammy-server-cloudimg-amd64.img --install qemu-guest-agent

# create a new VM from this image
qm create 9000 --name "ubuntu-2204-cloudinit-template" --memory 2048 --cores 2 --net0 virtio,bridge=vmbr0
qm importdisk 9000 jammy-server-cloudimg-amd64.img local-zfs
qm set 9000 --scsihw virtio-scsi-pci --scsi0 local-zfs:vm-9000-disk-0
qm set 9000 --boot c --bootdisk scsi0
qm set 9000 --ide2 local-zfs:cloudinit
qm set 9000 --serial0 socket --vga serial0
qm set 9000 --agent enabled=1

# convert the VM to a template
qm template 9000
You should now have a template node with the name ubuntu-2204-cloudinit-template in proxmox.
For Terraform to modify Proxmox VMs, you need to give it access.
First, create a new API token in Proxmox. Click "datacenter" -> "permissions" -> "API tokens", and fill in the form.
Yake note of the secret value, as you'll need it in a moment.
Locally, install terraform with brew install terraform or the equivalent command for your OS.
Create a new folder terraform in your homelab repo, and place in it these files:
terraform/.gitignore
credentials.auto.tfvars
*.tfstate
*.tfstate.backup
terraform/authorized_keys- place here your SSH key from~/.ssh/id_rsa.pub. Usessh-keygenif you don't have a key. It should look something like this:
ssh-rsa AAA..SKIPLONGWALLOFTEXT..npt5tx marius@MinuArvuti
terraform/vars.tf- defaults to various vars
variable "authorized_keys_file" {
    default = "authorized_keys"
}
variable "proxmox_host" {
    default = "pve"
}
variable "template_name" {
    default = "ubuntu-2204-cloudinit-template"
}
variable "ci_user" {
    default = "ubuntu"
}
credentials.auto.ftvars- tasty secrets. DO NOT commit this to github. Instead, store in your password manager.
proxmox_api_url = "https://10.4.0.10:8006/api2/json"
proxmox_api_secret = "COPY_SECRET_FROM_PREVIOUS_STEP"
proxmox_api_token_id = "root@pam!terraform"
terraform/provider.tf- this sets up the connection between Terraform and Proxmox. Feel free to update the connector's version number when this guide goes out of date.
terraform {
    required_version = ">= 0.13.0"

    required_providers {
      proxmox = {
        source = "telmate/proxmox"
        version = "2.9.11"
      }
    }
}
variable "proxmox_api_url" {
    type = string
}
variable "proxmox_api_token_id" {
    type = string
}
variable "proxmox_api_secret" {
    type = string
}

provider "proxmox" {
  pm_api_url = var.proxmox_api_url
  pm_api_token_id = var.proxmox_api_token_id
  pm_api_token_secret = var.proxmox_api_secret

  pm_debug = true
  pm_tls_insecure = true
}terraform/kube.tf- finally, this is the script that builds the kubernetes host VMs
resource "proxmox_vm_qemu" "kube-server" {
  count = 1
  name = "kube-server-0${count.index + 1}"
  target_node = var.proxmox_host
  vmid = "80${count.index + 1}"
  clone = var.template_name
  agent = 1
  os_type = "cloud-init"
  cores = 8
  sockets = 1
  cpu = "host"
  memory = 8192
  scsihw = "virtio-scsi-pci"
  bootdisk = "scsi0"
  disk {
    slot = 0
    size = "10G"
    type = "scsi"
    storage = "local-zfs"
    iothread = 1
  }
  network {
    model = "virtio"
    bridge = "vmbr0"
  }
  lifecycle {
    ignore_changes = [
      network,
    ]
  }
  ipconfig0 = "ip=10.4.80.${count.index + 1}/16,gw=10.4.0.1"
  sshkeys = file(var.authorized_keys_file)
  ciuser = var.ci_user
}
resource "proxmox_vm_qemu" "kube-agent" {
  count = 2
  name = "kube-agent-0${count.index + 1}"
  target_node = var.proxmox_host
  vmid = "81${count.index + 1}"
  clone = var.template_name
  agent = 1
  os_type = "cloud-init"
  cores = 8
  sockets = 1
  cpu = "host"
  memory = 8192
  scsihw = "virtio-scsi-pci"
  bootdisk = "scsi0"
  disk {
    slot = 0
    size = "10G"
    type = "scsi"
    storage = "local-zfs"
    iothread = 1
  }
  network {
    model = "virtio"
    bridge = "vmbr0"
  }
  lifecycle {
    ignore_changes = [
      network,
    ]
  }
  ipconfig0 = "ip=10.4.81.${count.index + 1}/16,gw=10.4.0.1"
  sshkeys = file(var.authorized_keys_file)
  ciuser = var.ci_user
}
Copy the script, change the network, RAM and CPU settings as you'd like, and then run terraform apply to transform your infrastructure.
You can run a separate terraform plan step to just see the changes, but apply anyway asks for a "yes" to continue, so 🤷.
Protip: terraform fails, and won't say why, run this:
export TF_LOG=TRACE
terraform apply
export TF_LOG=ERROR
Turning on TRACE logs yields a lot of output, including the real error somewhere in the noise.
I ran into a problem where I had a differently defined disk in the VM template, and in Terraform. This caused Terraform to add an extra disk, and not boot the VM. Another problem I had was with some weirdly configured boot order.
When everything finally works, and you can terraform VMs like a boss, it'll all have been worth it.
Terraform can make sure you have a fresh Ubuntu VM, but it won't install software on it. The tool for that job is ansible.
Install it like you would anything else: brew install ansible, or whatever is the equivalent for your OS.
Ansible works by running playbooks. Each playbook cotains a bunch of steps, which can do something (install cowsay) or skip (already installed, moo).
We want to use ansible to set up kubernetes on the new nodes.
There are two options: k8s aka "big daddy" and k3s aka "wait, SUSE is still a thing? not bad!".
In this case, I'm going to go with k3s. I tried both, and the setup with k3s is just so much simpler. It takes care of a lot of the plumbing for you (networking), has half the memory, and does virtually the same stuff. What's not to like?
Create a new ansible folder, and follow these steps:
- Clone the
k3sansible repo:
cd ansible
git clone https://github.com/k3s-io/k3s-ansible
You should now have a folder ansible/k3s-ansible
- Create
ansible/hosts.ini(like in the guide here)
[master]
10.4.80.1

[node]
10.4.81.1
10.4.81.2

[k3s_cluster:children]
master
node- Create
ansible/group_vars/all.yml(copied from here)
---
k3s_version: v1.25.3+k3s1
ansible_user: ubuntu
systemd_dir: /etc/systemd/system
master_ip: "{{ hostvars[groups['master'][0]]['ansible_host'] | default(groups['master'][0]) }}"
extra_agent_args: ""- Run the playbook:
cd ansible
ansible-playbook -i hosts.ini k3s-ansible/site.yml- Copy the k3s server's kube config, to allow local access:
scp ubuntu@10.4.80.1:~/.kube/config ~/.kube/configNow, when you run kubectl get pod -A, you should actually be talking to the server.
Please note: This last step is not a clean approach, and only do it if you have no other k8s servers you're talking to.
TODO: add a better step?
To monitor your cluster, I recommend running k9s. It's so much nicer than running kubectl in the console. You could also install it in the kube server directly, and control your ship from there.
Now things are going to get interesting!
In the olden days, you'd ask your ISP to grant you a static IP, or run a service like dyndns... ooh, that's owned by Oracle now, abort!
Weirdly, most production websites I know of don't do that. They put Cloudflare in front of their site. Why would I expose my home IP to the internet, and fear a random $5 "DDoS testing service" taking down my YouTube evening, if I could use Cloudflare Tunnels instead?
CloudFlare Tunnels is a neat free service. You run a little "backdoor" inside your server, that then routes all traffic to and from the internet.
The catch? You need to host a domain's DNS with Cloudflare. Get a free one from the Central African Republic or Tokelau, transfer the DNS to Cloudflare, and you're good to go.
-
The first steps is the same as always:
brew install cloudflared -
Then run the following commands locally to set up a new domain.
some.example.domainin my case:
# authorize for your domain when prompted
cloudflared tunnel login

# create a new tunnel
cloudflared tunnel create homelab-k8s

# replace with .json file from last step
kubectl create namespace posthog
kubectl -n posthog create secret generic tunnel-credentials --from-file=credentials.json=/Users/marius/.cloudflared/33889175-2343-427b-8056-123456123453.json

# route the domain
cloudflared tunnel route dns homelab-k8s some.example.domain- Create the file
k8s/cloudflared.yaml(from Cloudflare's k8s guide and its example file)
---
apiVersion: apps/v1
kind: Deployment
metadata:
  name: cloudflared
spec:
  selector:
    matchLabels:
      app: cloudflared
  replicas: 2 # You could also consider elastic scaling for this deployment
  template:
    metadata:
      labels:
        app: cloudflared
    spec:
      containers:
      - name: cloudflared
        image: cloudflare/cloudflared:latest
        args:
        - tunnel
        # Points cloudflared to the config file, which configures what
        # cloudflared will actually do. This file is created by a ConfigMap
        # below.
        - --config
        - /etc/cloudflared/config/config.yaml
        - run
        livenessProbe:
          httpGet:
            # Cloudflared has a /ready endpoint which returns 200 if and only if
            # it has an active connection to the edge.
            path: /ready
            port: 2000
          failureThreshold: 1
          initialDelaySeconds: 10
          periodSeconds: 10
        volumeMounts:
        - name: config
          mountPath: /etc/cloudflared/config
          readOnly: true
        # Each tunnel has an associated "credentials file" which authorizes machines
        # to run the tunnel. cloudflared will read this file from its local filesystem,
        # and it'll be stored in a k8s secret.
        - name: creds
          mountPath: /etc/cloudflared/creds
          readOnly: true
      volumes:
      - name: creds
        secret:
          # By default, the credentials file will be created under ~/.cloudflared/<tunnel ID>.json
          # when you run `cloudflared tunnel create`. You can move it into a secret by using:
          # ```sh
          # kubectl create secret generic tunnel-credentials \
          # --from-file=credentials.json=/Users/yourusername/.cloudflared/<tunnel ID>.json
          # ```
          secretName: tunnel-credentials
      # Create a config.yaml file from the ConfigMap below.
      - name: config
        configMap:
          name: cloudflared
          items:
          - key: config.yaml
            path: config.yaml
---
# This ConfigMap is just a way to define the cloudflared config.yaml file in k8s.
# It's useful to define it in k8s, rather than as a stand-alone .yaml file, because
# this lets you use various k8s templating solutions (e.g. Helm charts) to
# parameterize your config, instead of just using string literals.
apiVersion: v1
kind: ConfigMap
metadata:
  name: cloudflared
data:
  config.yaml: |
    # Name of the tunnel you want to run
    tunnel: homelab-k8s
    credentials-file: /etc/cloudflared/creds/credentials.json
    # Serves the metrics server under /metrics and the readiness server under /ready
    metrics: 0.0.0.0:2000
    # Autoupdates applied in a k8s pod will be lost when the pod is removed or restarted, so
    # autoupdate doesn't make sense in Kubernetes. However, outside of Kubernetes, we strongly
    # recommend using autoupdate.
    no-autoupdate: true
    # The `ingress` block tells cloudflared which local service to route incoming
    # requests to. For more about ingress rules, see
    # https://developers.cloudflare.com/cloudflare-one/connections/connect-apps/configuration/ingress
    #
    # Remember, these rules route traffic from cloudflared to a local service. To route traffic
    # from the internet to cloudflared, run `cloudflared tunnel route dns <tunnel> <hostname>`.
    # E.g. `cloudflared tunnel route dns homelab-k8s tunnel.example.com`.
    ingress:
    - hostname: demo.example.domain
      service: hello_world
    - hostname: posthog.example.domain
      service: http://posthog-ingress-nginx-controller:80
    - hostname: grafana.example.domain
      service: http://posthog-grafana:80
    # This rule matches any traffic which didn't match a previous rule, and responds with HTTP 404.
    - service: http_status:404
Configure the domains at the end of the script to match the names of the services.
- Finally, launch the tunnel
cd k8s
kubectl -n posthog apply -f cloudflared.yaml
Please note that we're launching the tunnel in the posthog k8s namespace. This is because we'll also run the rest of PostHog here.
Load your equivalent of https://demo.example.domain and see a sweet welcome page.
In case you need to add another host to the tunnel, you need yo update the yml file, and restart the deployment:
# route the domain
cloudflared tunnel route dns homelab-k8s phpbb.example.domain

# restart cloudflared
kubectl -n posthog apply -f cloudflared.yaml
kubectl -n posthog rollout restart deployment cloudflaredWe're finally, finally, finally, at a point where we can set up PostHog. Just one more tool: helm.
The setup tharts the same way: brew install helm
The steps below are adapted from PostHog's self hosting guide. Please check there if something blows up.
- Add the PostHog repo to helm:
helm repo add posthog https://posthog.github.io/charts-clickhouse/
helm repo update- Create a file
posthog/values.yamlwith the following:
cloud: other
siteUrl: https://posthog.example.domain/
ingress:
    hostname: posthog.example.domain
    nginx:
        enabled: true
cert-manager:
    enabled: true
clickhouse:
    enabled: true
minio:
    enabled: true
grafana:
    enabled: true
prometheus:
    enabled: true
loki:
    enabled: true
promtail:
enabled: true- Upgrade/install the chart:
cd posthog
helm upgrade --install -f values.yaml --timeout 30m --create-namespace --namespace posthog posthog posthog/posthog --wait --wait-for-jobs --debug
Then watch the k9s output for a good 30 minutes, until all the pods have launched.
Helm's own output won't be that useful, as it'll endlessly repeat
ready.go:258: [debug] Service does not have load balancer ingress IP address: posthog/posthog-ingress-nginx-controller
ready.go:258: [debug] Service does not have load balancer ingress IP address: posthog/posthog-ingress-nginx-controller
ready.go:258: [debug] Service does not have load balancer ingress IP address: posthog/posthog-ingress-nginx-controller
until it fails. PostHog will be running though, so I consider that a win.
TODO: tell the load balancer we don't need it
When all is done, open https://posthog.example.domain/, and feel immense pride in what you have just accomplished.
This guide above only scratches the surface of what you can do with a self hosted PostHog. Read the rest of the docs here, configure monitoring on all your services, set up alerts and backups, and make sure you never run out of disk space.
Then set up a few input and output sources, and enjoy the show!
Or just sign up for PostHog Cloud, if you don't want to hear your partner ask "are you terraforming again?", every time you vanish for 30 minutes when a minor kubernetes version upgrade throws another kurveball.
does it work on a 1GB RAM? 🚀