Last updated: 1 May 2024
Note: Replace all following instances of
<project-name>with the name of your current project
Reference: https://developer.mozilla.org/en-US/docs/Learn/Server-side/Express_Nodejs/skeleton_website#using_the_application_generator
Reference: https://expressjs.com/en/starter/generator.html
cdinto the appropriate parent directory and enter the following command:- If you want to create an app with a view engine (replace
<engine>with your choice of view engine, such as pug, ejs, hbs, etc):express <project-name> --view=<engine> --git - If you want to create an app with no view engine:
express <project-name> --no-view --git
- If you want to create an app with a view engine (replace
- The generator will create (and list) the project's files, then provide instructions on how to install the dependencies (as listed in the
package.jsonfile) and how to run the application on different operating systems. - Open a new workspace in VSCode for the new repo and install the dependencies (the install command will fetch all the dependency packages listed in the project's package.json file):
code <project-name> npm install - The following (very scary) message will appear:
added 54 packages, and audited 55 packages in 4s 4 vulnerabilities (3 high, 1 critical) To address all issues (including breaking changes), run: npm audit fix --force Run `npm audit` for details. - Simply install the latest versions of Express and EJS (if relevant) to fix these vulnerabilities:
npm install express@latest
npm install ejs@latest
- Replace all instances of
varwithconstin the following files:bin/www,app.js, androutes/index.js - Replace all callback functions with arrow functions in the following files:
app.jsandroutes/index.js - Delete the lines
const usersRouter = require('./routes/users');andapp.use('/users', usersRouter);inapp.js, and remove theroutes/users.jsfile:rm routes/users.js
- To run the app on MacOS or Linux:
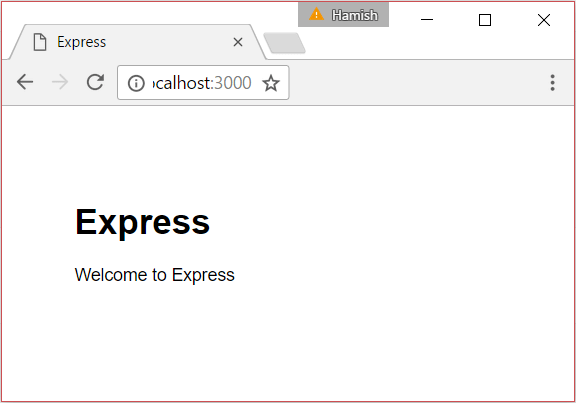
DEBUG=<project-name>:* npm start - Load http://localhost:3000/ in your browser to access the app. You should see a browser page that looks like this:
- Install nodemon as a developer dependency in the root directory with the following command:
npm install --save-dev nodemon - Update the
"scripts"section of yourpackage.jsonto the following:"scripts": { "start": "node ./bin/www", "devstart": "nodemon ./bin/www", "serverstart": "DEBUG=<project-name>:* npm run devstart" },
Note: Now if you edit any file in the project the server will restart (or you can restart it by typing
rson the command prompt at any time). You will still need to reload the browser to refresh the page.
Reference: https://gist.github.com/ManonLef/2d3de90cbbdf9db563cbc786c21ae1cc
Reference: https://medium.com/@kiran.jasvanee/prettier-auto-formatting-in-visual-studio-code-beab1c026b13
npm install --save-dev --save-exact prettierecho -e "{\n \"singleQuote\": true\n}"> .prettierrc.jsonto create a.prettierrc.jsonfile (needed to recognize this repo uses prettier). When opened, it should look like the following:{ "singleQuote": true }cp .gitignore .prettierignoreto create a.prettierignorefile with the contents from.gitignore(or compose otherwise as needed)- (Be sure Prettier VSCode extension is installed)
- If not already set up in global settings, create a
settings.jsonfile within the workspace.vscodedirectory and add the following in order to format on save:Or open workspace settings wih VSCode command palette, go to "Workspace" tab, select "Text Editor" dropdown, select "Formatting", check "Format on Save"{ "editor.formatOnSave": true }
Reference: https://eslint.org/docs/latest/use/getting-started
Reference: https://www.digitalocean.com/community/tutorials/linting-and-formatting-with-eslint-in-vs-code
npm init @eslint/configto initialize ESLint and create config file- Configure the resulting
.eslintrc.*file via the prompts - Install the ESLint VSCode extension if you haven't already
- Customize the
.eslintrc.*"rules"object. For example:"rules": { "consistent-return": "off", "func-names": "off", "import/newline-after-import": "off", "import/order": "off", "no-console": "off", "no-else-return": ["error", { "allowElseIf": true }], "no-param-reassign": ["error", { "props": false }], "no-plusplus": "off", "no-underscore-dangle": "off", "no-unused-expressions": ["error", { "allowTernary": true }], "no-unused-vars": ["error", { "args": "none" }], "no-use-before-define": ["error", { "functions": false, "classes": false }], "prefer-template": "off" }
- Add the following to the the second line of of
./bin/www, just below#!/usr/bin/env node, to surpress some ESLint rules:/* eslint-disable no-restricted-globals */ /* eslint-disable no-shadow */
npm install --save-dev eslint-config-prettierto make ESLint and Prettier work together without conflict- Add
"prettier"to the end of the"extends"array in your.eslintrc.*file. For example:"extends": ["airbnb-base", "prettier"],
npx eslint-config-prettier path/to/main.jsto see if there are conflicts (replacepath/to/main.jswith your main.js file path)
- Create a new repo on Github website
- Copy the repo SSH string (looks something like:
git@github.com:<username>/<project-name>.git) - Follow the instructions to create a new repository on the command line:
git init
git add .
git commit -m "First commit"
git branch -M main
git remote add origin git@github.com:<username>/<project-name>.git
git push -u origin main
WARNING: The steps to set up a MongoDB database have recently changed somewhat, but the concept is largely the same. You should be able to get through it with the help of the following old instructions, but do not expect to be able to follow them to a tee.
- Go to the MongoDB homepage and log in
- Click on the projects dropdown in the upper-left corner, then + New Project to create a new project
- Name your project, add tags if desired, and select Next
- Configure members and permissions, then click Create Project
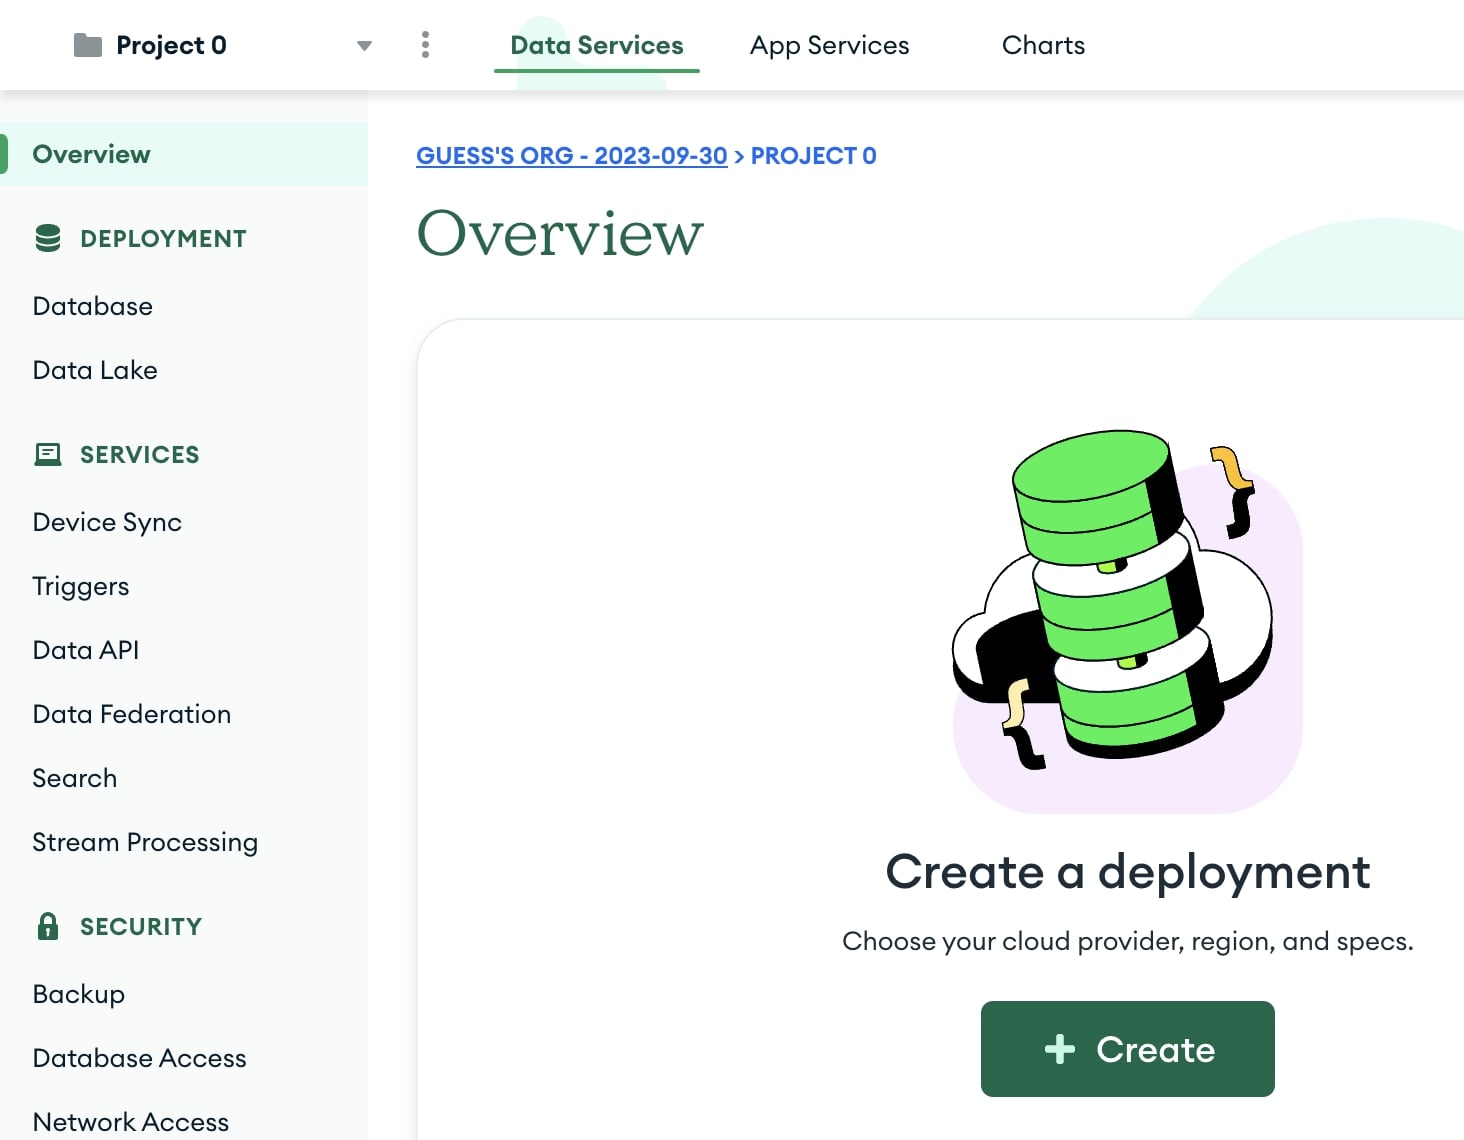
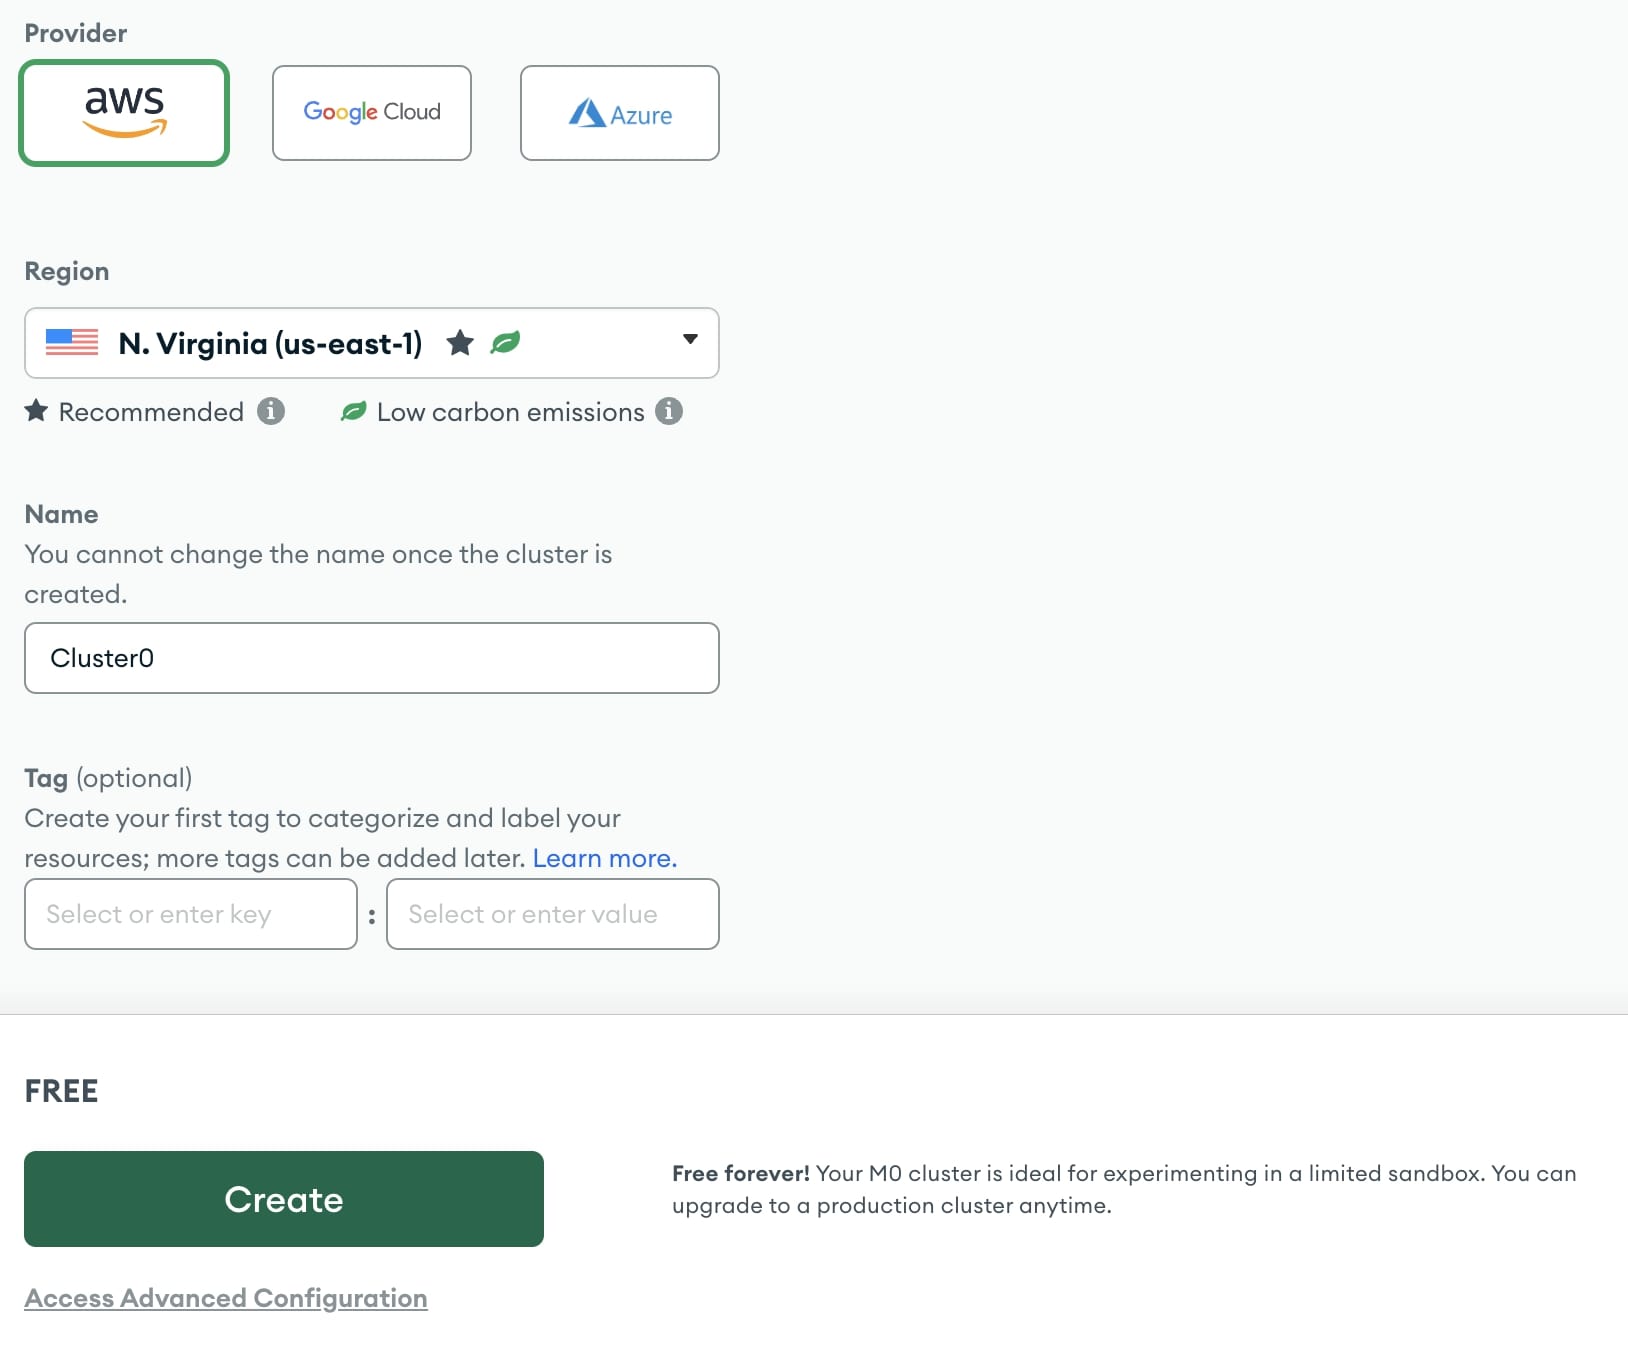
- Click the + Create button in the Overview section to create a new deployment
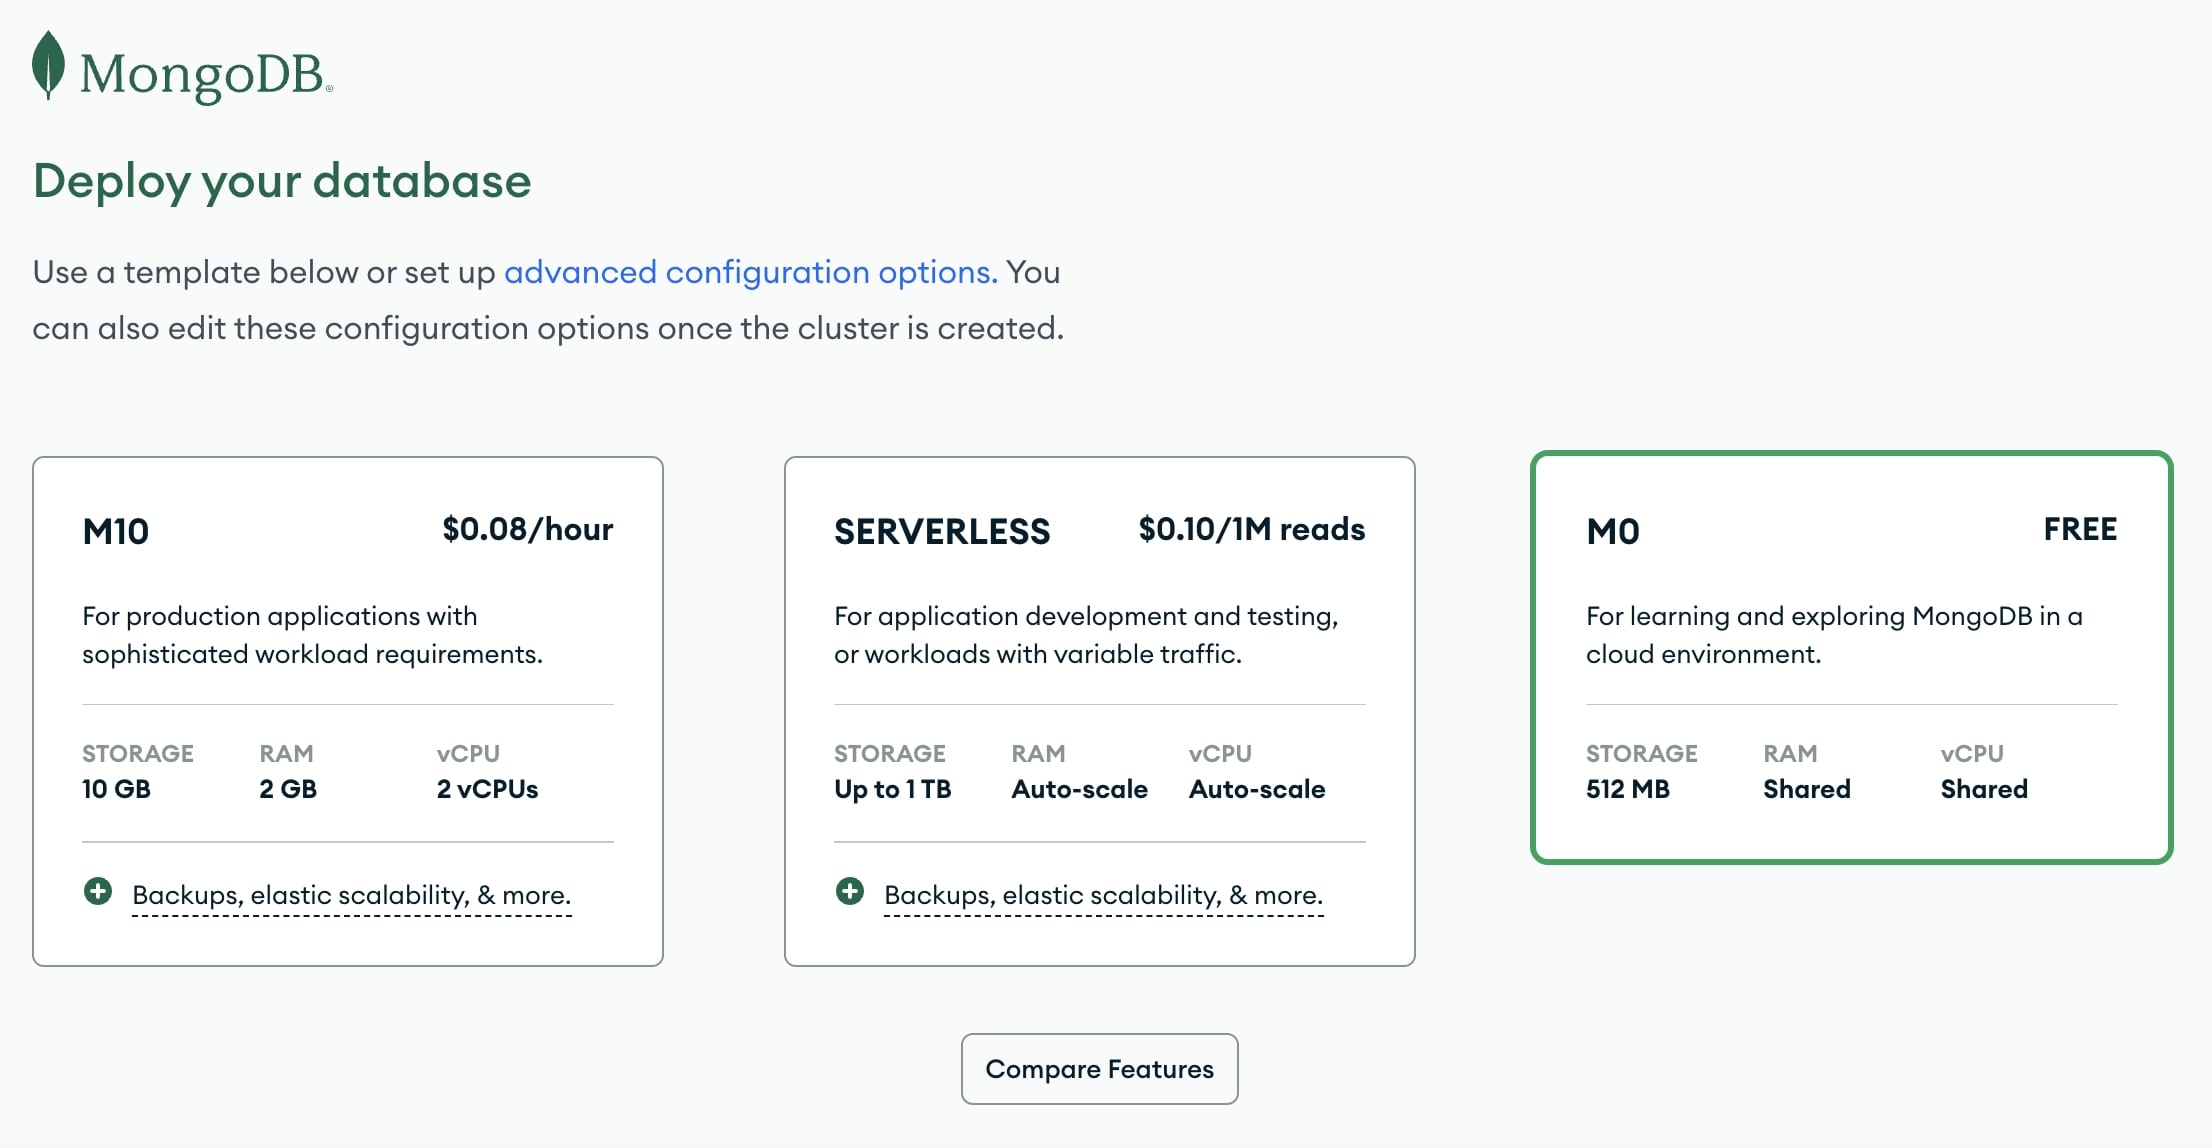
- This will open the Deploy your database screen. Click on the M0 FREE option template.
- Scroll down the page to see the different options you can choose
- Select any provider and region from the Provider and Region sections. Different regions offer different providers.
- You can change the name of your Cluster under Cluster Name. We are naming it "Cluster0" for this tutorial.
- Tags are optional. We will not use them here.
- Click the Create button (creation of the cluster will take some minutes).
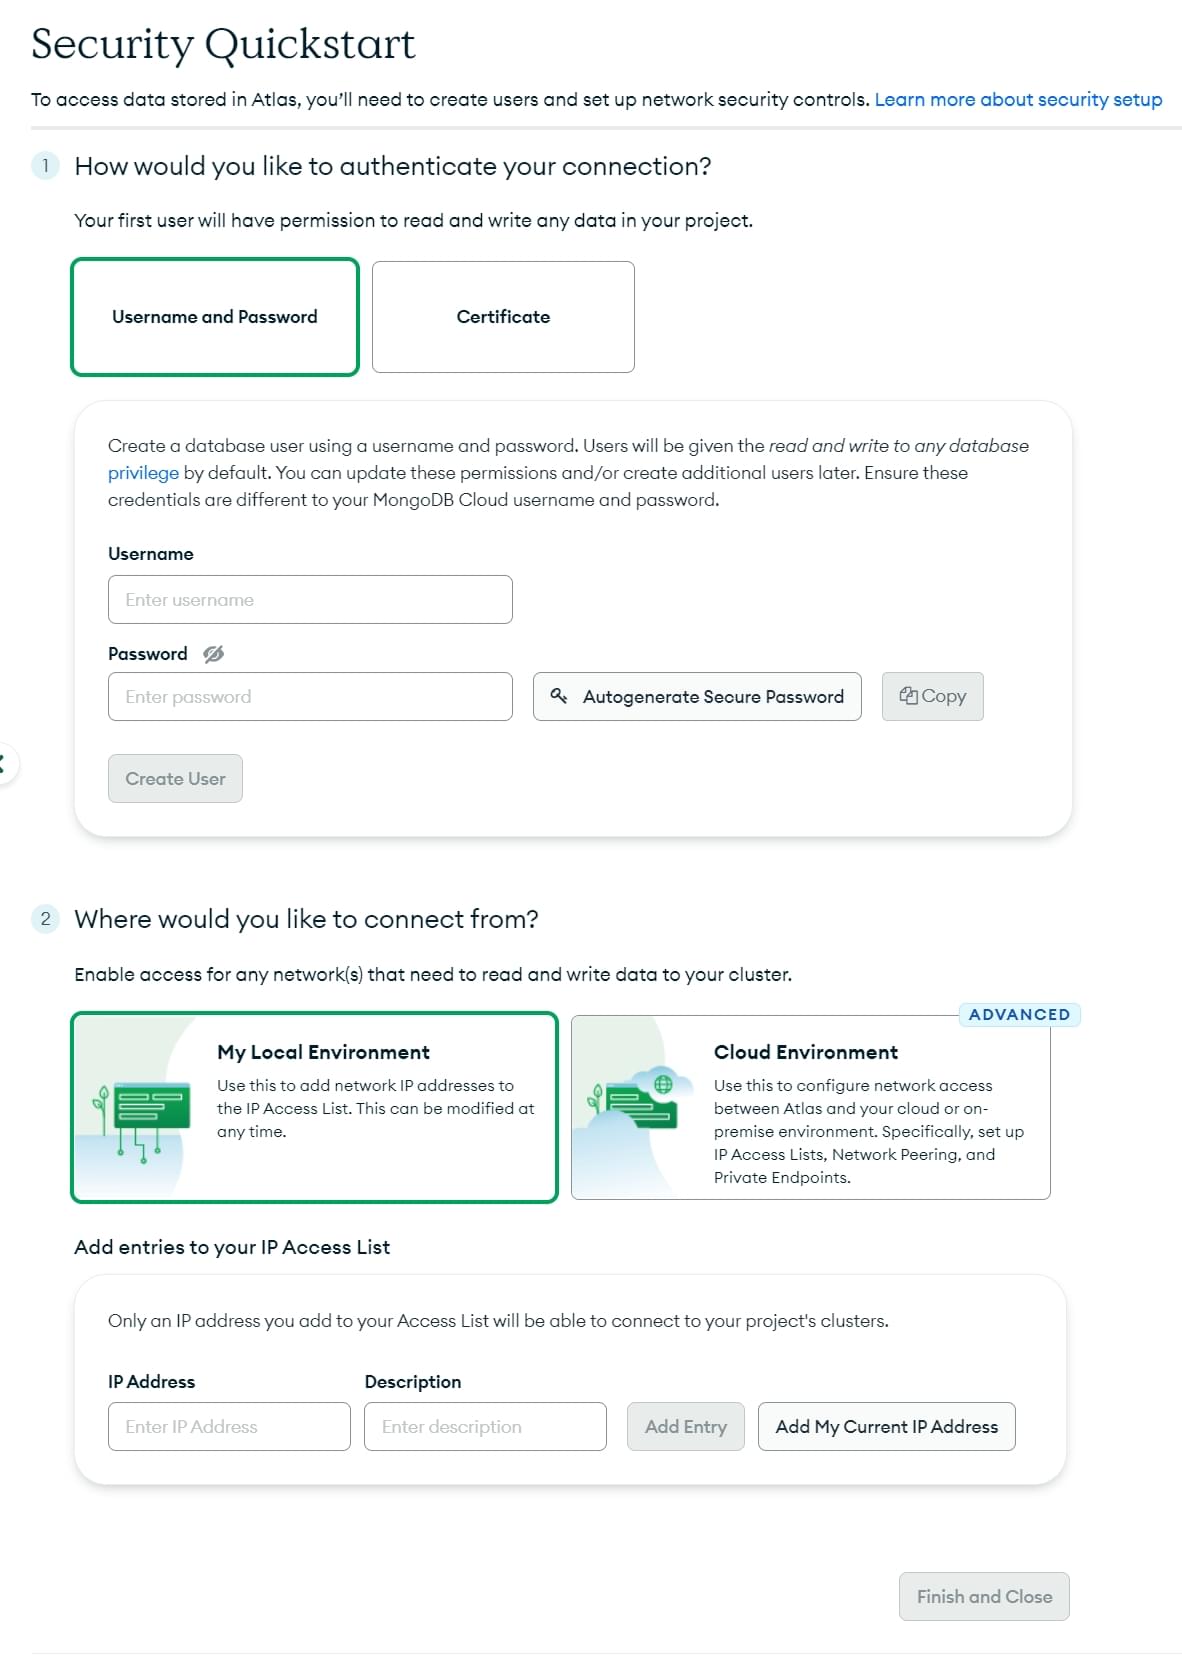
- This will open the Security Quickstart section
- Enter a username and password. Remember to copy and store the credentials safely as we will need them later on. Click the Create User button.
Note: Avoid using special characters in your MongoDB user password as mongoose may not parse the connection string properly.
- Enter
0.0.0.0/0in the IP Address field. This tells MongoDB that we want to allow access from anywhere. Click the Add Entry button.Note: It is a best practice to limit the IP addresses that can connect to your database and other resources. Here we allow a connection from anywhere because we don't know where the request will come from after deployment.
- Click the Finish and Close button
- Enter a username and password. Remember to copy and store the credentials safely as we will need them later on. Click the Create User button.
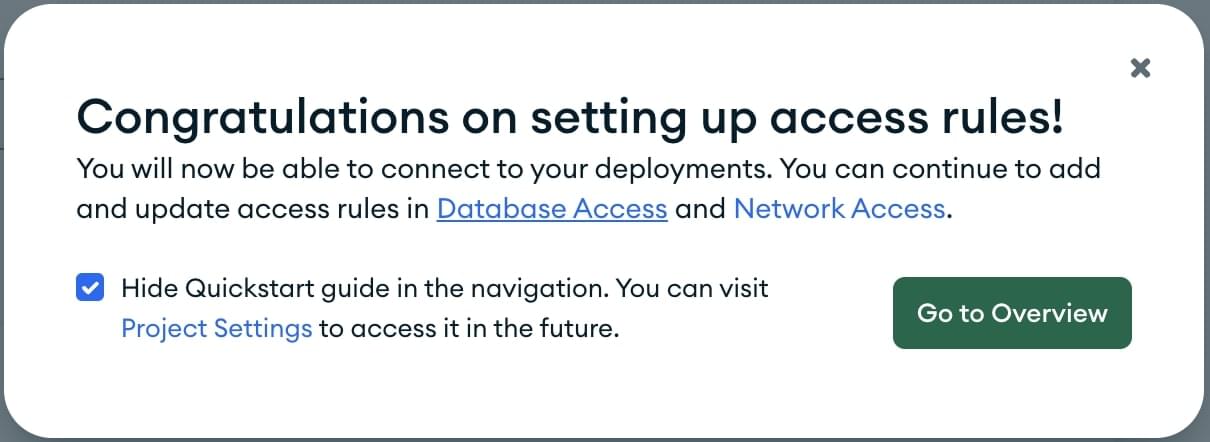
- This will open the following screen. Click on the Go to Overview button.
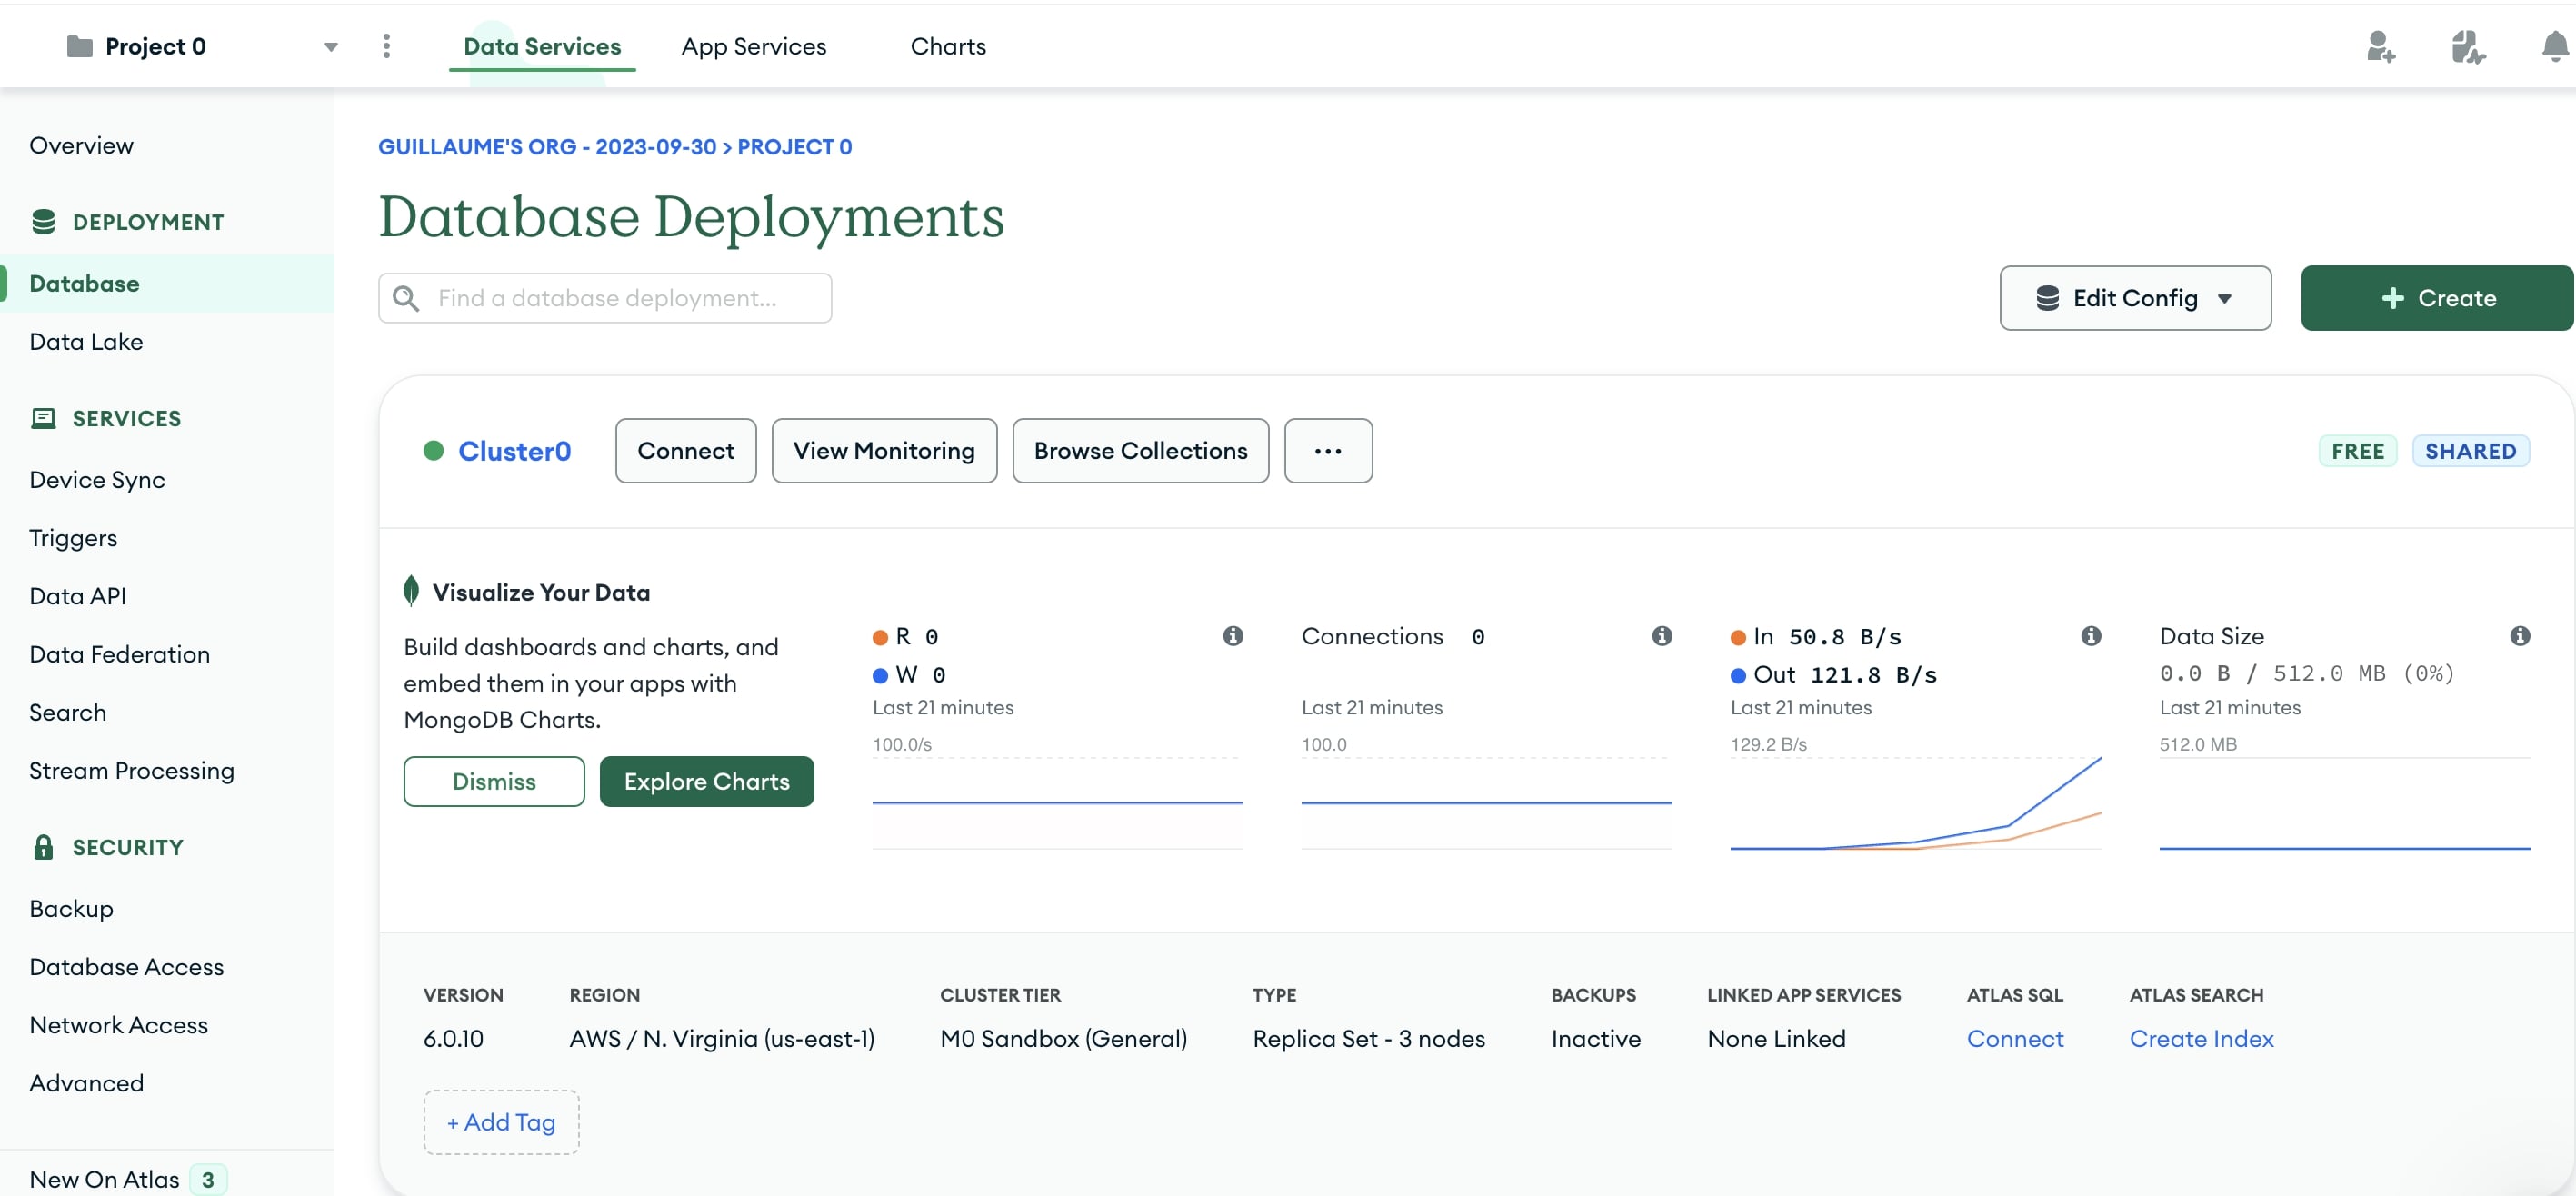
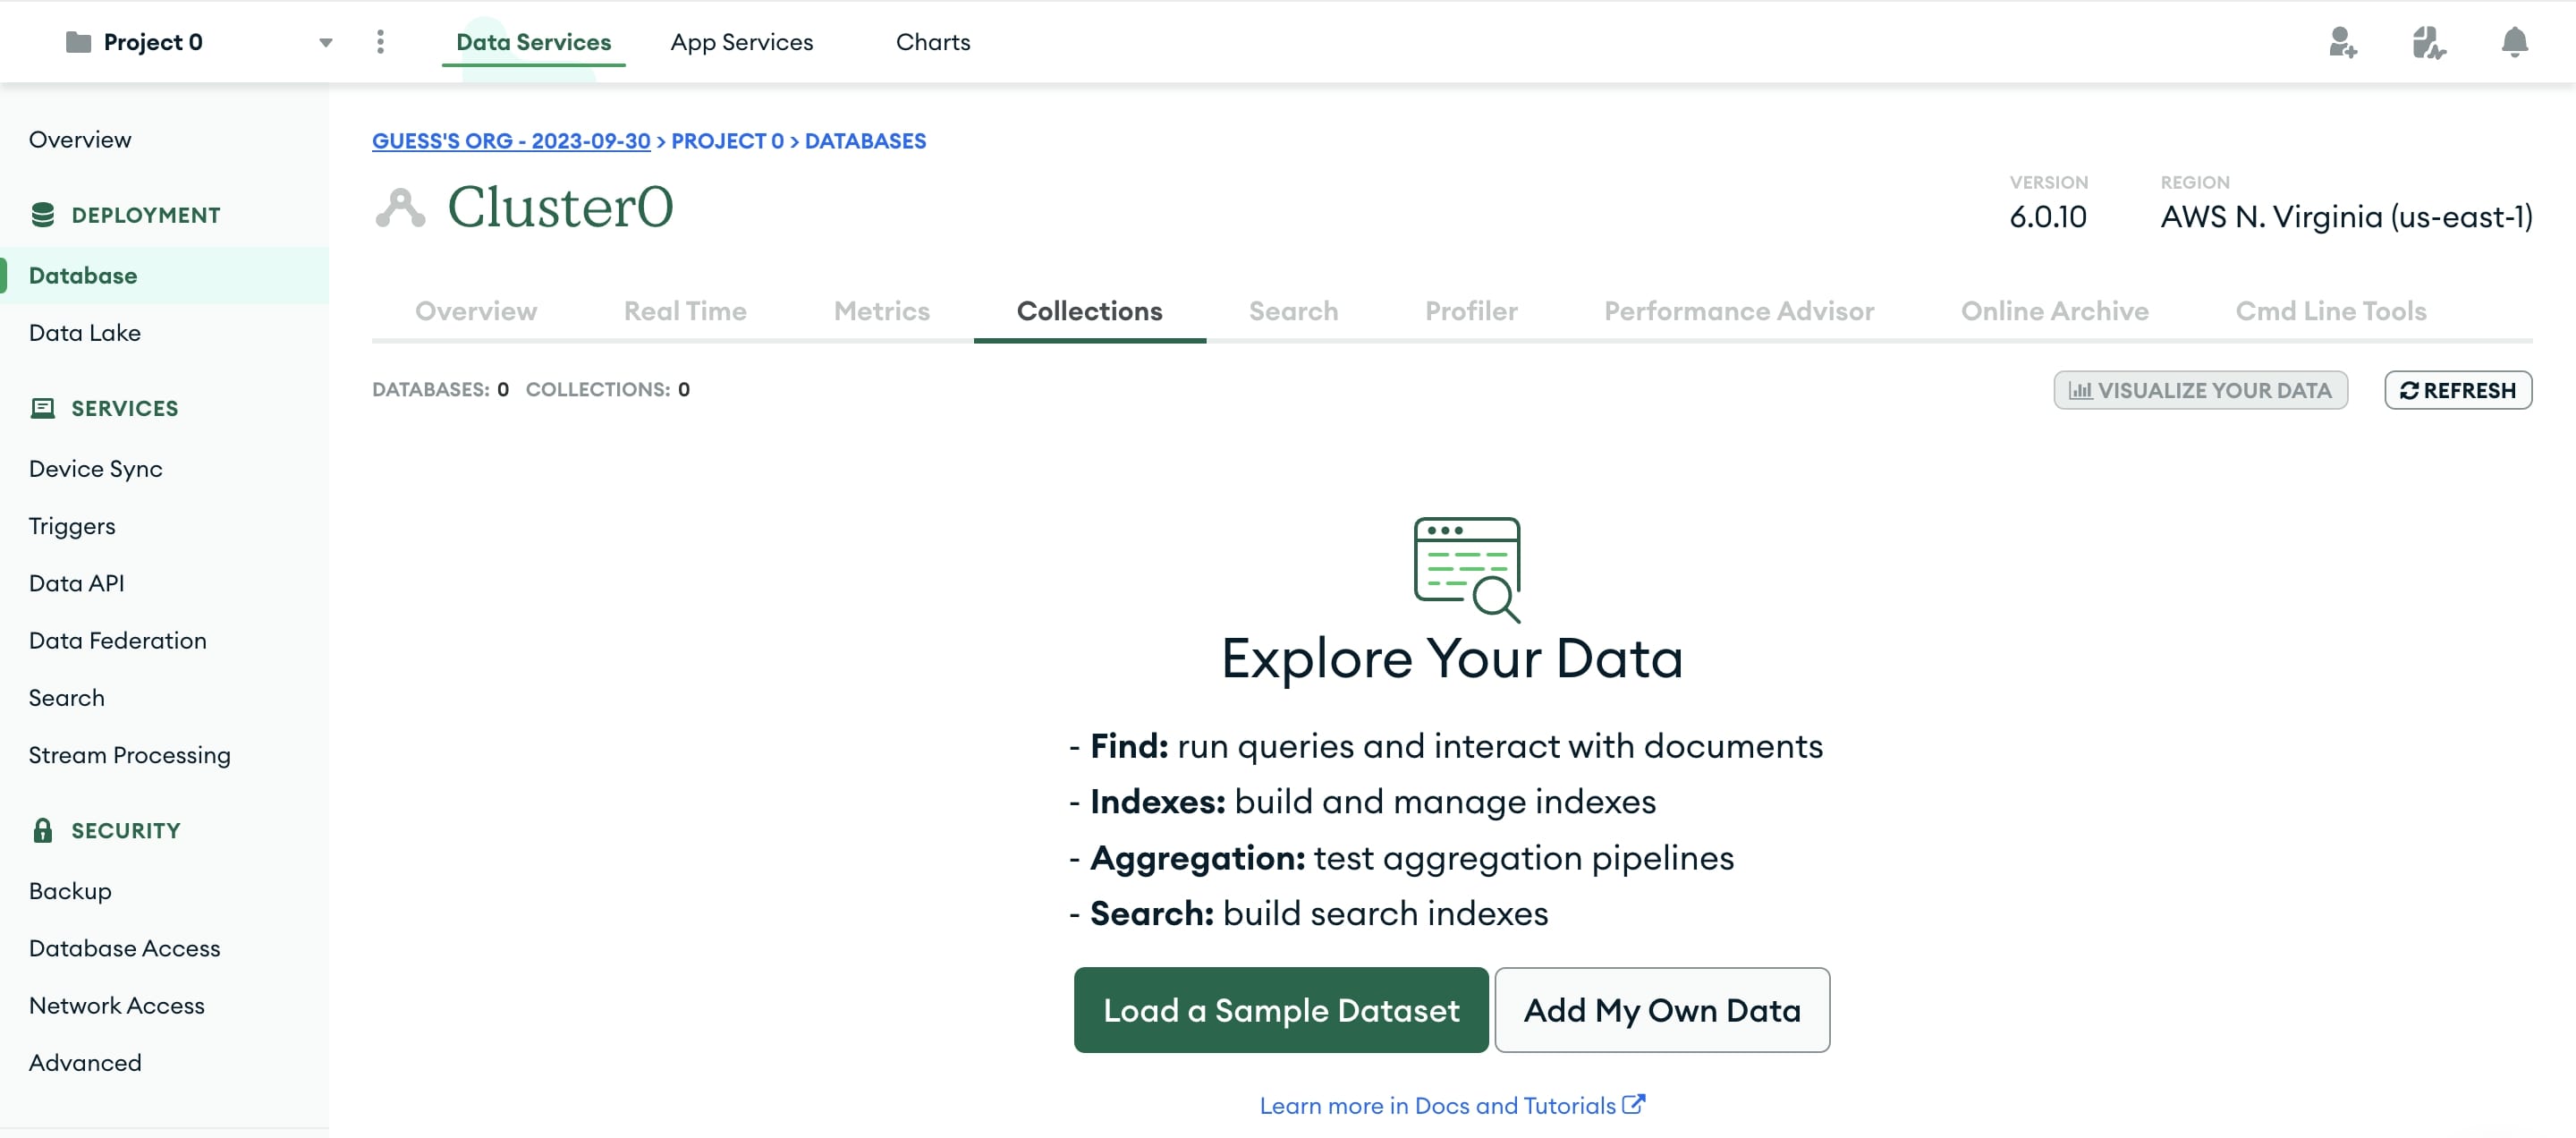
- You will return to the Overview screen. Click on the Database section under the Deployment menu on the left. Click the Browse Collections button.
- This will open the Collections section. Click the Add My Own Data button.
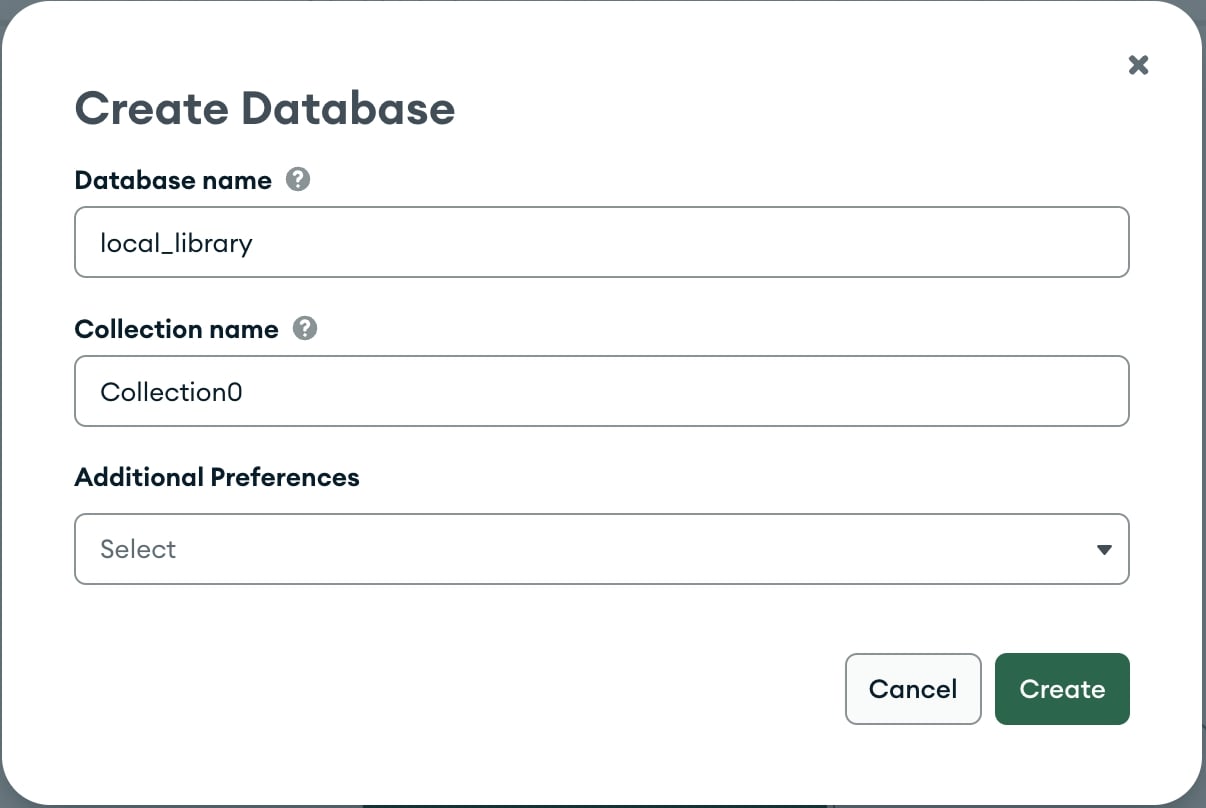
- This will open the Create Database screen
- Enter the name for the new database as (e.g.
local_library) - Enter the name of the collection (e.g.
Collection0) - Click the Create button to create the database
- Enter the name for the new database as (e.g.
- You will return to the Collections screen with your database created
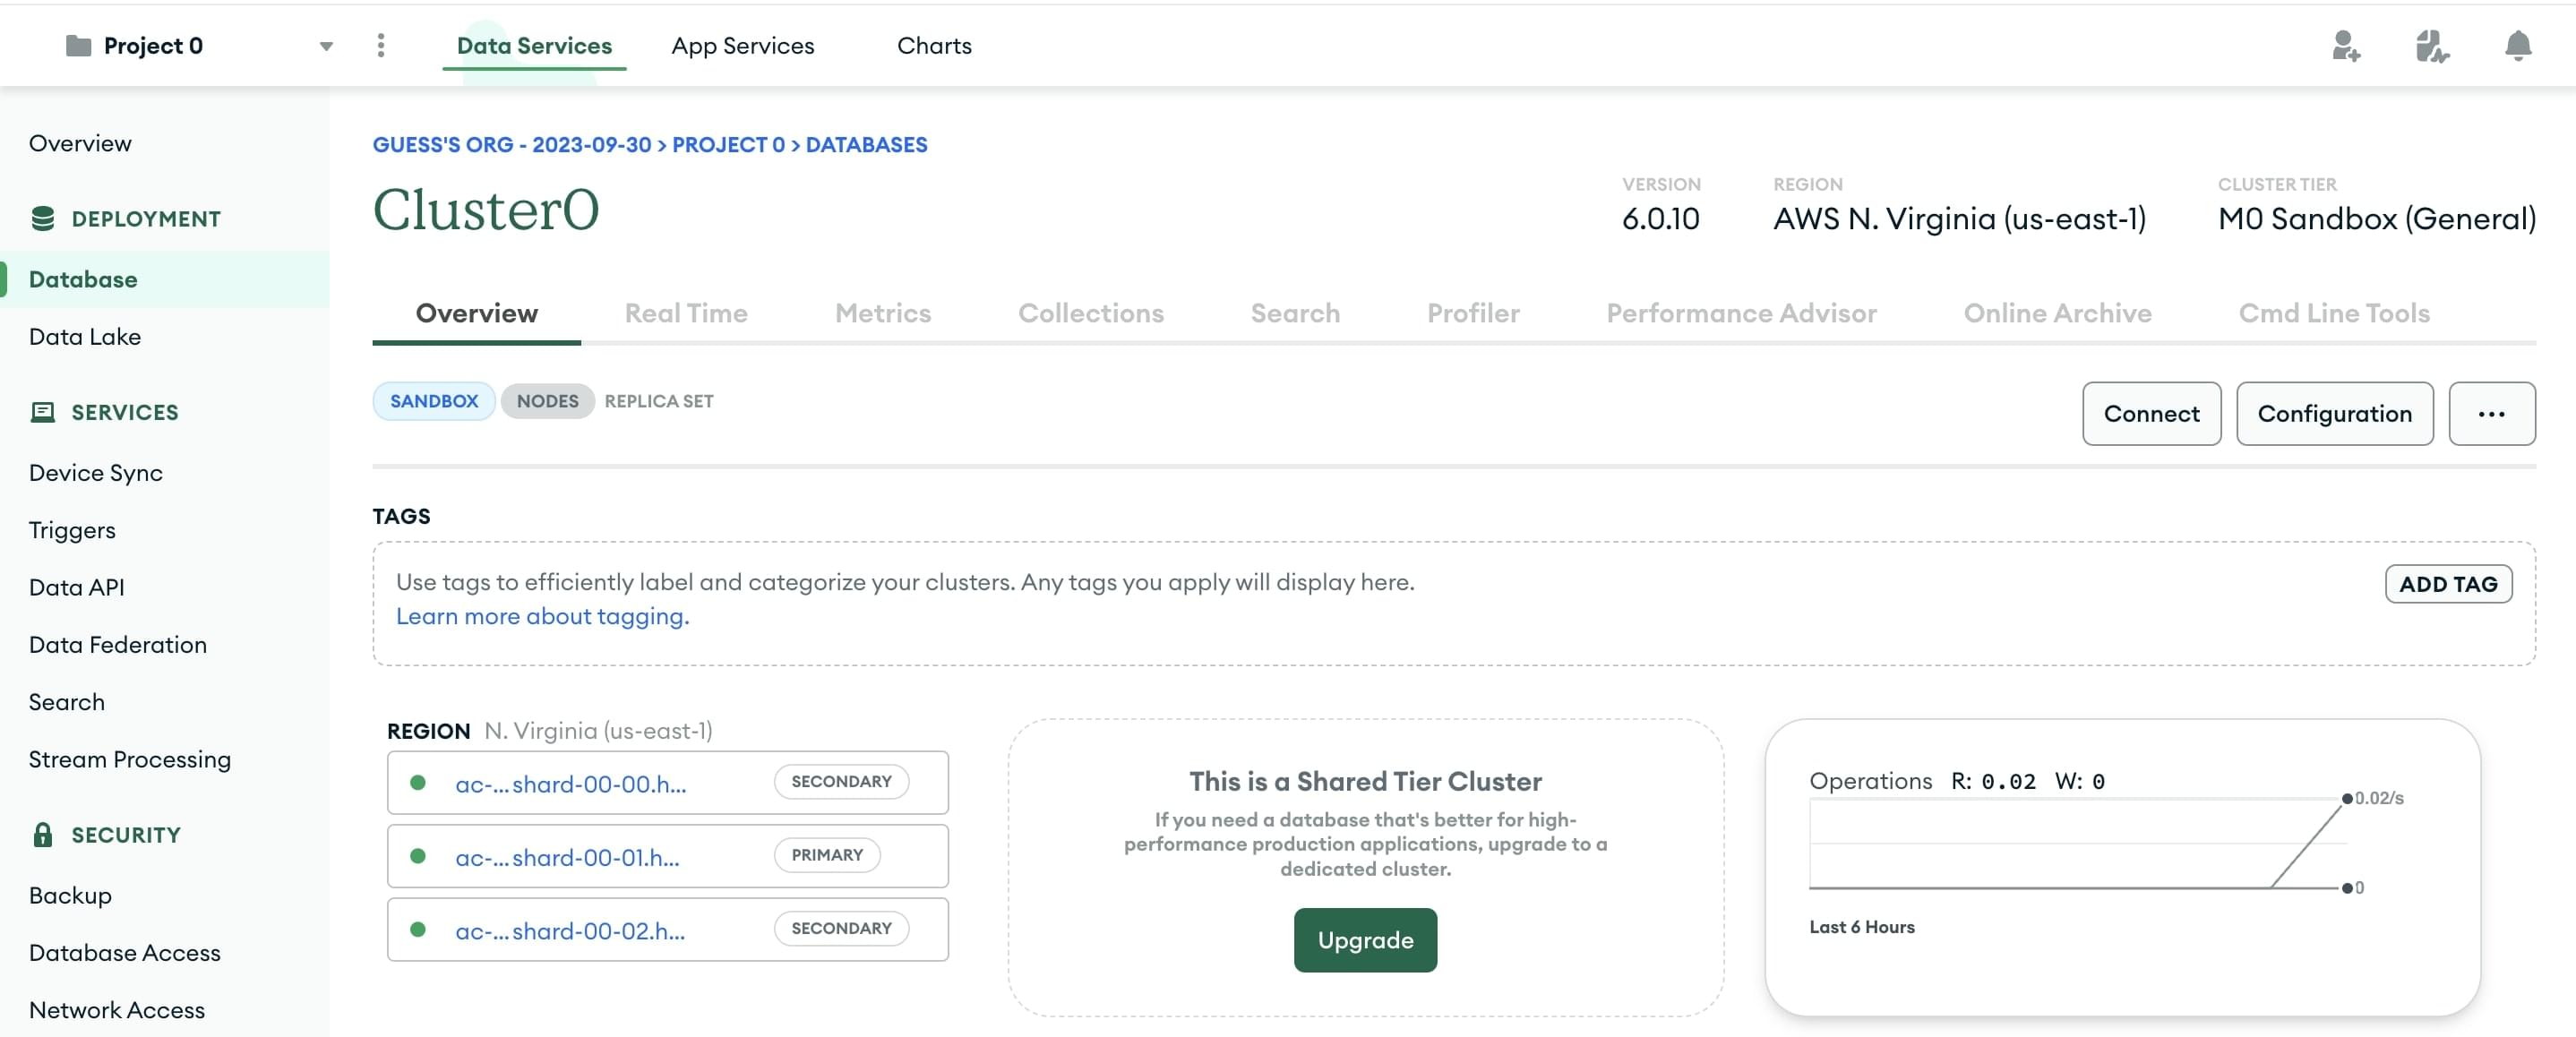
- Click the Overview tab to return to the cluster overview
- From the cluster Overview screen click the Connect button
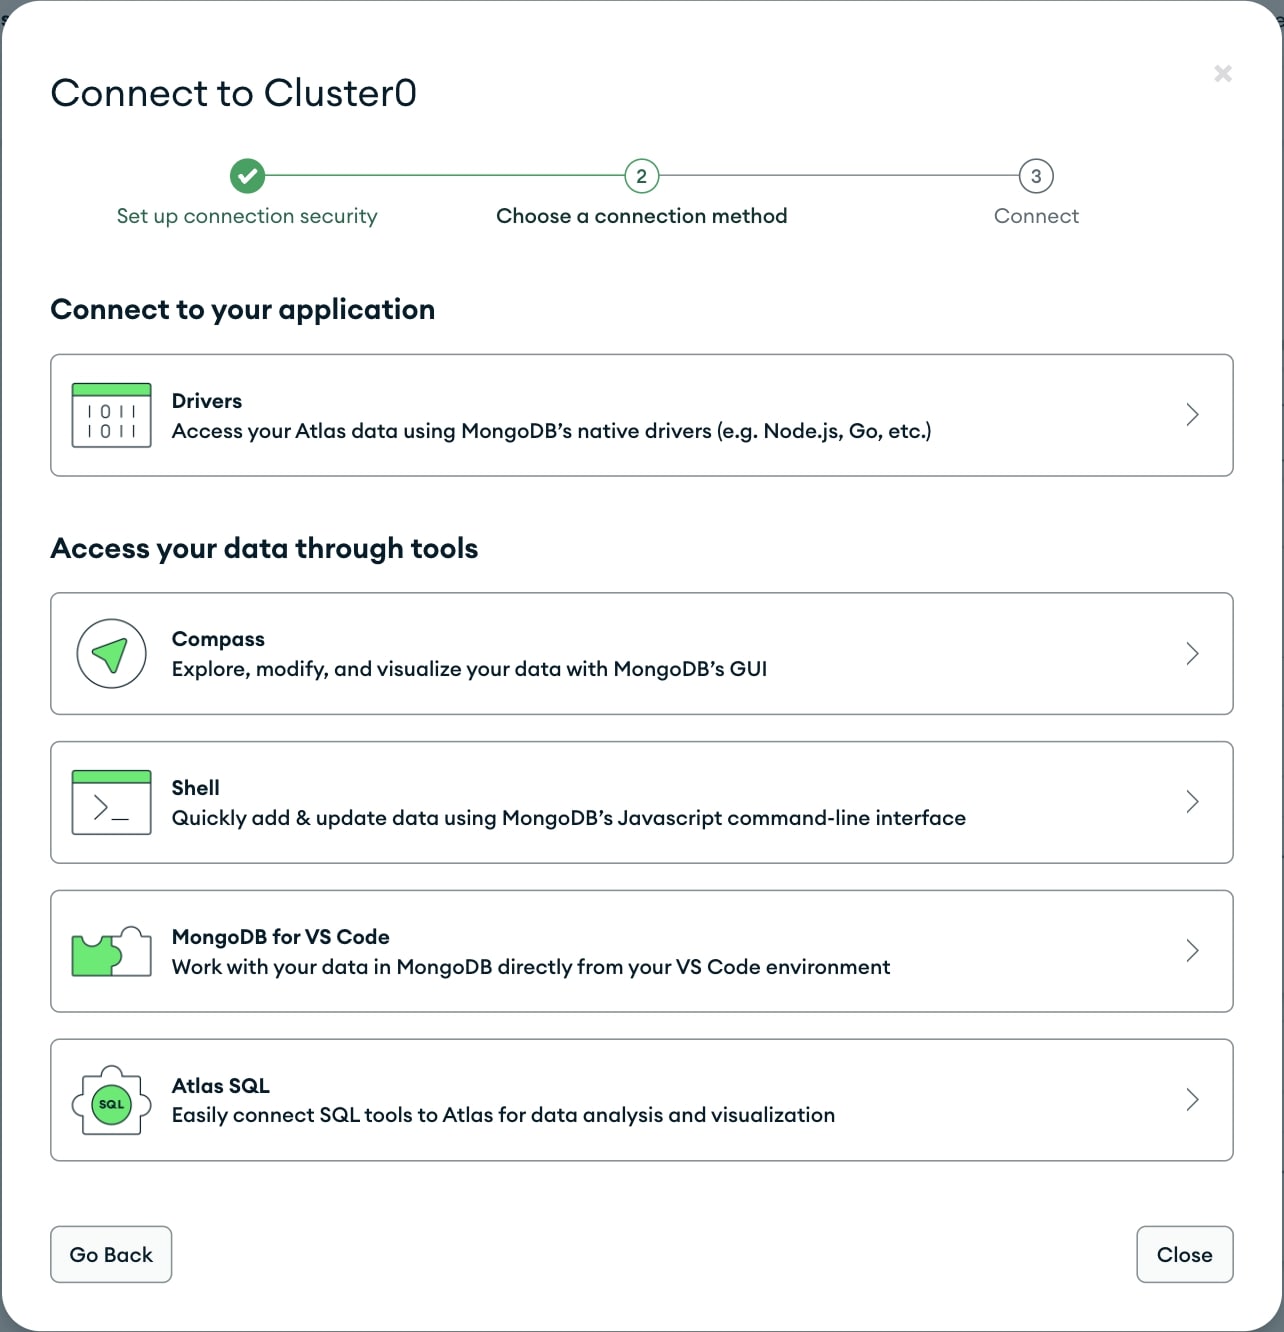
- This will open the Connect to Cluster screen. Click the Drivers option under the Connect to your application section.
- You will now be shown the Connect screen
- Select the Node driver and version as shown
- DO NOT follow the step 2
- Click the Copy icon to copy the connection string
- Paste this somewhere safe where you'll be able to access it later
- Update the username and password with your user's password
- Insert the database name (e.g. "local_library") in the path before the options (e.g.
...mongodb.net/local_library?retryWrites...) - Save the file containing this string somewhere safe

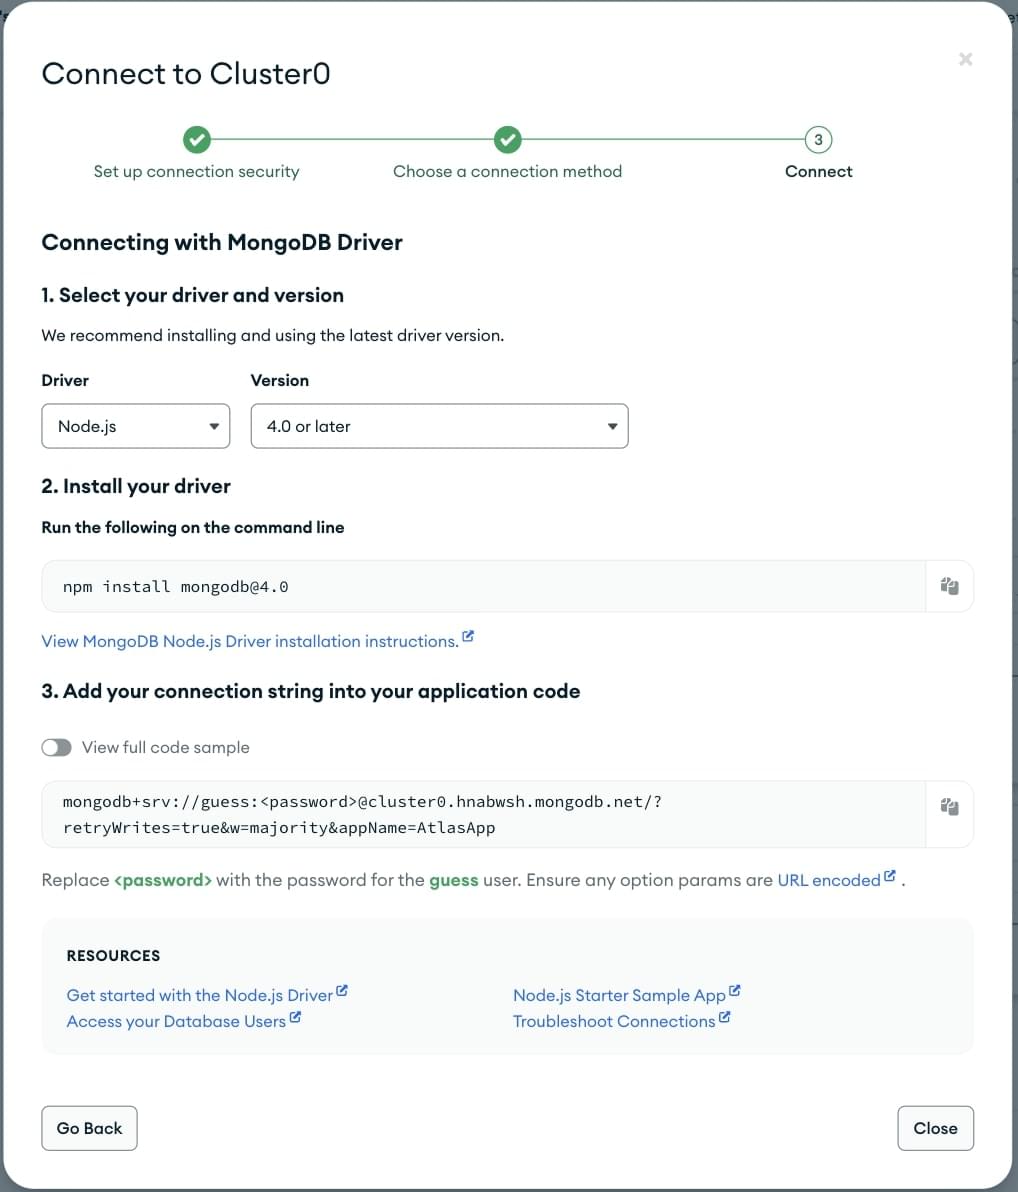
You have now created the database, and have a URL (with username and password) that can be used to access it. This will look something like: mongodb+srv://<your_user_name>:<your_password>@cluster0.lz91hw2.mongodb.net/<project_name>?retryWrites=true&w=majority
- Install Mongoose with the following command in the project root directory:
npm install mongoose
Reference: https://github.com/motdotla/dotenv
- Install Dotenv with the following command in the project root directory in order to keep the MongoDB connection string secret:
npm install dotenv --save - Create a
.envfile in the project root directory and add the MongoDB connection string:MONGODB_URI_DEV="<insert_your_database_url_here>" - Make sure your
.gitignoreincludes.envin it - Open
/app.js(in the root of your project) and import and configure dotenv as early as possible (i.e. at the top)require('dotenv').config();
- Open
/app.js(in the root of your project) and copy the following text below where you declare the Express application object (after the lineconst app = express();).// Set up mongoose connection const mongoose = require('mongoose'); mongoose.set('strictQuery', false); const mongoDB = process.env.MONGODB_URI_DEV; main().catch((err) => console.log(err)); async function main() { await mongoose.connect(mongoDB); }
- This code creates the default connection to the database and reports any errors to the console (Ref: Mongoose primer)
Note: hard-coding database credentials in source code is not recommended. See deploying to production for more information on how to do this safely.
- Create a folder for models in the project root (
/models)mkdir models - Create a separate file for each of the models
cd models
touch <model-name>.js
Reference: https://tailwindcss.com/docs/installation
Reference: https://tailwindcss.com/docs/content-configuration
- Install Tailwind CSS and create your
tailwind.config.jsfile in the project root directory:npm install -D tailwindcss npx tailwindcss init - Configure your template paths in your
tailwind.config.jsfile:content: ['./views/**/*.ejs'],
- Create a
tailwind.cssfile with the@tailwinddirectives:echo -e "@tailwind base;\n@tailwind components;\n@tailwind utilities;"> public/stylesheets/tailwind.css - Add the following build scripts to the
"scripts"section of yourpackage.json:"scripts": { // ... "build:css": "tailwindcss -i ./public/stylesheets/tailwind.css -o ./public/stylesheets/style.css", "build:css-watch": "npm run build:css -- --watch" },
- Build your
public/stylesheets/style.cssfile:npm run build:css - If you don't yet have a
.vscode/settings.jsonRun the following to create one and configure it for Tailwind CSS:
The resultingmkdir .vscode echo -e "{\n \"editor.quickSuggestions\": {\n \"strings\": \"on\"\n },\n \"files.associations\": {\n \"*.css\": \"tailwindcss\",\n \"*.ejs\": \"html\"\n }\n}"> .vscode/settings.json.vscode/settings.jsonshould look like the following:If you do already have a{ "editor.quickSuggestions": { "strings": "on" }, "files.associations": { "*.css": "tailwindcss", "*.ejs": "html" } }.vscode/settings.json, simply add the above settings to it. - Add the following lines to your
.gitignorefile:# IDE settings .vscode
- Follow the earlier instructions to create a new production database in MongoDB and add its connection string to your
.envfile. e.g.:MONGODB_URI_PROD="<insert_your_database_url_here>" - Open
app.jsand find the line that sets the MongoDB connection variable. It will look something like this:Change it to the following:const mongoDB = process.env.MONGODB_URI_DEV;
const mongoDB = process.env.MONGODB_URI_PROD || process.env.MONGODB_URI_DEV;
- Install the compression library:
npm install compression - Open
./app.jsand require the compression library as shown. Add the compression library to the middleware chain with theuse()method (this should appear before any routes you want compressed — in this case, all of them!)const exampleRouter = require("./routes/example"); // Import routes for "example" area of site const compression = require("compression"); // Create the Express application object const app = express(); // ... app.use(compression()); // Compress all routes app.use(express.static(path.join(__dirname, "public"))); app.use("/", indexRouter); app.use("/example", exampleRouter); // Add example routes to middleware chain. // ...
- Install the Helmet library:
npm install helmet - Open
./app.jsand require the Helmet library as shown. Then add the module to the middleware chain with theuse()method.const compression = require("compression"); const helmet = require("helmet"); // create the Express application object const app = express(); // Add helmet to the middleware chain app.use(helmet()); // ...
- If needed, configure any Helmet headers. For example:
// add helmet to the middleware chain
// set CSP headers to allow images from Cloudinary
app.use(
  helmet({
    contentSecurityPolicy: {
      directives: {
        'img-src': ["'self'", 'data:', 'https://res.cloudinary.com'],
      },
    },
  }),
);
- Install the express-rate-limit library:
npm install express-rate-limit - Open
./app.jsand require the express-rate-limit library as shown. Then add the module to the middleware chain with theuse()method.const compression = require("compression"); const helmet = require("helmet"); const app = express(); // Set up rate limiter: max of 20 requests per minute const RateLimit = require("express-rate-limit"); const limiter = RateLimit({ windowMs: 1 * 60 * 1000, // 1 min max: 20, }); app.use(limiter); // apply rate limiter to all requests // ...
- The command above limits all requests to 20 per minute (you can change this as needed)
- Find the version of Node that was used for development by entering the following command:
You will then see your current Node version displayed in the console. For example:node --versionv20.10.0 - Open
package.jsonand add this information as anengines > nodesection as shown (using the version number for your system):{ "name": "<project-name>", "version": "0.0.0", "engines": { "node": ">=20.10.0" }, "private": true, // ...
- The hosting service might not support the specific indicated version of Node, but this change should ensure that it attempts to use a version with the same major version number, or a more recent version. (Check to verify this upon deployment.)
- Before we proceed, we need to test the site again and make sure it wasn't affected by any of our changes. First fetch all dependencies by running the following command in the terminal:
npm install - Now run the site and check that the site still behaves as expected
- This is a good point to make a backup of your "vanilla" project, before making adjustments for deployment on any individual hosting service.
- Create a branch
vanilla-deploymentfrom the current branch (main)
ORgit branch vanilla-deployment <old-commit>git checkout -b vanilla-deployment- This will checkout the new branch, so remember to switch back to main after pushing this branch
- Push the new branch to GitHub
git push origin vanilla-deployment - If you need to switch back to the main branch
git checkout main
Reference: https://fly.io/launchpad
Reference: https://fly.io/docs/speedrun/
Reference: https://web.archive.org/web/20230823151155/https://fly.io/docs/languages-and-frameworks/node/
Reference: https://fly.io/docs/rails/the-basics/configuration/
Reference: https://community.fly.io/t/environment-variables-set-by-flyctl-secrets/12266/7
- Create an account at fly.io if you don't already have one
- Install the flyctl CLI if you haven't yet:
# Install flyctl on Mac OS brew install flyctl - Run the following command from your project root directory:
flyctl launch- Tweak the settings as necessary
- If the previous step was successful, Fly will generate a
Dockerfile,.dockerignoreandfly.toml.
- Configure your Fly environment variables. There are two ways to do this:
- To add a single variable, you may run the following:
fly secrets set SUPER_SECRET_KEY=password1234 - To import all variables from your
.envfile, first remove the quotes from all variables in your.envfile, then you may run the following:
(Don't forget to add the quotes back into yourflyctl secrets import < .env.envfile afterward.) - To view the environment variables of your Node.js app, run:
fly ssh console -C "printenv"
- To add a single variable, you may run the following:
- Whitelist all IP addresses (
0.0.0.0) in MongoDB Atlas - Add the following line to your code (right after you create the express application):
where
app.set('trust proxy', numberOfProxies);
numberOfProxiesis the number of proxies between the user and the server. For Fly.io, this number is typically 2. To find the correct number, create a test endpoint that returns the client IP:Go toapp.set('trust proxy', 1); app.get('/ip', (req, res) => res.send(req.ip));
/ipand see the IP address returned in the response. If it matches your IP address (which you can get by going to http://ip.nfriedly.com/ or https://api.ipify.org/), then the number of proxies is correct and the rate limiter should now work correctly. If not, then keep increasing the number until it does.- For more information about troubleshooting proxy issues, take a look at the express-rate-limit docs
- For more information about the trust proxy setting, take a look at the official Express documentation.
- Run the following to deploy the Node.js app:
fly deploy
- Create an account at glitch.com if you don't already have one
- Make sure your GitHub repo is up-to-date by pushing all commits:
git push - Go to the GitHub repo, click on the green <> Code button, then copy the HTTPS web URL
- Go to Glitch, select New project in the upper-right corner, select Import from GitHub, paste the full URL of the GitHub repo you've just copied into the dialog, and select Ok
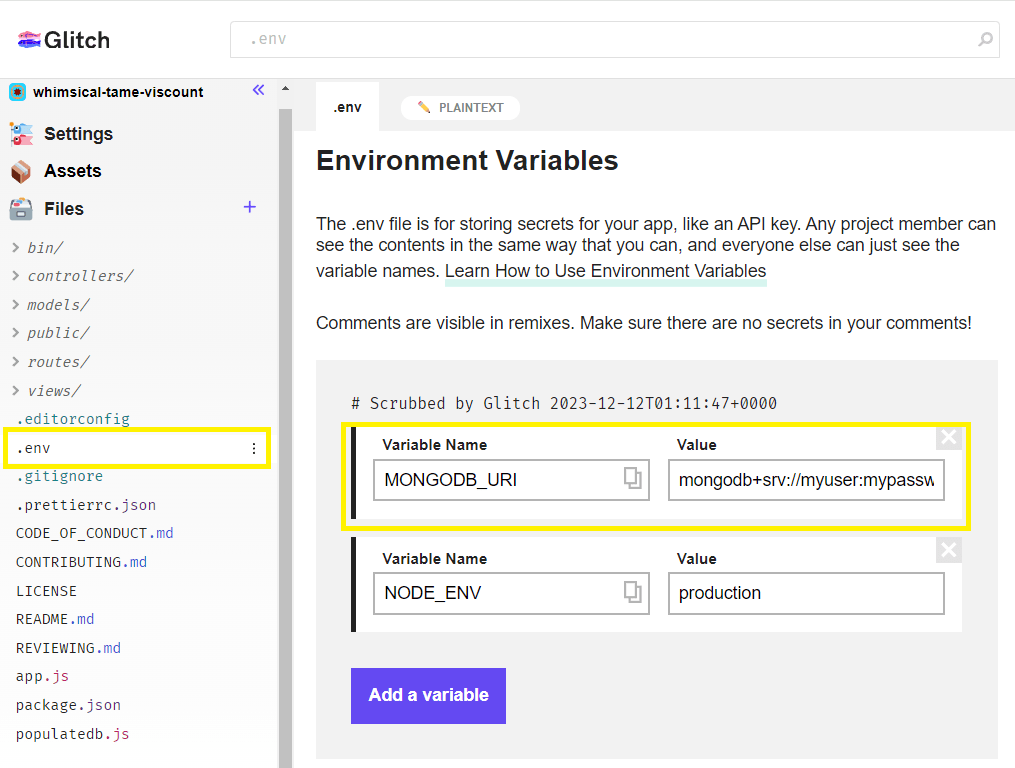
- Open
.envand add your environment variables:- Add
MONGODB_URI_PRODandMONGODB_URI_DEVvariables with the values of their respective connections strings - If you used Cloudinary, add a
CLOUDINARY_URLvariable with the value of it's production string - Be sure to add a
NODE_ENVvariable with the value ofproduction
- Add
- Open
package.jsonand add the following in order to specify the version of Node:"engines": { "node": ">=16.14.2" },
Note: at the time of writing v16.14.2 is the latest version supported by Glitch
- Add the following line to your code (right after you create the express application):
Where
app.set('trust proxy', numberOfProxies);
numberOfProxiesis the number of proxies between the user and the server. To find the correct number, create a test endpoint that returns the client IP:Go toapp.set('trust proxy', 1); app.get('/ip', (req, res) => res.send(req.ip));
/ipand see the IP address returned in the response. If it matches your IP address (which you can get by going to http://ip.nfriedly.com/ or https://api.ipify.org/), then the number of proxies is correct and the rate limiter should now work correctly. If not, then keep increasing the number until it does.- For more information about troubleshooting proxy issues, take a look at the express-rate-limit docs
- For more information about the trust proxy setting, take a look at the official Express documentation.
- Click on Settings on the left-hand side, then Edit project details to update the project name
- Click on Share in the upper-right corner to find the live link