| title | author | date | version | description | tags |
|---|---|---|---|---|---|
Git Survival Guide |
Frédéric Delorme |
2022-MAY-20 |
1.0.5 |
This docuemnt intends to provide some helpt on git usage. Some parts are from their respective author (see provided links) |
git,branch,tag,flow |
Git is distributed versioning tool. This software is based on a command line tool to manage source versioning and history of a project. You can control local and remote repository, by cloning and synching all throughthe command line:
- You local files are in a Workking tree,
- the files under versioning control are stored and tracked in a local branch
- Then you can synchronize those locale branches with ones in a remote repository.
THis tool not only manage the source version, but also will help you clean and maintain a clear history of your project. THere is no coded lifecycle process, you can create your. It exists multiple way to manage the project source code, and the git flow is one of them.
The following diagram explains which command can help you push, pull, clone, etc... your local files with remotes ones.
You will be also able to tag a specific status of the repository (a commit) with a free tag to mark some specific version of the repository to correspond to a clear identified version of your sources (for example).
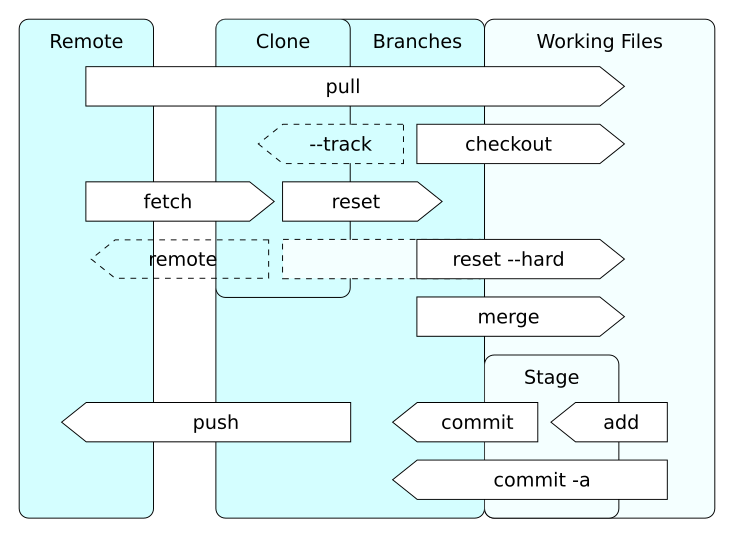
source: https://en.wikipedia.org/wiki/Git#/media/File:Git_operations.svg
first create a project directory:
mkdir my-projectand initialize the git repo in it
cd my-project
git init
Initialized empty Git repository in C:/Users/frederic/Projects/personnel/my-project/.git/
The default created branch is master.
To add a remote repository where to push securely your [my-project] code,
git remote add origin git@[my-server]:[my-account]/[my-project].gitwhere:
originis the keyword for this remote repo (the default one)git@[my-server]:[my-account]/[my-project].gitthe destination 'URL' for this server's repo.
typically:
- via ssh :
git@github.com:mcgivrer/my-project.git - via https :
https://github.com/mcgivrer/my-porject.git
But before beeing able to push data throuh the ssh protocole, you must create an ssh key:
ssh-keygenAnd follow the requesting things. At end a new ~/.ssh/id_rsa.pub file (your public ssh key) will be created.
Copy and paste the content file of your new public key to the remote server configuration page (e.g.: https://github.com/settings/keys on github, or https://gitea.com/user/settings/keys on gitea).
Now you are ready to push code !
Note
while using http protocole, you must authenticate to the remote server on each operation. To avoid such discrepencies, you can use a credential storage. To activate the storing of the credential, you must configure it:
git config --global credential.helper storesee https://git-scm.com/docs/git-credential-store for details.
To add any modified, created or track deleted files:
touch README.mdJust execute the following command:
git add .
warning: LF will be replaced by CRLF in REAMDE.md.
The file will have its original line endings in your working directory
and then to record the change to the repo, apply a commit command:
git commit -m "Create My-Project"
[master (root-commit) cdea82c] Create My-Project
 1 file changed, 5 insertions(+)
The -m option let's you add a comment (a message) to your commit to explain the reason of such changes.
There are some well known standard about commit message, the
TIPS #1
The magic of.gitignorefile allow you to automatically filter not desired file to be added to your repo. Just add full filename or joker filename (eg:*.class,*.log) to this file, one per line, and that's it; thegit addcommand will automatically exclude the.gitignoreentries. an easy way to start is to execute atouch .gitignore.
here is my own for this fantastic my-project
# exclude common java files
**/*.class
**/*.log
target/
# exclude IDE metadata files
.idea/
*.iws
*.ipr
*.iml
.vsdcode/
.settings/
.project
.classpath
TIPS #2
The github platform will propose standard .gitignore file according to programmation language you intend to use in your project.
git pushand if its a newly create branch
git push --set-upstream origin master
Enumerating objects: 3, done.
Counting objects: 100% (3/3), done.
Delta compression using up to 8 threads
Compressing objects: 100% (2/2), done.
Writing objects: 100% (3/3), 311 bytes | 311.00 KiB/s, done.
Total 3 (delta 0), reused 0 (delta 0), pack-reused 0
To github.com:mcgivrer/my-project.git
 * [new branch]      master -> master
Branch 'master' set up to track remote branch 'master' from 'origin'.Here is a typical branching model:
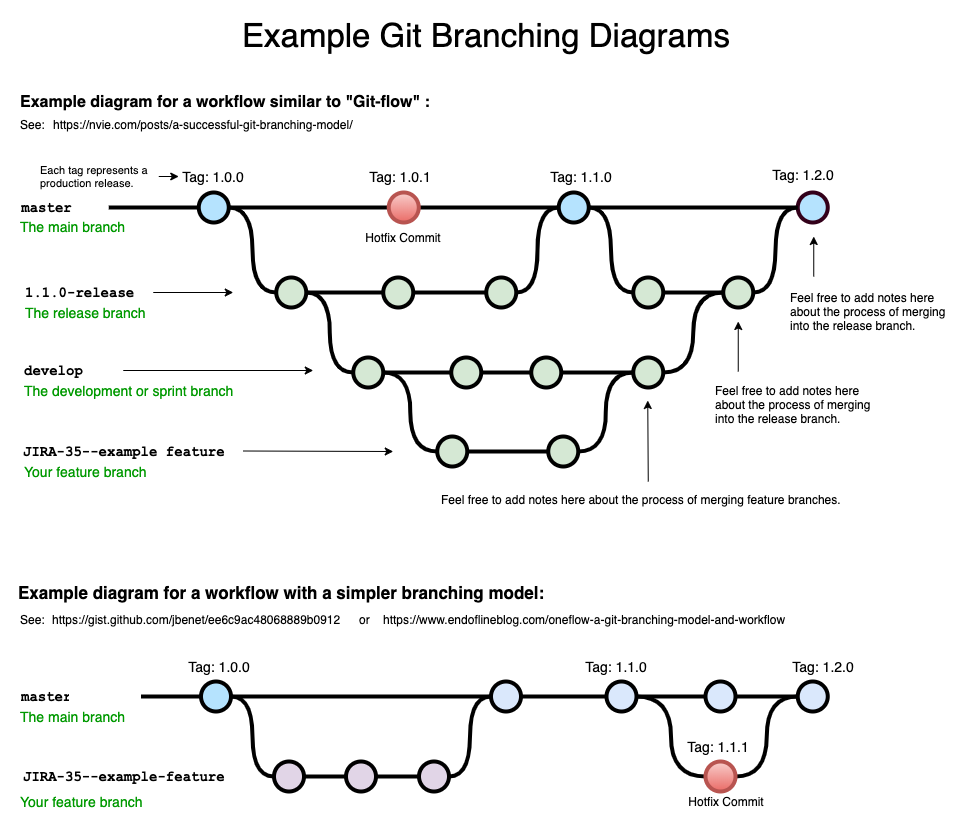
source: https://www.bryanbraun.com/2020/04/24/drawing-git-branching-diagrams/
git checkout -b {my-branch-name}It will create a branch named my-branch-name.
TIPS
Creating a branch from a tag see create branch from a tag
sample:
git checkout -b feature/add-main-programm-structure
Switched to a new branch 'feature/add-main-programm-structure'(from https://linuxize.com/post/how-to-rename-local-and-remote-git-branch/)
To rename a Local and Remote Git Branch:
- Start by switching to the local branch which you want to rename:
git checkout <old_name>- Rename the local branch by typing:
git branch -m <new_name>- At this point, you have renamed the local branch.
If you’ve already pushed the <old_name> branch to the remote repository , perform the next steps to rename the remote branch.
Push the <new_name> local branch and reset the upstream branch:
git push origin -u <new_name>- Delete the <old_name> remote branch:
git push origin --delete <old_name>That’s it. You have successfully renamed the local and remote Git branch.
NOTE Branches are part of the software development process and one of the most powerful features in Git. Branches are essentially pointers to a certain commit. Renaming a local Git Branch is a matter of running a single command. However, you can’t directly rename a remote branch; you need to push the renamed local branch and delete the branch with the old name.
To be able to get an newly creted beanch linked to a remote one :
git push --set-upstream-to=<remote>/<branchname>Then you local branch will be linked and stick to the remote/branchname.
Thanks to this stackoverflow comment: https://stackoverflow.com/questions/5188320/how-can-i-get-a-list-of-git-branches-ordered-by-most-recent-commit
This will ist all branch with there latest commit, sorted by matest commit date, and display branch age:
git for-each-ref --sort=-committerdate refs/heads --format='%(authordate:short) %(color:red)%(objectname:short) %(color:yellow)%(refname:short)%(color:reset) (%(color:green)%(committerdate:relative)%(color:reset))'you will get such display:

First tag your code on the main (or master) branch, an then create a release/[x.y.z] branch for maintainance purpose.
git tag v[x.y.z]INFO
A TAG is a short name for specific commitId. Mutliple tags can be attached to same commitId.
TIPS
To know how to create tag correctly, you can read the SemVer principle.
And to synchronize your new tag with remote repo:
git push --tags
Total 0 (delta 0), reused 0 (delta 0), pack-reused 0
To github.com:mcgivrer/my-project.git
 * [new tag]         v0.0.1 -> v0.0.1
Then create a new branch to proceed maintenance purpose on the create release:
git checkout -b release/v[x.y.z] v[x.y.z]where :
release/v[x.y.z]is the name for this new branchv[x.y.z]is the tag to create this branch from.
e.g.:
git checkout -b release/v0.0.1 v0.0.1
Switched to a new branch 'release/v0.0.1'
Now you can code all your new feature in this feature branch.
When you finish developing your fancy fantastic feature (FFF) in your feature branch, you must merge it to your master (or develop, see git flow).
So first go back to master branch, and then merge the new code into it:
git checkout master
git merge feature/add-main-programm-structure
Merge made by the 'ort' strategy.
 src/main/java/App.java | 18 ++++++++++++++++++
 1 file changed, 18 insertions(+)
 create mode 100644 src/main/java/App.java
And it's done !
TIPS
There is 2 political ways to proceed.
- You can delete the feature branch as soon the feature is merged,
- You can wait until the next release is publish, thene delete all the relatives branches.
Git flow is a core dev wellknown standard way to manage all branches, tags, bugfixes and releases in your project repo.
To manage your repo according to this standard, you must first install the git 'plugin' to manage it (see :::), and execute the following command:
git flow initAfter a few common question, the following branch model structure will be initialized :
developwhere everything startmainormasterthe point where everything endfeature/where all new feature must be createdbugfix/where any bug must be fixed before falling in a target branch and in main/master.release/to maintain any release you are intend to create and make it survive ;)
to know how to manage the flow, see the
git checkout v1.0.1-1git checkout -b new-branch v1.0.1-1git tag -d v1.0.1-1git push --delete origin v1.0.1-1where:
originis the remote idv1.0.1-1the ga to be deleted.
You will pop-up an editor to confirm all git commit message, one by one.
git rebase -i YOUR_SHA -x "git commit --amend --author 'Author Name <author.name@mail.com>' -CHEAD"git rebase -i HEAD~4 -x "git commit --amend --author 'Author Name <author.name@mail.com>' --no-edit"NOTE:
A simple script to perform user/author/email replacement on all commits : git-replace-author.sh, just replaceOLD_EMAIL,CORRECT_NAMEandCORRECT_EMAILwith the required values.
- script :
initjavaprj.sh - usage:
initjavaprj my-project
#!/bin/bash
mkdir $1
cd $1
mkdir -p src/main/{java,resources}
mkdir -p src/test/{java,resources}
echo "# README" > README.md
curl https://gist.githubusercontent.com/mcgivrer/85075539679f32763146ee4d9335a437/raw/2516dd23b766f5c6cf4b91385e0cb6c027621d7a/build.sh -o build.sh
touch .gitignore
echo "Project $1 created."