| title | subtitle | author | createdAt | copyright | description | license |
|---|---|---|---|---|---|---|
the Basic Java Survival Guide |
Java is an Oracle programming language (formerly a Sun one). |
Frédéric Delorme |
2020-09-23 |
2023 |
the mandatory how-to to survive in the maelström of tools and command line tools in the Java world ecosystem. |
MIT |
Java is an Oracle programming language (formerly a Sun one), created in 1995 by sun Corp, Java technologies have been acquired by Oracle, and evolve since this date to today with its latest release Java 17.
Here you will fnd some useful answer to you basic and not so basic one questions.
Some external referencies:
Let's start with the java command line tools.
javac, java and jar are the basic triptic of the java world.
The first one, javac, is the compiler, the second, java, is the virtual vm execution environment for you program, and the last one, jar, is the packaging tool to produce the famous java archive file : *.jar.
In the following table, we will explore ones of the most useful command lines capabilities.
| Command | Description |
|---|---|
| javac | To compile a list of sources, you must use the javac compiler command line:$> javac -sourcepath ./src -d ./target/classesTo be more precise, the compilation options can be : - -d target/classes the compiled class path- -g:source,lines,vars the debug information to be added- -sourcepath src/main/java/;src/main/resources the sources path- -source 1.8 the source level- -target 1.8 the compiled target - -classpath target/classes class path must be build upon this patha sample usage can be : $> javac @$LIBS/options.txt @$LIBS/sources.lst -cp $CLASSESwhere: - $LIBS/options.txt contains a list of javac options,- $LIBS/sources.lst a list of sources to be compiled,- -cp $CLASSES the path to be added to the class path. |
| jar | Build a JAR with a list of classes, a manifest file to define entry point and the jar -cfmv $TARGET/$PROGRAM_NAME.jar $TARGET/manifest.mf -C $CLASSES . -C $RESOURCES .where : - -cfmv [c] create the Java archive, [f] define the output file with an *.jar pattern, [m] define the path to the manifest file an [v] lets verbose 'bout jar creation- $TARGET/$PROGRAM_NAME.jar will be the path ($TARGET) and the name of the program ($PROGRAM_NAME),- $TARGET/manifest.mf is the Java MANIFEST file to define jar version, Java version, and moreover Main-Class to start the program (see bellow for details),- -C $CLASSES the path containing all the classes to be added,- -C $RESOURCES . the resources to be added to the JAR, like properties files, images, and so on ! |
| java | To execute some Java program, use the java command line :$> java MyClass.classIf you need to execute a jar : $> java -jar myjar.jarIf you want to debug a class, you must start your java virtuel machine (jvm) through a javagent to remotely control its execution : $> java -Xdebug -Xrunjdwp: transport=dt_socket, address=8000, server=y, suspend=y MyClassNotice that you must not add space in the -Xrunjdwp attribute value.If you want to execute a jar in a debug session : $> java -Xdebug -Xrunjdwp: transport=dt_socket, address=8000, server=y, suspend=y -jar myfantastic.jar |
The manifest file is a map of a JAR (Java ARchive file), defining all the specific information to understand what has been compiled, with which compiler, by which author from which company, etc... It's an administrative signature of the jar file. And moreover, it defines the Main-Class, execution entry point for the JAR.
- The Manifest description : https://docs.oracle.com/javase/tutorial/deployment/jar/manifestindex.html
- Adding some classes :https://docs.oracle.com/javase/tutorial/deployment/jar/downman.html
A sample file is a better than long definition:
Manifest-Version: 1.0
Main-Class: my.program.package.MyClass
Implementation-Title: MyProgram
Implementation-Version: 1.0.0
Implementation-Vendor: TheVendorOfThatProgram
Implementation-Author: The Author<the.authorATthevendorofthatprogramDOTcom>
figure 1 - A "MANIFEST.MF" file sample
But we also need some long definition : here are some interesting keys for the manifest file.
| Tag | [M]andatory / [O]ptional | Description |
|---|---|---|
| Manifest-Version: {value} | M | The version of this manifest file format.Manifest-Version: 1.0 |
| Main-Class: {value} | O | The main class, execution entry point for this jar:Main-Class: com.snapegames.demo.Game |
| Implementation-*: {value} | O | Everything about the implementation: - Implementation-Title: string is the name for this program,- Implementation-Version: semveris the official release version for this program,- Implementation-Vendor: string the vendor for this program,- Implementation-Author: string the name of the Author of the program. |
| Created-By: {value} | O | The compiler version and vendor, typically "version (vendor)". Oracle JDK compiler will output: Created-By: 1.8.0_212 (Oracle)Maven will produce something like: Created-By: Apache Maven 3.6.3 |
| Class-Path: {val1} {val2} {val3} | O | A list of String to define the class path of this JAR.Class-Path: core.jar lib/ properties/This embed a core.jar and some libs in /lib and also some properties in the /properties path. |
| Package: {value} | O | The define package for this JAR:Package: com.snapgames.demo.core |
| Sealed: boolean | O | If the jar is sealed, the boolean value will be true. |
A jar, to be secured and authenticate its provenance, can be digitaly signed. Here is the area of jarsigner.
- Signing process : https://docs.oracle.com/javase/tutorial/deployment/jar/signing.html
- Certificates attributes : https://docs.oracle.com/cd/E24191_01/common/tutorials/authz_cert_attributes.html
- Verify Signed Jar : https://docs.oracle.com/javase/tutorial/deployment/jar/verify.html
With some very simple operations, you can signed a JAR file :
- Generate a new RSA key in your own keystore with
keytool:
$> keytool -genkey -keyalg RSA -alias myFirstKey -keystore myKeystore -validity 360where :
genkeyrequest to generate a new key,keyalgdefine the algorithm to be used for generation (here RSA),-aliasan alias to name this certificate entry in the keystore,-keystorethe name of the keystore to be used to store this new certificate,-validitya time delay (in days) until this new certificate will be unvalidated.
- the sign the JAR with
jarsignerutility:
$>jarsigner -keystore myKeystore -verbose jarfiller-example.jar myFirstKeyThe resulting jarjarfiller-example.jar is now signed with the myFirstKey aliased certificate.
#### A more complex way
With a more tricky options, you can go in a more sexy signature :
- Generate a certificate in the keystore with some RDN (Relative Distinguished Name) :
$> keytool -genkey -noprompt -alias myownalias -dname "CN=Hostname, OU=OrganizationalUnit, O=Organization, L=City, S=State, C=Country" -keystore path.to.keystore -storepass password -keypass password -validity 3650- Sign the jar with the alias pointing the RDN and the key :
$> jarsigner -keystore path.to.keystore -storepass password -keypass password -signedjar signed.jar unsigned.jar myownaliasWhere signerjar define the output signed jar file and myownalias, the predefined alias in the keystore.
Java with a simple class file is easy to build wioth the javac command line. bu as soon as you need multiple classes, and a some jar dependencies, things geting complex.
Here are some accelerators for your build:
- a simple bash
build.shscript to buildyour simplest program - and a recommended tooln maven, as soon things must be more industrial.
- not already descibed in this chapter, the gradle tool is a latest commer in the build ecosystem, particularly for the android java world
- and a good and old pal, ant
the bash script build.sh will build a jar with all resources from a structure project described below.
/!\ NOTE This build script does not offer an out-of-the-box signed JAR generation, but it can be easily adapted regarding previous chapter to perform such signature.
The Project Structure is clearly inspired by the maven project one.
${projectfolder}/
 |_ lib
 |  |_ options.sh
 |  |_ stub.sh
 |_ src
 |  |_ main
 |  |  |_ java
 |  |  |  |_ my
 |  |  |     |_ program
 |  |  |        |_ package
 |  |  |           |_ MyMainClass.java
 |  |  |_ resources
 |  |     |_ res
 |  |     |  |_ images
 |  |     |  |  |_ mylogo.png
 |  |     |  |_ game.properties
 |  |_ test
 |     |_ java
 |     |  |_ MyMainClassTest.java
 |     |_ resources
 |     |  |_ my-test-resources.properties
 |_ .gitignore
 |_ README.md
 |_ build.sh
figure 2 - Project file structure inspired and compatible with maven
The build.sh script is build on top of the following command line:
- standard
bashcommands, javac,java,jar,- and
gitcli.
Some variables must be define at script beginning :
PROGRAM_NAMEYour program name,PROGRAM_VERSIONThe version of your program,MAINCLASScanonical name of your JAR entry point class,VENDOR_NAMEthe vendor for this program,AUTHOR_NAMEthe author of this program.
The script itself build.sh:
#!/bin/bash
#!/bin/sh
cd ./
## project configuration
export PROGRAM_NAME=demogame
export PROGRAM_VERSION=1.0
export MAINCLASS=com.snapgames.demo.DemoGame
export VENDOR_NAME=SnapGames
export AUTHOR_NAME=fredericDOTdelormeATgmailDOTcom
## default internal variables and pathes
export SRC=./src
export LIBS=./lib
export TARGET=./target
export BUILD=$TARGET/build
export CLASSES=$TARGET/classes
export RESOURCES=$SRC/main/resources
export GIT_COMMIT_ID=$(git rev-parse --verify HEAD)
## build program
echo "Build of program '$PROGRAM_NAME' ..."
echo "-----------"
## manifest
echo "|_ 1. Create Manifest file '$TARGET/manifest.mf'"
echo 'Manifest-Version: 1.0'>$TARGET/manifest.mf
echo "Main-Class: $MAINCLASS">>$TARGET/manifest.mf
echo "Implementation-Title: $PROGRAM_NAME">>$TARGET/manifest.mf
echo "Implementation-Version: $PROGRAM_VERSION">>$TARGET/manifest.mf
echo "Implementation-Vendor: $VENDOR_NAME">>$TARGET/manifest.mf
echo "Implementation-Author: $AUTHOR_NAME">>$TARGET/manifest.mf
echo "Git-Commit-Id: $GIT_COMMIT_ID">>$TARGET/manifest.mf
echo "   |_ done"
## compilation
mkdir -p $CLASSES
rm -Rf $CLASSES/*
echo "|_ 2. compile sources from '$SRC' ..."
find $SRC -name '*.java'  > $LIBS/sources.lst
javac @$LIBS/options.txt @$LIBS/sources.lst -cp $CLASSES
echo "   done."
## packaging
echo "|_ 3. package jar file '$PROGRAM_NAME.jar'..."
jar -cfmv $TARGET/$PROGRAM_NAME.jar $TARGET/manifest.mf -C $CLASSES . -C $RESOURCES .
echo "   |_ done."
echo "|_ 4. create run file '$PROGRAM_NAME.run'..."
mkdir -p $BUILD
## transform jar into bash executable (linux only)
cat $LIBS/stub.sh $TARGET/$PROGRAM_NAME.jar > $BUILD/$PROGRAM_NAME.run
chmod +x $BUILD/$PROGRAM_NAME.run
echo "   |_ done."
chmod +x debug.sh
echo "-----------"
echo "... '$PROGRAM_NAME' is built".
figure 3 - a build script for a Java jar program.
The options.txt file where all the compilation options are defined :
-d target/classes
-g:source,lines,vars
-sourcepath src/main/java/;src/main/resources
-source 1.8
-target 1.8
-classpath tartget/classes
figure 4 - the options files for the build script
The stub.sh file :
#!/bin/sh
# see https://github.com/maynooth/CS210/wiki/Convert-Java-Executable-to-Linux-Executable
MYSELF=`which "$0" 2>/dev/null`
[ $? -gt 0 -a -f "$0" ] && MYSELF="./$0"
java=java
if test -n "$JAVA_HOME"; then
    java="$JAVA_HOME/bin/java"
fi
exec "$java" $java_args -jar $MYSELF "$@"
exit 1
figure 5 - the stub file to be concatenated with jar file itself to produce a Linux executable jar a a script.
/!\ NOTE The resulting JAR is in
./targetand the built Linux executable is in./target/build.
- see gist for build script usage details https://gist.github.com/mcgivrer/85075539679f32763146ee4d9335a437
Maven is a java (not-only) build tools to automate all the buld process, build artifacts, source and binary packages, including the delivery process to a dedicated repository. IT is also able to deploy compiled program to specific target, like an application server.
An internal plugin mechanism allow Maven to extends its capabilities to other development area, like javascript with providing plugin to build front application through Node Package Manager.
- The Build Cycle
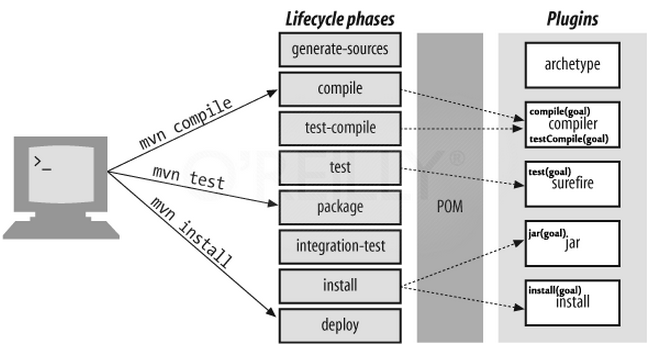
The Maven Build is an ordered list of phases, each corresponding to one step of the standard software build proccess.
- The Goals

Goals are keywords use to execute one or more phases with all its internal and plugins process.
How to develop and build a plugin? a tutorial from okta explains in details the phases and the tools.
extracted from Stackoverflow What is use of enabled(snapshot, releases) tag in maven pom's repository element?
When specifying the repository element why we need snapshots and releases as well?
Example:
<repository>
  <id>my-repo</id>
  <url>https://some.url.com/my-repo</url>
  <snapshots>
    <enabled>false/true</enabled>
  </snapshots>
  <releases>
    <enabled>false/true</enabled>
  </releases>
</repository>
How it affects a specific version of the dependency? (1.2.3-SNAPSHOT, 1.2.3, 1.2.3-RELEASE)
When there are multiple repositories, which repository will be searched for the artifact? How the artifacts being resolved?
Answer
When specifying the repository element why we need false/true and as well?
We need to do so if we would like to have a repository only for released versions, for instance, and another one only for SNAPSHOT versions.
This is a common use case for enterprise Maven repositories (i.e. Nexus, Artifactory, Archivia), when certain versions (like SNAPSHOT) are only available in a repository (deployed but a CI job, as an example) while released versions would only be available in another repository. A CI job releasing something for PROD should only use the latter repository, not using/allowing any SNAPSHOT version and breaking the build otherwise (enforcing build reproducibility and good practices).
From official Maven Settings documentation
releases, snapshots: These are the policies for each type of artifact, Release or snapshot. With these two sets, a POM has the power to alter the policies for each type independent of the other within a single repository. For example, one may decide to enable only snapshot downloads, possibly for development purposes. enabled: true or false for whether this repository is enabled for the respective type (releases or snapshots).
--
When there are multiple repositories , which repository will be searched for the artifact? How the artifacts being resolved?
The order of declaration will affect the look up order used by Maven. Check this official Maven ticket providing the fix for the proper behavior from version 3.0 on.
MNG-4400: Repository order from settings.xml is not respected during artifact resolution
How it affects a specific version of the dependency? (1.2.3-SNAPSHOT, 1.2.3, 1.2.3-RELEASE)
--
Merging the two answers above, depending on the order of declaration and which repository allow which type of artifact (snapshot or not).
Reference: https://mvnrepository.com/artifact/org.apache.maven.plugins/maven-javadoc-plugin
<!-- Javadoc -->
<plugin>
    <groupId>org.apache.maven.plugins</groupId>
    <artifactId>maven-javadoc-plugin</artifactId>
    <version>3.3.1</version>
    <configuration>
        <encoding>utf-8</encoding>
        <stylesheet>maven</stylesheet>
        <source>1.8</source>
        <show>public</show>
        <!-- do not stop build on javadoc generation error -->
        <failOnError>false</failOnError>
        <!-- do not stop build on javadoc generation fail -->
        <failOnWarnings>false</failOnWarnings>
        <useStandardDocletOptions>false</useStandardDocletOptions>
        <!-- does the javadoc must provide link to sources ? -->
        <linksource>false</linksource>
        <!-- do we need to show provate attributes ? -->
        <show>private</show>
        <nohelp>true</nohelp>
        <!-- Add a REAMDE page as a project overview -->
        <overview>${project.basedir}/README.md</overview>
        <!-- adding some links to the javadoc-->
        <links>
            <link>${project.issueManagement.url}</link>
            <link>${project.ciManagement.url}</link>
            <link>https://docs.oracle.com/en/java/javase/11/docs/api/</link>
        </links>
        <!-- specify the page footer -->
        <bottom>
            <![CDATA[<em>Copyright ${project.inceptionYear} - <a href="${organization.url}" title="see the organization official website">${organization.name}</a>]</em>]]>
        </bottom>
    </configuration>
    <executions>
        <execution>
            <id>attach-javadocs</id>
            <phase>verify</phase>
            <goals>
                <goal>jar</goal>
            </goals>
        </execution>
    </executions>
</plugin>
If you rely on the JDK 8, you will be able to enable the markdown markup language to write the javadoc in code with the following configuration :
    <plugin>
      <artifactId>maven-javadoc-plugin</artifactId>
      <version>2.9</version>
      <configuration>
        ...
        <doclet>ch.raffael.mddoclet.MarkdownDoclet</doclet>
        <docletArtifact>
          <groupId>ch.raffael.markdown-doclet</groupId>
          <artifactId>markdown-doclet</artifactId>
          <version>1.4</version>
        </docletArtifact>
        <useStandardDocletOptions>true</useStandardDocletOptions>
        ...
        </configuration>
</plugin>Reference: https://mvnrepository.com/artifact/org.apache.maven.plugins/maven-resources-plugin
Using the maven-resource-plugin, add the following declaration in your pom.xml file :
<!-- Resource parsing -->
<plugin>
    <groupId>org.apache.maven.plugins</groupId>
    <artifactId>maven-resources-plugin</artifactId>
    <version>3.1.0</version>
    <configuration>
        <encoding>UTF-8</encoding>
    </configuration>
</plugin>
this will specify the file encodign to prefer at parsing time.
and to add other directory than src/main/resources:
<resources>
    <resource>
        <directory>src/changes/**/*.xml</directory>
        <filtering>true</filtering>
    </resource>
    <resource>
        <directory>src/docs/**/*.md</directory>
        <filtering>true</filtering>
    </resource>
</resources>
All the placeholder ${placholder} will be replaced by their values:
- project.name
- project.description
- project.version
- project.id
- project.group
- project.artifact
- etc ...
Reference: https://mvnrepository.com/artifact/org.jacoco/jacoco-maven-plugin
To generate a code covergae analysis, you can use the JaCoCo tool.
Just add the following lines on your build/plugins section :
<!-- Compute coverage -->
<plugin>
    <groupId>org.jacoco</groupId>
    <artifactId>jacoco-maven-plugin</artifactId>
    <version>0.8.6</version>
    <executions>
        <execution>
            <id>default-prepare-agent</id>
            <goals>
                <goal>prepare-agent</goal>
            </goals>
        </execution>
        <execution>
            <id>default-report</id>
            <phase>prepare-package</phase>
            <goals>
                <goal>report</goal>
            </goals>
        </execution>
    </executions>
</plugin>
And to generate the report, add the following in the reporting section :
<!-- Code coverage -->
<plugin>
    <groupId>org.jacoco</groupId>
    <artifactId>jacoco-maven-plugin</artifactId>
    <version>0.8.6</version>
    <reportSets>
        <reportSet>
            <reports>
                <!-- select non-aggregate reports -->
                <report>report</report>
            </reports>
        </reportSet>
    </reportSets>
</plugin>Reference: https://mvnrepository.com/artifact/org.apache.maven.plugins/maven-shade-plugin
To generate a JAR with all dependencies, you can use the maven-shade-plugin :
You must declare a maimClass property defining the entrypoint class where the famous main can be executed. You can also add some specific files (include resources) to specify some needs wil the transformer tag.
And then in the <plugins/> section, define the maven plugin configuration:
 <!-- Shaded jar with all dependencies -->
<plugin>
    <groupId>org.apache.maven.plugins</groupId>
    <artifactId>maven-shade-plugin</artifactId>
    <version>3.2.0</version>
    <configuration>
        <!-- put your configurations here -->
        <shadedArtifactAttached>true</shadedArtifactAttached>
        <shadedClassifierName>shaded</shadedClassifierName>
        <transformers>
            <transformer
                  implementation="org.apache.maven.plugins.shade.resource.ManifestResourceTransformer">
              <mainClass>${mainClass}</mainClass>
            </transformer>
            <!-- To add a specific file at Shaded JAR generation: -->
            <!--transformer implementation="org.apache.maven.plugins.shade.resource.IncludeResourceTransformer">
              <resource>src/main/resources/res</resource>
              <file>app.properties</file>
            </transformer -->
        </transformers>
    </configuration>
    <executions>
        <execution>
            <phase>package</phase>
            <goals>
                <goal>shade</goal>
            </goals>
        </execution>
    </executions>
</plugin>Reference: https://mvnrepository.com/artifact/org.apache.maven.plugins/maven-assembly-plugin
The assembly proecess in Maven consists in building a package that can be an acrhive or directory containing what is needed to distribute your application.
THe standard srtucture is as follow:
[project]
 |_ src
    |_ assembly
       |_ scripts
       |  |_launch.sh
       |  |_launch.bat
       |  |_launch.ps1
       |_ dep.xml
the dep.xml xml file describe the files to be packed in to your assembly, and the output.
The listed files in the dep.xml file and existing in the src/assembly/scripts wich are the script used in to the packaging after deployement/installation of the package to start the application, according to the target platforme (Linux/Window).
the maven plugin must be added to the build tag:
<!-- packaging of the delivery solution -->
<plugin>
    <groupId>org.apache.maven.plugins</groupId>
    <artifactId>maven-assembly-plugin</artifactId>
    <version>3.3.0</version>
    <executions>
        <execution>
            <id>create-archive</id>
            <phase>package</phase>
            <goals>
                <goal>single</goal>
            </goals>
        </execution>
    </executions>
    <configuration>
        <descriptors>
            <descriptor>src/assembly/dep.xml</descriptor>
        </descriptors>
    </configuration>
</plugin>
to start the assembly, just:
mvn packageReference: https://mvnrepository.com/artifact/org.codehaus.mojo/exec-maven-plugin
How to produce a dedicated JRE sizzle to match the deplyed application requirements. we will use the maven-exec-plugin to start successiveley the JDeps and the JLink java utilities to build a specific JRE with required modules.
<!-- create the required JRE to package with the demogame module -->
<plugin>
    <groupId>org.codehaus.mojo</groupId>
    <artifactId>exec-maven-plugin</artifactId>
    <version>3.0.0</version>
    <executions>
        <execution>
            <id>jdeps</id>
            <phase>prepare-package</phase>
            <goals>
                <goal>exec</goal>
            </goals>
            <configuration>
                <!--
                    jdeps  --ignore-missing-deps  -q  \
                           --multi-release 11 \
                           --print-module-deps \
                           target/demogame-${project_version}-shaded.jar > jre-deps.info
                -->
                <executable>jdeps</executable>
                <workingDirectory>${project.build.directory}/bin</workingDirectory>
                <arguments>
                    <argument>--ignore-missing-deps</argument>
                    <argument>-q</argument>
                    <argument>--multi-release</argument>
                    <argument>11</argument>
                    <argument>--print-module-deps</argument>
                    <argument>${project.build.directory}/${project.name}-${project.version}-shaded.jar
                    </argument>
                </arguments>
                <outputFile>${project.build.directory}/jre-deps.info</outputFile>
            </configuration>
        </execution>
        <execution>
            <id>jlink</id>
            <phase>prepare-package</phase>
            <goals>
                <goal>exec</goal>
            </goals>
            <configuration>
                <!--
                    jlink --module-path target/demogame-${project_version}-shaded.jar \
                          --add-modules $(cat jre-deps.info) \
                          --output target/embbededjdk
                -->
                <executable>jlink</executable>
                <workingDirectory>${project.build.directory}/bin</workingDirectory>
                <arguments>
                    <argument>--module-path</argument>
                    <argument>${project.build.directory}/${project.name}-${project.version}-shaded.jar
                    </argument>

                    <!-- this list of module dependencies must be updated according to the required JRE ones -->
                    <argument>--add-modules</argument>
                    <argument>java.base,java.desktop,java.logging</argument>

                    <argument>--output</argument>
                    <argument>${project.build.directory}/embeddedjdk
                    </argument>
                </arguments>
            </configuration>
        </execution>
    </executions>
</plugin>
The package JRE will be prepared to the ${project.build.directory}/embeddedjdk, packaged with the application JAR file (${project.build.directory}/${project.name}-${project.version}-shaded.jar here we are talking about a shaded JAR, containing itself all its own dependencies).
To build this JRE, you must just execute the package goal, the activated phase to build the JRE is the prepare-package:
mvn packagethen, the prepared JRE will be output to :
[project]
|_target
  |_ embededjdk
Reference: https://mvnrepository.com/artifact/org.openjfx/javafx-maven-plugin
If you need to package a javaFX project, use the dedicated maven plugin :
<plugin>
  <groupId>org.openjfx</groupId>
  <artifactId>javafx-maven-plugin</artifactId>
  <version>0.0.8</version>
  <executions>
      <execution>
          <!-- Default configuration for running with: mvn clean javafx:run -->
          <id>default-cli</id>
          <configuration>
              <mainClass>${project.groupId}.${project.artifactId}/${project.mainClass}</mainClass>
              <launcher>${project.name}</launcher>
              <jlinkZipName>${project.artifactId}-${project.version}</jlinkZipName>
              <jlinkImageName>${project.name}</jlinkImageName>
              <noManPages>true</noManPages>
              <stripDebug>true</stripDebug>
              <noHeaderFiles>true</noHeaderFiles>
          </configuration>
      </execution>
  </executions>
</plugin>
see javafx-maven-plugin for details.
Reference: https://mvnrepository.com/artifact/org.apache.maven.plugins/maven-release-plugin
Maven has also a releasing capability to produce full packaged and consistent release.
you can :
release:clean,release:prepare,release:perform- and
release:rollbacka release. - You will be also able to create a release branch with
release:branch(see the create a branch documentation in the paven plugin ).
The mandatory release plugin in your pom.xml is as depicted below for a github package publishing (using a github profile):
<!-- Release -->
<plugin>
    <groupId>org.apache.maven.plugins</groupId>
    <artifactId>maven-release-plugin</artifactId>
    <version>2.5.3</version>
    <configuration>
        <useReleaseProfile>false</useReleaseProfile>
        <releaseProfiles>github</releaseProfiles>
        <tagNameFormat>v${project.version}</tagNameFormat>
        <autoVersionSubmodules>true</autoVersionSubmodules>
    </configuration>
</plugin>
ℹ NOTE
The<autoVersionSubmodules/>tag will automate the versioning of child maven project in you project structure.
This will enable the preparation and perform of the release thought the maven command:
mvn release:preparewill build and package everything juste before publishing therelase and its artifact to the dedicater maven repository. Source is tagged according to the project version (without the SNAPSHOT wording) and prepare the next release cycle, move release version number to the next one.
example:
- current version is
0.0.1-SNAPSHOT - start release:prepare => version
0.0.1and the source repository is tagged with thev0.0.1, - the next cycle is initialied by update the version to
0.0.2-SNAPSHOT.
mvn release:performThe current prepared release artifacts are pushed to the artifact repository.
This require that the maven pom tags must defined, here is an example with the github maven package repository:
<distributionManagement>
    <repository>
        <id>github</id>
        <name>GitHub Packages</name>
        <url>https://maven.pkg.github.com/mcgivrer/fromClassToGame</url>
    </repository>
</distributionManagement>
And in your $USERHOME/.m2/settings.xml define the user settings:
<activeProfiles>
    <activeProfile>github</activeProfile>
  </activeProfiles>

  <profiles>
    <profile>
      <id>github</id>
      <repositories>
        <repository>
          <id>central</id>
          <url>https://repo1.maven.org/maven2</url>
        </repository>
        <repository>
          <id>github</id>
          <url>https://maven.pkg.github.com/mcgivrer/fromClassToGame</url>
          <snapshots><enabled>true</enabled></snapshots>
          <releases><enabled>true</enabled></releases>
        </repository>
      </repositories>
    </profile>
</profiles><servers>
<server>
<id>github</id>
<username>repo_user</username>
<!-- other optional elements:
<password>my_login_password</password>
<privateKey>/path/to/identity</privateKey> (default is ~/.ssh/id_dsa)
<passphrase>my_key_passphrase</passphrase> -->
</server>
</servers>ℹ NOTE
go to github ? see at publishing java packages with maven
ℹ NOTE
You can also request a release automation with the Non interactive Release process
Further references:
 figure 1 - Configure Git Bash at defalut IntelliJ terminal
- Define the path and command line arguments to
"C:\[path_to_your]\Git\bin\sh.exe" --login -i
- Set an explicite title for this terminal
Git Bashsounds good, no ?
--
That's All Folks !
McG.
(c) 2020-2021, Frédéric Delorme