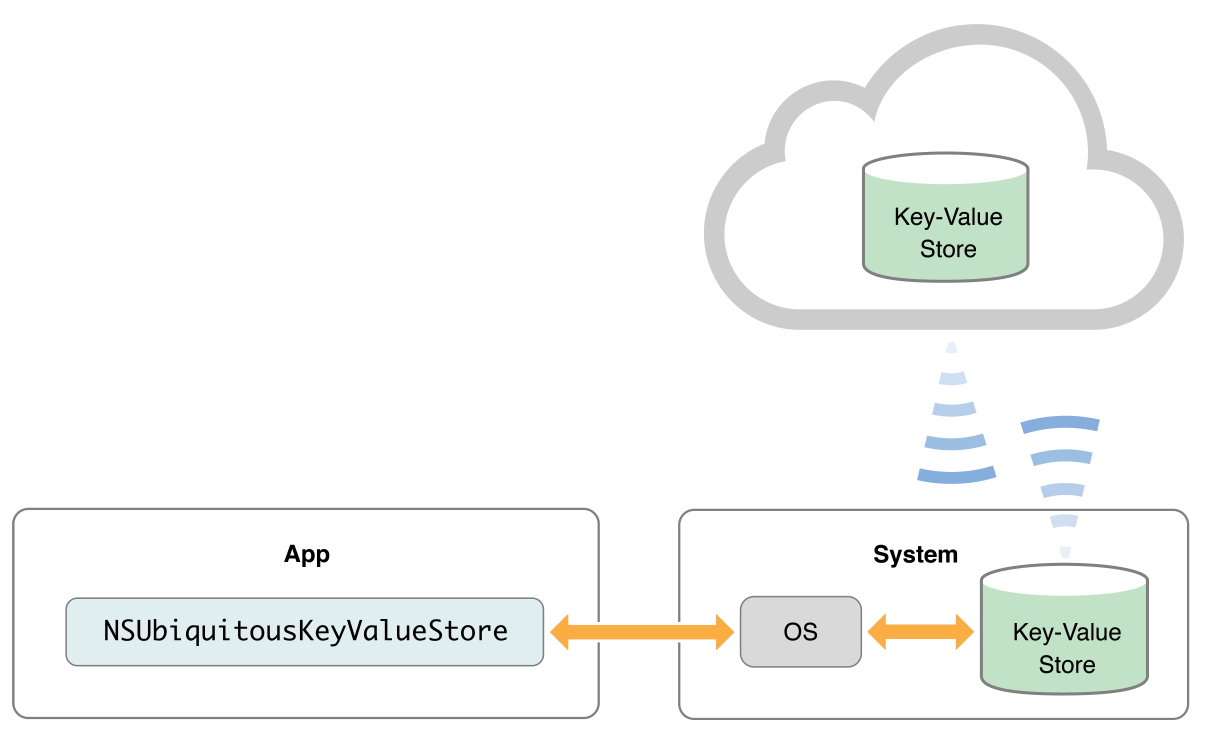
1つのデバイスでの変更が同じアプリがインストールされた全てのデバイスへ伝わる

アプリはNSUbiquitousKeyValueStoreを通してkey-valueにアクセスできる
アプリ起動時にやること
- NSUbiquitousKeyValueStoreDidChangeExternallyNotificationを NotificationCenterに登録
- synchronizeして新しいデータをiCloudから取得
簡単な説明コード
// register to observe notifications from the store
[[NSNotificationCenter defaultCenter]
    addObserver: self
       selector: @selector (storeDidChange:)
           name: NSUbiquitousKeyValueStoreDidChangeExternallyNotification
         object: [NSUbiquitousKeyValueStore defaultStore]];

// get changes that might have happened while this
// instance of your app wasn't running
[[NSUbiquitousKeyValueStore defaultStore] synchronize]; A simple iOS iPhone application that demonstrates how to use iCloud key-value store to share a single piece of data, its background color, with the same app on other iOS devices. It uses NSUbiquitousKeyValueStore to achieve this by storing a simple NSInteger representing a chosen color index.
他のiOSデバイスで同じアプリを使った時に背景色データを共有するためにiCloudのkey-value storeの使い方デモ用のiOSアプリだよ。 選択した色保存のためにNSUbiquitousKeyValueStoreを使ってますよ。
The user changes the background color of the app by choosing between 4 known colors. Tap the 'i' button and pick the color you want. After tapping "Done", this key-value store (number 0 to 3) is uploaded to iCloud. Any device running the same app will be notified to match that specific background color.
iボタンを押し、自分の好きな色を押し、Doneを押した後、0から3の数字のどれかがiCouldにuploadされますよ。 同じアプリが動いている他のデバイスで通知されますよ。
It then uses NSNotificationCenter and iCloud's NSUbiquitousKeyValueStoreDidChangeExternallyNotification to detect for value changes in the cloud.
cloud上の変更を検知するためにNSNotificationCenterとiCloudのNSUbiquitousKeyValueStoreDidChangeExternallyNotificationが使われますよ。
Important: Using iCloud's NSUbiquitousKeyValueStore with this sample will not work in the simulator.
important: シミュレータではNSUbiquitousKeyValueStoreは動かないよ。
Note: Each application that uses iCloud key-value store is limited to 64KB of total space. So do not use it to store large amounts of data.
For more detailed information in iCloud key-value store, refer to the "Preferences and Settings Programming Guide".
Note: iCloud key-value storeはアプリあたり64KBの制限がありますよ。なのでデカいデータを保存するようには使えないよ。
iCloud key-value storeをより詳しく知るには Preferences and Settings Programming Guide を見ましょう。
- 「Each app is limited to 1 MB of total space in the key-value store」とあるので今は容量が増えました。
- keyの長さは64バイトのようです。
iCloudキー値ストレージにアプリケーションが占有できる容量は、ユーザごとに1 MB以内です。指定できるキーは1024個まで、各キーに対応する値のサイズはそれぞれ1 MB以内です。したがって、ある特定のキーに対してちょうど1 MBの値を格納すれば、これだけでユーザに割り当てられた容量を消費してしまいます。各キーに対して1 KBのデータであれば、1000組のキーと値を保存できます。 キー文字列の長さは、UTF8エンコードした状態で、64バイト以内です。1000組分のキー文字列のデータ長(最大64 KB)が、iCloudキー値ストレージに割り当てられた1 MBを上回ることはありませんが、ユーザに割り当てられたiCloudの総容量との関係で問題になる可能性はあります。
Configuring your Xcode project and devices require a few steps in the iOS Provisioning Portal and in Xcode:
Note: If you are unfamiliar with device provisioning or entitlements, please refer to the "iOS Development Workflow Guide" found at http://developer.apple.com/library/ios/#documentation/Xcode/Conceptual/ios_development_workflow/
- Configure your devices: Each device you plan to test needs to have an iCloud account. This is done by creating or using an existing Apple ID account that supports iCloud. You can do this directly on the device by opening the Settings app, selecting iCloud option. Each device needs to be configured with this account.
- デバイスの設定: それぞれのデバイスでiCloudが必要ですよ。
- Configure your Provisioning Profile: You will need to visit the iOS Provisioning Portal to create a new development provisioning profile https://developer.apple.com/ios/my/overview/index.action. This involves creating a new App ID to include iCloud support. iCloud requires an Explicit App ID (non-wildcard). After creating the App ID verify iCloud shows as Enabled on the Manage Tab, and click 'Configure' to enable iCloud if necessary.
- Provisioning Profileの設定 iOS Provisioning Portalに行って、development provisioning profileを作り必要がありますよ。 iCloudは*なしのApp IDが必要ですよ。App ID
After creating a new development provisioning profile in the iOS Provisioning Portal "Provisioning" section > "Development" tab, download and install the iCloud development provisioning profile by dragging it to the Xcode icon on the Dock.
新しいdevelopment provisioning profile作ったあと、ProvisioningセクションのDevelopmentタブに行き、iCloud development provisioning profileをダウンロードしてXcodeにドラッグしてinstallしますよ。
- Xcode project Entitlements: An entitlements file in this sample project includes the key "com.apple.developer.ubiquity-kvstore-identifier", where $(TeamIdentifierPrefix) is the Team ID found in the Provisioning Portal, and the rest is followed by your app's bundle identifier.
- Xcode project Entitlements: このサンプルプロジェクトのentitlementsファイルは$(TeamIdentifierPrefix)がProvisioning Portalの中で見つかるTeam IDの”com.apple.developer.ubiquity-kvstore-identifier”というkeyを持っていて、残りはアプリのbundle identifierに従っていますよ。 entitlementsファイルについてはこの辺 https://developer.apple.com/library/mac/documentation/General/Conceptual/iCloudDesignGuide/Chapters/iCloudFundametals.html#//apple_ref/doc/uid/TP40012094-CH6-SW13
- The bundle identifier defined on your Xcode project's Target > Info tab needs to match the App ID in the iCloud provisioning profile. This will allow you to assign the new profile to your Debug > Code Signing Identities in your Xcode project Target > Build Settings.
- Xcode projectのTarget > Infoのタブのbundle identifierは、iCloud provisioning profileのApp IDと一致していないとダメですよ。これでTarget > Build SettingsのCode Signing Identitiesに新しいprofileが割り当てられますよ。
So if your provisioning profile's App ID is ".com.yourcompany.yourAppName", then the bundle identifier of your app must be "com.yourcompany.yourAppName".
なので、provisioning profileのApp IDが".com.yourcompany.yourAppName”なら、bundle identifier