You signed in with another tab or window. Reload to refresh your session.You signed out in another tab or window. Reload to refresh your session.You switched accounts on another tab or window. Reload to refresh your session.Dismiss alert
Verify and Repair Disk Permissions via Terminal (Mac OS X)
Verify Permissions
diskutil verifyPermissions /
Repair Permissions
diskutil repairPermissions /
Verify and Repair Volume via Terminal (Mac OS X)
Launch Terminal from your Dock, Utilities folder, or via an app launcher like Alfred. Once launched, type or paste in the following command.
diskutil verifyVolume [drive name]
So, for your main hard drive, you could type or paste in something like:
diskutil verifyVolume /
Or, if you have an external drive attached, you can type or paste in the following:
diskutil verifyvolume /Volumes/[drive name]/
So for an external drive named “BackupStuff” you would enter:
diskutil verifyvolume /Volumes/BackupStuff/
If you see no messages, then you can assume that diskutil hasn’t found any errors, and you can move on. If, however, you get an error like “The volume Macintosh HD was found corrupt and needs to be repaired,” then you can repair the drive using diskutil as well.
To repair the drive, you can issue the following command into Terminal:
You can try booting from OS X recovery by holding CMD + R at the time of startup. Once booted from OS X recovery, select Terminal from the utilities and then at the unix prompt enter:
diskutil list
then press return and look for the disk identifier and enter the following command with the disk identifier:
sudo diskutil unmountDisk /dev/(enter here disk identifier name)
Press return and enter your admin password if prompted. This should unmount all volumes of the physical drive.
If still the above method didn't work, then the last option is to force the entire disk to unmount.
For that using the terminal application again, enter the following command:
sudo diskutil unmount force /dev/(enter here disk identifier name)
Then press return and enter the admin password if prompted. This will definetely unmount the entire disk and all its related volume.
Time Machine is a great tool for ensuring that your data is safe, and it's pretty easy to set up and use. But for some users, the basic Time Machine interface isn't enough. As with most of OS X's functions, there is a command-line tool that lets you do many things with Time Machine. Here's how you can use the tmutil command to control and tweak Time Machine from Apple's command-line tool, Terminal.
The basics
Most people won't need to use this command for their backups because the Time Machine interface will suffice. Who will need it? People who want to manage remote Macs or who want to run scripts containing commands for Time Machine.
The basics of the tmutil command can be found by typing man tmutil in Terminal. (You'll find the Terminal app in your /Applications/Utilities folder.) The man page tells you what you can do with this command.
For example, to turn Time Machine on or off, you can run these commands:
sudo tmutil enable
sudo tmutil disable
The sudo command is required for many of the commands you issue with tmutil because you need administrative privileges; you'll have to enter your password after running the above commands.
If you want to run a Time Machine backup right away, on a Mac that either has Time Machine disabled, or, say, just before updating to a new version of OS X, you can run this command:
tmutil startbackup
This is the same as choosing Back Up Now from the Time Machine menu in the menu bar at the top of your screen.
And if you ever want to stop a backup, just run this:
tmutil stopbackup
Save disk space on your laptop
Since your laptop isn't always connected to its backup disk, Time Machine retains "local snapshots," or files that it will copy to your backup disk the next time it is available. However, these local snapshots take up space, and you may want to turn this feature off if you don't have much room on your hard disk. You can do so with the following command:
sudo tmutil disablelocal
Running this command will also delete any local snapshots. You can turn local snapshots back on by running:
sudo tmutil enablelocal
If you love delving into the nitty-gritty, and especially if you manage remote Macs, you'll find this to be a very useful tool.
Exclude files and folders
You can exclude certain files and folders from your Time Machine backups from the Time Machine pane in System Preferences. Naturally, you can also do this from the command line, too. Run this command:
sudo tmutil addexclusion
The part stands for the path to a file or folder. For example, if I want to exclude my Downloads folder from Time Machine backups, I would run the following:
sudo tmutil addexclusion ~/Downloads
The tmutil addexclusion command has an interesting property: it's sticky. When you use this command, the item you exclude remains in the Time Machine exclusion list even if you move it, which is not the case when you exclude items from the Time Machine preference pane. If you use the above command with the -p flag, then it will not be sticky, and will be the same as an exclusion you add from the Time Machine preference pane.
Manage remote backups
If you're managing a remote Mac, such as a server, you may want to change Time Machine settings for that computer. You can start by finding where Time Machine backups are stored. Run this command:
tmutil destinationinfo
You'll see something like this in Terminal:
Name : TM Backup
Kind : Local
Mount Point : /Volumes/TM Backup
ID : B9DAT9A6-0C37-4C39-A2AE-10A3403C97F9
To change the destination, you can use two commands. First, remove the current destination like this:
tmutil removedestination
In place of , type in the text string returned by the destinationinfo command. Then run this command to set up a new destination disk:
tmutil setdestination _volume_name_
Replace _volume_name_ with the name of the disk or volume you want to use. You can add multiple destinations as well, since Time Machine can rotate its backups on several disks or volumes. See man tmutil for more on setting up multiple backup destinations. (You can now do this without the command line too, see "How to create redundant Time Machine backups.")
Get Time Machine stats
Time Machine saves a lot of backups: one per hour for the past 24 hours; one a day for the past week; and one a week before that. You can get a list of all the backups on your Time Machine disk with this command:
tmutil listbackups
This will show the full path of each backup.
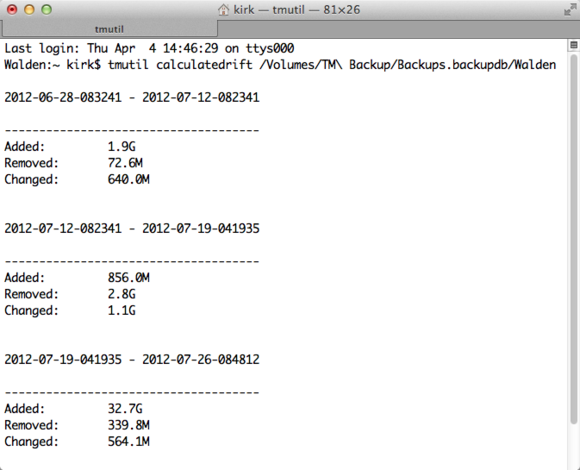
If you're curious about how much has changed in your Time Machine backups, there's a command that will let you find out how much of each backup is new. Run this command to see the delta between each of the Time Machine backups on your backup disk or volume:
tmutil calculatedrift _backup_folder_
Replace _backup_folder_ with the path of the folder containing your backups. This is not the Backups.backupdb folder at the top level of your Time Machine volume, but rather the next folder down; this is generally labeled with your Mac's name.
For example, when I ran this command on my backups, I saw data like this:
Here's what I saw when I ran the tmutil calculatedrift backup_folder command on my Mac.
Note that this command takes a long time to run, as your Mac has to calculate a lot of information.
The tmutil command offers many other options, such as the ability to inherit destinations, perform detailed comparisons of backups, restore items and much more. See man tmutil to find out all that you can do.
If you love delving into the nitty-gritty, and especially if you manage remote Macs, you'll find this to be a very useful tool.