- 某勉強会 で 教わった内容 の 復習用まとめ
- 講師
- 馬谷 さん
- Main.storyboard ではなく,
xibファイル上で 画面レイアウト する - エンドユーザが画面を操作した時のアクション(
@IBAction) を 実装 する - ロジックを共通化 するために メソッド を 定義 する
- Navigation Controller を 利用して 画面遷移 する
- 遷移元画面 から 遷移先画面 へ データ の 受け渡し を 実装 する
File-New-Projectを 【選択】Single View Appを 【選択】- Next
- Product Name: 任意の名前 を 【入力】
- Next
- 任意のディレクトリ を 指定
- Create
Cmd + NCocoa Touch Classを 【選択】- Next
- Class:
TopViewControllerと 【入力】 - Subclass of:
UIViewControllerのまま Also create XIB fileに チェック- Next
- 任意のディレクトリ を 指定
- Create
- Class:
didReceiveMemoryWarning()は 【削除】extension TopViewController {}を 3個 【追加】MARK: -付きの コメント を 4個 【追加】
viewDidLoad()をMARK: - Life Cycle内 に 【移動】
import UIKit
// MARK: - Property
class TopViewController: UIViewController {
}
// MARK: - Life Cycle
extension TopViewController {
  override func viewDidLoad() {
    super.viewDidLoad()
  }
}
// MARK: - Protocol
extension TopViewController {
}
// MARK: - Method
extension TopViewController {
}
import UIKit
+// MARK: - Property
class TopViewController: UIViewController {
-
- override func viewDidLoad() {
- super.viewDidLoad()
-
- // Do any additional setup after loading the view.
- }
-
- override func didReceiveMemoryWarning() {
- super.didReceiveMemoryWarning()
- // Dispose of any resources that can be recreated.
- }
-
-
- /*
- // MARK: - Navigation
-
- // In a storyboard-based application, you will often want to do a little preparation before navigation
- override func prepare(for segue: UIStoryboardSegue, sender: Any?) {
- // Get the new view controller using segue.destinationViewController.
- // Pass the selected object to the new view controller.
- }
- */
-
}
+// MARK: - Life Cycle
+extension TopViewController {
+ override func viewDidLoad() {
+ super.viewDidLoad()
+ }
+}
+// MARK: - Protocol
+extension TopViewController {
+}
+// MARK: - Method
+extension TopViewController {
+}Ctrl + 6を 押して class 内の構造 を 確認
TopViewController.xibを 【ファイル選択】- 部品 を 配置
- Label 【追加】
- Button 【追加】
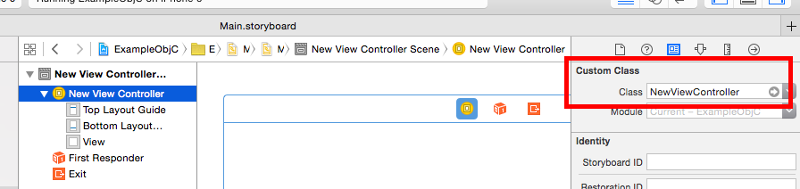
Main.storyboardを 【ファイル選択】View Controllerを 【選択】- Custom Class の
- Class:
TopViewControllerと 【入力】
- Class:
- View Controller の
Is Initial View Controllerに チェック が 入っている事を確認
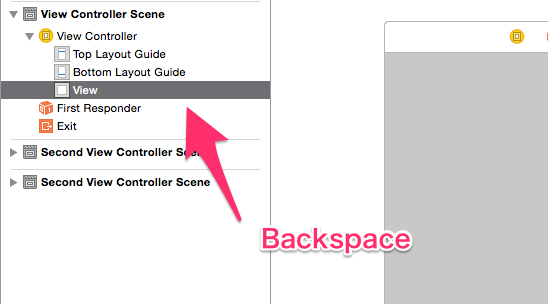
- Custom Class の
- Top View Controller 直下の
- View を 【削除】
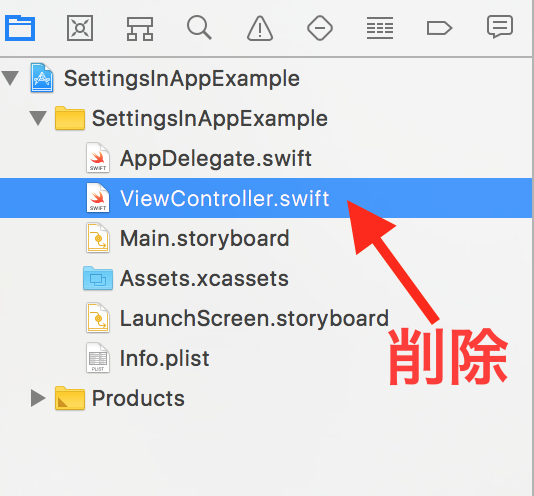
ViewController.swiftが 不要 になったので 【ファイル削除】
Cmd + R で 動作確認 (Label と Button が 表示される事の確認)
TopViewController.xibを 【ファイル選択】Alt + Cmd + Enterで 【アシスタント エディタ 起動】- (
Cmd + Enterで アシスタント エディタ 閉じる)
- (
- Label 【選択】
Ctrl + マウスドラッグ-> コード 内に- Connection:
Outletのまま - Name:
label1と 【入力】 - Connect 【押下】
- Connection:
- Button 【選択】
Ctrl + マウスドラッグ-> コード 内に- Connection:
Actionに 【変更】 - Name:
touchButtonと 【入力】 - Type:
Any->UIButtonに 【変更】 - Connect 【押下】
- Connection:
  @IBOutlet weak var label1: UILabel!
  @IBAction func touchButton(_ sender: UIButton) {
  }
import UIKit
// MARK: - Property
class TopViewController: UIViewController {
+ @IBOutlet weak var label1: UILabel!
+ @IBAction func touchButton(_ sender: UIButton) {
+ }
}
// MARK: - Life Cycle
extension TopViewController {
override func viewDidLoad() {
super.viewDidLoad()
}
}
// MARK: - Protocol
extension TopViewController {
}
// MARK: - Method
extension TopViewController {
}- Button が タップされたら Label の 文字色 を 変更
  @IBAction func touchButton(_ sender: UIButton) {
    label1.textColor = UIColor.red
  }
// MARK: - Property
class TopViewController: UIViewController {
@IBOutlet weak var label1: UILabel!
@IBAction func touchButton(_ sender: UIButton) {
+ label1.textColor = UIColor.red
}
}
// (以下略)Cmd + R で 動作確認 (Button を押した時に Label の テキスト の 色 が 変わる 事の確認)
- メソッド を定義して, ロジックを共通化 する練習をする
- メソッド の シグニチャ は 以下の仕様 とする
- 英語文型:
SVOCのOCの 部分
- 英語文型:
  func setColor(label: UILabel, color: UIColor) {
    // TODO 実装
  }
import UIKit
// MARK: - Property
class TopViewController: UIViewController {
@IBOutlet weak var label1: UILabel!
@IBAction func touchButton(_ sender: UIButton) {
- label1.textColor = UIColor.red
+ setColor(label: label1, color: UIColor.brown)
}
}
// MARK: - Life Cycle
extension TopViewController {
override func viewDidLoad() {
super.viewDidLoad()
}
}
// MARK: - Protocol
extension TopViewController {
}
// MARK: - Method
extension TopViewController {
+ func setColor(label: UILabel, color: UIColor) {
+ label.textColor = color
+ }
} func setColor(label: UILabel, color: UIColor) {
label.textColor = color
}Cmd + R で 動作確認 (Button を押した時に Label の テキスト の 色 が 変わる 事の確認)
Main.storyboardを 【ファイル選択】Editor-Embed in-Navigation Controllerを 【選択】- Navigation Controller の
Is Initial View Controllerに チェック が 入っている 事を確認 - Top View Controller の
Is Initial View Controllerの チェック が 外れている 事を確認
- Navigation Controller の
- 手順 2. と 以下の項目 以外 は 同じ
- Class:
SecondViewControllerと 【入力】
- Class:
import UIKit
// MARK: - Property
class SecondViewController: UIViewController {
}
// MARK: - Life Cycle
extension SecondViewController {
  override func viewDidLoad() {
    super.viewDidLoad()
  }
}
// MARK: - Protocol
extension SecondViewController {
}
// MARK: - Method
extension SecondViewController {
}- 部品 を 追加
- Label 2個 【追加】
nameLabelageLabel
- Label 2個 【追加】
// MARK: - Property
class SecondViewController: UIViewController {
+  @IBOutlet weak var nameLabel: UILabel!
+  @IBOutlet weak var ageLabel: UILabel!
}
// (以下略)- ↑で定義した
setColor()を削除 navigationControllerを 利用して 画面遷移 する ロジック を 追加
TopViewController.swift
  @IBAction func touchButton(_ sender: UIButton) {
    let nextVC = SecondViewController()
    navigationController?.pushViewController(nextVC, animated: true)
  }
// MARK: - Property
class TopViewController: UIViewController {
@IBOutlet weak var label1: UILabel!
@IBAction func touchButton(_ sender: UIButton) {
- setColor(label: label1, color: UIColor.brown)
+ let nextVC = SecondViewController()
+ navigationController?.pushViewController(nextVC, animated: true)
}
}
// (中略)
```diff
// MARK: - Method
extension TopViewController {
- func setColor(label: UILabel, color: UIColor) {
- label.textColor = color
- }
}Cmd + R で 動作確認 (Button を押した時に 画面遷移 する 事の確認)
TopViewController.swift
  func transitionVC(to: UIViewController)  {
    navigationController?.pushViewController(to, animated: true)
  }
class TopViewController: UIViewController {
@IBOutlet weak var label1: UILabel!
@IBAction func touchButton(_ sender: UIButton) {
let nextVC = SecondViewController()
- navigationController?.pushViewController(nextVC, animated: true)
+ transitionVC(to: nextVC)
}
}
// (中略)
// MARK: - Method
extension TopViewController {
+ func transitionVC(to: UIViewController) {
+ navigationController?.pushViewController(to, animated: true)
+ }
}Cmd + R で 動作確認 (Button を押した時に 画面遷移 する 事の確認)
Controller間の データの受け渡し 用の Model クラスを定義- 手順 2. と 以下の項目 以外 は 同じ
- Class:
UserModelと 【入力】 - Subclass of:
UIViewController->NSObjectに 【変更】
- Class:
import UIKit

class UserModel: NSObject {
  var name: String?
  var age: Int?
}varでUserModel型 の プロパティ を 定義
TopViewController.swift
// MARK: - Property
class TopViewController: UIViewController {
  @IBOutlet weak var label1: UILabel!
  @IBAction func touchButton(_ sender: UIButton) {
    let nextVC = SecondViewController()
    transitionVC(to: nextVC)
  }
+  var userModel: UserModel = UserModel()
}
// (以下略)
SecondViewController.swift
// MARK: - Property
class SecondViewController: UIViewController {
  @IBOutlet weak var nameLabel: UILabel!
  @IBOutlet weak var ageLabel: UILabel!
+  var userModel: UserModel = UserModel()
}
// (以下略)- 遷移元(
TopViewController) のviewDidLoad()で- 【1】
UserModelに データ(固定値) を セット
- 【1】
- ボタン の タップ イベント(
touchButton()) で- 【2】
UserModelを 遷移先(SecondViewController) の Property に セットUserModelは 参照型(class) のため, この時点で- 遷移元(
TopViewController) のuserModelProperty と - 遷移先(
SecondViewController) のuserModelProperty は- 同じ instance を 参照 するようになる
- 遷移元(
- 【2】
- 遷移先(
SecondViewController) のviewDidLoad()で- 【3】
UserModelから データ を 受け取り - 【3】 Label に 表示
- 【3】
TopViewController.swift
// MARK: - Property
class TopViewController: UIViewController {
  @IBOutlet weak var label1: UILabel!
  @IBAction func touchButton(_ sender: UIButton) {
    let nextVC = SecondViewController()
+    nextVC.userModel = userModel // 【2】
    transitionVC(to: nextVC)
  }
  var userModel: UserModel = UserModel()
}
// (中略)
// MARK: - Life Cycle
extension TopViewController {
  override func viewDidLoad() {
    super.viewDidLoad()
+    userModel.name = "xxxxx" // 【1】
+    userModel.age = 100      // 【1】
  }
}
// (以下略)
SecondViewController.swift
// MARK: - Life Cycle
extension SecondViewController {
  override func viewDidLoad() {
    super.viewDidLoad()
+    nameLabel.text = userModel.name // 【3】
+    ageLabel.text = userModel.age   // 【3】
  }
}
ageLabel.text = userModel.age- ↑ の 1行 が コンパイルエラー
- 代入先/代入元 の 型が異なる ため
ageLabel.textがString?型userModel.ageがInt?型
- 代入先/代入元 の 型が異なる ため
Int?->String?, またはInt?->Stringの 型変換 が 必要- 参考:
Int->Stringへの 型変換 の コード例 ↓let a = String(11)Int型の値(この場合は11) を 引数 に取るStringの initializer を 呼ぶ- 変数
aはString型 となる
- 参考:
変更(まだコンパイルエラー)
    ageLabel.text = String(userModel.age)
// Cannot invoke initializer for type 'String' with an argument list of type '(Int?)'userModel.ageの 型 がInt?のため,Stringの initializer の 引数 には渡せない- unwrap して
Int?->Int型 に 変換してから 引数 に渡す
- unwrap して
解決案
    if let age = userModel.age {   //   `userModel.age` は `Int?` 型
      ageLabel.text = String(age)  // if let 内の `age` は `Int`  型
    }
SecondViewController.swift
// MARK: - Life Cycle
extension SecondViewController {
  override func viewDidLoad() {
    super.viewDidLoad()
+    nameLabel.text = userModel.name
+    if let age = userModel.age {
+      ageLabel.text = String(age)
+    }
  }
}
Cmd + R で 動作確認 (画面遷移先 の 画面 に UserModel の値が表示される 事の確認)
- iOSアプリ開発勉強会 2018-08-25 に 続く...