Created
March 25, 2020 16:50
-
-
Save okunokentaro/8bc8068b96ba57b5201167cc9fc17b02 to your computer and use it in GitHub Desktop.
npm i angular2してHello World!するところまで
This file contains bidirectional Unicode text that may be interpreted or compiled differently than what appears below. To review, open the file in an editor that reveals hidden Unicode characters.
Learn more about bidirectional Unicode characters
| 2015/12/02 にQiitaに投稿した記事のアーカイブです | |
| --- | |
| 【160325追記】この記事はAngular 2 alpha時代に初稿を仕上げ、それ以降は変更にあわせて保守を続けていましたが、そろそろ差が大きくなってきたため[改稿版として別の記事を用意しました。](http://qiita.com/armorik83/items/ae737ab584012a0f5876)今後はそちらをご覧ください。 | |
| --- | |
| @armorik83です。初日である昨日は、このアドベントカレンダー最大のサプライズとして@btford氏に寄稿していただきました。アドベントカレンダーの立ち上げ直後からオファーし、日本の「アドベントカレンダー」という特殊なTech系の事情を説明し、Angular 2のカレンダーをぜひ飾ってほしいという旨で依頼したことを覚えています。直前になって、時差で向こうはまだ11月なため日本のカレンダー開始に気付いていなかった、という笑い話も乗り越え、公開にこぎ着けたことを喜ばしく思います。 | |
| Thank you so much for contributing! | |
| --- | |
| Angular 2 Advent Calendar 2015の2日目の本日は、皆さんに手っ取り早くAngular 2を触ってもらうために、`npm i`してからHello Worldを表示するところまでを解説します。 | |
| 【151225追記】本稿公開以降にAngular 2のalphaバージョンが上がり、公開当初の内容では動かなくなってしまいました。~~現在は改稿しbeta.0に対応しています。~~ | |
| 【160303追記】現在は改稿しbeta.8に対応しています。 | |
| # 前提知識 | |
| `npm`を用いたインストール、`package.json`での管理には慣れているものとします。今回はビルドに[Browserify](http://browserify.org/)を使いますが、おそらく[webpack](https://webpack.github.io/)でもいけるはず。 | |
| Angular 2は[TypeScript](http://www.typescriptlang.org/)でのコーディングを前提に設計されているので、本稿もTypeScriptを使用します。一応ES6 ([Babel](https://babeljs.io/))やES5でも書けるとは言われていますが、私はTypeScriptで書くのが一番書きやすいと感じています。 | |
| ## 今回の環境 | |
| 細かなバージョン違いは影響しないと思いますが、npmだけ、2.x系だとチュートリアル通りにいかない可能性があります。 | |
| ``` | |
| $ node -v | |
| v5.5.0 | |
| $ npm -v | |
| 3.6.0 | |
| ``` | |
| ## 公式サイト | |
| - https://angular.io/ | |
| - https://github.com/angular/angular | |
| # 開発環境を作る | |
| ## sandbox | |
| Angular 2をインストールするディレクトリを作成します。これはなんでもかまいません。 | |
| ``` | |
| mkdir ~/Desktop/angular2-sandbox && $_ | |
| ``` | |
| ## インストール | |
| 下地となる`package.json`を作成します。ビルドの際に`npm run`するためにこれが必要です。 | |
| ``` | |
| npm init -y | |
| ``` | |
| 続いてインストールを進めていきます。 | |
| ``` | |
| npm i -D typescript browserify babelify | |
| npm i -S angular2 es6-promise es6-shim@^0.33.3 reflect-metadata@0.1.2 rxjs@5.0.0-beta.2 zone.js@0.5.15 | |
| ``` | |
| `npm i -S angular2`は本体のインストールです。~~npm 2系では`npm i -S reflect-metadata zone.js`が必要かもしれません。これも将来的には不要になる(Angular 2が内部で依存するようになる)見込みのようです。~~ | |
| Angular 2 beta.8時点ではes6-promise以下のモジュールも手動で指定してインストールする必要があり、それを満たさない場合npmは`UNMET PEER DEPENDENCY`と警告を出します。今後beta.2以降で上記を試した時にもし`UNMET PEER DEPENDENCY`と表示されたらバージョン指定がズレている可能性があるので、エラー文を頼りに修正してください。 | |
| TypeScriptの`-t es6`が指定できるにも関わらず`es6-promise es6-shim`が必須と指定されていますが、今後この辺りは整理されると予想しています。 | |
| ## ビルドスクリプト | |
| TypeScriptで書くためコンパイルが必要です。それぞれのファイルはTypeScriptの`import/export`によって依存関係を記述するので、最終的にはBrowserifyを使用します。 | |
| Angular 2公式のチュートリアルではBrowserifyではなく[SystemJS](https://github.com/systemjs/systemjs)を推奨していますので、そちらを使っても構いません。どちらを使っても実装自体の`import/export`の書き方が変わるわけではありません。 | |
| `package.json`の`"scripts"`を次のように書き換えます。 | |
| ```package.json | |
| { | |
| "scripts": { | |
| "tsc": "tsc -p ./", | |
| "browserify": "browserify ./index.js -t babelify -o ./bundle.js", | |
| "build": "npm run tsc && npm run browserify" | |
| }, | |
| "babel": { | |
| "presets": ["es2015"] | |
| }, | |
| } | |
| ``` | |
| `tsc`では、`-t es5 -m commonjs`とオプションを渡すのが初期のバージョンでおなじみでしたが、現在([TypeScript 1.5.3以降](http://qiita.com/vvakame/items/9b9fde6c71aae6a824c0))は`tsconfig.json`がサポートされていますので、`-p`オプションでプロジェクト・ディレクトリを指定し`tsconfig.json`を使っていくのが標準的な形式です。今回はサンプルなので雑にルートを指定しています。 | |
| 従来通りコンパイラオプションを書くことも出来ますが、Angular 2の場合は有効にすべきオプションが多いため、積極的に`tsconfig.json`を作成するほうがよいでしょう。オプションについては後述します。 | |
| `browserify`は単純にエントリーソースを指定して`bundle.js`として出すだけ。`build`でその二つの処理をまとめています。これくらいの量だと[gulp](http://gulpjs.com/)は使っていません。 | |
| ## tsconfig.json | |
| ```tsconfig.json | |
| { | |
| "compilerOptions": { | |
| "target": "es6", | |
| "noImplicitAny": true, | |
| "removeComments": true, | |
| "experimentalDecorators": true, | |
| "emitDecoratorMetadata": true, | |
| "moduleResolution": "node" | |
| }, | |
| "files": [ | |
| "./index.ts" | |
| ] | |
| } | |
| ``` | |
| `experimentalDecorators`は[Decorators構文](https://speakerdeck.com/armorik83/es7-decorators)を有効にするためのオプションで、`emitDecoratorMetadata`は引数の型アノテーションを実装内でも扱うための出力を指定します。Angular 2のDIのためにあるようなオプションだと認識しています。 | |
| それ以外のオプションについては[公式のWiki](https://github.com/Microsoft/TypeScript/wiki/Compiler-Options)を参照してください。`files`はコンパイル対象のファイルを配列で与えますが、これを毎回手書きするのはとても煩雑なので、IDEの支援や[CLI](https://www.npmjs.com/package/tsconfig-cli)を活用して、人の手では書かないようにしましょう。 | |
| # ファイル作成 | |
| - `index.ts` | |
| - `index.html` | |
| この二つを作成します。 | |
| ```ts:index.ts | |
| // まだ何もない | |
| ``` | |
| ```html:index.html | |
| <!DOCTYPE html> | |
| <html lang="ja"> | |
| <head> | |
| <meta charset="UTF-8"> | |
| <title>Angular 2 Advent Calendar 2015</title> | |
| </head> | |
| <body> | |
| </body> | |
| </html> | |
| ``` | |
| # コーディング | |
| ## Angular 2をimport | |
| `"angular2/*"`からAngular 2の様々なAPIを取得できます。今回は初回起動に必要な`bootstrap`とコンポーネント定義に使う`Component`をimportします。`CORE_DIRECTIVES`は今回は扱いませんが、Angular 2の標準的なDirectiveが詰まったパッケージなので、importしておくとよいでしょう。 | |
| ```ts:index.ts | |
| import "reflect-metadata"; | |
| import "zone.js"; | |
| import "rxjs/Rx"; | |
| import {bootstrap} from "angular2/platform/browser"; | |
| import {Component} from "angular2/core"; | |
| import {CORE_DIRECTIVES} from "angular2/common"; | |
| ``` | |
| このとき、beta.8時点では`reflect-metadata`, `zone.js`, `rxjs/Rx`のimportも必要となります。 | |
| ## Component定義 | |
| ```ts:index.ts | |
| import "reflect-metadata"; | |
| import "zone.js"; | |
| import "rxjs/Rx"; | |
| import {bootstrap} from "angular2/platform/browser"; | |
| import {Component} from "angular2/core"; | |
| import {CORE_DIRECTIVES} from "angular2/common"; | |
| @Component({ | |
| selector: `my-app`, | |
| template: ` | |
| <hello-world></hello-world> | |
| `, | |
| directives: [CORE_DIRECTIVES] | |
| }) | |
| class MyApp { | |
| } | |
| ``` | |
| 今回はMyAppというComponentを作るとします。`class MyApp {}`と書いた上に`@Component()`のDecoratorsを添えます。 | |
| `class`構文はJavaScriptの印象と異なるかもしれませんが、JavaScript (ECMAScript)の次版であるES6やTypeScriptで、もはやお馴染みな構文です。一方で`@`を冠するDecorators構文はECMAScriptには策定されておらず(proposal審議中)TypeScriptの仕様には含まれている構文です。これを本格的に扱うのはAngular 2が初ではないでしょうか。 | |
| `@Component`の引数オブジェクトは、AngularJSでいうDirectiveの定義オブジェクトのようなものです。 | |
| ```js | |
| angular.module("myapp").directive("myDirective", function() { | |
| return { | |
| restrict: "E", | |
| link: function() { | |
| // ... | |
| } | |
| }; // この辺に似てる | |
| }); | |
| ``` | |
| `selector`はセレクタ、ここではComponent名を表します。~~Angular 2の独自パーサのおかげでここをキャメルケースで記述することも可能になり、HTML中では`<foo-bar></foo-bar>`や`<FooBar></FooBar>`のように書きます。~~ [W3Cの仕様](http://www.w3.org/TR/custom-elements/#concepts)には従うべきなので、要素名は小文字のハイフンで表記すべきです。 | |
| `template`は見ての通りテンプレートHTML、ここは`templateUrl`とすることで外部ファイルのパスを指定できます。 | |
| `directives`に与える配列は「このComponentが扱う子DirectiveおよびComponent」を含むものです。`directives: [CORE_DIRECTIVES]`とすると十徳ナイフのようにAngular 2の便利DirectiveがまとめてDIできます。(これについては別の機会に) | |
| ## 子Componentを作る | |
| Hello Worldを出力するComponentを作ってみましょう。前述の`MyApp`に書いてしまうこともできますが、せっかくなので親子構造をとってみます。 | |
| ```ts:index.ts | |
| import "reflect-metadata"; | |
| import "zone.js"; | |
| import "rxjs/Rx"; | |
| import {bootstrap} from "angular2/platform/browser"; | |
| import {Component} from "angular2/core"; | |
| import {CORE_DIRECTIVES} from "angular2/common"; | |
| @Component({ | |
| selector: `hello-world`, | |
| template: ` | |
| <h1>Hello World!</h1> | |
| ` | |
| }) | |
| class HelloWorld { | |
| } | |
| @Component({ | |
| selector: `my-app`, | |
| template: ` | |
| <hello-world></hello-world> | |
| `, | |
| directives: [CORE_DIRECTIVES, HelloWorld] | |
| }) | |
| class MyApp { | |
| } | |
| ``` | |
| このように、Angular 2ではComponentを複数記述するのも簡単です。`MyApp`の`directives`配列に`HelloWorld`を追加している点に注意してください。 | |
| ここでは一つのファイルにまとめていますが、実際のアプリケーション開発ではもちろん複数のファイルに分割し、互いに`import/export`してください。 | |
| ## エントリーポイントを記述 | |
| 最後にエントリーポイントである`bootstrap`を記述します。 | |
| ```ts:index.ts | |
| import "reflect-metadata"; | |
| import "zone.js"; | |
| import "rxjs/Rx"; | |
| import {bootstrap} from "angular2/platform/browser"; | |
| import {Component} from "angular2/core"; | |
| import {CORE_DIRECTIVES} from "angular2/common"; | |
| // 略 | |
| @Component({ | |
| // ... | |
| }) | |
| class MyApp { | |
| } | |
| bootstrap(MyApp); | |
| ``` | |
| bootstrapは、最初に表示されるHTMLとAngular 2を繋ぐ大切な処理です。この引数に与えるComponent classは、Angular 2アプリケーションのルートとなるComponentです。HTML側も追記します。 | |
| ```html:index.html | |
| <!DOCTYPE html> | |
| <html lang="ja"> | |
| <head> | |
| <meta charset="UTF-8"> | |
| <title>Angular 2 Advent Calendar 2015</title> | |
| </head> | |
| <body> | |
| <my-app>Loading…</my-app> | |
| <script src="./bundle.js"></script> | |
| </body> | |
| </html> | |
| ``` | |
| `<my-app>`内は読み込み後にテンプレートに置き換わりますが、ローディング表示を書くことも可能です。その下、`<script src="">`ではBrowserifyが出力したソースを指定します。 | |
| # ビルド、そして起動 | |
| まずは完成形ソースを貼っておきます。 | |
| ```ts:index.ts | |
| import "reflect-metadata"; | |
| import "zone.js"; | |
| import "rxjs/Rx"; | |
| import {bootstrap} from "angular2/platform/browser"; | |
| import {Component} from "angular2/core"; | |
| import {CORE_DIRECTIVES} from "angular2/common"; | |
| @Component({ | |
| selector: `hello-world`, | |
| template: ` | |
| <h1>Hello World!</h1> | |
| ` | |
| }) | |
| class HelloWorld { | |
| } | |
| @Component({ | |
| selector: `my-app`, | |
| template: ` | |
| <hello-world></hello-world> | |
| `, | |
| directives: [CORE_DIRECTIVES, HelloWorld] | |
| }) | |
| class MyApp { | |
| } | |
| bootstrap(MyApp); | |
| ``` | |
| ```index.html | |
| <!DOCTYPE html> | |
| <html lang="ja"> | |
| <head> | |
| <meta charset="UTF-8"> | |
| <title>Angular 2 Advent Calendar 2015</title> | |
| </head> | |
| <body> | |
| <my-app>Loading…</my-app> | |
| <script src="./bundle.js"></script> | |
| </body> | |
| </html> | |
| ``` | |
| `npm`でビルドスクリプトを起動し、コンパイル&ビルドしましょう。 | |
| ``` | |
| npm run build | |
| ``` | |
| 少し待つと`bundle.js`が出力されます。あとは`index.html`をブラウザで開けば完了!(まだローカル経由で動きますがRouterやAjaxなどが絡むときはサーバを立ててください) | |
| 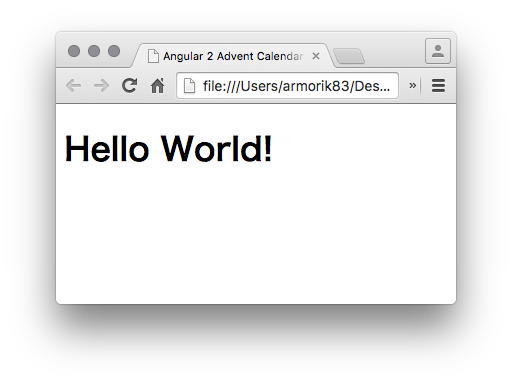 | |
| まだまだアプリケーションからは程遠いですが、基本的にいくつものComponentを細かく作ってはViewを組み立てていき、その後ろをドメイン層やストア層が支えるというアーキテクチャは変わりません。今回は基礎としてComponentの作り方を紹介しました。Angular 2での本格的なアプリケーション開発については今後の記事・解説などをお待ち下さい。何よりまだalpha版ですからね! | |
| # 実はもっと簡単にできる | |
| ここに[Plunker](http://plnkr.co/edit/?p=catalogue)があるじゃろ? | |
| 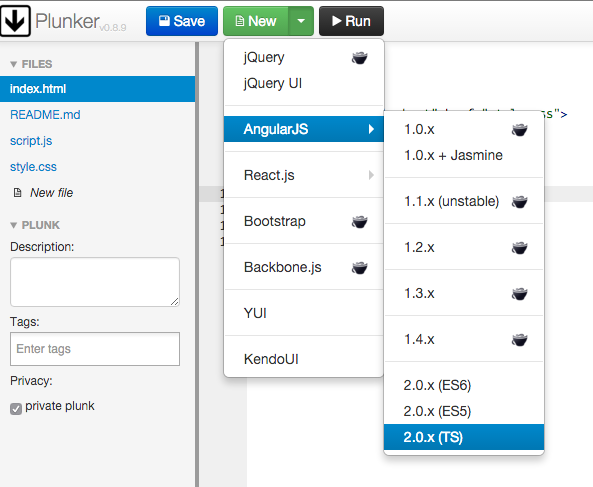 | |
| これをこうして、 | |
| 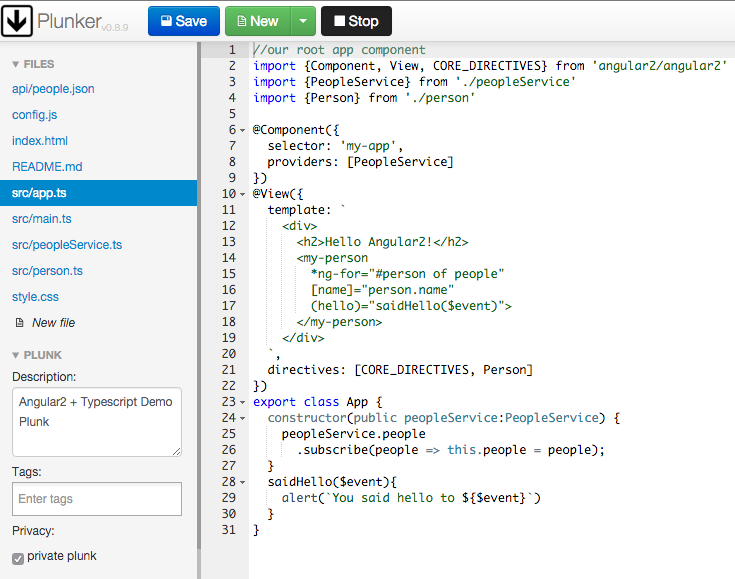 | |
| こうじゃ。 ( ^ω^) | |
| --- | |
| Plunkerだとビルドも何も要らないのですげー簡単。みんな、これやろう。 |
Sign up for free
to join this conversation on GitHub.
Already have an account?
Sign in to comment