说到androidvector, 就要首先明白什么是Vector & SVG,
Vector: 矢量图形是计算机图形学中用点、直线或者多边形等基于数学方程的几何图元表示图像。矢量图形与使用像素表示图像的位图不同。 SVG: 是一种基于可扩展标记语言(XML),用于描述二维矢量图形的图形格式。SVG由W3C制定,是一个开放标准。
优点:
- 占用空间小, 对比bitmap而言,天生具有优势
- 放大不会出现失真现象, 完美适配
缺点:
- 对设计师来讲, 学习导图工作成本增加了
- 不适合复杂的图片(产出/时间投入比较高)
<vector xmlns:android="http://schemas.android.com/apk/res/android"
    android:width="24dp"
    android:height="24dp"
    android:viewportHeight="24.0"
    android:viewportWidth="24.0">
    <path android:name="path1"
          android:pathData="M24,0L0,24 M0,0L24,24z"
          android:strokeColor="#ff0000"
          android:strokeWidth="1"/>
</vector>
与之对应的SVG:
<?xml version="1.0" encoding="utf-8"?>
<svg viewBox="0 0 24 24" xmlns="http://www.w3.org/2000/svg">
	<path d="M 24, 0 L 0,24" style="fill: none; stroke: red;"/>
    <path d="M 0, 0 L 24,24" style="fill: none; stroke: red;"/>
</svg>
- width & height 定义了drawable大小
- viewportWidth & viewportHeight 定义了了Vector画布大小
- pathData定义了Vector的路径. 对应SVG文件的d属性
| 命令 | 参数 | 说明 |
|---|---|---|
| M | (x y)+ | moveto 移动到 |
| Z | none | closepath 关闭路径 |
| L | (x y)+ | lineto 连接到 |
| H | x+ | horizontal lineto 水平线到 x+ |
| V | y+ | vertical lineto 垂直线到 y+ |
| C | (x1 y1 x2 y2 x y)+ | curveto 三次贝塞尔曲线到 |
| S | (x2 y2 x y)+ | smooth curveto 光滑三次贝塞尔曲线到 |
| Q | (x1 y1 x y)+ | uadratic Bézier curveto 二次贝塞尔曲线到 |
| T | (x y)+ | smooth quadratic Bézier curveto 光滑二次贝塞尔曲线到 |
| A | (rx ry x-axis-rotation large-arc-flag sweep-flag x y)+ | elliptical arc 椭圆弧 |
| R | x1 y1 (x y)+ | Catmull-Rom曲线 |
- 其中M,Z比较好理解
- L, H, V是除了M,Z最好用的指令.
- C,S,Q,T是比较难理解,难用的指令, 本次一介绍Q,T为例
- A,R 本次不做介绍
参考这篇文章介绍的更为生动详细点我
掌握了0x02的一些基本命令后, 我们可以小试牛刀了....
 <vector xmlns:android="http://schemas.android.com/apk/res/android"
        android:width="24dp"
        android:height="24dp"
        android:viewportHeight="24.0"
        android:viewportWidth="24.0">
    <path android:name="path1"
          android:pathData="M6,18 L12,24 24,0"
          android:strokeColor="#ff0000"
          android:strokeWidth="1"/>
</vector>
<vector xmlns:android="http://schemas.android.com/apk/res/android"
        android:width="24dp"
        android:height="24dp"
        android:viewportHeight="24.0"
        android:viewportWidth="24.0">
    <path android:name="path1"
          android:pathData="M12,12 L0,24 V0 H24 V24z"
          android:strokeColor="#ff0000"
          android:strokeLineJoin="round"
          android:strokeWidth="4"/>
</vector>
注意这里采用了fillColor填充整个path, 也可以同时设置strokeColor & strokeWidth来显示路径轮廓.
Q命令式意图
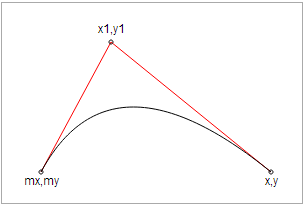
Q x1 y1, x y
<vector xmlns:android="http://schemas.android.com/apk/res/android"
        android:width="24dp"
        android:height="24dp"
        android:viewportHeight="24.0"
        android:viewportWidth="24.0">
    <path android:name="path1"
          android:pathData="M0,4 Q0,0 4,0 H20 Q24,0 24,4 V20 Q24,24 20,24 H4 Q0,24 0,20Z"
          android:strokeColor="#ff0000"
          android:strokeLineJoin="round"
          android:strokeWidth="1"/>
</vector>
绘制思路 假设圆角为4
- 绘制左上角圆角 M0,4 Q,0 4,0
- 连线到右上角并且话圆角 H20 Q24,0 24,0 ....
T命令式意图
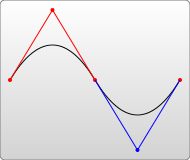
T x y
<vector xmlns:android="http://schemas.android.com/apk/res/android"
        android:width="24dp"
        android:height="24dp"
        android:viewportHeight="24.0"
        android:viewportWidth="24.0">

    <path
        android:name="pathEyeLeft"
        android:fillColor="#ff0000"
        android:pathData="M6,6 H8 V8 H6 V6Z"
    />
    <path
        android:name="pathEyerRight"
        android:fillColor="#ff0000"
        android:pathData="M16,6 H18 V8 H16 V6Z"
    />
    <path
        android:name="pathEyerMouth"
        android:pathData="M6,14 Q12,20 18,14"
        android:strokeColor="#ff0000"
        android:strokeWidth="1"
    />
    <path
        android:name="pathOutLine"
        android:pathData="M0,12 Q0,0 12,0 T 24,12 12,24 0,12"
        android:strokeColor="#ff0000"
        android:strokeWidth="1"/>

</vector>
外轮廓的圆
  <path
        android:name="pathOutLine"
        android:pathData="M0,12 Q0,0 12,0 T 24,12 12,24 0,12"
        android:strokeColor="#ff0000"
        android:strokeWidth="1"/>
对应的指令和参数是:
A rx ry x-axis-rotation large-arc-flag sweep-flag x y
| 参数 | 取值范围 | 说明 |
|---|---|---|
| rx, ry | double | 半径 |
| x-axis-rotation | 度数 | x轴旋转角度 |
| large-arc-flag | 0, 1 | 0表示小角度弧,1表示大角度 |
| sweep-flag | 0, 1 | 弧线方向,0逆时针,1沿顺时针 |
| x, y | double | 圆弧的终点 |
<vector
    xmlns:android="http://schemas.android.com/apk/res/android"
    android:width="200dp"
    android:height="200dp"
    android:viewportHeight="100"
    android:viewportWidth="100">
    <path
        android:fillColor="#ff0000"
        android:pathData="M2,50 A 48,48 0 1 0 98,50 A 48,48 0 1 0 2,50z"/>
</vector>
####参考: Markdown命令 SVG介绍


