This document aims to provide an easy way encode video optimized for playback in mobile devices that use the Android or the iOS operating systems.
libx264 is used for (single or two-pass) video encoding and libfdk_aac for audio encoding.
ffmpeg, libx264 and libfdk_aac settings are optimized for playback quality and compatibility on Android and iOS.
There is extensive documentation and references for each of the settings used and contributions are very welcome :)
This is a work in progress and for now it only covers encoding video for playback as progressive download.
If you have docker installed, you can easily pull a docker image with ffmpeg installed:
- pull docker image
$ docker pull jrottenberg/ffmpeg
Using default tag: latest
latest: Pulling from jrottenberg/ffmpeg
Digest: sha256:7f8ab40068b3fad2dde08eec111d952005dcdd24fb74cba6a7137d0f98f7c1f8
Status: Image is up to date for jrottenberg/ffmpeg:latest- run
ffmpeg
$ docker run jrottenberg/ffmpeg -version
ffmpeg version 4.1 Copyright (c) 2000-2018 the FFmpeg developers
built with gcc 5.4.0 (Ubuntu 5.4.0-6ubuntu1~16.04.11) 20160609
configuration: --disable-debug --disable-doc --disable-ffplay --enable-shared --enable-avresample --enable-libopencore-amrnb --enable-libopencore-amrwb --enable-gpl --enable-libass --enable-libfreetype --enable-libvidstab --enable-libmp3lame --enable-libopenjpeg --enable-libopus --enable-libtheora --enable-libvorbis --enable-libvpx --enable-libx265 --enable-libxvid --enable-libx264 --enable-nonfree --enable-openssl --enable-libfdk_aac --enable-libkvazaar --enable-libaom --extra-libs=-lpthread --enable-postproc --enable-small --enable-version3 --extra-cflags=-I/opt/ffmpeg/include --extra-ldflags=-L/opt/ffmpeg/lib --extra-libs=-ldl --prefix=/opt/ffmpeg
libavutil      56. 22.100 / 56. 22.100
libavcodec     58. 35.100 / 58. 35.100
libavformat    58. 20.100 / 58. 20.100
libavdevice    58.  5.100 / 58.  5.100
libavfilter     7. 40.101 /  7. 40.101
libavresample   4.  0.  0 /  4.  0.  0
libswscale      5.  3.100 /  5.  3.100
libswresample   3.  3.100 /  3.  3.100
libpostproc 55. 3.100 / 55. 3.100The jrottenberg/ffmpeg docker image includes ffmpeg correctly configured and compiled with libfdk_acc support
$ docker run jrottenberg/ffmpeg -codecs | grep aac
ffmpeg version 4.1 Copyright (c) 2000-2018 the FFmpeg developers
  built with gcc 5.4.0 (Ubuntu 5.4.0-6ubuntu1~16.04.11) 20160609
  configuration: --disable-debug --disable-doc --disable-ffplay --enable-shared --enable-avresample --enable-libopencore-amrnb --enable-libopencore-amrwb --enable-gpl --enable-libass --enable-libfreetype --enable-libvidstab --enable-libmp3lame --enable-libopenjpeg --enable-libopus --enable-libtheora --enable-libvorbis --enable-libvpx --enable-libx265 --enable-libxvid --enable-libx264 --enable-nonfree --enable-openssl --enable-libfdk_aac --enable-libkvazaar --enable-libaom --extra-libs=-lpthread --enable-postproc --enable-small --enable-version3 --extra-cflags=-I/opt/ffmpeg/include --extra-ldflags=-L/opt/ffmpeg/lib --extra-libs=-ldl --prefix=/opt/ffmpeg
  libavutil      56. 22.100 / 56. 22.100
  libavcodec     58. 35.100 / 58. 35.100
  libavformat    58. 20.100 / 58. 20.100
  libavdevice    58.  5.100 / 58.  5.100
  libavfilter     7. 40.101 /  7. 40.101
  libavresample   4.  0.  0 /  4.  0.  0
  libswscale      5.  3.100 /  5.  3.100
  libswresample   3.  3.100 /  3.  3.100
  libpostproc    55.  3.100 / 55.  3.100
 DEA.L. aac                   (decoders: aac aac_fixed libfdk_aac ) (encoders: aac libfdk_aac )
D.A.L. aac_latmYou can add -movflags +faststart as an output option if your videos are going to be viewed in a browser. This will move some information to the beginning of your file and allow the video to begin playing before it is completely downloaded by the viewer. It is not required if you are going to use a video service such as YouTube. YouTube recommends using faststart, so they can begin re-encoding before uploads complete.
If uploading MP4/M4V/MOV files YouTube recommends that the moov atom should be at the beginning of the file
- https://trac.ffmpeg.org/wiki/Encode/YouTube#faststartforMP4M4VMOVfiles
- https://support.google.com/youtube/answer/1722171?hl=en
Use libx264 for H.264 encoding.
Scale to 720p. Assuming a 1080p input, 1:1 Sample Aspect Ratio/Pixel Aspect Ratio
CABAC is the default entropy encoder used by x264. Though somewhat slower on both the decoding and encoding end, it offers 10-15% improved compression on live-action sources and considerably higher improvements on animated sources, especially at low bitrates. It is also required for the use of trellis quantization. Disabling CABAC may somewhat improve decoding performance, especially at high bitrates. CABAC is not allowed in Baseline Profile. Recommended default: -coder 1 (CABAC enabled)
CABAC enabled.
Chroma subsampling: 4:2:0
High Profile
If you want your videos to have highest compatibility with ancient devices (e.g., old Android phones): This disables some advanced features but provides for better compatibility. Typically you may not need this setting (and therefore avoid using -profile:v and -level), but if you do use this setting it may increase the bit rate compared to what is needed to achieve the same quality in higher profiles.
iOS
| Profile | Level | Devices | Options |
|---|---|---|---|
| Baseline | 3.0 | All devices | -profile:v baseline -level 3.0 |
| Baseline | 3.0 | 3.1 iPhone 3G and later, iPod touch 2nd generation and later | -profile:v baseline -level 3.1 |
| Main | 3.1 | iPad (all versions), Apple TV 2 and later, iPhone 4 and later | -profile:v main -level 3.1 |
| Main | 4.0 | 4.0 Apple TV 3 and later, iPad 2 and later, iPhone 4s and later | -profile:v main -level 4.0 |
| High | 4.0 | Apple TV 3 and later, iPad 2 and later, iPhone 4s and later | -profile:v high -level 4.0 |
| High | 4.1 | iPad 2 and later, iPhone 4s and later, iPhone 5c and later | -profile:v high -level 4.1 |
| High | 4.2 | iPad Air and later, iPhone 5s and later | -profile:v high -level 4.2 |
- https://trac.ffmpeg.org/wiki/Encode/H.264#Compatibility
- https://developer.apple.com/library/archive/documentation/NetworkingInternet/Conceptual/StreamingMediaGuide/UsingHTTPLiveStreaming/UsingHTTPLiveStreaming.html#//apple_ref/doc/uid/TP40008332-CH102-SW8
A preset is a collection of options that will provide a certain encoding speed to compression ratio. A slower preset will provide better compression (compression is quality per filesize). This means that, for example, if you target a certain file size or constant bit rate, you will achieve better quality with a slower preset. Similarly, for constant quality encoding, you will simply save bitrate by choosing a slower preset.
Use the slowest preset that you have patience for. The available presets in descending order of speed are:
| Preset |
|---|
| ultrafast |
| superfast |
| veryfast |
| faster |
| fast |
| medium – default preset |
| slow |
| slower |
| veryslow |
| placebo – ignore this as it is not useful (see FAQ) |

| tuning | Description |
|---|---|
| film | use for high quality movie content; lowers deblocking |
| animation | good for cartoons; uses higher deblocking and more reference frames |
| grain | preserves the grain structure in old, grainy film material |
| stillimage | good for slideshow-like content |
| fastdecode | allows faster decoding by disabling certain filters |
| zerolatency | good for fast encoding and low-latency streaming |
| psnr | ignore this as it is only used for codec development |
| ssim | ignore this as it is only used for codec development |
The x264 encoder will adaptively decide when to use B-frames and how many to use (see above), up to a given limit. Allowing longer sequences of consecutive B-frames is good for quality because B-frames are the most efficient frame type in terms of compression, but considering large numbers of B-frames will slow down encoding significantly, with diminishing returns because the encoder will rarely choose to actually use more than 4 or 5, with 1-3 being much more common.
| Resolution range | Value | Description |
|---|---|---|
| 240p/360p | 0 | (B-frames disabled by baseline profile, displayed as 1 in x264Encoder) |
| 432p-1080p | 3 | (default), for compatibility with older ATI/NVIDIA GPUs and Android devices based on the Tegra 2 processor, and possibly other hardware decoders with similar bugs (3 B-frames is a pretty "standard" |
| 1080p Superbit | 5 | which is about as many as might ever be used in practice |
YouTube: 2 consecutive B frames for ingestion/re-encoding
x264, by default, adaptively decides through a low-resolution lookahead the best number of B-frames to use. It is possible to disable this adaptivity; this is not recommended. Recommended default: 1
0: Very fast, but not recommended. Does not work with pre-scenecut (scenecut must be off to force off b-adapt).
1: Fast, default mode in x264. A good balance between speed and quality.
2: A much slower but more accurate B-frame decision mode that correctly detects fades and generally gives considerably better quality. Its speed gets considerably slower at high bframes values, so its recommended to keep bframes relatively low (perhaps around 3) when using this option. It also may slow down the first pass of x264 when in threaded mode.
The x264 encoder supports using an adaptive number of B-frames rather than just a fixed pattern like IBBPBBPBBPBB, and this setting controls that adaptive decision. x264's default is a fast, simple algorithm (1), but it also supports a slower, higher quality, "optimal" algorithm (2). The slow algorithm is the default for the quality-oriented presets, including the x264Encoder QuickTime plug-in's "optimized" presets. Strangely, the x264Encoder QuickTime plug-in's iPod presets set this to 1 even though they use baseline profile and therefore don't use B-frames.
240p/360p 0 (B-frames disabled by baseline profile). 432p+ 2 (slow, "optimal").
4 * 25 fps so we can provide seek points every 4 seconds for progressive downloads.
The maximum amount of time between keyframes (I-frames) has a major impact on quality, which makes it one of the most important settings to tune, and one of the most difficult decisions. The encoder will try to use keyframes at scene changes, of course (see above), but for a lot of content this value is important because many scenes are longer than 5 or even 10 seconds. Having too many keyframes severely reduces quality, because the efficiency of reusing image areas from previous frames is completely lost at each keyframe – the encoder has to "start over" at every keyframe. Therefore, we want as few keyframes as possible to achieve the highest quality for the given target bitrate.
On the other hand, we still want enough keyframes that seeking and fast-forwarding behavior is good, because players can only jump directly to keyframes "under the hood" during playback, and will usually only display the keyframes during fast-forwarding and rewinding at higher speeds (at low speeds such as 2x or 3x they can often play every frame).
Use a 2 second GOP (Group of Pictures), so simply multiply your output frame rate * 2. For example, if your input is -framerate 30, then use -g 60.
Keyframe interval, also known as GOP length. This determines the maximum distance between I-frames. Very high GOP lengths will result in slightly more efficient compression, but will make seeking in the video somewhat more difficult. Recommended default: 250
NOTE: some of the YouTube settings are optimized for video ingestion/re-encoding
Closed GOP. GOP of half the frame rate.
10 reference frames that each P-frame can use.
Number of reference frames each P-frame can use. The range is from 0-16.
Increasing the number of reference frames beyond 2 allows even better matches to possibly be found, but naturally suffers from severely diminishing returns after 3 or 4 frames, since frames further away in time are likely to be more and more different and therefore not very useful for finding similarities. Increasing the number of reference frames also dramatically increases the encoding time, since motion-estimation search, which is the slowest part of video encoding, has to occur on all possible reference frames in order to find the best match.
All: 4, which should find about as much useful similarity as there is to find, doesn't blow out the encoding time ridiculously, complies with the target H.264 levels, is safe for almost all known hardware decoders (assuming Android 3.1+ on Tegra 2 processors), and shouldn't really stress software players too much.
b:v target bitrate is 3M (lighterra's bitrate for 720p HQ) minrate is 2.85M, 5% less than target bitrate maxrate is 80% of 80% of average mobile network speed in 2018: 0.8 * 0.8 * 11.1 Mbps = ~7.1 Mbps bufsize is the same as maxrate, so bitrate check runs every second
-b Enables target bitrate mode. Attempts to reach a specific bitrate. Should be used in 2-pass mode whenever possible; 1-pass bitrate mode is generally the worst ratecontrol mode x264 has.
bufsize will determine how religious ffmpeg is about keeping your bitrate constant. If you set a bufsize of 64k, as per FFmpeg Wiki: Limiting the output bitrate, it will calculate its current bitrate every 64 kilobytes and adjust accordingly. Smaller sizes for bufsize can be harmful to quality in that they don't allow enough space between checks for x264 to do sudden changes - you will get blockiness.
If your maxrate is 640kbps, and your bufsize is 64k, then every tenth of a second x264 would check. This is sub-optimal - FFmpeg Wiki: Encoding for streaming sites recommends to run it every 1 to 2 seconds. If this didn't make sense, think of it as maxrate/bufsize = frequency of checks. Keep this frequency between 1 and 2 seconds as a rule of thumb.
If you set both maxrate and bufsize, you should:
set maxrate to whatever your lowest upload speed will likely be (in the ffmpeg wiki example, this is 80% of total upload speed, but your mileage may vary). set bufsize to somewhere between the same as your maxrate (one second) and twice of your maxrate (2 seconds). If this is still not low enough, lower your maxrate and then re-set bufsize accordingly. Then, you'll have to play around a bit, but since you have to start somewhere I'd just start at a maxrate around 600k, which was usually satisfying enough for me back before I used crf for everything.
If you'd like, you can try lower values for bufsize, like for every three or four seconds, just to see how the value changes how your output looks. Then you can determine how much you should worry about it for your video.
There is no normal value, really - what crf does is to optimize output based on what it thinks is the best buffer size for maintaining whatever it's rate is set at. It tries to keep as low a file size while maintaining some quality, at the cost of occasional spikes.
What does -bufsize do? Based on the -bufsize option, ffmpeg will calculate and correct the average bit rate produced. If we didn't specify -bufsize, these intervals could be significantly longer than we would want. This would cause the current bit rate to frequently jump a lot over and below the specified average bit rate and would cause an unsteady output bit rate.
If we specify a smaller -bufsize, ffmpeg will more frequently check for the output bit rate and constrain it to the specified average bit rate from the command line. Hence, lowering -bufsize lowers the bitrate variation that the encoder can produce.
Specifying too small -bufsize would cause ffmpeg to degrade the output image quality, because it would have to (frequently) conform to the limitations and would not have enough of a free space to use some optimizations (for example, optimizations based on the frame repetitions and similar), because the buffer would not contain enough frames for the optimizations to be effective.
The suggestion is to play around with the combinations of -bufsize, starting from the same value like the one specified for the -b:v option (or even half of it) and increasing it until your output bit rate starts jumping too much above/below the specified average bit rate. Then you know you've reached the limit and should lower the -bufsize value a little bit in order to get back on the safe side.
Average global mobile network connection speeds from 2016 to 2021 (in Mbps)
| Year | Network connection speed (Mbps) |
|---|---|
| 2016 | 6.8 |
| 2017 | 8.7 |
| 2018 | 11.1 |
| 2019 | 14.3 |
| 2020 | 17.7 |
| 2021 | 20.4 |
For each resolution, we use a bitrate which is the lowest sensible 64% cut (80% of 80%) of a common Internet link speed (see below) that still achieves "very good" visual quality, with no major visible compression artifacts. Just like saving a still image for use on a web site, we put quality first and only compress as much as possible without introducing any noticeable degradation (hopefully). If that means using a higher bitrate for a given resolution than some other web sites, then so be it – the 'net can take it, and bandwidth is less and less of a problem every day. It's unwise to push bitrates too low and risk delivering a blurry, unprofessional video, which other sites such as YouTube routinely do.
For most of the resolutions we also provide a higher quality (HQ) version encoded at a somewhat higher bitrate, for the benefit of users with sufficiently fast Internet links. The visual differences from the normal, "very good" quality version to the HQ version are generally quite small, such as less blur during rapid motion, less risk of banding in dark scenes, and less risk of crystallizing during difficult fades. Nonetheless, we might as well take advantage of the user's link speed for improved quality from fewer compression artifacts, assuming the user's link is not fast enough to get up to the next higher resolution, which would be a significant step up in general sharpness and clarity.
The exact bitrates chosen are...
| Name | Resolution | Link (Mbps) | Bitrate (Mbps) | Video (kbps) | Audio (kbps) |
|---|---|---|---|---|---|
| 240p | 424x240 | 1.0 | 0.64 | 576 | 64 |
| 360p | 640x360 | 1.5 | 0.96 | 896 | 64 |
| 432p | 768x432 | 1.8 | 1.15 | 1088 | 64 |
| 480p | 848x480 | 2.0 | 1.28 | 1216 | 64 |
| 480p HQ | 848x480 | 2.5 | 1.60 | 1536 | 64 |
| 576p | 1024x576 | 3.0 | 1.92 | 1856 | 64 |
| 576p HQ | 1024x576 | 3.5 | 2.24 | 2176 | 64 |
| 720p | 1280x720 | 4.0 | 2.56 | 2496 | 64 |
| 720p HQ | 1280x720 | 5.0 | 3.20 | 3072 | 128 |
| 1080p | 1920x1080 | 8.0 | 5.12 | 4992 | 128 |
| 1080p HQ | 1920x1080 | 12.0 | 7.68 | 7552 | 128 |
| 1080p Superbit | 1920x1080 | N/A | 20.32 | 20000 | 320 |
The Video Buffering Verifier provides a way to ensure that the bitrate is constrained to a certain maximum. This is useful for streaming, as you can now be certain that you won’t send more bits than you promised within a certain time frame. VBV can be used both with 2-pass VBR (use it in both passes), or with CRF encoding—it can be “added” to the already presented rate control modes. The latter mode is also called “capped CRF”.
Turn on VBV with the -maxrate and -bufsize options to set the maximum bitrate and the expected client buffer size
- https://trac.ffmpeg.org/wiki/EncodingForStreamingSites#a-maxrate
- https://slhck.info/video/2017/03/01/rate-control.html
The bitrates below are recommendations for uploads. Audio playback bitrate is not related to video resolution.
Recommended video bitrates for SDR uploads To view new 4K uploads in 4K, use a browser or device that supports VP9.
| Type | Video Bitrate, Standard Frame Rate (24, 25, 30) | Video Bitrate, High Frame Rate (48, 50, 60) |
|---|---|---|
| 2160p (4k) | 35-45 Mbps | 53-68 Mbps |
| 1440p (2k) | 16 Mbps | 24 Mbps |
| 1080p | 8 Mbps | 12 Mbps |
| 720p | 5 Mbps | 7.5 Mbps |
| 480p | 2.5 Mbps | 4 Mbps |
| 360p | 1 Mbps | 1.5 Mbps |
For two-pass, you need to run ffmpeg twice, with almost the same settings, except for:
- In pass 1 and 2, use the -pass 1 and -pass 2 options, respectively.
- In pass 1, output to a null file descriptor, not an actual file. (This will generate a logfile that ffmpeg needs for the second pass.)
- In pass 1, you need to specify an output format (with -f) that matches the output format you will use in pass 2.
- In pass 1, you can leave audio out by specifying -an.
Use libfdk_aac for AAC encoding.
- https://trac.ffmpeg.org/wiki/Encode/HighQualityAudio#AudioencodersFFmpegcanuse
- https://developer.android.com/guide/topics/media/media-formats
- https://developer.apple.com/library/archive/documentation/AudioVideo/Conceptual/MultimediaPG/UsingAudio/UsingAudio.html

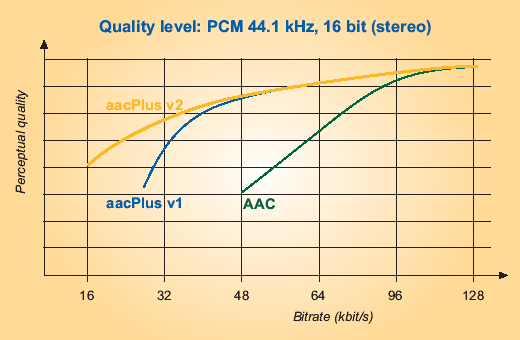
This is a pair of AAC profiles tailored for low bit rates (version 1 and version 2). HE-AAC version 1 is suited for bit rates below 64kb/s (for stereo audio) down to about 48 kb/s, while HE-AAC version 2 is suited for bit rates as low as 32 kb/s (again, for stereo).
Note: HE-AAC version 2 only handles stereo. If you have mono, or want to down-mix to mono, use HE-AAC version 1.
Unfortunately, many devices that can play AAC-LC (the default profile for libfdk_aac) simply cannot play either version of HE-AAC, so this is not recommended for surround sound audio, which normally needs to be compatible with such hardware players. If you are only going to play it on your computer, or you are sure that your hardware player supports HE-AAC, you can aim for a bit rate of 160kb/s for version 1, or 128kb/s for version 2. As always, experiment to see what works for your ears.
Constant Bit Rate (CBR) mode
These settings target a specific bit rate, with less variation between samples. It gives you greater control over file size, and it is compatible with the HE-AAC profile. As a rule of thumb, for audible transparency, use 64 kBit/s for each channel (so 128 kBit/s for stereo, 384 kBit/s for 5.1 surround sound).
Set the bit rate with the -b:a option.
$ docker run \
    -v $PWD:/tmp \
    jrottenberg/ffmpeg \
        -i /tmp/input.mp4 \
        -y \
        -movflags +faststart \
        -c:v libx264 \
        -filter:v scale=1280:720,setsar=1:1 \
        -coder 1 \
        -pix_fmt yuv420p \
        -profile:v high \
        -level 4.0 \
        -preset:v veryslow \
        -tune film \
        -bf 3 \
        -b_strategy 2 \
        -g 100 \
        -refs 10 \
        -b:v 3M \
        -minrate 2.85M \
        -maxrate 7M \
        -bufsize 7M \
        -movflags faststart \
        -c:a libfdk_aac \
        -profile:a aac_he_v2 \
        -b:a 128k \
        -pass 1 \
/tmp/output.mp4$ docker run \
-v $PWD:/tmp \
jrottenberg/ffmpeg \
-i /tmp/input.mp4 \
-y \
-movflags +faststart \
-c:v libx264 \
-filter:v scale=1280:720,setsar=1:1 \
-coder 1 \
-pix_fmt yuv420p \
-profile:v high \
-level 4.0 \
-preset:v veryslow \
-tune film \
-bf 3 \
-b_strategy 2 \
-g 100 \
-refs 10 \
-b:v 3M \
-minrate 2.85M \
-maxrate 7M \
-bufsize 7M \
-pass 1 \
-an \
-f mp4 /dev/null && \
docker run \
-v $PWD:/tmp \
jrottenberg/ffmpeg \
-i /tmp/input.mp4 \
-y \
-movflags +faststart \
-c:v libx264 \
-filter:v scale=1280:720,setsar=1:1 \
-coder 1 \
-pix_fmt yuv420p \
-profile:v high \
-level 4.0 \
-preset:v veryslow \
-tune film \
-bf 3 \
-b_strategy 2 \
-g 100 \
-refs 10 \
-b:v 3M \
-minrate 2.85M \
-maxrate 7M \
-bufsize 7M \
-movflags faststart \
-c:a libfdk_aac \
-profile:a aac_he_v2 \
-b:a 128k \
-pass 2 \
/tmp/output.mp4
Thank you very much for this!
I have a couple of questions:
-movflagsis used twice in the 2 pass script?