Skip to content

Instantly share code, notes, and snippets.

@pwharrison
Last active November 17, 2022 19:16
Show Gist options
  • Star 2 You must be signed in to star a gist
  • Fork 0 You must be signed in to fork a gist
  • Save pwharrison/c97df04b93c93aab86c1462faad236de to your computer and use it in GitHub Desktop.
Save pwharrison/c97df04b93c93aab86c1462faad236de to your computer and use it in GitHub Desktop.
Unofficial Timing Widget for iOS

Unofficial Timing Widget for iOS

This Gist provides an unofficial iOS widget for the excellent Timing time tracking app for Mac.

Features

The widget allows you to:

  • See the title of your currently-running time entry at a glance
  • Jump to the Timing Web App with a single tap to start, stop, and manage your time entries on the go

Here's a screenshot of the widget in action:

Timing Widget Screenshot

Getting Started

The widget requires a few prerequisites:

Once you've done all of the above, here are the steps to set up the widget:

  1. On your iOS device, open the Scriptable app.

  2. Create a new script and give it a descriptive name, like "Timing Widget".

  3. Insert the contents of the TimingWidget.js file in this Gist in your new script in Scriptable.

  4. Create a new Scriptable widget on your iOS Home Screen, in your iOS Today View, or both.

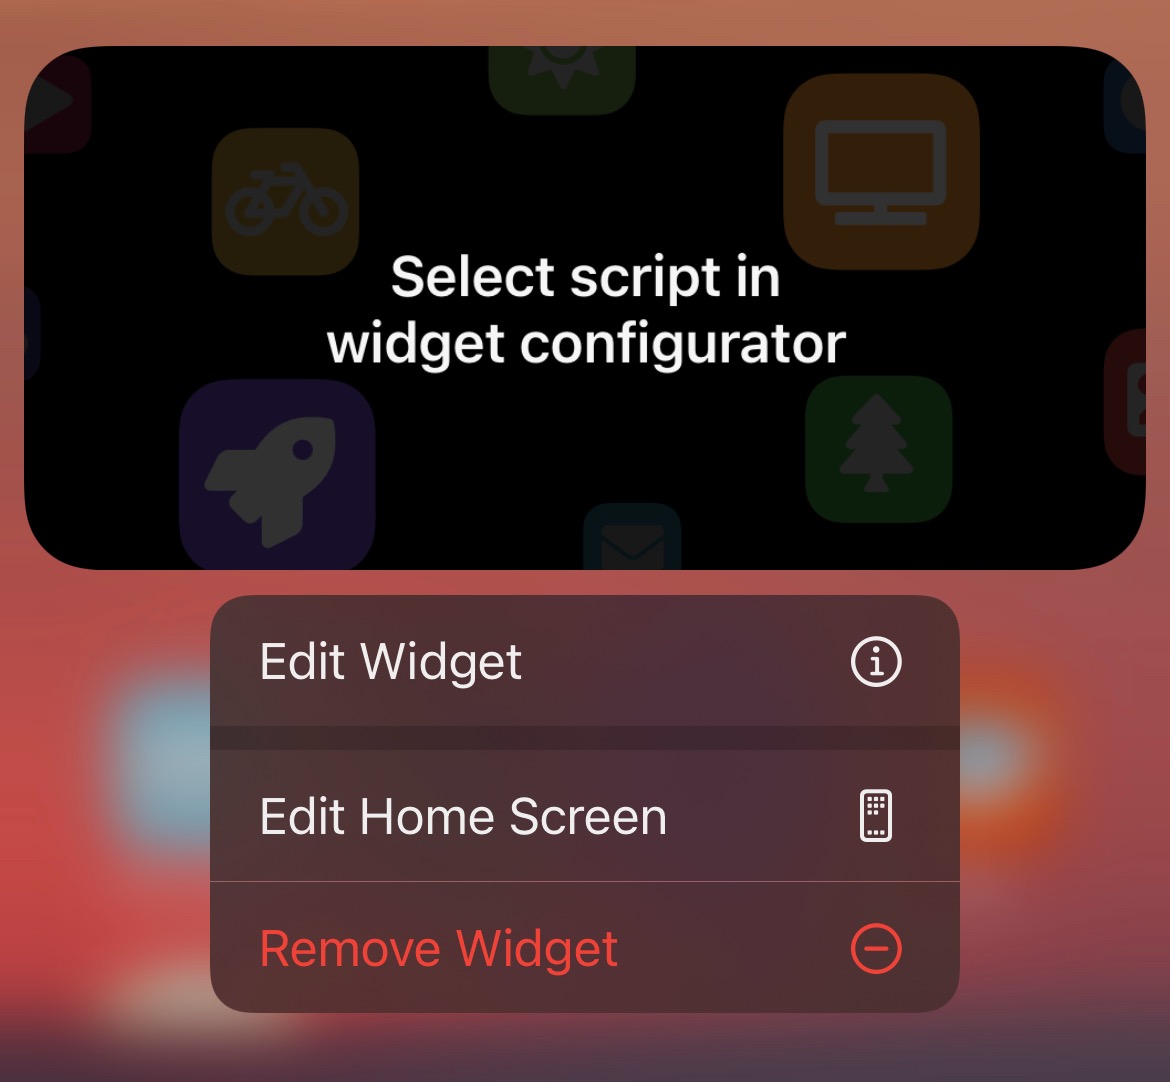
  5. Long-press the new widget and select "Edit Widget".

  6. In the widget configuration view, select the new script you just created.

  7. For the "When Interacting" option, select "Open URL".

  8. In the new URL field, paste a URL for where you would like to go in the Timing Web App when you tap on the widget. I use https://web.timingapp.com/time-entries.

  9. Copy-and-paste your API Key for the Timing Web API into the "Parameter" field.

  10. Close the widget configuration screen, and you should be up and running!

Caveats

Your widget often won't update immediately after you've started or stopped a time entry. There can be a lag of a few minutes before the widget is allowed to refresh and display new information. The refresh rate is managed by iOS under the hood. You can always tap the widget to open the Timing Web App and confirm your current time entry.

If you know how to program in JavaScript, Scriptable offers a robust toolkit to customize the appearance and behavior of your widget.

const TIME_ENTRIES_API = "https://web.timingapp.com/api/v1/time-entries";
// After you create the widget, you need set its parameter to your Timing API Key
// by long-pressing on the widget in the iOS user interface.
// See here to create a Timing API Key: https://web.timingapp.com/integrations/tokens
const TIMING_API_KEY = args.widgetParameter;
var headers = {
"Authorization": `Bearer ${TIMING_API_KEY}`,
"Accept": "application/json",
"Content-Type": "application/json",
}
var req = new Request(`${TIME_ENTRIES_API}?is_running=true`);
req.headers = headers;
var res = await req.loadJSON();
try {
if (res.data.length > 0) {
// If there is a time entry running, use its title as the widget text
var timeEntryText = res.data[0].title;
} else {
// If there is no time entry running, use "No Time Entry Running" instead
var timeEntryText = "No Time Entry Running";
}
} catch (e) {
if (e instanceof TypeError) {
// The user probably hasn't supplied their Timing API Key
var timeEntryText = "Enter a valid Timing API Key as the Widget Parameter";
}
}
// Create the widget
let widget = new ListWidget();
widget.backgroundColor = new Color("#1A1A1A");
// Set the next opportunity to refresh the widget to 30 seconds from now
let nextRefresh = Date.now() + 1000 * 30
widget.refreshAfterDate = new Date(nextRefresh)
// Add and format the time entry text
let titleTxt = widget.addText(timeEntryText)
titleTxt.textColor = Color.white()
titleTxt.font = Font.systemFont(18)
titleTxt.centerAlignText()
widget.addSpacer(10)
// Add the current time to the widget,
// so the user knows when the widget was last updated
const updatedAt = new Date().toLocaleTimeString([], {
hour: "numeric",
minute: "2-digit",
});
// Add and format the "last updated" text
const lastUpdatedText = widget.addText(`Updated ${updatedAt}`);
lastUpdatedText.textColor = Color.gray();
lastUpdatedText.font = Font.regularSystemFont(9);
lastUpdatedText.minimumScaleFactor = 0.6;
lastUpdatedText.centerAlignText()
// Add some padding around the edges
widget.setPadding(10, 10, 10, 10)
// show the widget
if (config.runsInWidget) {
Script.setWidget(widget)
Script.complete()
}
else {
widget.presentMedium()
}
Sign up for free to join this conversation on GitHub. Already have an account? Sign in to comment