由於 Google API 久久才會用一次,但它的文件對我來說實在是不好閱讀,應該花點時間把它筆記起來才是。
閱讀 Google API 使用文件,覺得難以閱讀的主要原因是它分成許多部分,每一部分不一定跟你要做的功能相關,而是在滿足你能使用 API 的基本條件。要攻略使用文件就必需清楚知道哪些是屬於「共通科目」、「必修科目」屬於任何產品的 API 使用前都必需滿足的。
內容分為下列主題:
- API 的設計哲學:Service Discovery (描述 API 的 API)
- API 開通與證認:API Console & OAuth 2
- API Client Library 的使用(需先了解前二項再搭配文件與範例)
- 特定產品 API Method 的使用(需先學會前三項才能駕輕就熟)
本文將主題集中在 1, 2 的內容,因為這才是容易卡關的部步。3, 4 的內容通常是改寫官網範例的問題。
關於 Service Discovery 的文件可至 Google APIs Discovery Service 瀏覽。
可大致快速看過幾回就好,它的目標其實很簡單:讓想要製作 API Library 的人能透過描述資料產生出特定語言的實作(Code Generator), 那麼對於我們單純作為 API 與 Library 的使用者為何需要知道它的存在呢?有幾個理由:
- 我們可以利用它來快速查詢 Library 應該有哪些功能,特別在文件沒有齊備的情況,直接看描述資料是最快的。
- 當你看到 sample code 有出現 discovery 字眼時,不會想不通它在 discovery 什麼東西。
以 YouTube Data API 為例,我們可以查到它的基本資料。在使用 API 時,我們需要它的名稱 youtube 與版本 v3
qty:~ qrtt1$ curl https://www.googleapis.com/discovery/v1/apis/youtube/v3/rest|less
{
 "kind": "discovery#restDescription",
 "etag": "\"0kaFfN0xfjZjASExv-gUnrWhdto/UGYLPDsM6UCDXI0YMfvjBhxapko\"",
 "discoveryVersion": "v1",
 "id": "youtube:v3",
 "name": "youtube",
 "canonicalName": "YouTube",
 "version": "v3",
 "revision": "20130605",
 "title": "YouTube Data API",
 ......
}
例如:
from apiclient.discovery import build
service = build('api_name', 'api_version', ...)
同樣以 Youtube Data API 為例,你可以知道為何 Sample Code 寫的 OAuth Scope 是特定的 URL,下列指令查詢 videos 下的 insert 方法支援的 scopes URL:
curl https://www.googleapis.com/discovery/v1/apis/youtube/v3/rest|json "resources['videos']['methods']['insert']['scopes']"
[
  "https://www.googleapis.com/auth/youtube",
  "https://www.googleapis.com/auth/youtube.upload",
  "https://www.googleapis.com/auth/youtubepartner"
]
PS. 雖然描述資料有列可以用的 URL,但你只能用 OAuth 授權時要求的 scope URL。
透過描述資料的對應,你可以更容易理解 範例程式 內的一些 magic code 是如何來的。同時可以將它當作一個容易取得的小抄,用它來核對 Library 文件。
下圖為 OAtuh 2 協定運作流程圖
1.2.  Protocol Flow


     +--------+                               +---------------+
     |        |--(A)- Authorization Request ->|   Resource    |
     |        |                               |     Owner     |
     |        |<-(B)-- Authorization Grant ---|               |
     |        |                               +---------------+
     |        |
     |        |                               +---------------+
     |        |--(C)-- Authorization Grant -->| Authorization |
     | Client |                               |     Server    |
     |        |<-(D)----- Access Token -------|               |
     |        |                               +---------------+
     |        |
     |        |                               +---------------+
     |        |--(E)----- Access Token ------>|    Resource   |
     |        |                               |     Server    |
     |        |<-(F)--- Protected Resource ---|               |
     +--------+                               +---------------+


                     Figure 1: Abstract Protocol Flow
使用 Google API 的另一個門檻就是使用 OAuth 機制,它目前使用的版本為 OAuth 2.0 protocol。OAuth 使用起來雖然不如單純輸入帳號密碼般直覺,但它提供一個安全的機制,讓使用者透過授權的方式,使應用程式在不需知道帳號持有者密碼的情況下取用該帳號的資料。
所以,由我這段話來看,讀者應該要意識到製作出來的程式需經過「帳號持有者授權」(專業術語稱這過程為 User Consent)才能使用受保護的功能。
它通常會啟動一個網頁,帳號持有人若願意提供您權限,那麼他安下同意後你會獲得一組隨機產生的字串 Authorization Code
這讓你有機會「請求」取得存取權限。注意,只是「有機會」而已,你還沒有真的取得權限。這個開網頁顯示給「帳號持有者」再吐回 Authorization Code 的過稱即為規格描述的 (A) (B) 的流程。
當收到 Authorization Code 後,我們就可以開始進行 (C) (D) 的流程,圖中的操作對象是 Authorization Server,以我們的例子來說就是對 Google API 的 scope URL 進行操作並取得真正的 Access Token。最後當然是用在 (D) 取得的 Access Token 對受保護的資源進行多回的 API 操作(E + F)。
為了能使用 Google API 需要在 Google API Console 建立新 Project 並產生 OAuth Client ID。
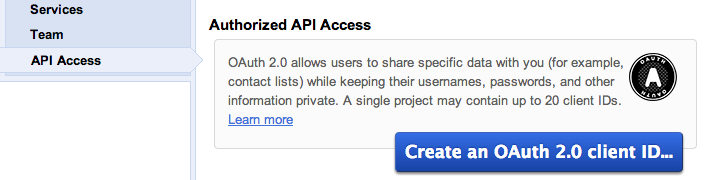
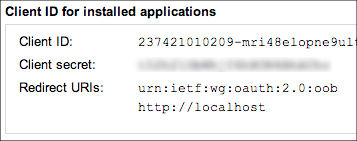
依 Client 的形式我選擇 Installed Application:
這些參數是會用在程式內的設定。若你有看過、用過其他的 OAuth Provider,Redirect URL 通常會是一個 URL,
那是 OAuth Provider 將資料回應到你程式的途路,在非 Web Application 的情況下並不會有這樣的 URL,依 API Console 產生的 urn:ietf:wg:oauth:2.0:oob 回填即可。
Credentials 的內容最重要的就是 Access Token(當然還有 Refresh Token,只是通常 Library 會幫我們處理 Access Token 過期問題就先忽略它吧。) 讓我們直接看 Code 吧!
from oauth2client.client import OAuth2WebServerFlow
from oauth2client.file import Storage
def authorize():
flow = OAuth2WebServerFlow(CLIENT_ID, CLIENT_SECRET, OAUTH_SCOPE, REDIRECT_URI)
authorize_url = flow.step1_get_authorize_url()
print 'Go to the following link in your browser: ' + authorize_url
code = raw_input('Enter verification code: ').strip()
credentials = flow.step2_exchange(code)
storage = Storage(credentials_file)
storage.put(credentials)
print 'The credentials_file saved to %s' % credentials_file在 authorize() 內會使用你給的資訊產生一個網址,這個網址需讓帳號持有人點選同意授權並取回 Authorization Code(即動作 A B)。
Client Application 用 Authorization Code 向 Google Authorization Server 取得 Access Token 與相關訊息(即動作 C D),這些授權資訊的集合稱為 credentials。
我們可以用 Storage 將 credentials 存起來後續使用,就不需要再請授權人重複執行授權的動作。它的存檔格式是 JSON,內容大致如下:
{
  "_module": "oauth2client.client",
  "token_expiry": "2013-06-12T01:14:51Z",
  "access_token": "ya29.AHES6ZT5f-.....HxNZv9Dc",
  "token_uri": "https://accounts.google.com/o/oauth2/token",
  "invalid": false,
  "token_response": {
    "access_token": "ya29.AHES6ZT5f-.....HxNZv9Dc",
    "token_type": "Bearer",
    "expires_in": 3600
  },
  "client_id": "237421010209-20uopvorpupne9.....ha9i48elov4jm.apps.googleusercontent.com",
  "id_token": null,
  "client_secret": "t6hXON6h21ObW.....h52jfc",
  "revoke_uri": "https://accounts.google.com/o/oauth2/revoke",
  "_class": "OAuth2Credentials",
  "refresh_token": "1/YmLiVbQJqv.....Bzod_YBSGwfZMF2aTE58V5P87H_o",
  "user_agent": null
}import httplib2
from apiclient.discovery import builddef build_service():
storage = Storage(credentials_file)
credentials = storage.get()
http = credentials.authorize(httplib2.Http())
service = build(API_NAME, API_VERSION, http=http)
return service取回 Credentials 後,要建出授權的連線就相對簡單。同樣利用 Storage 將先前取得的 Credentials 取入,並對 http client 做裝飾的動作並建出 Service 物件。這裡的 API_NAME 與 API_VERSION 就是使用 Discovery Service 查出的(通常文件也有寫)。
要使用 Client Library 在官方文件也有寫安裝的方式,我這就直接 show 出先前做 pycon 問卷統計的 pip 的設定:
(pycon)[ec2-user@deploy ~]$ pip freeze
BeautifulSoup==3.2.1
PyYAML==3.10
google-api-python-client==1.0
httplib2==0.7.7
python-gflags==2.0
主要還是在 google-api-python-client 與 httplib2 要安裝。使用方式如先前示範的:
- 取得 credentials
- 建立授權的 http client
- 建立 Service 物件
- 開始使用 API methods(建立 http request 並執行它解析 http response 結果)
def list_files_with_id(credentials_file, title):
    storage = Storage(credentials_file)
    credentials = storage.get()
    http = credentials.authorize(httplib2.Http())
    drive_service = build('drive', 'v2', http=http)
    response = drive_service.files().list().execute()
    for file in response['items']:
        for k, v in file.items():
            if "title" == k and (u"%s" % title) == v:
                print k, v
                print "file_id", file['id']
PS. 對 search 用法不熟,這是暴力解啊!
def export_google_driver_documents(credentials_file, file_id):
    storage = Storage(credentials_file)
    credentials = storage.get()
    http = credentials.authorize(httplib2.Http())
    drive_service = build('drive', 'v2', http=http)
    response = drive_service.files().get(fileId=file_id).execute()
    download_url = response["exportLinks"].values()[0]
    download_url = download_url.split("exportFormat")[0]+"exportFormat=csv"
    resp, content = drive_service._http.request(download_url)
    tmp = tempfile.mkstemp()[1]
    open(tmp, "wb").write(content)
    storage.put(credentials)
return tmpfrom apiclient.http import MediaFileUpload
insert_request = service.videos().insert(
    part="snippet,status",
    body=dict(
      snippet=dict(
        title=u'標題',
        description=u'影片描述',
        tags=['api'],
        categoryId=22
      ),
      status = dict(
        privacyStatus='unlisted'
      )
    ),
    media_body=MediaFileUpload('sample.mp4', chunksize=-1, resumable=True)
  )
在官網的 影片上傳範例 還有做斷線續傳處理,相當值得參考。