Ribs is a 32 voice midi-triggered granular effect. It can act as both a really interesting synth and as a midi controlled audio mangler.
This document is a rough guide put together from viewing the extensive tutorial video, looting the useful bits from the KVR forum, and trial and error while trying out what it says to do there! it isn't complete yet, and questions should be directed to the forum. Ribs can be downloaded at the kvr forum as well.
questions for dev are in __<strong>__: Just look for the emphasis on the web page or search "__" in a text editor.
Ribs is made by Eugene Yakshin. You can listen to his music and hear some of the sounds Ribs is capable of at https://soundcloud.com/crimsonbrain, or contribute to his financial well-being at https://www.patreon.com/eugeneyakshin and https://www.paypal.me/EugeneYakshin.
This manual is written by Rich Rath. Check out his music at http://rreplay.com and http://way.net/waymusic. Also on soundcloud, bandcamp, itunes, amazon, and the usual suspects, under either his name or the band rreplay.
This work is licensed under a Creative Commons Attribution 4.0 International License.

- Put Ribs on an audio track as an effect
- Add or route some audio to the track
- Send MIDI notes to the track
- As the notes are being sent to Ribs, the buffers start filling with the audio and a sound will appear
- Question mark button next to Logo will tell what everything does
- On Youtube there is an excellent tutorial that includes time codes in the description to navigate it. Click on image for video.
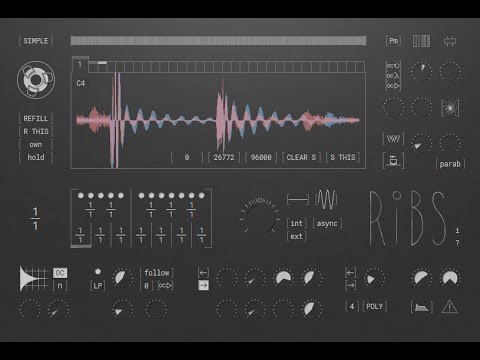
- 32 voices. Each voice has its note number, grain length, playhead, filter, AGC and so on. voices are triggered either by selecting them by clicking on a tab twice, or by sending midi notes to them. See polyphony section below for more.
- 32 buffers that hold the recorded sound. The length of all buffers is set globally by the big reel icon.
- and there are 32 tabs in the GUI
- Actionable stuff is between square brackets and brighter (white instead of gray). If it is not a knob, an actionable item whill usually have a set of square brackets around it. The exception to the brackets is the base length for beat mode and the set of fractions in the beat mode note picker. The latter has the whole section by a big bracket.
- Labels are in gray.
- actionable items appear the same but do different things. The might light up when you click them in an on/off toggle. They might change to something else (an on A/on B toggle) or they might produce a dropdown menu. (is there a way to make this consistent visually?)
- Any number can generally be scrolled up or down.
- Step Length, Playrate controls:Shift+wheel while these are selected will multiply or divide by factors of 2.
- ctrl-drag knobs gives fine control over them.
- For buffer mouse controls, see buffer section.
- Simple just plays buffer
- Notes: cuts up buffer to make notes. follows midi notes
- Beat: syncs grains to time and has other functions
- reel icon on left below performance nodes sets global length of buffers. Holds about 10 seconds of audio at full length. Changing this length has a big effect on the sound.
Selecting a buffer: the buffer is selected via the tabs at the top of the buffer window.
- hover over tab to view its buffer without switching to it,
- click tab once to select buffer,
- click tab twice to make next voice trigger the buffer no matter what, this second click lights buffer red.
- clicking another buffer tab when current buffer is red transfers the "next voice" function to the newly selected buffer.
- when capturing next voice, the length parameters at the bottom left are temporarily ignored.
- clicking a red buffer tab again cancels the function.
Selection of a part in a buffer: a selection of a subset of the buffer called a part, that marks start and endpoints within which playback and recording take place. can be set differently for each buffer.
- Set current buffer selection by context-click (i.e. right click) and drag, or shift-left-click and drag. If "select all" button is pressed lit of "select this", then the selection will apply to all buffers.
- left clicking in the buffer moves playhead toward clicked position. how fast it gets there is determined by glide parameter ("ph g"). The behavior will vary depending on mode (simple, beat, or note) and the grain settings. See video for details at 08:24 Playhead.
- clicking in a buffer then vertically scrolling zooms in and out.
- Ctrl scroll: vertical (amplitude) zoom in and out
- shift-scroll: horizontal scroll
Top right corner. toggle switch. Usually the same stereo pair of inputs feeds all the buffers. When this is on, each buffer has its own input. (this is not covered in the video, and it does not seem to work. there are only two audio inputs to the plugin externally. Are the inputs routed internally somehow so that the input shifts with the note played? That would be cool.)
- refill all, refill this: refills all buffers or only currently selected one. If "refill this" is called for a voice that does not currently have focus, it will show "refill pending" until the voice gains focus.
- own/common:
- common: all buffers read from the selected buffer instead of their own content, without losing their own contents. You can switch back to "own" without losing whatever was in "own" before.
- still can't quite figure this out. Help message says "doesn't erase own buffers, only switches other voices to the picked buffer."
- own: buffers read themselves. different content can be recorded into different buffers. refills begin only once voice is activated. If you switch to common and come back, the buffers will be remembered.
- common: all buffers read from the selected buffer instead of their own content, without losing their own contents. You can switch back to "own" without losing whatever was in "own" before.
- dropdown menu (these seem to be global, affecting all buffers). Would be nice if buffers could set this per buffer instead of globally.
- notes mode: new midi note triggers refill
- !glide mode (not glide). Same as notes mode, but glides and legato notes do not retrigger.
- hold: holds contents of buffer without refilling once filled
- tempo: adds numerator/denom. control to the buffer window, which can be set to control the resetting of the host buffer in time with the DAW tempo. Units are are quarter notes. 1/1 will refill the current buffer every quarter note.
- tabs at top of buffer are for viewing and selecting buffers. the buffers light up a little when a voice activates them
- in the buffer window, the thick gray line is the grain start, while the play head is the thin white line.
- "picked buffer" is a midi parameter allowing setting a buffer by midi cc.
- when you set poly/mono voices to one, only the first buffer tab gets used
- in poly mode, There is one buffer per voice. Set it to four and the first buffer tab gets used if you play a single note, the first two if you do a doublestop and the first four if you play a four note chord, and so on. Not sure how you would use 32 buffers. Reducing the number of buffers brings down cpu usage a lot it seems, at least in poly mode. If you click a buffer tab twice, the next midi note will go to the clicked buffer no matter what.
- mono mode stays on the currently selected buffer. Select a tab by clicking it twice. It lights up a rose color. that buffer will be used until you select another the same way.
- If you click a new tab twice, it will make the next incoming midi note trigger that buffer no matter what, poly or mono..
- When set to "own", you can enter different audio in each buffer, and set the selection lengths within each buffer differently, but the overall buffer length (set with the "reel" knob at the top left) is global.
For how to select buffers and parts, see "Mouse behavior", above.
- leftmost number is selection start
- middle number is playhead position.
- rightmost number is selection endpoint
- "select all" applies current buffer selection to all buffers (not, as I first thought, selecting all of the current buffer). "Select this" limits selection to current buffer.
- "clear selection" is the "select all of current buffer" switch. When. When "select all" button is pressed, "clear selection" clears all the selections.
Number of voices active at once. 1-32.
Ribs uses voices based on harmonic diversity (note numbers) of available voices and some other params. For example, poly set to "4" results in the first note triggering buffer one. A subsesquent note after the first has turned off will trigger one again. Playing a second note before then end of the first note will trigger buffer two, and so on. The modes in the buffer refill dropdown menu will help determine the specific behavior of recording and playback of the buffer, along with the controls to the right of the buffer. You can use any voice for mono mode by requesting this voice. To request a voice for the next incoming note just click on the top of the tab twice. It should become... Turkish Rose / Contessa in color (#B67474). Lol. As soon as you do it, the next MIDI note will be played by this voice. Requesting overrides the "use buf" flags. In mono mode it means this voice will be used until you switch to poly or request another voice.
to the right of the bottom of the buffer are two buttons.
- The button that switches between roughly an "M" and a "W" determines whether the buffer starts over when it reaches the end or reverses and goes back through in reverse.
- When the button that looks like a tape play head with a left arrow is lit, it retriggers the buffer from its beginning with each new midi note that comes into that buffer (as determined by the "voices/poly/mono" section).
Knobs on right control grain parameters. These seem to be global, for all buffers.
- step length: often also called "hop". Expressed in number of samples, from -128 to +128. Controls how the grain start point moves through the selected part of the buffer, as kept track of by the voice.
- the Voice keeps track of the grain start position in the buffer.
- When step == 0, this position doesn't change (if you don't use error controls below the step control).
- When step != 0, every new grain will start from old position + step.
- Low positive or negative settings give some motion and life. Higher settings cause the note to gradually fall apart and become noisy. Does not have any effect in modes other than note. Shift+wheel while this is focused will multiply or divide by factors of 2.
- repeat: repeats the step between 0 and 512 times before advancing. In note mode, this can calm down and reintroduce steady pitch when the step length is set high. As the repeats increase, they become a rapid trilling, and at higher settings, they create periodic jumps in the grain that keep the pitch but change the tone suddenly. Does not seem to have any effect in other modes. Balancing step length and repeat gives interesting variations.
- The three "oc" buttons are multipliers that change the step, which is multiplied by these values.
- the top one, ocμ: multiply rate by number of repeats (global)
- the middle one, ocλ: multiply rate by wave length/grain length. Used alone, this will cause the grain to move through the buffer at the same rate as the original recording when step length is "1." Each voice will be affected according to its grain size/wavelength.
- the bottom one, ocΔ: multiply the step length by the playrate (the big dial below the buffer). Global.
- to the bottom left of the buffer is the grain length ratio, which changes the grain length by multiplying it by the ratio you set. Both numerator and denominator can be set, resulting in very long or very short grain lengths. This seems to have a lot of overlap with the step length control, but handles differently musically in that the shifts are ratios rather than absolute lengths.
Below the step/rep controls are the error controls, "e int" and "e ext" which introduce error or noise. The "nebula" button is the third in that row.
- e int: introduces error into the playhead position (the thin white vertical line)
- e ext: introduces error into the grain start position (the thicker gray vertical band)
- Nebula button: when on (the nebula is concentrated looking) the error is calculated against the correct position. When off (the nebula looks distributed), the error is calculated against the previous (erroneous) position, leading the error to propagate so that time coherence gets lost. This seemed to me to have the most clearly audible effect in simple mode.
- Above the buffer area is a long pbar that shows gap probability, that is the likelihood of a grain being skipped. Dragging the mouse up or down increases and decreases the gap probability.
- To the right is a stereo (Ps) mono (Pm) button which determines whether the gaps are mono or stereo. I really like this at low probabilities and in stereo for bringing the sound to life a little.
- the waveform button to the right of the stereo switch fills the gaps with the incoming audio instead of leaving them silent, which can be a different way of mixing in the original audio signal.
- Just above the RIBS logo on the right is a dropdown menu (I did not realize this was a dropdown menu until watching the video a couple of times. I thought it was a label. I see now in the visual logic that labels are gray and dropdown or actionable stuff is white) The default of this dropdown menu is "parab" and the other two options are "linear" and "sine." (maybe simple images of the envelope shapes would be more useful than the terms here) These determine the shape of the attack and release on each grain. The envelopes are simple and symmetrical with attack and release times that are always equal to each other. Grain length acts as a sort of sustain time too. (correct?, meaning that there is a flat horizontal section to any grain where the grain is longer than the onset and release time?) No effect in simple mose because no grains.
- The knob above the dropdown menu adjusts the envelope onset and release rate. Low settings will produce rapid onset and release, leaving the grains discrete. As it is increased, the onset and release grow longer. The attack and release are anchored to their center points rather than the start of attack and end of release, so longer settings extend the grain earlier and later, causing overlap with other grains and a nice smearing effect that also reduces the volume in the cases I have used it in. The autogain setting can compensate for this. The envelope time has no effect in simple mode since there are no grains. The envelope settings are most noticeable in notes mode.
- Shift+wheel while this is focused will multiply or divide by factors of 2.
- In simple mode adjusting this "scratches" the sound. multiplying or dividing by factors of two willmove the buffer up and down by octaves.
- In granular modes, playrate affects the speed inside the grain.
There are five controls to the right of playrate
- Wobble: two top two boxes next to playrate are an LFO of the playrate, with amount/depth in the left control and speed in the right (drag the mouse up for more, down for less, flat for off).
- the two buttons below that set the wobble to affect the internal speed (i.e. playrate) of the grain ("int") and/or the size of the grain ("ext").
- sync/async matches the LFO to the host tempo (or not).
To the right of the grain length ration is a one octave set of grain length controllers for beat mode. They only affect beat mode.
- Each controller is triggered by an incoming midi note. There are twelve controllers, going through a chromatic scale beginning on C. Octave does not matter.
- In beat mode, each ratio controls how long the grain will last in comparison to a normal (i.e., 1/1 ratio) grain, and the grain is extended or contracted with a ratio for each note. There is an on/off switch for each note as well. When a note is turned off, no grain will play when that note is received. Shift-scroll multiplies or divides the ratios by factors of 2. The on/off switch is ignored in mono mode. The switch can be overridden by double clicking on a buffer tab (i.e., receive next note) and playing the note. (someone on the forum requested a randomize button for this to speed workflow, since setting all twelve by hand is fiddly. If there were a randomize button with an option to truly randomize or shift-click to randomize only in factors of 2, that would make this easier to set up for interesting results I think. There would need to be a return to default ratio too, maybe double clicking on the bar between the numerator and denominator could reset a ratio to 1/1).
- Automatic Gain Control: AGC reduces the dynamic range and raises the volume on softer passages. Too much will flatten out dynamics, but it is useful for bringing up softer settings, such as when the grain window envelope settings are turned up.
- AGC can be set locally (meaning the settings hold for the currently selected buffer?) or globally. the "Σ" symbol, which math geeks will recognize as a commonly used symbol for "sum" is the global setting, while "n" as in the "nth" buffer is for local. (like the math geekiness, but wondering if this might better be a "G" that lights for global and goes off for local, since the math symbols might go over some of our heads.)
- DC bias switch: useful for short grains to remove DC bias so that the waveform is equal amplitude above and below the zero crossing. Your speakers will thank you.
- AGC speed: responsiveness of AGC, like attack and release on a compressor. default is off, which auto-adjusts to program material. Moving the dial may introduce amplitude modulation
- AGC hardness distorts the signal by clipping it harder or softer, (I am guessing) like the ratio setting on a compressor.
All the usual suspects: Filter type, frequency, Resonance ("Q").
Envelope applies an envelope to the filter, with higher settings making for a slow engagement of the filter.
- Follow has the filter frequency change in correlation to the current midi note. The frequency is affected by the base length (see above) and the filter frequency multiplier (see next)
- filter frequency multiplier: multiplies the filter frequency in both manual and follow modes.
- filter linked to playrate. The setting next to the filter multiplier with the right arrow. When engaged, the filter frequency is linked to the playrate and affected by the glissando settings. Aiming the playhead to a new location (see above) also moves the filter.
- Rearticulate forward/back buttons do something to the envelope triggers. They only work in mono or portamento/legato modes. (Neither tutorial nor help is clear on what they do exactly though).
- envelopes: Filter and amplitude both have envelopes with the usual ADSR settings.
As they usually are. More voices = more cpu load.
In mono/legato modes these determine how the glides work when separate notes are played. when notes are connected (legato) they do not engage. (this could use some clarification)
Just below amplitude setting. Extrude, when on, will raise the attack and release volumes but lower the decay and sustain volumes.
Obvious controls are obvious.
Available on right click.
Automation is not exact because sample level control is needed, but MIDI does not have it, so when you record automation, it may not play back exactly the same each time. In order to make it more exact, Ribs uses data from four parameters that affect the other parameters, making them more exact. they are:
- picked buffer
- buffer size
- selection start
- selection end.
- turn up the "err" knobs to the right of the waveform tabs,
- select a very short section of the sound (by right click and drag on the waveform)
- set the playback speed close to zero or to max
- turn up agc params too high (on the bottom left)
- play very high MIDI notes
- use very big denumerators in base len / beat ratios (in the middle left)
- turn up the gap probability (the grey stripe on top)
- turn filter resonance to max
Yes and no. Often changing the playrate without changing the pitch is also done with a variation of granular approach. You could do some sort of it in NOTES mode, if instead of using the "playrate" control you use "step" on the top right. Maybe increase the "grain overlap" too, so it would sound softer.
I've put Ribs on a midi channel which receives midi from a midi keyboard (m-audio oxygen 49) and I've put some pad samples on an audio track wich is routed to send audio to the track Ribs is on.
The thing is, when I click on the drop down menu for the inputs for Ribs, it only shows 3 options.
- Input 3/input 4
- Input 5/input 6
- Input 7/input 8
And when I play the pad while playing a midi note into Ribs, Ribs' refill thing starts 'playing' but no waveform appears and no audio comes out.
works fine in Ableton Live here... No unusual setup, just 1 audio + 1 midi track and you're good to go.
Here's another setup 
zusco_ wrote:
user Top responded:
In Fl Studio, you just need to place ribs on a track as an effect, then route an audio source and a midi source to it.
- For instance, you could route the kick drum from the basic template to some track.
- Load up a step sequencer (or other midi source), and set its midi "output" to port 2 on the plugin's settings page.
- Put ribs in the effect rack of some track, then set its midi "input" to port 2. *The midi port doesn't matter, so long as the "output" for the sequencer and the "input" for ribs match up.
- Set up a midi pattern to play the kick, then route the audio from the kick track, to the track with ribs on it. Program a pattern for the step sequencer, and press play. Thats it...
The audio from the kick and the midi from the step sequencer will drive the ribs plugin.
Its actually really simple, even if my instructions here seem confusing. This isn't the only way to do it btw, just a quick example...
- bob bobwood wrote:
Insert a MIDI Out channel and set it to Port 2. Set your VSTi MIDI Input port to 2 and also set the MIDI Output port to 2.
With Ribs open, play via the MIDI Out channel and hopefully you will hear and see the results. If not twiddle about with Ribs and be prepared to hear some pretty harsh sounding results
Hi! I've just noticed there are questions to developer here :)
So yes, in common mode all voices read audio from the buffer that you chose to be common.