My name is Rheza. Time flew really fast. I just realized that 8 months passed since I became full-timer at ACCESS. There's up and down, but it's been a great journey! This article will be my first Advent Calendar for ACCESS (and apparently, this also my FIRST blog post! WOOHOO). I realized that my Japanese isn't good enough to write a proper article, so I put this English version, with a hope that this one will be easier to understand. This article is going to talk about Tensorflow Lite and Android. And also its implementation in Fashion-MNIST dataset. Without further ado, let's start!
As everybody might already know, Tensorflow is one of the biggest Deep Learning libraries that developed by Google. One of the product lines is created to work with mobile and embedded devices like smartphone, Raspberry Pi, etc.
(I picked the images from Tensorflow User Group Meetup on December 7th. The slide was presented by Laurence Moroney from Google)
TensorFlow Lite is the official solution for running machine learning models on mobile and embedded devices. It enables on‑device machine learning inference with low latency and a small binary size on Android, iOS, and other operating systems. - https://www.tensorflow.org/lite/
Tensorflow can be used for everything, from creating the models, training, data manipulation, and doing the prediction. The problem is, machine learning, especially deep learning, needs massive computational power. It's possible to do the training in the mobile and embedded devices, but it'll cost a lot of time. So, we still are going to use Tensorflow for Training Phase and Tensorflow Lite can be used for Inference Phase.
[//]: # ( )
)
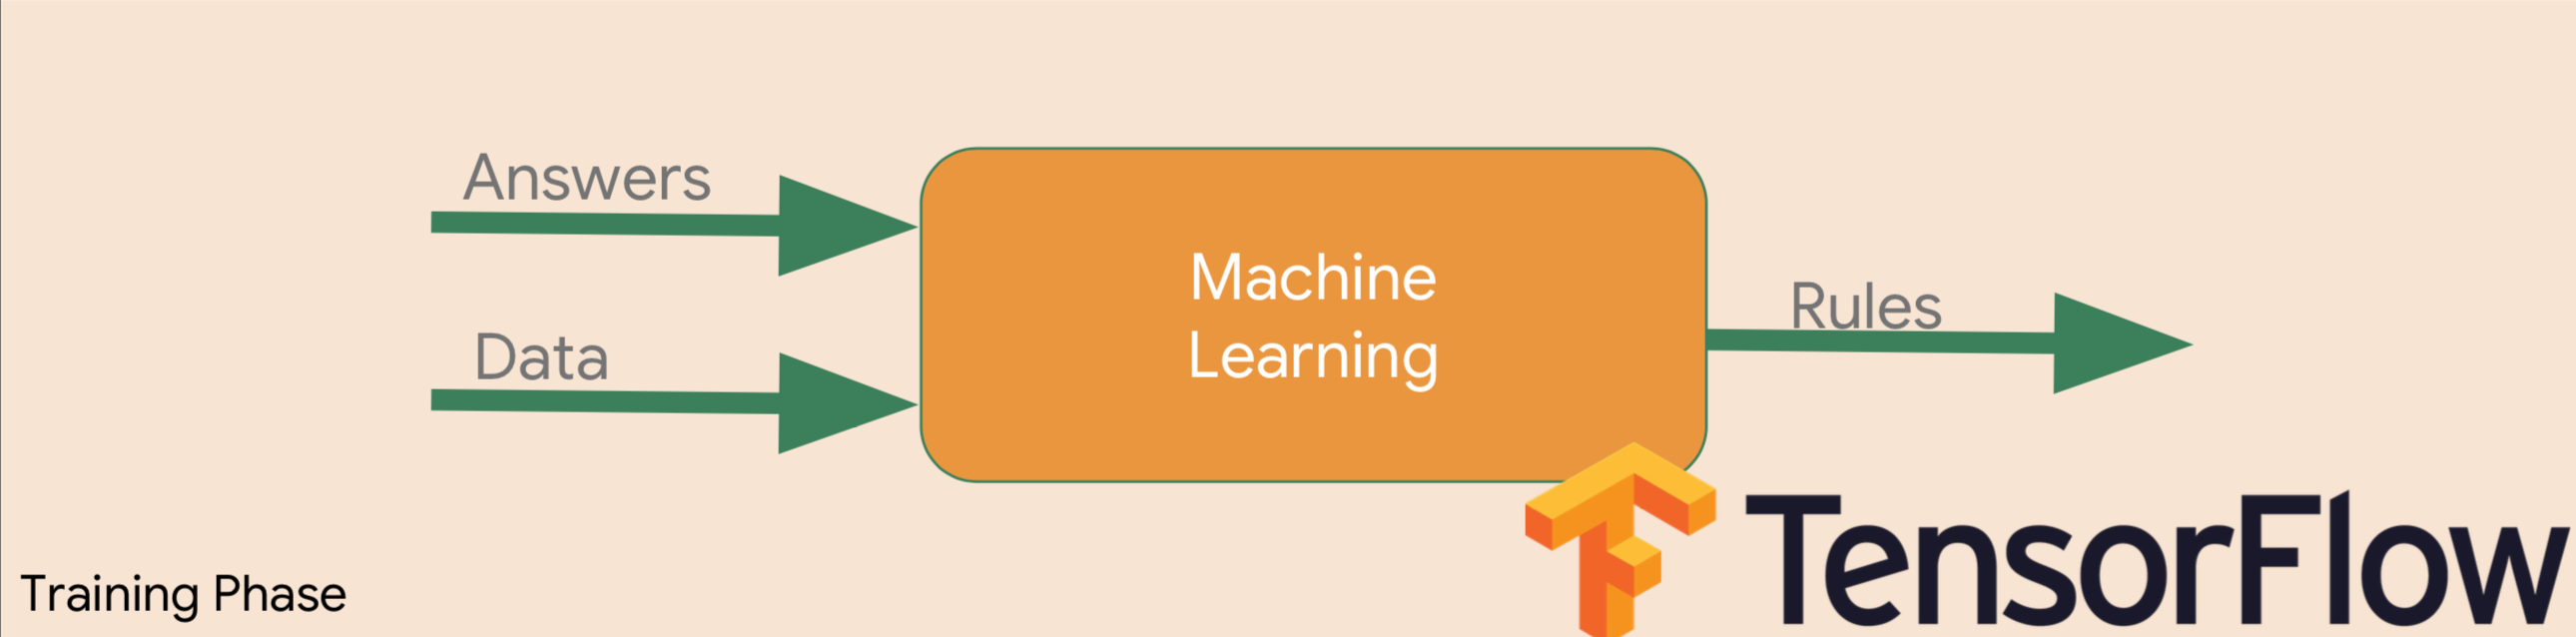
Tensorflow will do the training and produce the rules (model), then we put the model as assets in Android so Tensorflow Lite can load and use it to do the prediction.
[//]: # ( )
)

The flow of the application will be like below
[//]: # ( )
)

So, the goal of this article is we can create a simple machine learning application in Android using Tensorflow Lite. The application will be number handwriting recognition. We are going to draw a number in Android screen, then let our model predict the number. It's pretty much easy to do, so we can say this application is like "Hello World" but in number. I'll write in 2 big parts, training code and inference code.
It'll be easier to run it on Google Collaboratory.
https://colab.research.google.com/notebooks/welcome.ipynb?hl=ja
Colaboratory は、完全にクラウドで実行される Jupyter ノートブック環境です。設定不要で、無料でご利用になれます。
And they SUPPORT free GPU and TPU also (with time limit of course)!!! So, why not?
As I stated before, I am going to use Fashion-MNIST dataset. Why? I suck at math hahaha. Just joking. There're a lot of people already tried with MNIST in this project, so I am going to try a new thing.
Fashion-MNIST is MNIST alike dataset created by Zalando Research with around 70000 images consists of 10 classes of fashion items.
- T-shirt/top
- Trouser
- Pullover
- Dress
- Coat
- Sandal
- Shirt
- Sneaker
- Bag
- Ankle boot

Size of each image is 28 x 28 with grayscale color space. Pretty much MNIST right?
注意: Please don't expect an overwhelming model here!
I am going to create a simple neural network model using Tensorflow with Keras wrapper.
# TensorFlow and tf.keras
import tensorflow as tf
from tensorflow import keras

# Helper libraries
import numpy as np
import matplotlib.pyplot as pltLuckily Keras already made fashion-MNIST as one of the ready-to-be-used dataset, so we don't need to bother to play with the dataset.
Returned parameter from fashion_mnist.load_data() already divides the dataset into train set and test set with 60000 images and 10000 images respectively.
fashion_mnist = keras.datasets.fashion_mnist

(train_images, train_labels), (test_images, test_labels) = fashion_mnist.load_data()
Let's take a look at one of the image

SHOES!
It isn't a complicated one, even you can find this in tutorial page.
data_format='channels_last' here is to make sure that the format of the image that gets into the model put the color channels at last. For example, the image size is (28, 28), if we use this data_format, then the input will be (28, 28, 1) for grayscale, or (28, 28, 3) for RGB.
model = keras.Sequential([
    keras.layers.Conv2D(32, kernel_size=(3, 3),
                        activation=tf.nn.relu,
                        input_shape=input_shape,
                        data_format='channels_last'),
    keras.layers.Conv2D(64, (3, 3), activation=tf.nn.relu),
    keras.layers.MaxPool2D(pool_size=(2, 2)),
    keras.layers.Dropout(0.25),
    keras.layers.Flatten(),
    keras.layers.Dense(128, activation=tf.nn.relu),
    keras.layers.Dropout(0.5),
    keras.layers.Dense(10, activation=tf.nn.softmax)
])
model.compile(optimizer="Adadelta",
              loss='sparse_categorical_crossentropy',
              metrics=['accuracy'])
If we see the summary of the model by using model.summary(), then we'll get the structure like below.

Or even more details using Tensorboard.

So, how's the performance of this model to the Fashion-MNIST dataset
Epoch 1/100
60000/60000 [==============================] - 6s 102us/step - loss: 0.5628 - acc: 0.8017
Epoch 2/100
60000/60000 [==============================] - 5s 82us/step - loss: 0.3599 - acc: 0.8730
Epoch 3/100
60000/60000 [==============================] - 5s 82us/step - loss: 0.3118 - acc: 0.8885
Epoch 4/100
60000/60000 [==============================] - 5s 82us/step - loss: 0.2798 - acc: 0.9006
Epoch 5/100
60000/60000 [==============================] - 5s 82us/step - loss: 0.2553 - acc: 0.9084
Epoch 6/100
60000/60000 [==============================] - 5s 82us/step - loss: 0.2351 - acc: 0.9161
Epoch 7/100
60000/60000 [==============================] - 5s 82us/step - loss: 0.2186 - acc: 0.9210
Epoch 8/100
60000/60000 [==============================] - 5s 83us/step - loss: 0.2074 - acc: 0.9247
Epoch 9/100
60000/60000 [==============================] - 5s 82us/step - loss: 0.1980 - acc: 0.9293
Epoch 10/100
60000/60000 [==============================] - 5s 82us/step - loss: 0.1846 - acc: 0.9339
0.9339 accuracy at Epoch 10. GOOD! 100 epoch is......
Epoch 100/100
60000/60000 [==============================] - 5s 85us/step - loss: 0.0569 - acc: 0.9807
0.9807! This means that the model reaches 98% when validating it with the training set. Let's evaluate it with the test set.
10000/10000 [==============================] - 1s 68us/step
Test accuracy: 0.9324
93%. Not a bad result! Next, we need to save the model. No worries, built-in Keras API already supports that. model.save(file_name.h5) then you're ready to go!
After training, we are getting the .h5 extension file. This file is the graph file that consists of all calculations in our model. To work with Tensorflow-Lite, we need to convert this into tflite format. There're several ways to do the conversion.
- By Command Line
tflite_convert --output_file=test.tflite --keras_model_file=fashion_mnist.h5 - By Python code
import tensorflow as tf

# In Tensorflow 1.12, lite still under contrib package
converter = tf.contrib.lite.TFLiteConverter.from_keras_model_file("file.h5")
tflite_model = converter.convert()
open("file.tflite", "wb").write(tflite_model)Note: If you're trying this on Mac, it can be run correctly, but not in Windows. They didn't support Windows for the time being. So, if you work on Windows, the easiest way is to run it on Google Collaboratory and saved the converted tflite to Google Drive, then download it.
Because we need to save the file to Google Drive, we need to authenticate Google Colaboratory to access our Google Drive.
# Load the Drive helper and mount
from google.colab import drive
drive.mount('/content/drive')
After mounted, the file path will be like /content/drive/My Drive/path_to_file.
When the conversion is done, we can download the tflite file and get ready with Android.
注意:
- WARNING: The API is currently experimental and is not covered by TensorFlow API stability guarantees.
- There's no official support for Kotlin (yet), but it is possible to develop Tensorflow Lite using it. Based on Laurence Moroney, Google is working on it but he doesn't know when it'll be released yet. They're focusing on improving the performance for the time being.
As I told earlier, I am going to make a simple application that can classify our drawing within Fashion-MNIST class. In this article, I'm not going to talk much about the drawing part. You can refer to the ApiDemos below
To make Tensorflow works, you need to add Tensorflow-lite at Gradle File like below.
dependencies {
    ...
    implementation 'org.tensorflow:tensorflow-lite:+'
    ...
}
You also need to add "no compression" flag for tflite file.
aaptOptions {
    noCompress "tflite"
    noCompress "lite"
}
We also need to put the tflite file and information about the label in assets directory. For the label, we can write it in the .txt file with 1 line for each class. The label's order should be the same as when we were doing the training. So, in this case, it should be written like below.
T-shirt/top
Trouser
Pullover
Dress
Coat
Sandal
Shirt
Sneaker
Bag
Ankle boot
Classification can be easily done in Tensorflow Lite.
We just need to create an org.tensorflow.lite.Interpreter and then do interpreter.run(image, output)
Sounds easy right?
Let's start with initializing the Interpreter!
To initialize the interpreter, we need the model file that we already put in the assets directory. The Interpreter can be initialized with a model file using the constructor:
public Interpreter(@NotNull File modelFile);
or with a MappedByteBuffer:
public Interpreter(@NotNull MappedByteBuffer mappedByteBuffer);
I tried using File, but it didn't successful :(, so I used MappedByteBuffer that I took from example.
The code is like below.
private static MappedByteBuffer loadModelFile(AssetManager assets, String modelFilename)
      throws IOException {
    AssetFileDescriptor fileDescriptor = assets.openFd(modelFilename);
    FileInputStream inputStream = new FileInputStream(fileDescriptor.getFileDescriptor());
    FileChannel fileChannel = inputStream.getChannel();
    long startOffset = fileDescriptor.getStartOffset();
    long declaredLength = fileDescriptor.getDeclaredLength();
    return fileChannel.map(FileChannel.MapMode.READ_ONLY, startOffset, declaredLength);
}
So, interpreter's initialization is finished. Next, the run part.
To run the interpreter, we need the image and container for the output.
Let's prepare the image. I created a simple drawing view based on the FingerPaint example,
public class DrawingView extends View {

    private static final float TOUCH_TOLERANCE = 4;

    private Context mContext;

    private Bitmap mBitmap;
    private Canvas mCanvas;
    private Path mPath;
    private Paint mBitmapPaint;
    private Paint mPaint;
    private float mOldXPos;
    private float mOldYPos;

    public DrawingView(Context context) {
        super(context);
        initialize(context);
    }

    public DrawingView(Context context, @Nullable AttributeSet attrs) {
        super(context, attrs);
        initialize(context);
    }

    public DrawingView(Context context, @Nullable AttributeSet attrs, int defStyleAttr) {
        super(context, attrs, defStyleAttr);
        initialize(context);
    }

    public DrawingView(Context context, @Nullable AttributeSet attrs, int defStyleAttr, int defStyleRes) {
        super(context, attrs, defStyleAttr, defStyleRes);
    }


    private void initialize(Context context) {
        mContext = context;
        mPath = new Path();
        mBitmapPaint = new Paint(Paint.DITHER_FLAG);
        mPaint = new Paint();
        mPaint = new Paint();
        mPaint.setAntiAlias(true);
        mPaint.setDither(true);
        mPaint.setColor(0xFF000000);
        mPaint.setStyle(Paint.Style.STROKE);
        mPaint.setStrokeJoin(Paint.Join.ROUND);
        mPaint.setStrokeCap(Paint.Cap.ROUND);
        mPaint.setStrokeWidth(12);
    }

    @Override
    protected void onSizeChanged(int w, int h, int oldW, int oldH) {
        super.onSizeChanged(w, h, oldW, oldH);
        mBitmap = Bitmap.createBitmap(w, h, Bitmap.Config.ARGB_8888);
        mCanvas = new Canvas(mBitmap);
        mCanvas.drawColor(Color.WHITE);
    }

    @Override
    protected void onDraw(Canvas canvas) {
        super.onDraw(canvas);

        canvas.drawBitmap(mBitmap, 0, 0, mBitmapPaint);
        canvas.drawPath(mPath, mPaint);
    }

    @Override
    public boolean onTouchEvent(MotionEvent event) {
        float xPos = event.getX();
        float yPos = event.getY();

        switch (event.getAction()) {
            case MotionEvent.ACTION_DOWN: {
                resetDrawPath(xPos, yPos);
                invalidate();
                break;
            }
            case MotionEvent.ACTION_MOVE: {
                drawPath(xPos, yPos);
                invalidate();
                break;
            }
            case MotionEvent.ACTION_UP: {
                resetTouch();
                invalidate();
                break;
            }
        }
        return true;
    }

    private void resetDrawPath(float x, float y) {
        mPath.reset();
        mPath.moveTo(x, y);
        mOldXPos = x;
        mOldYPos = y;
    }

    private void drawPath(float x, float y) {
        float dx = Math.abs(x - mOldXPos);
        float dy = Math.abs(y - mOldYPos);
        if (dx >= TOUCH_TOLERANCE || dy >= TOUCH_TOLERANCE) {
            mPath.quadTo(mOldXPos, mOldYPos, (x + mOldXPos)/2, (y + mOldYPos)/2);
            mOldXPos = x;
            mOldYPos = y;
        }
    }

    private void resetTouch() {
        mPath.lineTo(mOldXPos, mOldYPos);
        // commit the path to our offscreen
        mCanvas.drawPath(mPath, mPaint);
        // kill this so we don't double draw
        mPath.reset();
    }

    public void resetCanvas() {
        mCanvas.drawColor(Color.WHITE);
        invalidate();
    }

    public Bitmap getBitmap() {
        return mBitmap;
    }
}
This view will draw the canvas as long as you touched the screen. Assume, everyone is using the similar approach, the resulted Bitmap will be a white background with black drawing. If it's the case, we need to invert the image, into black background and white drawing.
From


As I explained earlier that fashion-MNIST is 28x28 pixels images, and our model received that size of the input, we need to make sure that our bitmap also has the same size. Now it's a bit tricky. We also need to make sure that the input is a ByteBuffer that is 28 x 28 x 1 bytes. Yes, image input to interpreter.run(image, output) is ByteBuffer.
Tensorflow lite also processed the image as floating point, so we initialized the ByteBuffer like below.
// 32-bit float value requires 4 bytes
ByteBuffer byteBuffer = ByteBuffer.allocateDirect(4 * batchSize * imageWidth * imageHeight * pixelSize);
Because we didn't use batch while training and these images are black and white images, both of the parameters are set to 1. The conversion code will be like this.
After we finished with the input, we need the container to get the prediction result.
The container result will be in 2 dimensions array of floating point.
float[][] result = new float[1][mLabels.size()];I put 1 because we're just classifying 1 image, and expecting the confidence score for each classes. The result is always ordered by class, so in this case, because we have 10 classes, it will be from 0 to 9.
There's the success story and the fail story. Of course my ability to draw pretty much affect the result, but here's some screenshot
Success


Failed

I was drawing dress though... :(
I couldn't test it properly for the real production usage, but for 28x28 images, the inference speed ranged from 24 ~ 128 ms. This process does not include pre-processing for the image, only the inference.
The challenge at this implementation is the image size. When you have to scale down the image without losing its context, from 1440x2112 (Nexus 6P) to 28x28, it's hard. For example, this image below,

When I scaled it down into 28x28, it became like this.

It almost looks like different things.
- Doing the inference process directly in the device has some merits especially in security area.
- Tensorflow lite did a good job to provide this functionality in Android. We also can use Tensorflow Lite in iOS. It'll use CoreML engine.
- There're some trade-offs compared to doing the inference at the cloud. Will talk about it again in detail later (need more research 😅)
Thank you very much for reading this article. It was fun to play agin with machine learning even though it's small stuff.
That's all for today's advent calendar. Merry Christmas and Happy Holiday!
External Link:
Hi. Thanks for reading. How can I help?