Open your Heroku Dashboard
-
Go to
dashboard.heroku.com/apps, and then select:New >>> Create new app >>> Choose region - Europe >>> Create app.
-
After you create the app, you should be redirected to the app's dashboard.
-
Select the Deploy section.

While in the Heroku app Dashboard open the Deploy section
To login to Heroku and create a new Dyno, from your server/project root directory, run the following commands (also mentioned in the Deploy section) :
# Login to heroku from the terminal
heroku login
# Add heroku remote
heroku git:remote -a <name-of-the-newly-created-app>
# Check the remotes available
# Newly added `heroku` remote repository connection should be shown
git remote -v# Commit the most recent work on the development branch
git add .
git commit -m 'Write a clear meaningful commit message here'
git push origin <development-branch-name>
# Checkout to the master branch
git checkout master
# Merge (bring) updates from the development branch
git merge <development-branch-name>
git push heroku master- In the client side (React app) root folder create the new files:
touch .env.development .env.production-
Update both files in the following way:
-
In the
env.developmentfile (in React app) set the URL of the server used in development:# .env.development REACT_APP_API_URL=http://localhost:5000
-
In the
env.developmentfile (in React app) set the URL of the server in production, our newly created heroku app:# .env.production REACT_APP_API_URL=https://name-of-your-app.herokuapp.com
-
NOTE: Our production server will be running on the URL of the newly created app in Heroku, that we set in the .env.production in the previous step.
The Create React App will automatically load the values coming from the files .env.production or .env.development to the React app, depending on how the app is run:
During the development when running the React app localy via npm start, Create React App automatically loads the values from .env.development and makes them available in the app.
When creating the production build with create-react-app by using the npm run build command, the variables from .env.production are loaded and made embedded in the app during the build time.
NOTE: When creating custom environment variables in your React app, they must begin with REACT_APP_. Meaning that REACT_APP_ prefix is mandatory.
Any other variables will be ignored by Create React App.
Before creating the build, you must refactor you React App frontend code and change all hardcoded URLs used in the axios requests. You must change this and instead set the value coming from .env file exposed via the process.env .
Refactor all the axios requests in your React app. You must refactor the baseURL in each service (e.g. auth-service.js) and also axios requests that are not in a service.
Examples:
- For axios requests refactored into services, update the
baseURL:
//	lib/auth-services.js

//  ...

  constructor() {
    this.api = axios.create({
	//  baseURL: http://localhost:5000              // <-- REMOVE
      baseURL: process.env.REACT_APP_API_URL,            // <-- ADD
      withCredentials: true
    });
  }

// ...- For individual axios requests, (not refactored to a service ) update the request URL, for example the following
    axios.post(
      'http://localhost:5000/api/users',
      { username, password },
      { withCredentials: true }
    )
should be refactored to an axios request using process.env.REACT_APP_API_URL as the value of the base URL:
    axios.post(
      `${process.env.REACT_APP_API_URL}/api/users`,
      { username, password },
      { withCredentials: true }
)The Create React App command npm run build creates the build of the React App ready for production. The build process creates an index.html file as the entrance point of our app and the minified bundle of .js and .css files holding the logic (and styles) of our App.
From the root folder of the React App project run the command:
npm run buildThis step will produce a new directory (called build/) containing the minified and optimized code, ready to be deployed in production.
NOTE: Our production server will be running on the URL of the newly created app in Heroku. The same production server will be used for additional purpose, and that is to also serve the production build of the React app.
-
Copy all the files and folders from the client side React App
/buildfolder. -
Paste the copied files and folders to the server's
/publicfolder.
We will make the React and app accessible through the same URL/domain that our server is running at.
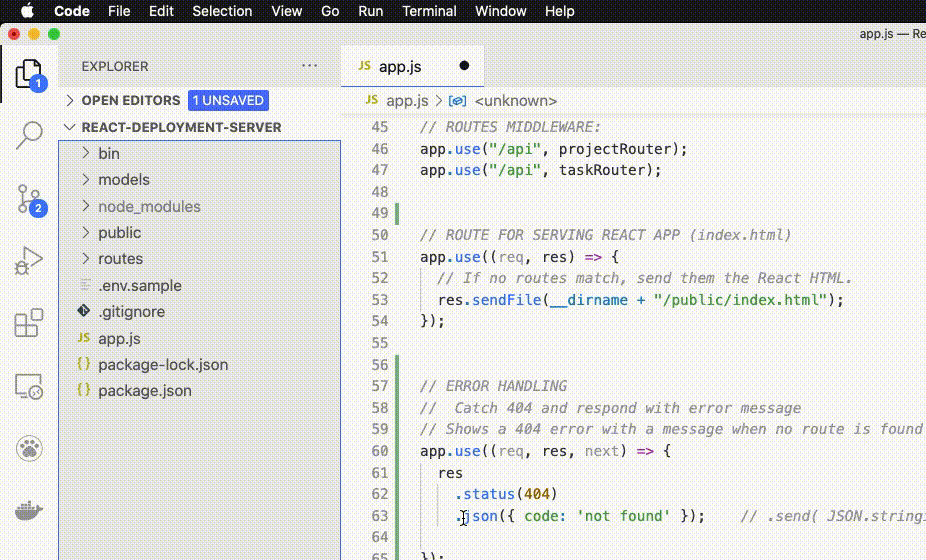
Create a route used to serve the React App from our server.
Make sure to create this route right after the ROUTES MIDDLEWARE and *before the ERROR HANDLING middleware.

#####Server - /app.js
//	app.js

// ROUTE FOR SERVING REACT APP (index.html)
app.use((req, res, next) => {
  // If no previous routes match the request, send back the React app.
  res.sendFile(__dirname + "/public/index.html");
});

-
Sign Up for Mongo Atlas - enter the email, password, first name, last name
-
Select >>> Starter Clusters (or Shared Clusters)
-
In the drop-down Cloud Provider & Region select:
- Europe Region
-
in the Cluster Tier select:
-
In the drop-down "Cluster Tier" make sure to select:
- M0 Sandbox - with the flag Free forever.
-
Click the button Create Cluster


-
In the sidebar in the SECURITY part:
- select -> Database Access
-
Click on + ADD NEW USER to create a new user
- Select Read and write to any database - User Privileges
- Set the Username and Password
- Set Database User Privileges to : Atlas admin
- Create New User
-
In the sidebar select SECURITY -> Network Access


- Click on + ADD IP ADDRESS
- Click on ALLOW ACCESS FROM ANYWHERE
- Confirm

- Connect To Your Cluster: Click on the gray button CONNECT
- Select Connect Your Application option
- Choose Your driver version: DRIVER: Node.js
- Copy the Connection String Only


- Update the connection string and add the username and password.
- Save the created connection string for the future step, where we will set it as the Config Var in the new Heroku app.
- In the Heroku app Dashboard go to >> Settings:
- Click on the Reveal Config Vars
- Create the new keys for the environment variables:
SECRET_SESSIONMONGODB_URI- Set the value to be the previously copied Connection String from Mongo Atlas. Remember to add theusernameandpasswordto the Connection String you created in Mongo Atlas.
For the sessions secret:
SECRET_SESSION=s0m3RaNd0mS7r1nG123
For the newly created MongoDB database in the Atlas Cloud.
MONGODB_URI=<Mongo Atlas Conection String with username and password>

❗ Double-check that all needed config variables (MONGODB_URI, SECRET_SESSION, etc.) were added properly during the previous step :
Heroku app Dashboard >> Settings >> Config Vars >> Reveal Config Vars
You must verify that your database connection in the app.js is using the database connection URL coming via process.env.MONGDB_URI:
- Your server
app.jsfile should have thedotenvimport, used to load the values from.envfile:
// app.js

require('dotenv').config();- In the same file the
mongoose.connectshould haveprocess.env.MONGDB_URIset as the first argument:
// app.js

mongoose
  .connect(
  	process.env.MONGODB_URI,
  	{
    	keepAlive: true,
    	useNewUrlParser: true,
    	useUnifiedTopology: true
  	}
);Ensure that cors middleware config is having credentials: true set.
In addition you should also add the URL of your newly created Heroku app, in the following way:
// app.js

//	...

//	...

// CORS SETTINGS TO ALLOW CROSS-ORIGIN INTERACTION:
app.use(cors({
  credentials: true,
  origin: [
    'http://localhost:3000',
    'http://your-heroku-app-name.herokuapp.com',         // <-- ADD
    'https://your-heroku-app-name.herokuapp.com'         // <-- ADD
  ],
}));Before deploying our server to Heroku we must specify the Node.js version that matches the Node.js version we use in development.
-
Run command
node --versionto get the version of Node.js installed:node --version #> v12.4.1
-
Add the
enginessection with yournodeversion to the server'spackage.jsonfile:"engines": { "node": "12.x" }
After updating the mongoose.connect connection strings and adding the node version make sure to commit the changes and push to remote on GitHub (origin) and Heroku (heroku):
git add .

git commit -m 'Initial Deployment'

# Push the commit and update the version on GitHub
git push origin master


# Push the commit to heroku origin to deploy in Heroku
git push heroku master


# Open the app in the browser (from terminal)
heroku openTo fetch your app’s most recent logs, use the heroku logs command:
heroku logsThe logs command retrieves 100 log lines by default.
You can specify the number of log lines to retrieve (up to a maximum of 1,500 lines) by using the --num (or -n) option.
heroku logs -n 200If there was an error during the deployment, you will be shown the following screen prompting you to run heroku logs --tail command:

Real-time tail displays recent logs and leaves the session open for real-time logs to stream in.
This command is used to troubleshoot any deployment errors when the deployed app is not working as expected.
heroku logs --tailWe can open the terminal instance on the Heroku container (dyno) in order to run custom scripts or see the files included in the instance. To do this we use the command heroku run bash.
For example to run the seed sequence and populate the production database we should do the following :
# Open the terminal in the app dyno in Heroku
heroku run bash

# We may then run the seed file
node bin/seed.js
Additionaly if during the lifetime of your project it becomes necessary to inspect the builds or maybe manually load a different .env file and values during the build, you can do this by creating a custom script in the package.json of our client side (React app).
Below scripts are an example on creating these custom build scripts.
You won't be needing the custom build scripts during your project and this should serve only as an example on how you can use them to load different .env values and create them if need be in future.
-
Add custom example scripts
build:devandbuild:prodthat load a specific.envfile during the build to embedd different environemnt variables:
"scripts": {
    "build:dev": "dotenv -e .env.development react-scripts build",
    "build:prod": "dotenv -e .env.production react-scripts build",

    "start": "react-scripts start",
    "build": "react-scripts build",
    "test": "react-scripts test",
    "eject": "react-scripts eject"
}