Setup
- Step 1 - The Project
- Step 2 - Fork the Project
- Step 3 - Get the Clone URL
- Step 4 - Create the Cloud9 Workspace
Virtualenvs
- Step 5 - Create a VirtualEnv
- Step 6 - Make sure the environment is active
- Step 7 - Install Dependencies
Run Tests
Git, Github and Pull Requests
- Step 11 - git status
- Step 12 - git diff
- Step 13 - git add
- Step 14 - git commit
- Step 15 - git push
- Step 16 - Submit the Pull Request
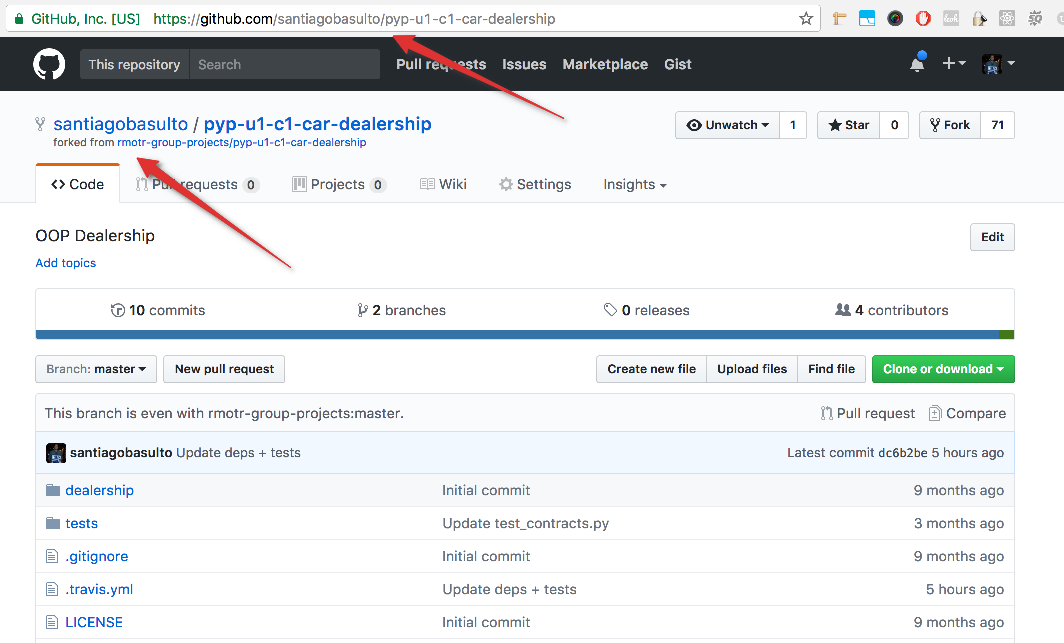
Take a look at the project. Make sure it belongs to our organization. In this case, we're using the following project as example: https://github.com/rmotr-group-projects/pyp-u1-c1-car-dealership
Click the Fork button to create your fork:

After you've successfully forked it, you'll see it's a copy in your own profile:
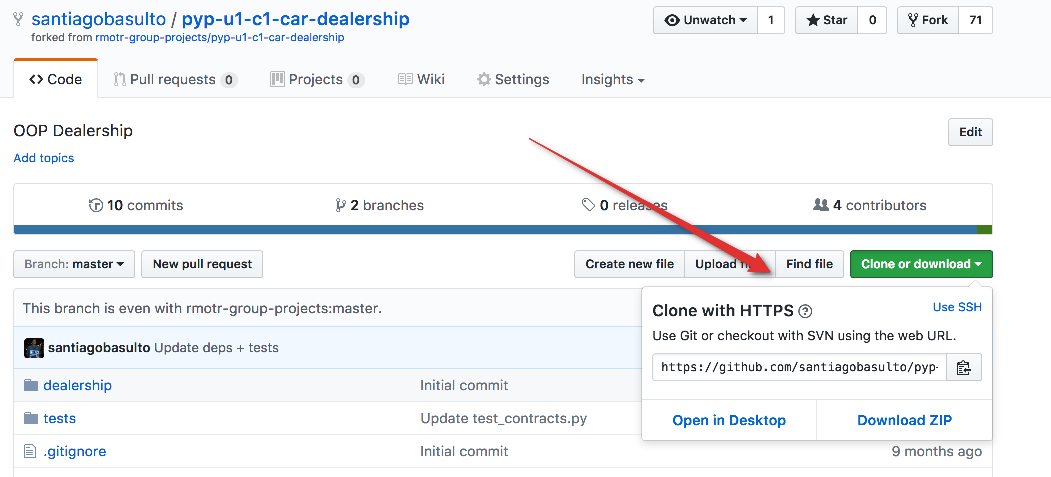
From YOUR forked repo (your copy), get the clone URL (HTTPS is prefered):
Go to ide.c9.io and create a new workspace. Make sure you set the correct clone URL (the one from the previous step) and the Python template:

In the bash terminal of C9 use the following syntax to create a virtualenv:
$ mkvirtualenv <YOUR-ENV-NAME> -p /usr/bin/python3
ALWAYS make sure the environment is active. When your environment is active, you'll see the name of it in your bash prompt. If it's not active, you can always active it using the command:
$ workon <YOUR-ENV-NAME>
With your virtualenv active execute the command to install the required libraries: pip install -r dev-requirements.txt:

First, make sure your virtualenv is active and the libraries are installed. To try it out, just type the command py.test in your console. It will probably fail, or tell you that it hasn't found tests, but what we DON'T want to see is "command not found". This is what we DON'T want to see:

IF that happens, you have to either, activate your virtualenv or install the libraries again.
Assuming the py.test command is correctly installed, we'll now proceed to run the tests. Projects will usually have tests in a tests/ directory, or in files with names starting with test_ (like test_customers.py). To run any of these, just use the py.test command. For example, I'll run py.test tests_customers.py to run ALL the tests contained in test_customers.py (it'll fail, but don't worry):

ALL my tests in test_customers.py are failing, and that's expected, because I haven't started implementing any code yet. Your job is now write the code that will make those tests pass.
But the output looks UGLY, and it's hard to read the errors happening, in the next step we'll see how to improve it.
_Quick note: If the tests are in a directory like tests/ you still can point py.test to the right file: py.test tests/test_customers.py (for example), or even run ALL the tests in that directory: py.test tests/.
As we said, the output looks ugly and it's hard to read and make sense of the the reason tests are failing. We want now to isolate individual tests. For example, in my case, the test_customers.py module contains 2 tests: test_customer_is_not_employee and test_customer_is_employee:

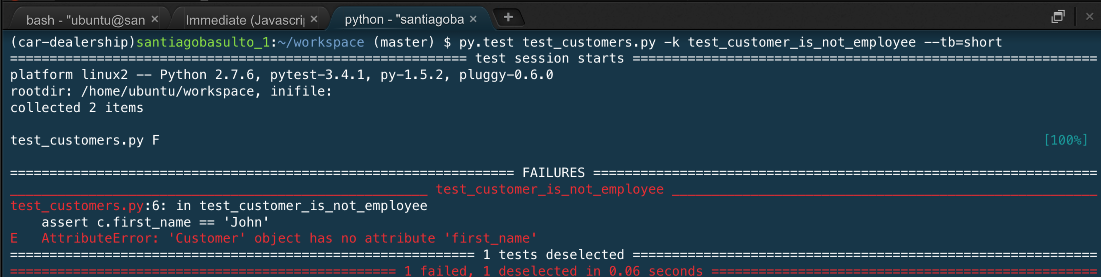
I want to start implementing the functionality for the first one test_customer_is_not_employee. So I ONLY want to run that test, not everything inside test_customers.py. We can now select individual tests to run with the -k flag. You'll just do: py.test tests_customers.py -k <MATCHING-STRING>. In that case, <MATCHING-STRING> is just a string that will be used by pytest to "filter" the tests to run. For example, I can say "run only test_customer_is_not_employee" by using this comand: py.test test_customers.py -k test_customer_is_not_employee:

If you look closely, it says that 1 test failed (the one I'm interested in, test_customer_is_not_employee) and one was "deselected". That means that Pytest didn't run that test because I only asked for test_customer_is_not_employee with the -k test_customer_is_not_employee.
IMPORTANT: -k doesn't need the whole name of the test. You can use it to filter by strings. For example, py.test test_customers.py -k employee will run all the tests that have the string employee in their name. In this case, it's both of them. Or I could just do py.test test_customers.py -k not_employee, and in that case, only one test, the one I'm interested in, test_customer_is_not_employee matches not_employee.
Finally, output it's still a little bit ugly. We can tune the way the errors are displayed:
The errors that you see (in red) are called "Stack trace". They guide you through your code showing you what Pytest tried to run and what went wrong (in what places in your code). Every new function call will add a new "level" to your Stack trace making it hard to read. You can control this output with the --tb flag. It takes different options like short or no (to supress it). As an example, I'll use the --tb=short option, which is the preferred one:
Full command: py.test test_customers.py -k not_employee --tb=short:
If you compare it with the previous output, it looks a lot cleaner, so it might help you identify the issue you have.
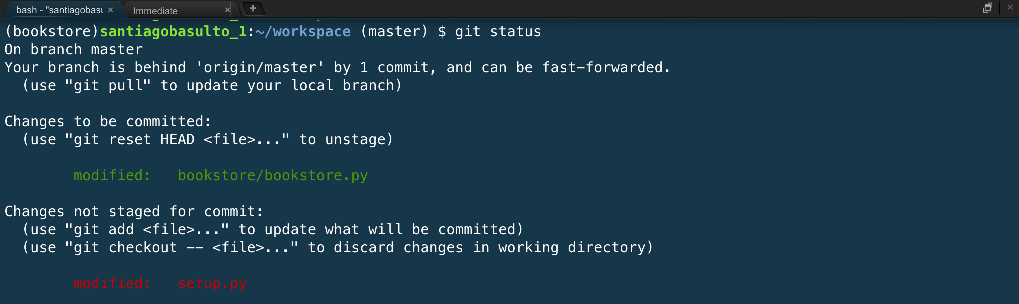
You can constantly check what has been changed in your project with the git status command. The changes are always based in the previous commit, so, as we always say, try to commit as often as possible while you're making progress.
$ git status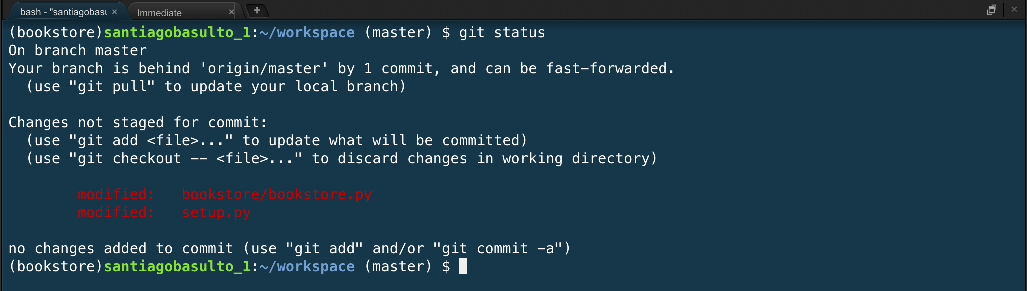
In this example I have changed two files: bookstore.py and setup.py. To be honest, I was just playing around with setup.py and I shouldn't have changed it. Keep this in mind for the git add step.
If you're curious about the actual changes that have been made in a file, you can use the git diff command:
$ git diff <PATH-TO-YOUR-FILE>
# in my example, git diff bookstore/bookstore.py
(make sure you replace <PATH-TO-YOUR-FILE> with the location of the file you're trying to review)
git diff will show you the details of all the lines added (starting with a + (plus) sign and usually in green) and all those that were removed (starting with a - (minus) sign and usually in red). If you're "stuck" in the diff, just hit the q key in your keyboard (from quit)
Now that you're aware of the files you've changed and the changes you've made to those files, it's time to create the commit. But before we commit, we need to decide which files we want to include in that commit. Remember that I told you I had changed setup.py while fooling around? That's a good example, I DON'T want to include that file in my commit. In this case, I only want to include bookstore.py.
$ git add <PATH-TO-YOUR-FILE>
# in my example, git add bookstore/bookstore.py
git add won't provide any output. But if you check the status again, you'll see that bookstore.py is ready to be included in the commit, while setup.py, won't be included:
Finally! It's time to commit. To commit, just run the following command:
$ git commit -m <MESSAGE>
# MESSAGE in my example was: "Bookstore project partially working"
<MESSAGE> in this case is a human readable message that describes the set of changes you're making. Anything that will help you figure out in the future what you had changed just by reading the message.

git commit will give you a quick summary of the commit that has been created. In my case, it says that "1 file changed, (with) 16 insertions(+), (and) 4 deletions(-)". It also shows you an "ID" to identify that commit. Keep an eye on that ID, as we'll use it to track down our commit later. In my case, it's 9bde749.
Now it's time to update your fork with the changes on cloud9. For that, just use the command git push
$ git push
Now, your fork should be updated and should show the commit you've pushed including the commit message you used and the ID generated by git:

This step is simple and it's enirely done within Github's page, but it takes a couple of clicks. First, navigate to your fork and click on the "New Pull Request" button:

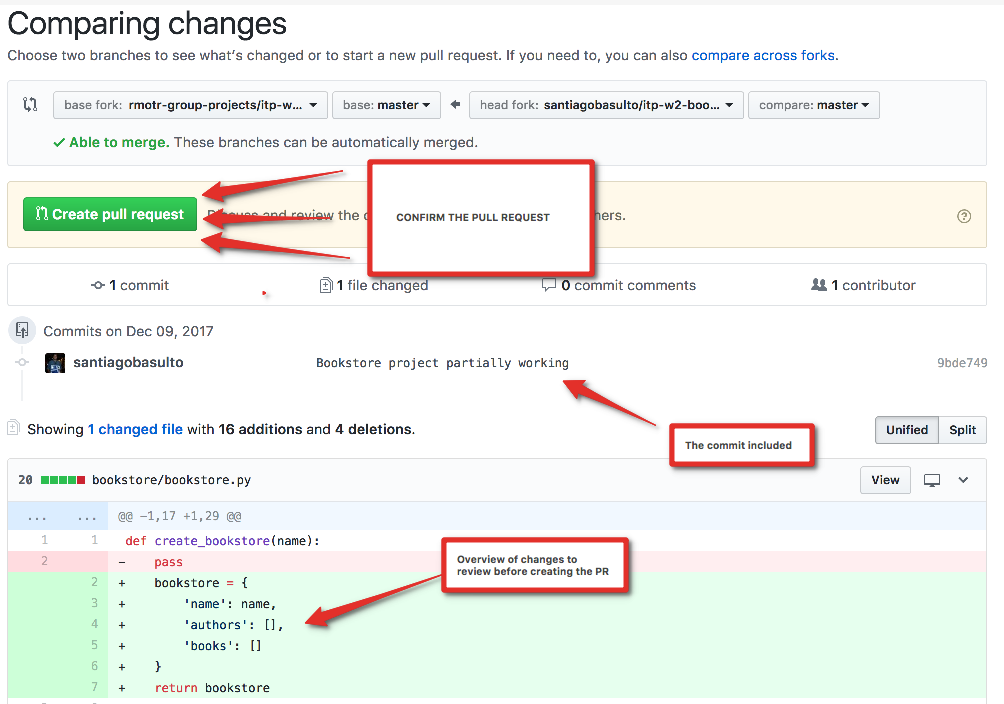
After that, Github will take you to a view in which it'll show you the changes you've made and ask you to confirm the Pull Request. In this view, you'll have the chance to review the changes you've made. Go ahead and click the Create pull request button to confirm it:
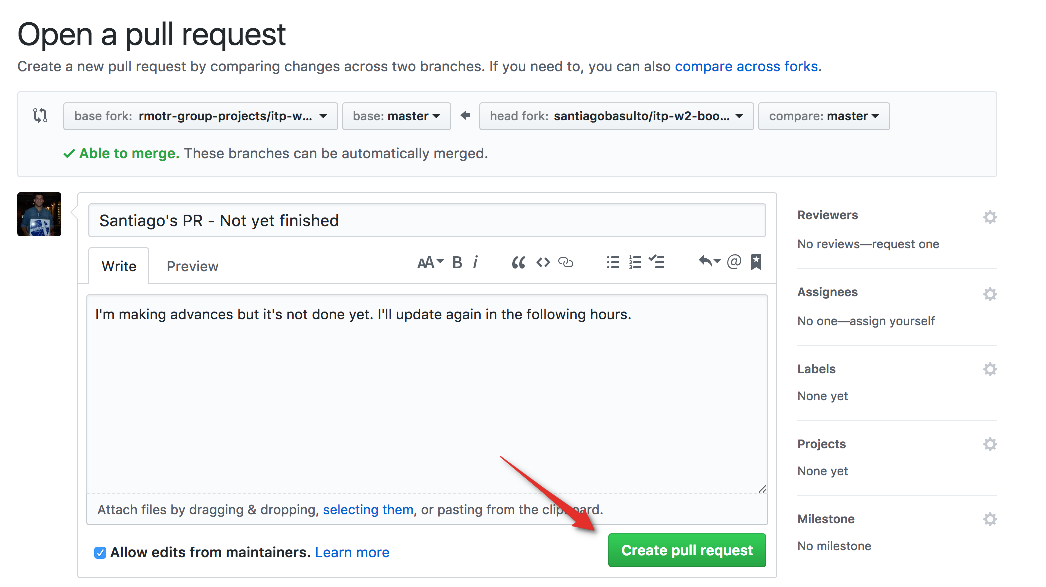
Now you'll be dropped in this screen, that will let you add information about your Pull Request (your name, notes for reviewers, etc). Feel free to include any thoughts here, it's free text and helps reviewers. Please include your name in the title. Once you're done, confirm by clicking on the Create pull request button:
Once you confirm, the PR is finally created and you'll see a view like the following one:

CONGRATULATIONS! You've submitted your PR!